
Original Aluminum Valve Cover Polishing
 10-14-2007, 09:27 AM
#1
Drifting

Thread Starter
Well....After seeing some nice & shinny valve covers around here I decided to take my first attempt ever at polishing metal. I read up on the internet how to do this and here are my results in progression....I am missing a few pics of starting out with 400 grit & 800 grit but you all get the idea from the pics below.
Start with a good metal prep/cleaner such as Por 15 metal prep. This will get all the years of grease off. If not...when you start sanding your sand paper becomes an instant mess all clogged with grease & dirt.
Here is the valve cover after Por 15 (the other one polished in the background done last night)


Results after 400 grit

Results after 600 grit

Results after 1000 grit

Results after 1500 grit (almost there!!!)

Results after taking a buffing wheel on the drill and metal polish/cleaner paste. This got rid of all the sand paper grooved marks


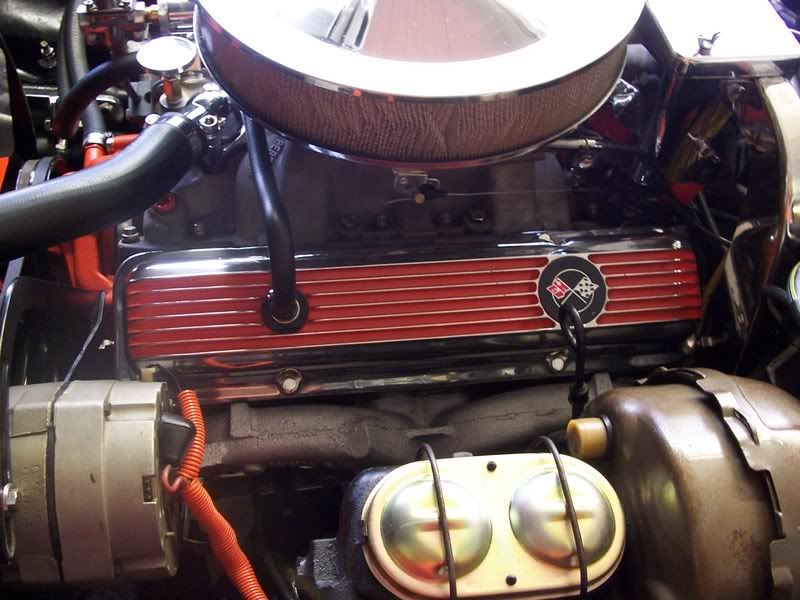
Here are the pics on my engine....before & after.


Tools used....along with Asprin/elbow grease/beer

So now I have a couple questions
1. What can I coat them with to protect the finish so they don't dull as easy over the next couple of years? What about using something like VHT Clear Caliper Paint?
2. What are your opinions on painting inbetween the fins Chevy Orange to match the engine block and leaving the tops of the fits shinny metal.. I have this done and I like it but can't find any pics of the covers "installed" on cars.
btw...it took me about 3 hours on the first valve cover (learning curve and not realizing I can't sand off grease/dirt easily so the first 400 grit pass was brutal and I used a ton of sand paper) the 2nd valve cover took about 1.5 hours and went much smoother as I used Por 15 metal prep to clean it first making job a lot easier. Also wire looms are waiting to be installed so that will help clean up the look also.
Start with a good metal prep/cleaner such as Por 15 metal prep. This will get all the years of grease off. If not...when you start sanding your sand paper becomes an instant mess all clogged with grease & dirt.
Here is the valve cover after Por 15 (the other one polished in the background done last night)
Results after 400 grit
Results after 600 grit
Results after 1000 grit
Results after 1500 grit (almost there!!!)
Results after taking a buffing wheel on the drill and metal polish/cleaner paste. This got rid of all the sand paper grooved marks
Here are the pics on my engine....before & after.
Tools used....along with Asprin/elbow grease/beer
So now I have a couple questions
1. What can I coat them with to protect the finish so they don't dull as easy over the next couple of years? What about using something like VHT Clear Caliper Paint?
2. What are your opinions on painting inbetween the fins Chevy Orange to match the engine block and leaving the tops of the fits shinny metal.. I have this done and I like it but can't find any pics of the covers "installed" on cars.
btw...it took me about 3 hours on the first valve cover (learning curve and not realizing I can't sand off grease/dirt easily so the first 400 grit pass was brutal and I used a ton of sand paper) the 2nd valve cover took about 1.5 hours and went much smoother as I used Por 15 metal prep to clean it first making job a lot easier. Also wire looms are waiting to be installed so that will help clean up the look also.
 10-14-2007, 09:40 AM
#2
CF JASOC Member

Looks great. My opinion is NO on the painting.
10-14-2007, 10:14 AM
#3
Le Mans Master

great job. I am kinda in the middle of doing the same thing, tho i am taking the sandpaper grit a bit higher for more luster. I havent done between the fins yet and am searching for an easier path to enlightment. (lol) How did you do yours? The drill and wire wheel? After measuring between the fins, I found the spacing would be perfect used with some thin plywood I have laying around ,as a backer.Havent tried that yet tho ,so cant tell of theroy versus application. You have done well, looks great..
10-14-2007, 11:30 AM
#4
Melting Slicks

Anybody have an idea of how much a set of those covers are worth?
I have a set I'm not going to be using any longer and was thinking about selling them but I don't know what to ask for them.
Thanks.
I have a set I'm not going to be using any longer and was thinking about selling them but I don't know what to ask for them.
Thanks.

 10-14-2007, 11:38 AM
#6
Drifting
Thread Starter
Thanks for the compliments. I know it is far from a perfect polish job but I want to try it myself first before paying somebody. I am very new to auto mechanics and trying my hardest to learn the basics. Now that I have done it once...I have no problem paying to have it professionally done.
If I go to 2000 grit will that make it shine better? Is there some othe type of metal polish paste & buffing wheel to use on the final steps to make it more shinny for the last step. I had no idea what to use after I got done with the 1500 grit seeing all the sand paper marks so I took my jar of chrome polish and buffing wheel thinking it can't hurt and was surprised at the results.
I had no idea how to get between the fins so yes...the wire wheel was my tool. It did not cut too deep....spun on low speed and applied very little pressure. Took a while but came out nice. Your plywood trick sounds promising.
At first I was really wanting to paint between the fins but now after looking at it again this morning I really like the polished fins so I am going to leave it all polished.
Is there any type of paint/coating I can put on the covers to protect them better? What about clear engine enamel or caliper paint?
10-14-2007, 11:42 AM
#7
Drifting
Thread Starter
I believe they are worth over $200 on eBay fully polished if they have the drippers. At least that is what I heard and I still can't believe that they cost that much. I almost scrapped them a few months ago taking a short cut and buying some new shinny off the shelf covers until somebody told me that they were worth some bucks.
10-14-2007, 11:46 AM
#8
Melting Slicks
 10-14-2007, 12:46 PM
#9
Le Mans Master

I believe they are worth over $200 on eBay fully polished if they have the drippers. At least that is what I heard and I still can't believe that they cost that much. I almost scrapped them a few months ago taking a short cut and buying some new shinny off the shelf covers until somebody told me that they were worth some bucks.
The dripper included ones are worth less than the original ('69 only) ones without the drippers. The '69 ones without the drippers would not have a polished finish originaly as they were delivered straight out of the die without any further polishing. '70 and up were polished or later they were black painted.
-Mark.
10-14-2007, 04:28 PM
#10
Drifting
Member Since: Jul 2004
Location: Kissimmee fl
Posts: 1,650
Received 51 Likes
on
31 Posts
Finalist 2021 C3 of the Year - Modified
2017 C3 of Year Finalist
Cruise-In VIII Veteran
St. Jude Donor '07

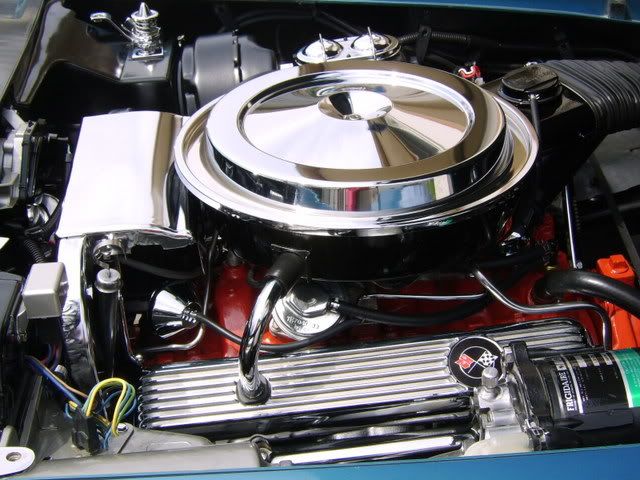
Just in case you still wanted to see what they look like painted here is a shot.
10-14-2007, 06:49 PM
#13
Drifting
Thread Starter
10-14-2007, 08:51 PM
#14
Instructor


Your valve covers look great.
I have a set of aluminum valve covers that were chrome plated and the chrome is chipped and flaking. Any ideas for the best way to remove the old chrome palting so I can expose, then polish the base aluminum.
Thanks.
I have a set of aluminum valve covers that were chrome plated and the chrome is chipped and flaking. Any ideas for the best way to remove the old chrome palting so I can expose, then polish the base aluminum.
Thanks.
10-14-2007, 09:09 PM
#15
Race Director

This is the same situation that chrome plating alternator cases eventually over time occurs. A good polish job is a better way to treat aluminum parts regardless of the time consuming as it requires to do a perfect job.
by the way those covers look great!: well done..cheers:
by the way those covers look great!: well done..cheers:


 10-14-2007, 10:53 PM
#17
Advanced
Member Since: Feb 2007
Location: Springfield MO.
Posts: 74
Likes: 0
Received 0 Likes
on
0 Posts
First, you did a nice job polishing...
I say "no" however to paint or clear coat...
just noticed you need chrome valve cover bolts, that rusty one has to go
These valve covers are high dollar...nearly $300 a pair in Eckler's.
Just polish 'em by hand a couple of times a year and they'll keep.
I say "no" however to paint or clear coat...
just noticed you need chrome valve cover bolts, that rusty one has to go
These valve covers are high dollar...nearly $300 a pair in Eckler's.
Just polish 'em by hand a couple of times a year and they'll keep.
10-14-2007, 10:56 PM
#18
Drifting
Member Since: Jul 2004
Location: Kissimmee fl
Posts: 1,650
Received 51 Likes
on
31 Posts
Finalist 2021 C3 of the Year - Modified
2017 C3 of Year Finalist
Cruise-In VIII Veteran
St. Jude Donor '07
My covers have no clear on them. Just Chevy orange motor paint between the fins. A light polishing once in a while with Meguires polish keeps the rest of the covers looking great. IMHO
10-14-2007, 11:29 PM
#19
Le Mans Master
Member Since: Jan 2007
Location: Omaha NE
Posts: 5,010
Received 1,816 Likes
on
825 Posts
2023 C3 of the Year Finalist - Unmodified
2022 C3 of the Year Finalist - Unmodified
2020 C3 of the Year Finalist - Unmodified
Chrome plating aluminum valve covers if done right should never chip or flake off over time....
Mine were done back in '99 & they look like new with almost zero maintenance....
Mine were done back in '99 & they look like new with almost zero maintenance....
10-15-2007, 04:26 AM
#20
Intermediate

Member Since: Oct 2006
Location: Virginia
Posts: 27
Likes: 0
Received 0 Likes
on
0 Posts
Man they really look nice and i know you spent some time and energy on them to get those results. Now change that rusted hold down bolt you have in the picture and this will compliment your work even more. It's jumping out at me when i look at them.