
How to clean dirty bolts?
 01-09-2009, 04:58 PM
#21
Racer

Member Since: Nov 2008
Location: Anaheim California
Posts: 364
Likes: 0
Received 0 Likes
on
0 Posts
That is remarkable. Did you tell them what the finish was supposed to be or did they determine that? I think you got a real good plater that may not be around many locations.
 01-09-2009, 05:52 PM
#22
Burning Brakes


I tried to work out what colour plating to specify for each part, but I'm sure I got some of it wrong. I know that back bumper brackets and shims were zinc chromate (yellow) because there was some of the original plating left under the dirt. Bolts, nuts and washers were all bright zinc to try and make them look like standard bolts. Basically, I figured that if the factory plated anything it was the yellow colour so if I thought it would have been plated originally then it went yellow. Anything else was bright clear zinc to make it look unplated.
However, the zinc chromate gives better corrosion resistance than the bright zinc so for parts that are prone to rust (like the lower rear shock mount elbows and bolts) I took the long-term choice despite knowing they probably weren't yellow originally.
I'm here in the UK and I don't think there's anything special about the company I used, although they were very professional and helpful. Our environmental laws are probably as tight as yours so I doubt there's anything they did which would be too hard/expensive to do in the US. Proper chrome plating is as expensive here as it is there, for example. I just looked them up in the Yellow Pages. Maybe I got lucky.

After a bunch of research I also had the aluminium rear bumper beam refinished in the same Alochrom finish that the factory used. I just wanted to go the extra mile if I could:
Again, nobody ever sees these parts but it was very satisfying to do, which is why I suggested large-scale plating to the OP

Last edited by BenUK; 01-09-2009 at 05:54 PM.
01-10-2009, 12:26 AM
#24
Drifting


I stopped by Harbor Freight tonight on my way home to get a rock tumbler, but couldn't find it in the store. I saw it on their web site, but didn't want to wait on shipping. I did find a vibratory tumbler that looks like it will do the same work. I think I paid about $50 and bought $10 of media. I have it shaking some U-Joint bolts and washers that I replaced when I put new joints in.
01-10-2009, 08:13 AM
#26
Were most of the factory bolts plated black oxide or natural finish?
I am getting close to the reassembly of my frame and had planned to post this question in a new thread, but since the topic is being disscussed I figured I'd ask.
My method has been Wire wheel with vice grips so far, now the Blasting company doing the frame is taking care of the rest.
I am getting close to the reassembly of my frame and had planned to post this question in a new thread, but since the topic is being disscussed I figured I'd ask.
My method has been Wire wheel with vice grips so far, now the Blasting company doing the frame is taking care of the rest.
01-10-2009, 10:34 AM
#27
Race Director

Most of the bolts were black oxide, at least a light coating.
An easy fast cheap way is to first degrease them in a bucket with Simple Green, Purple Stuff, gasoline or whatever, then let them soak in OSPO or Metal Prep (from Homey Depot, a lot cheaper), then take them out and let them dry without rinsing them with anything. Then dipping in oil will really help too.
If you don't drive in the rain this will look like black oxide and last up to a year.
The OSPHO is also a good prep for any paint and rust converter/remover.
Plating them is by far the best, around here a 5 gal bucket for around 60 bucks. Only problem with that is you better have a really good memory or a lot of pics.
01-10-2009, 02:03 PM
#28
Le Mans Master

Since gasoline has come up, I don't just want to assume everyone knows not to scrub parts with that as the solvent. Had a neighbor whose son did this a few years back with somewhat disastrous results. He's very lucky not to have been severely burned. 'Nough said...
01-10-2009, 04:01 PM
#29
Drifting
I would not recommend the Harbor Freight vibratory tumbler. The one I picked up yesterday ran for about an hour and then vibrated itself apart. I put it back together and used some locktite and turned it on again, checking on it every hour. It lasted about 4 hours before it broke the stud that holds the media bowl to the motor. I didn't notice right away and it spun itself around winding up its own cord into the springs and wore through the insulation.
I managed to find a few reviews on this model, and it really is junk. I am going to return the junk and head to Cabelas to pick up one of theirs. The gun people are giving them good reviews using them to polish shell casings.
This reminded me of why I don't buy anything from Harbor Frieght.
I managed to find a few reviews on this model, and it really is junk. I am going to return the junk and head to Cabelas to pick up one of theirs. The gun people are giving them good reviews using them to polish shell casings.
This reminded me of why I don't buy anything from Harbor Frieght.
01-10-2009, 04:44 PM
#30
Burning Brakes
But everything costs more in the UK so your mileage may vary. A C6 Z06 in the UK? Try USD 90k.... :o
01-10-2009, 10:09 PM
#31
Le Mans Master
...I managed to find a few reviews on this model, and it really is junk. I am going to return the junk and head to Cabelas to pick up one of theirs. The gun people are giving them good reviews using them to polish shell casings.
This reminded me of why I don't buy anything from Harbor Frieght.
This reminded me of why I don't buy anything from Harbor Frieght.
01-10-2009, 11:55 PM
#32
Drifting
I've had a Lyman Turbo 1200 (you may want to go larger) for many years which has been put to use for all kinds of purposes. But, I still don't suggest putting grungy bits in it before at least giving them a soak and/or quick blast, else your media will get nasty before you know it.
I just have 6 bolts going as an experiment to see how well they come out...same bolts I had run in the dying unit from Harbor Freight, so they are pretty clean already. I'll let them shake over night to see if they come out looking like jewelry.
 01-11-2009, 05:58 AM
#33
Safety Car

I've been playing with finishing bolts in different ways but noted in your photo the "natural finish" look on many. How did you achieve that without rust immediately following?
01-11-2009, 06:50 AM
#34
Pro

I gotta say that looks like the way to go for sure, if you have more than a few pieces that is. I've used all the above with exception to marvel mystery oil that Nick suggested, but I think for the amount of time spent  and the final outcome I real like yours best so far!
ikwhite
and the final outcome I real like yours best so far!ikwhite
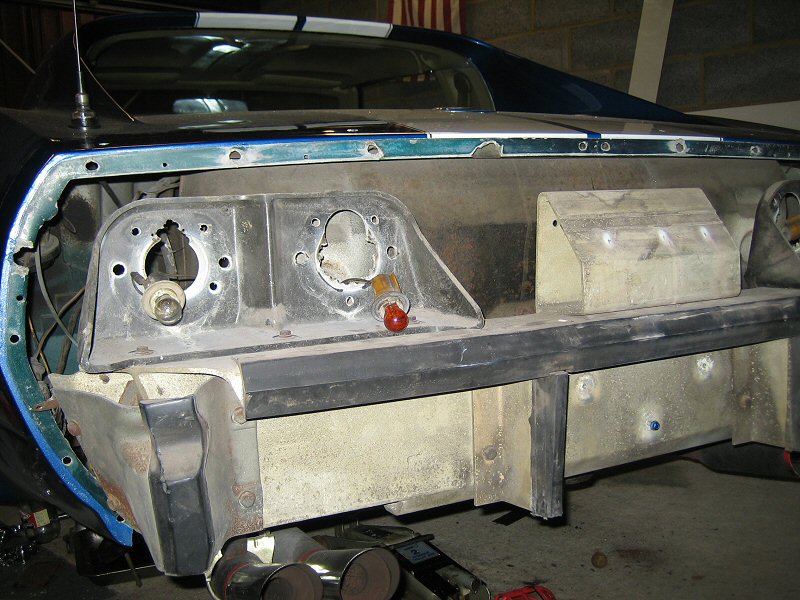
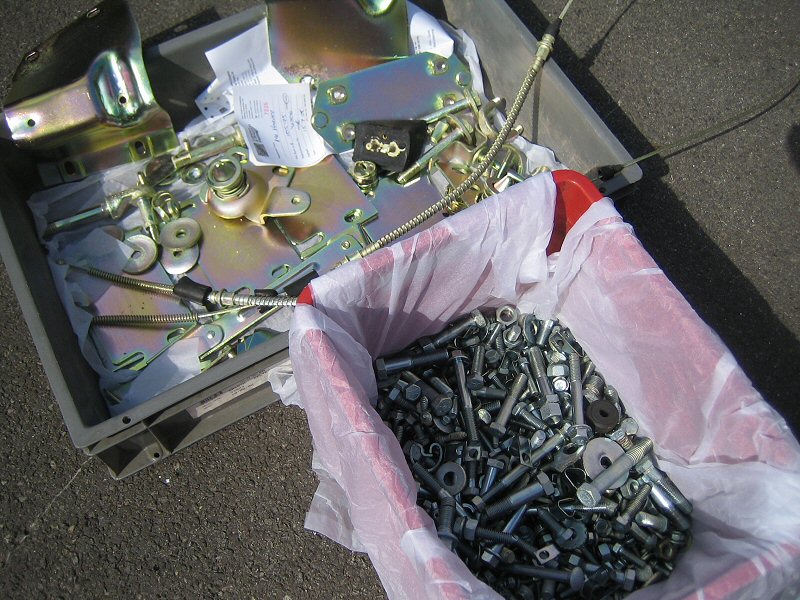
I took a bucket of chassis bolts and miscellaneous bits to a local plating specialist who turned them from this:
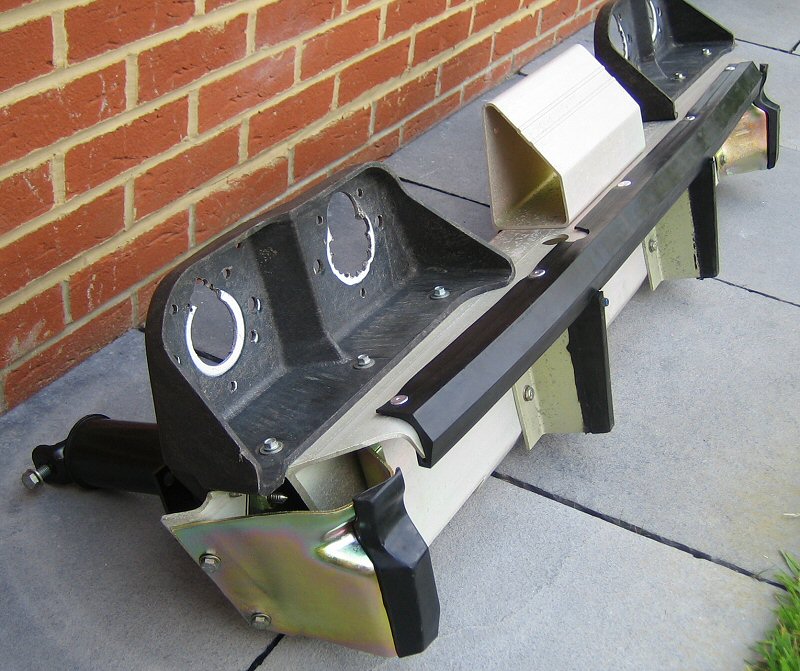
...into this:
It was easy, quick and relatively cheap. They came back like new parts - even things like the parking brake cable with its rubber seals still attached. I recommend it if you're doing a large-scale project. If you just have a few parts to clean up then other methods would be more cost-effective.
01-11-2009, 09:04 AM
#35
Racer

Member Since: May 2006
Location: Tampa by way of MIAMI! FL
Posts: 257
Likes: 0
Received 0 Likes
on
0 Posts

Eastwood can get you set up with tumblers and platers too. If you are going to be doing alot it might be worth the investment.
Search under tumbler... http://www.eastwoodco.com/jump.jsp?i...emType=CONTENT
Search under plating... http://eastwood.resultspage.com/sear...&submit=Search
Eastwood has all the crazy tools that you can never find. I bought a sheet metal brake and all kinds of metal forming tools when I made a custom Rad shroud for another project.
01-11-2009, 11:56 AM
#36
Le Mans Master

 01-11-2009, 06:39 PM
#38
Le Mans Master
I would not recommend the Harbor Freight vibratory tumbler. The one I picked up yesterday ran for about an hour and then vibrated itself apart. I put it back together and used some locktite and turned it on again, checking on it every hour. It lasted about 4 hours before it broke the stud that holds the media bowl to the motor. I didn't notice right away and it spun itself around winding up its own cord into the springs and wore through the insulation.
I managed to find a few reviews on this model, and it really is junk. I am going to return the junk and head to Cabelas to pick up one of theirs. The gun people are giving them good reviews using them to polish shell casings.
This reminded me of why I don't buy anything from Harbor Frieght.
I managed to find a few reviews on this model, and it really is junk. I am going to return the junk and head to Cabelas to pick up one of theirs. The gun people are giving them good reviews using them to polish shell casings.
This reminded me of why I don't buy anything from Harbor Frieght.
Last edited by bj1k; 06-01-2015 at 10:02 PM. Reason: Bought additional defective item.
01-12-2009, 02:03 PM
#39
Burning Brakes

Well I just bought a new TOY, tool that is...I ordered a Vibratory Tumbler from graingers. 18" diameter bowl and some different abrasive and polishing materials with it. Ill have to see what the biggest part is that will fit into it. That should take car of the dirty bolts !!!