
Pic Requests: Rear Frame Rust Repair with Body-On
 12-01-2009, 07:28 AM
#1
Racer

Thread Starter

Member Since: Aug 2005
Location: Salem MA
Posts: 308
Likes: 0
Received 0 Likes
on
0 Posts
Hello Everyone,
My '69 has some frame rust in front of the rear tires that has made me uncomfortable for a long time. I will get pictures later today.
The internet tells me this is 'the' area to cause problems.
The car is a driver that saw winter a long time ago, has the wrong year body on it, and will never be a fine example of what a corvette looked like right from the factory.
I would like to cut away some of the rot and weld some steel to the frame to structurally re-enforce it and i would like to do this with the body on. I was hoping some of you guys had some pictures of what you have done to give me some ideas.
Thanks,
-Dana
 12-01-2009, 08:04 AM
#2


That is the rear kick up area, and yes it is a common problem area. You can order repair pieces from Paragon.
http://www.corvette-paragon.com/c-23...aspx?pagenum=1
http://www.corvette-paragon.com/c-23...aspx?pagenum=1
12-01-2009, 11:37 AM
#3


Here are two pix of my "band-aid" repair. I had two silver dollar sized holes in the bottom of my frame, and the rear caps were rotted out. I got some 1/8 inch steel plate and welded repair patches. The patch on the bottom of the frame rail is L-shaped and it extends about 10 inches up the side frame rail and about 8 inches across the crossmember (toward the center of the car). The end cap is the same material. I made cardboard templates and cut the steel with a recip saw. I MIG welded the patches in place. I call this a "band-aid" because I realize this is just a temporary fix. In all likelihood, the rust you can see is only the tip of the ice berg. Someday in the future, I will do a frame off on my Vette, but I feel pretty confident in my stop-gap fix.
Temvette72

The following users liked this post:
Primoz (03-08-2022)
12-01-2009, 12:30 PM
#4
Drifting

Member Since: Jul 2006
Location: Sault Ste. Marie Ontario
Posts: 1,871
Likes: 0
Received 6 Likes
on
6 Posts
Depending on the extent of the rust you may have to pull the body to repair it properly.
I know that's not what you want to hear, but...
Here are a couple of shots of the frame repair we did. Hope they help.


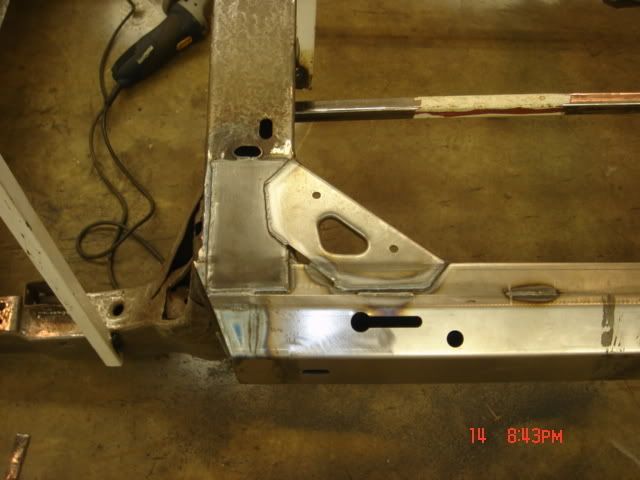

I know that's not what you want to hear, but...
Here are a couple of shots of the frame repair we did. Hope they help.
The following users liked this post:
Primoz (03-08-2022)

 Outstanding work.
The following users liked this post:
Primoz (03-12-2022)
12-01-2009, 07:18 PM
#9
Former Vendor

That is a 58 corvette, and the repair is easily accesible. Truth of the matter is that some frame repair is possible with the body on.
The one thing, one needs to make sure of, is that the rust you can see, is all the rust there is.
A lot of times (especialy in the kick ups of a C3), there is more rust than meets the eye.
The last thing you want to do is put a BAND AID on a STRUCTURALl part of the car!!!!!
Again, if the rust is just starting and limited to an accessible part of the frame where it can be welded correctly, all is good.
But if it has spread, then you better fix it right. Your life could depend on it.
www.2ndgenrestorations.com
12-01-2009, 08:37 PM
#10
Racer
Thread Starter
Member Since: Aug 2005
Location: Salem MA
Posts: 308
Likes: 0
Received 0 Likes
on
0 Posts
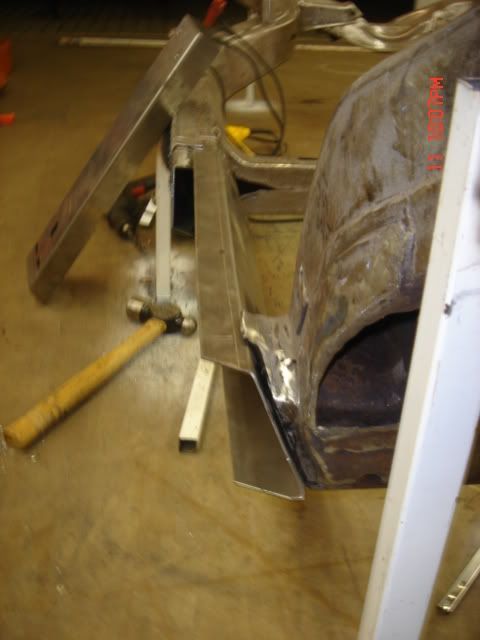
This is what i started with today:

And this is what i had to cut away before i hit acceptable metal.

Went better than i expected.
I plan to POR 15 anything i can reach and spray undercoat everything else. I then plan to re-make the bottom of the frame out of relatively thick steel and MIG it solid.
I don't plan to re-create those rotten vertical pieces. Anything wrong with this approach i should be aware of?
Thanks,
-Dana
And this is what i had to cut away before i hit acceptable metal.
Went better than i expected.
I plan to POR 15 anything i can reach and spray undercoat everything else. I then plan to re-make the bottom of the frame out of relatively thick steel and MIG it solid.
I don't plan to re-create those rotten vertical pieces. Anything wrong with this approach i should be aware of?
Thanks,
-Dana
12-01-2009, 10:07 PM
#12
Safety Car

Member Since: Aug 2001
Location: North Easton Mass
Posts: 4,883
Likes: 0
Received 8 Likes
on
8 Posts

You should check the differential crossmember carefully also. I can't imagine that you would have that much rust in the side rail and none in the diff crossmember. If there is a lot of thick rust scale elsewhere in the rails that would indicate that the original metal has thinned out quite a bit. Something to think about for the future, especially if you add a high HP motor to the car.
Rick B.
Rick B.
12-01-2009, 11:05 PM
#13
Melting Slicks

I don't mean to hijack the thread, but I don't understand how you can secure the shims with cotter pins after pushing them down. Mine sits just like in the pics that the OP posted.
12-01-2009, 11:40 PM
#14
Race Director

There should be holes in each side of the frame, where it kicks up. The pin goes through the hole in the frame and then the holes in the shims to hold them in place.
12-02-2009, 12:20 AM
#15
Former Vendor
Hard to tell from the pics, but if all else is solid, after you clean and treat the rest of the metal with a rust preventative, weld up a nice patch for what you just cut out, and you 'll be good to go.
12-02-2009, 07:04 AM
#16
Racer
Thread Starter
Member Since: Aug 2005
Location: Salem MA
Posts: 308
Likes: 0
Received 0 Likes
on
0 Posts
You should check the differential crossmember carefully also. I can't imagine that you would have that much rust in the side rail and none in the diff crossmember. If there is a lot of thick rust scale elsewhere in the rails that would indicate that the original metal has thinned out quite a bit. Something to think about for the future, especially if you add a high HP motor to the car.
Rick B.
Rick B.
My hope is that because the car is still relatively rigid when using jacks etc, simply stopping the rot where it sits will be good enough for many years to come.
The car has a relatively stock 427 390 HP and i have no intention of road racing or puttings slicks on for drag racing, so hopefully its 'good enough'. of course, if the car gets in good enough shape to go to a drag strip, that might all change... I have been known to do so pretty mean 4000 RPM launches with traction on street tires...
Thanks for the replies everyone
Last edited by not a '76; 12-02-2009 at 07:09 AM.
12-02-2009, 08:54 AM
#17
Team Owner

If you don't get any 'sag' of front and/or rear of car when you jack it up, repairing the obvious areas of frame rot may be all you need for adequate frame structure. It won't be up to new car strength, but it should be fine for daily driver. Whatever you do, it will still be stronger than it is now. Give it your best attempt without pulling the body and see how it goes.
The following users liked this post:
Primoz (03-08-2022)
12-02-2009, 04:55 PM
#18
Le Mans Master

No cotter pins used on a 70. The shims have holes at both ends, not a long slot at one end and a hole for the cotter pins on the other.
12-31-2014, 02:27 PM
#19
Instructor

This is what i started with today:
And this is what i had to cut away before i hit acceptable metal.
Went better than i expected.
I plan to POR 15 anything i can reach and spray undercoat everything else. I then plan to re-make the bottom of the frame out of relatively thick steel and MIG it solid.
I don't plan to re-create those rotten vertical pieces. Anything wrong with this approach i should be aware of?
Thanks,
-Dana

