
The Inner Workings of Seat Tracks - Post 1 of 3
 04-21-2011, 08:26 AM
#21
Senior Member


Thread Starter
Member Since: Jan 2008
Location: Easton, PA
Posts: 12,154
Received 2,031 Likes
on
1,103 Posts
St. Jude Donor '10

I hose down seat tracks with PB Blaster lube, work them back and forth for a while until they feel "free" then spray with motorcycle chain lube and they usually work well but, I live in the Peoples Republik of Kalifornia so rust usually insn't an issue here (dry off all external run-off.) In the past I have used spray lithium grease but, have found the MC chain spray is superior for lubrication.
 Good information, thank you. I am going to set up a test jig to try various different lubrications on the tracks. While I like the idea of lubrication I think the tracks need a semi viscous material due to the type of contact surface. Liquid will get removed pretty quickly unless it is contained, and grease may be too viscous. Good to hear the lithium may not have worked as well, will test that one and a new lubricant used in motors that see high friction areas of wear. Have to be a little creative here to see what might work well. I really appreciate your feedback on this, good information.
 David
 04-21-2011, 09:16 PM
#22
Racer

 04-21-2011, 10:39 PM
#23
Senior Member
Thread Starter
Member Since: Jan 2008
Location: Easton, PA
Posts: 12,154
Received 2,031 Likes
on
1,103 Posts
St. Jude Donor '10
Today I managed to move from my cut track and my drilled track over to one of my donor tracks from TeaEye. My first two postings will be general information about what initial inspection found with this set of four tracks. Second posting will cover the front guides as will the third posting tonight. The forth, fifth and sixth postings will show the work done thus far to the first of four tracks. I hope you enjoy it.
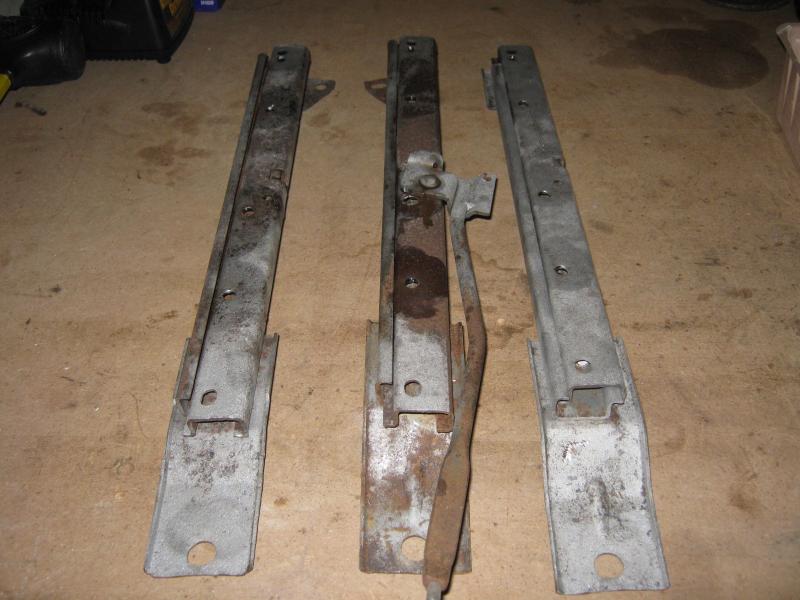
First up, the tracks arrive and are inspected.
Tracks arrive bundled.
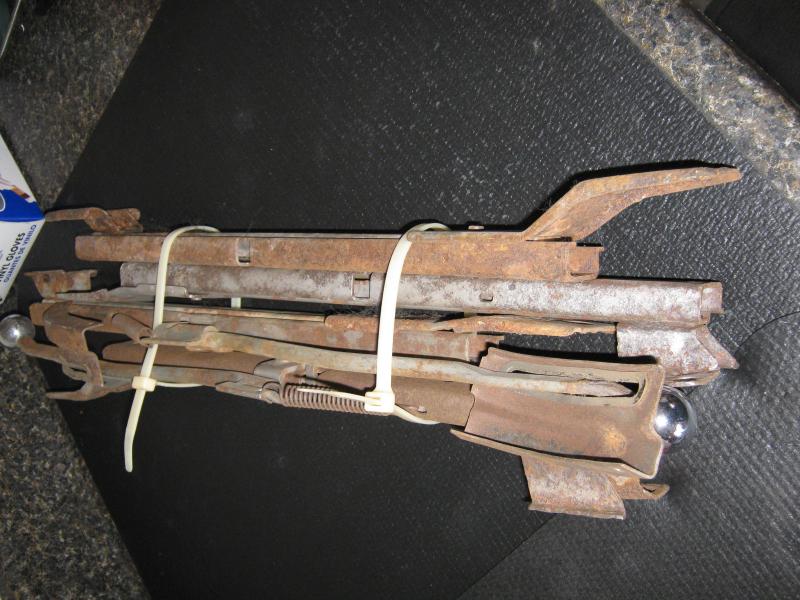
Tie straps removed and parts given first rough inspection.
Parts are matched in pairs and compared one to the other for completeness. Guides removed along with adjuster ***** and springs.
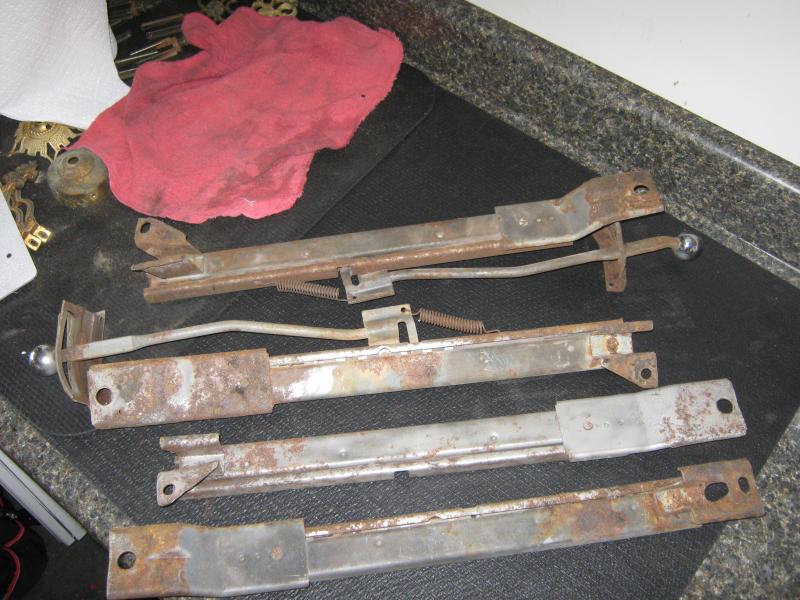
One track rear found to be different than the other three. Three match the rear track of a 74 ofr 75 style triangular rear. The forth one is much more like the 77 style rear.
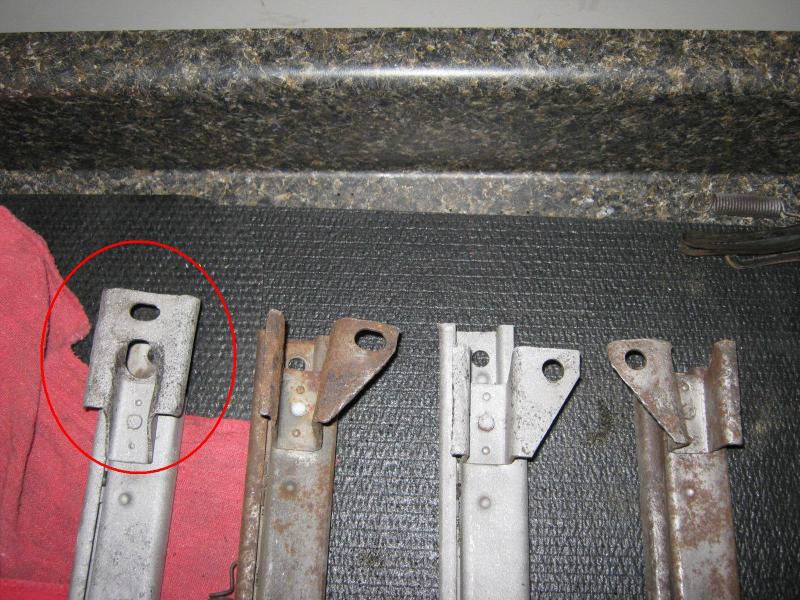
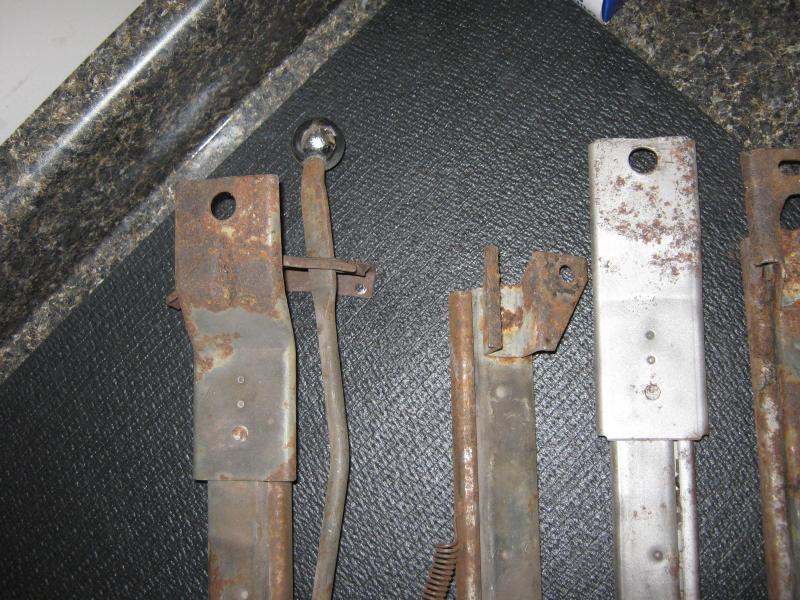
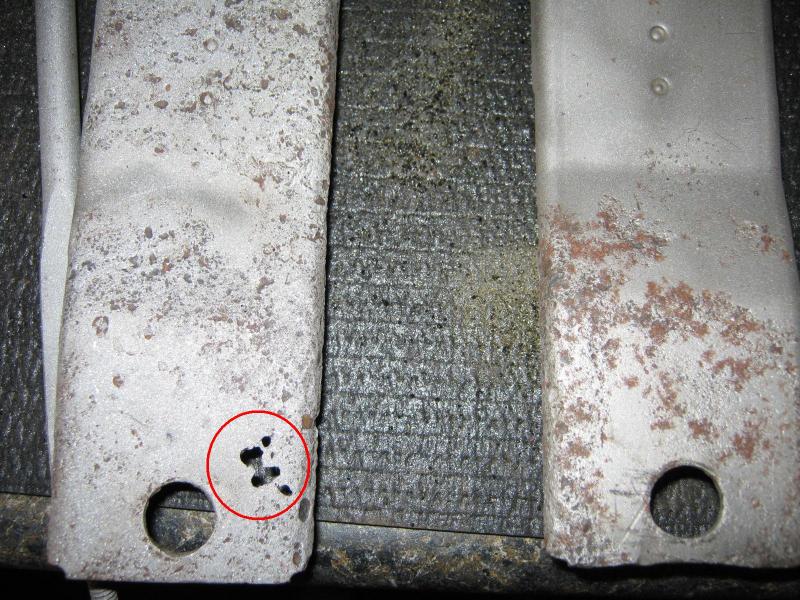
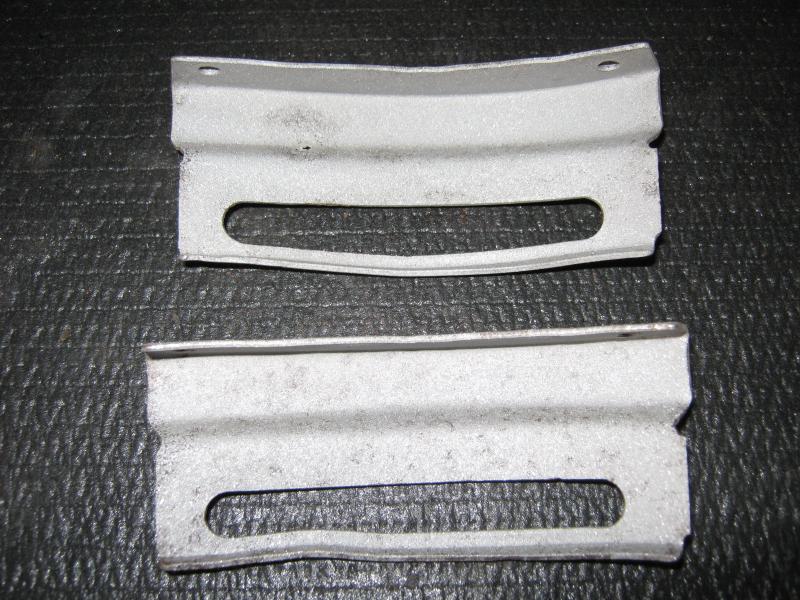
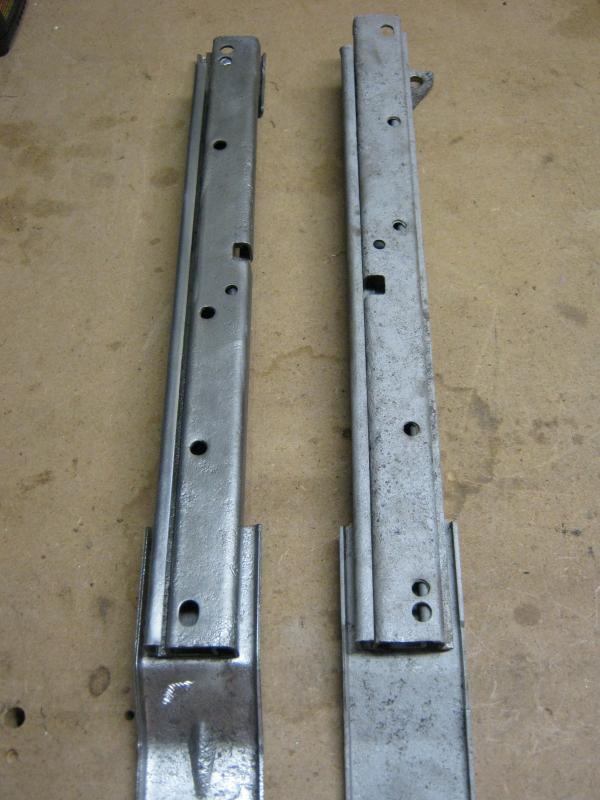
When inspecting the front brackets I found two differing sets of brackets. One set is like this one, that is contains a groove verticle to the front and they stand higher when lying on a flat surface.
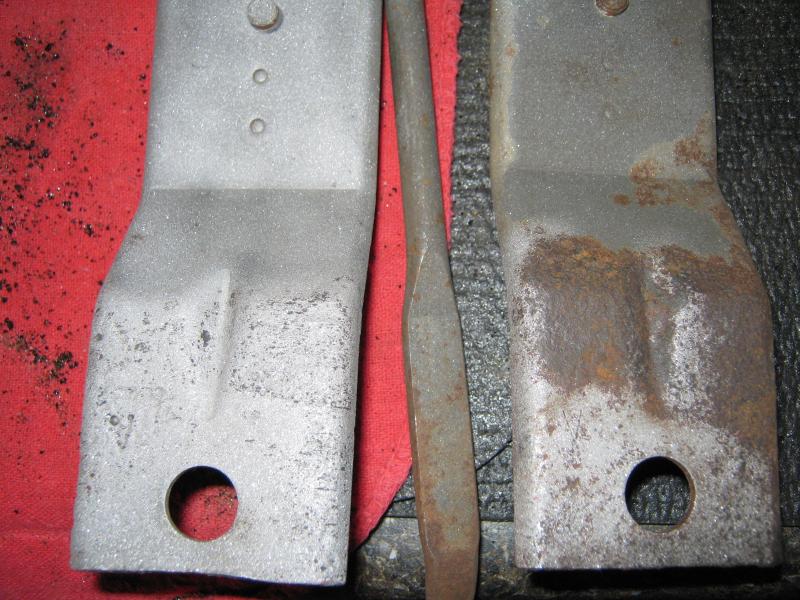
The second pair have the front bracket without the groove and they sit closer to the ground when on a flat surface. Also note that one of these two tracks had rusted through on the front mounting bracket, so we will want to deal with that as it is compromised steel.
First up, the tracks arrive and are inspected.
Tracks arrive bundled.
Tie straps removed and parts given first rough inspection.
Parts are matched in pairs and compared one to the other for completeness. Guides removed along with adjuster ***** and springs.
One track rear found to be different than the other three. Three match the rear track of a 74 ofr 75 style triangular rear. The forth one is much more like the 77 style rear.
When inspecting the front brackets I found two differing sets of brackets. One set is like this one, that is contains a groove verticle to the front and they stand higher when lying on a flat surface.
The second pair have the front bracket without the groove and they sit closer to the ground when on a flat surface. Also note that one of these two tracks had rusted through on the front mounting bracket, so we will want to deal with that as it is compromised steel.
04-21-2011, 10:44 PM
#24
Senior Member
Thread Starter
Member Since: Jan 2008
Location: Easton, PA
Posts: 12,154
Received 2,031 Likes
on
1,103 Posts
St. Jude Donor '10
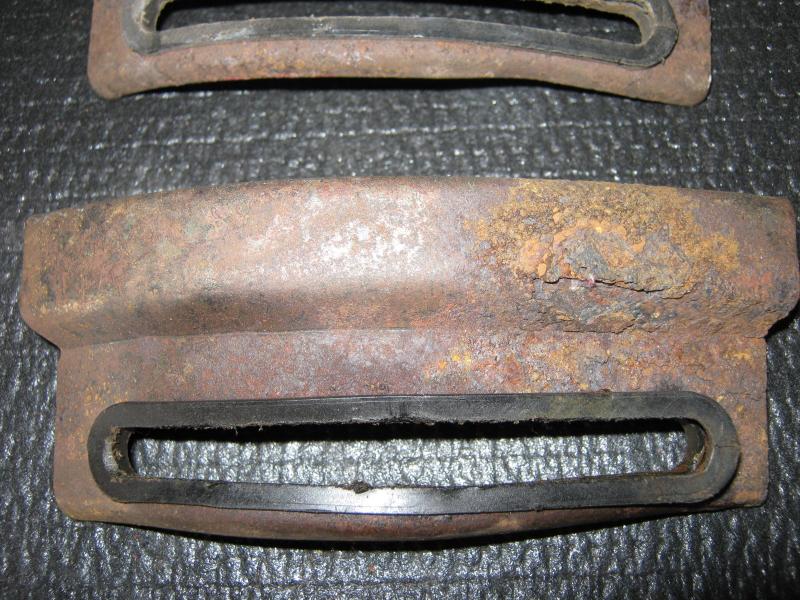
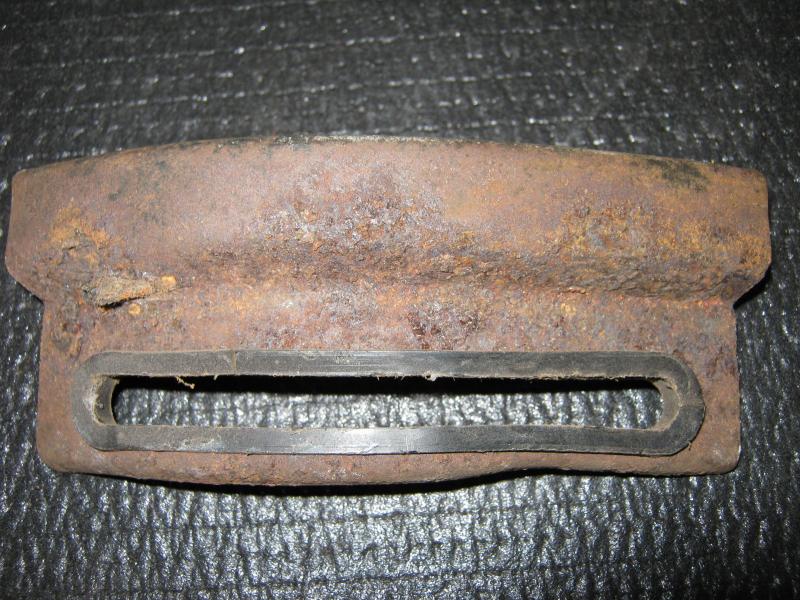
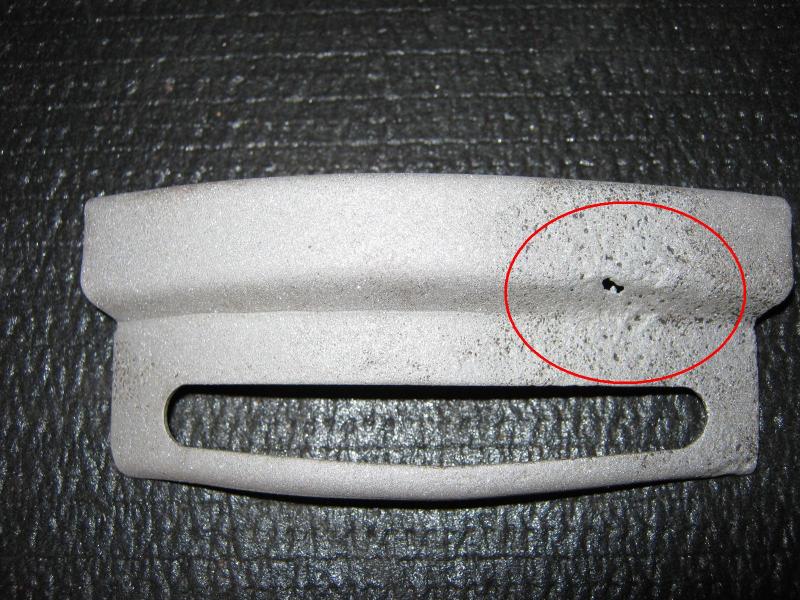
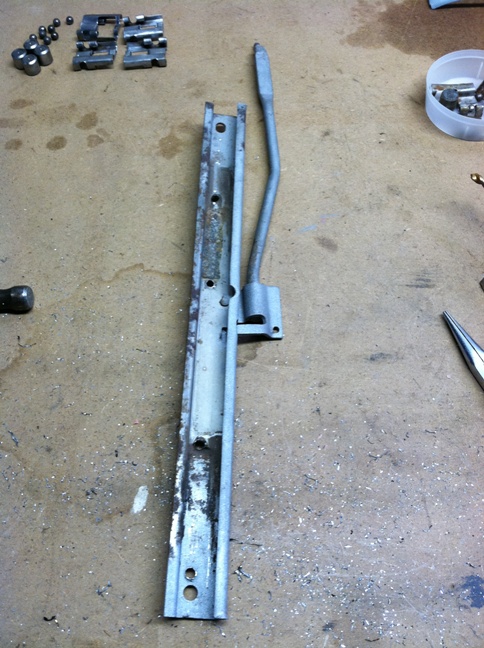
I went on to inspect the guides which TeaEye included when he sent me his seat tracks. Here are six pictures showing the general condition of the guides and note the heavy rust on one of the guides. That later proved to be rusted through and we deal with that as we moved through the day as well.
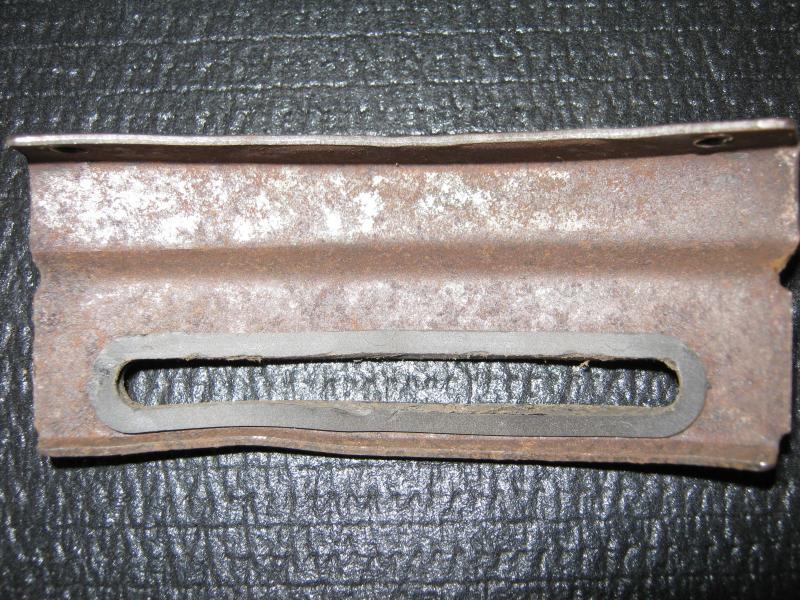
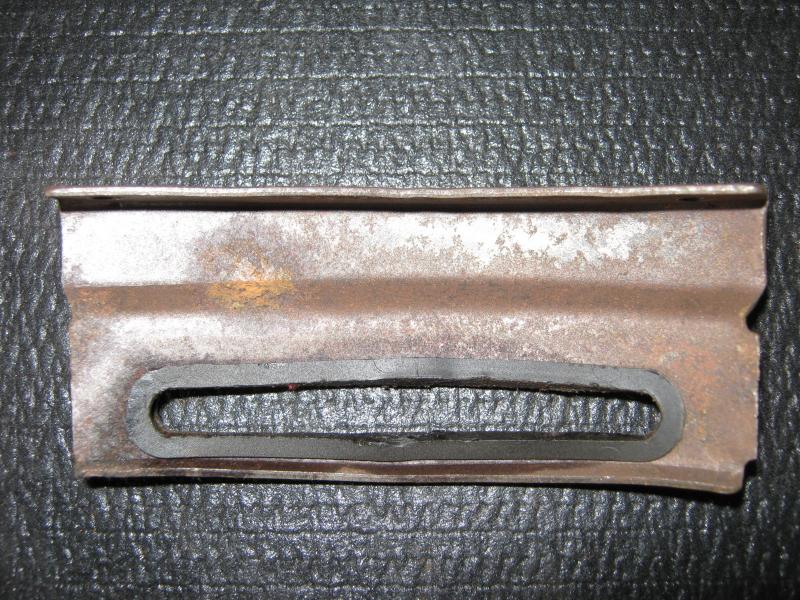
I removed the rubber covers from the guides and will clean them up and repair the tear, then replace them on the finished guides.
From this angle you can see the guides were bent and a little mis-formed, we will straighten those as well.
I removed the rubber covers from the guides and will clean them up and repair the tear, then replace them on the finished guides.
From this angle you can see the guides were bent and a little mis-formed, we will straighten those as well.
04-21-2011, 10:49 PM
#25
Senior Member
Thread Starter
Member Since: Jan 2008
Location: Easton, PA
Posts: 12,154
Received 2,031 Likes
on
1,103 Posts
St. Jude Donor '10
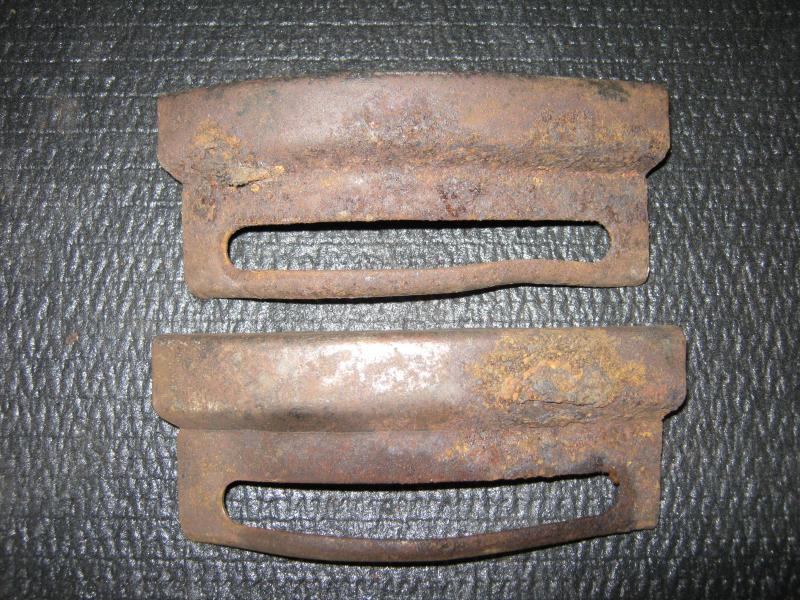
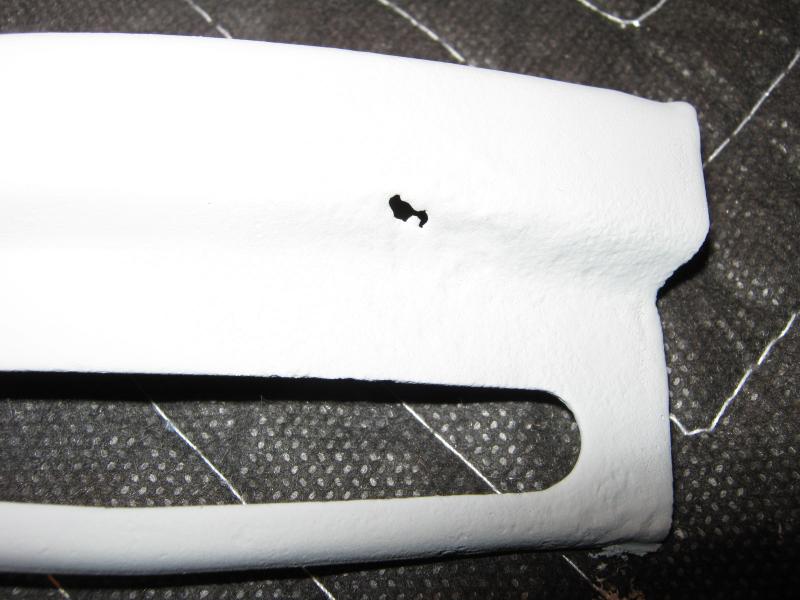
I media blasted the two guides to see how severe the rust and pitting were on these parts. These pictures show the rust through area on one of the two parts, and the deep pitting on the second part. I took this as a challenge to clean these up nicely again so after sand blasting them I wire wheeled them with a soft wheel and applied some body filler to build up the pits and the hole.
Here you can see the blow through area, the pitting and the bent lower rail. Next posting will show how I am dealing with each.
Here you can see the blow through area, the pitting and the bent lower rail. Next posting will show how I am dealing with each.
04-21-2011, 10:56 PM
#26
Senior Member
Thread Starter
Member Since: Jan 2008
Location: Easton, PA
Posts: 12,154
Received 2,031 Likes
on
1,103 Posts
St. Jude Donor '10
I wire brushed part of the guide by hand and then put some body filler in the pitted areas and the hole of the guide.
After allowing the body filler to set up for at least six hours I started the task of 80 grit sanding, followed by 150 grit, and ending in 180 grit.
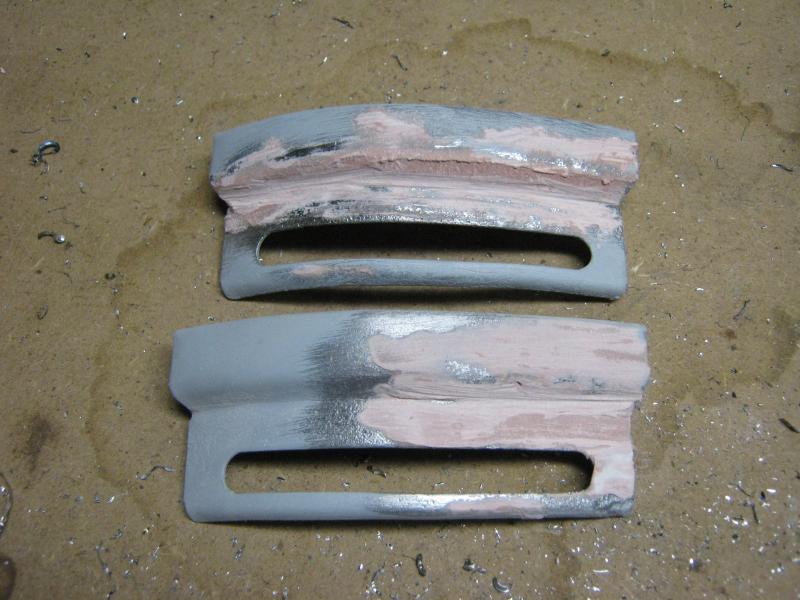
The blow through part still had a small dip in it that I wanted to fill and get smooth so I stopped after 80 grit and made up another small batch of body filler. This part is drying now and I will complete it tomorrow.
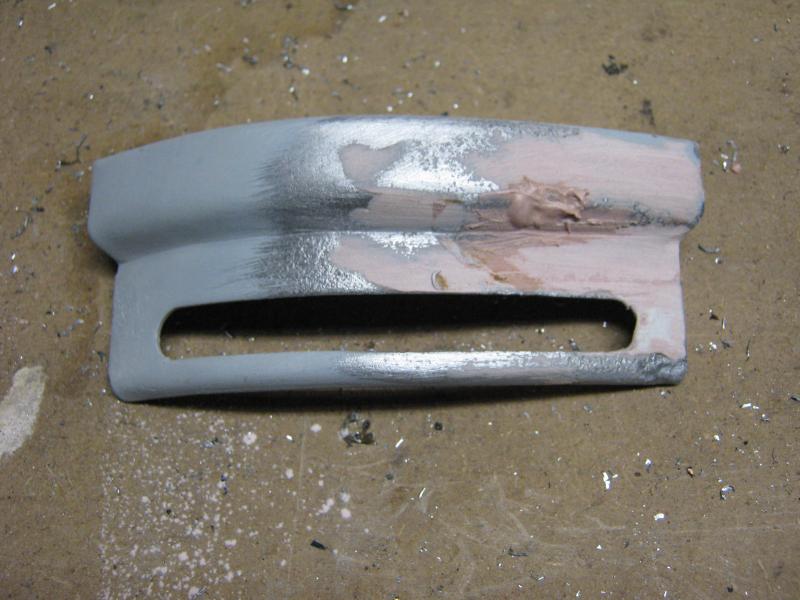
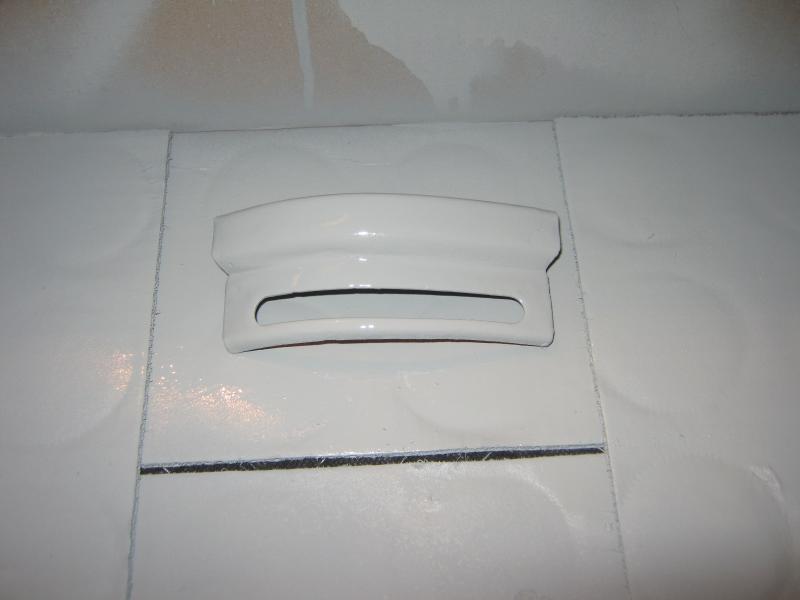
The second guide came out nice and smooth so I primed it with two coats of automotive primer and will allow it to cure overnight. I did straighten the guides and the bottom rail is now back like it should be.
Tomorrow I will finish the second guide body filler work, sanding, and then get it into primer to be at the same stage as the first guide. The guides will be put aside at that point so I can concentrate on the track work further. Now lets see where we are on the track.
After allowing the body filler to set up for at least six hours I started the task of 80 grit sanding, followed by 150 grit, and ending in 180 grit.
The blow through part still had a small dip in it that I wanted to fill and get smooth so I stopped after 80 grit and made up another small batch of body filler. This part is drying now and I will complete it tomorrow.
The second guide came out nice and smooth so I primed it with two coats of automotive primer and will allow it to cure overnight. I did straighten the guides and the bottom rail is now back like it should be.
Tomorrow I will finish the second guide body filler work, sanding, and then get it into primer to be at the same stage as the first guide. The guides will be put aside at that point so I can concentrate on the track work further. Now lets see where we are on the track.
04-21-2011, 11:09 PM
#27
Senior Member
Thread Starter
Member Since: Jan 2008
Location: Easton, PA
Posts: 12,154
Received 2,031 Likes
on
1,103 Posts
St. Jude Donor '10
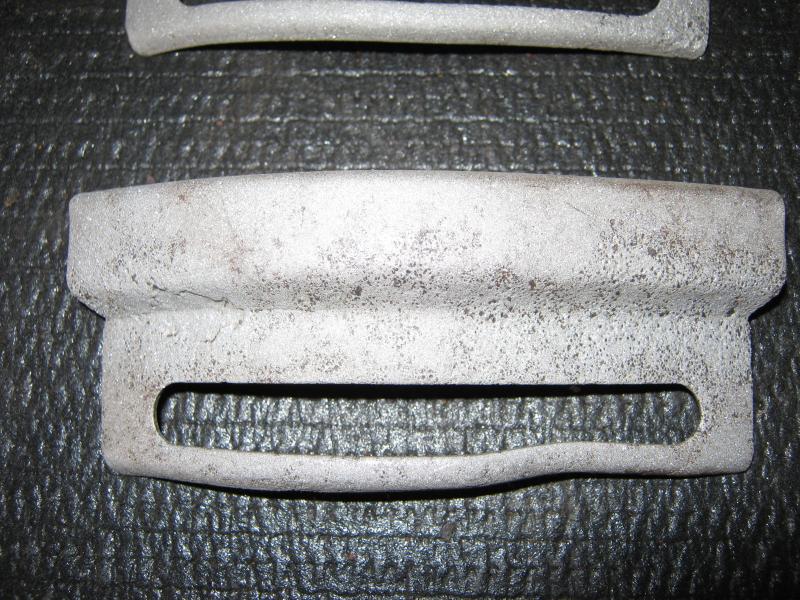
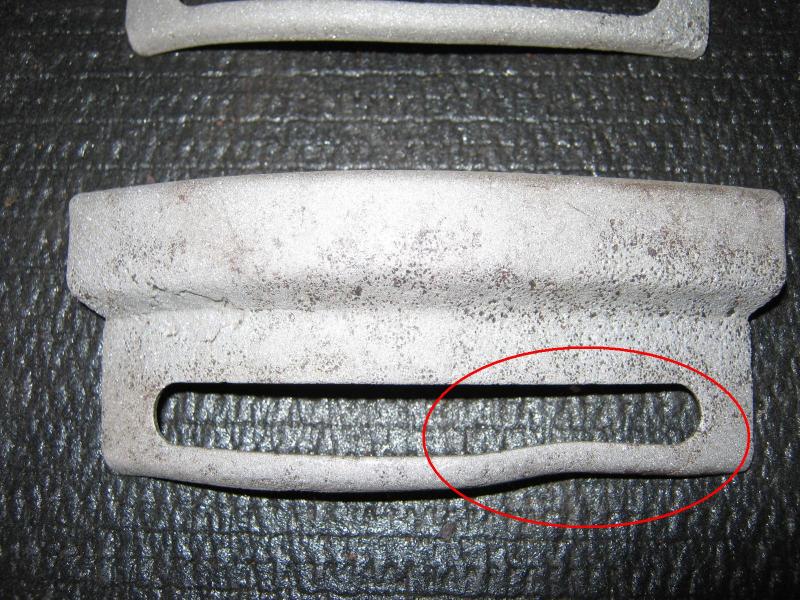
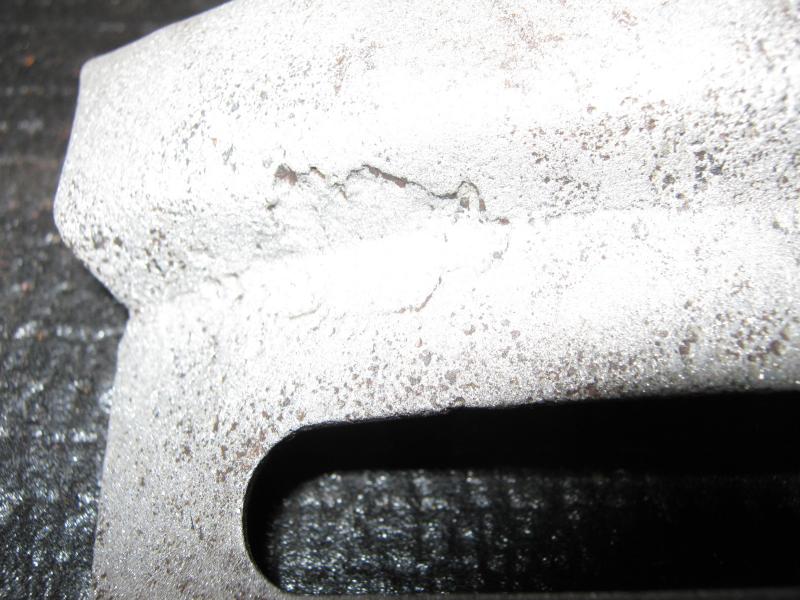
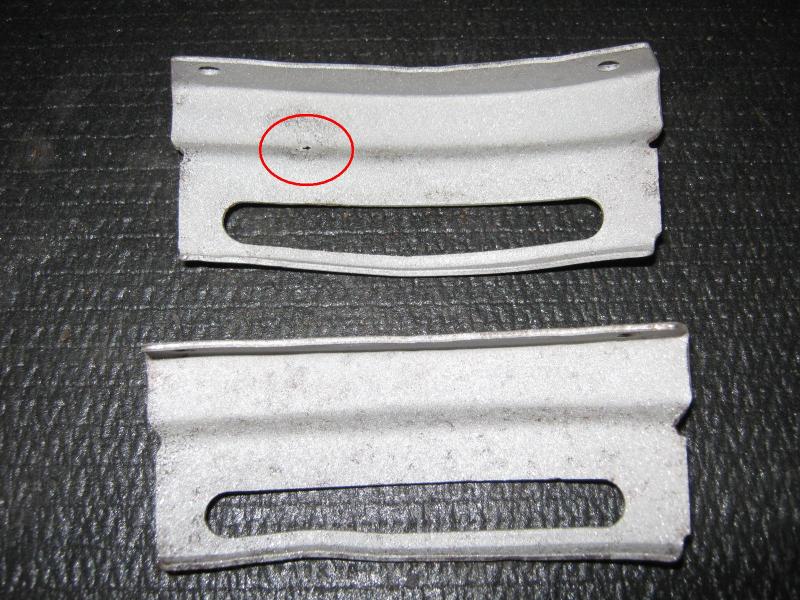
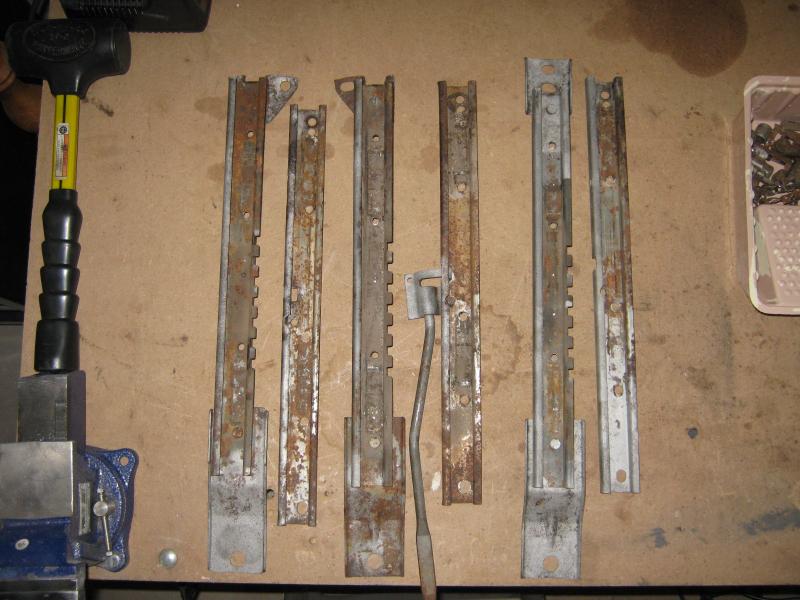
Using the same drilling method I used on my test track I carefully drilled out the dimples and the front bracket rivets on the worst of the tracks I could find. This is the track with the blow through area on the front track bracket.
Here are the tracks after opening them and looking down inside the inner track area. These did not look too bad at all on the inside.
You can see the track area where the roller moves. I'll clean this all up. Here you can also see where I have removed the front bracket to see if I can repair it or if I will replace it with a solid bracket.
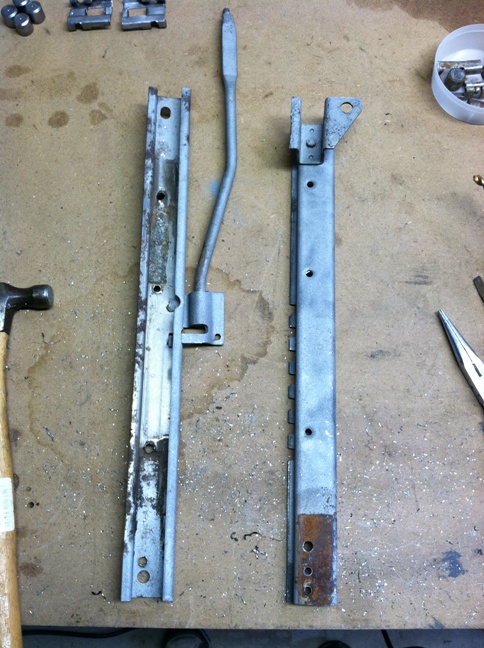
Same with the upper and lower track, grease area easily seen.
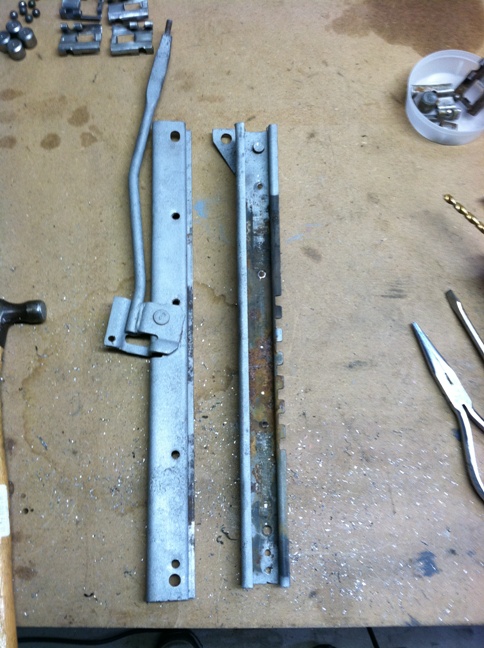
The rust is surface and not pitted badly at all here so we will remove this using a wire wheel first, then see if media blasting is in order.
You can see in this track the raised area of the dimple still showing on the inside of the track. I will use a grinder to carefully remove those.
The roller guide tracks were not in great shape when removed. They were bent but did not contain a lot of rust, surface rust mostly.
I put them together so you could see what I was starting with on the rollers. We'll clean them up nicely.
Here are the tracks after opening them and looking down inside the inner track area. These did not look too bad at all on the inside.
You can see the track area where the roller moves. I'll clean this all up. Here you can also see where I have removed the front bracket to see if I can repair it or if I will replace it with a solid bracket.
Same with the upper and lower track, grease area easily seen.
The rust is surface and not pitted badly at all here so we will remove this using a wire wheel first, then see if media blasting is in order.
You can see in this track the raised area of the dimple still showing on the inside of the track. I will use a grinder to carefully remove those.
The roller guide tracks were not in great shape when removed. They were bent but did not contain a lot of rust, surface rust mostly.
I put them together so you could see what I was starting with on the rollers. We'll clean them up nicely.
04-21-2011, 11:09 PM
#28
Race Director

I admire your devotion to detail with these tracks.
I've always taken the easiest route with them.
-soak in degreaser, thinner, gasoline whatever to disolve the old grease and crud.
-lubricate with good penetrant and hammer ends if necessary to free movement.
-degrease again, rinse and let dry.
-sandblast, moving the rails to try and get all areas inside and out.
-rinse with water and operate until all abrasive is gone.
-soak in phosphoric acid (OSPHO etc., a rust converter and paint prep)
-let drip dry on end
-paint liberally (inside) with semi rustoleum, turning end for end while operating mechanism (dipping would be a good alternative)
-let drip dry on end
-paint a nice semi finish coat on outside
-lube rollers, ***** while operating.
Always ended up operating at least as good as new
The mc chain lube is great. I've got some from the early 70's that is so sticky and stringy that it will pull a string about a foot long and won't run.
EP 140 gear lube works well too mixed with moly-d paste.
The best ep slow movement lubricant by far is Moly-d
Google and read it's characteristics.
CRC makes a dry spray moly-d that's pretty good. Here is some more variants like wire rope lube etc
http://www.tsmoly.com/catalog/produc...roducts_id=275
http://www.tsmoly.com/catalog/produc...products_id=89
Keep in mind that with the springy front mounts, the only contact inside the rails should be the rollers and ***** so any paint inside should remain.
Years ago when it was common and cheap I had some cad plated and it worked out well, perhaps some black oxide today would be a good choice too.
Have fun with the project.
 04-21-2011, 11:20 PM
#29
Senior Member
Thread Starter
Member Since: Jan 2008
Location: Easton, PA
Posts: 12,154
Received 2,031 Likes
on
1,103 Posts
St. Jude Donor '10
This will be my last post tonight on the donor tracks but we made some good progress today so let me show you where we stand now.
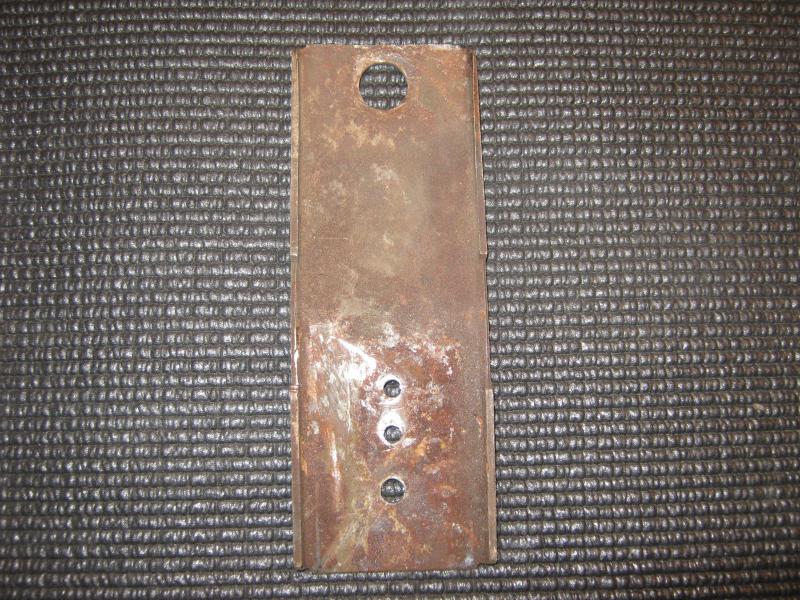
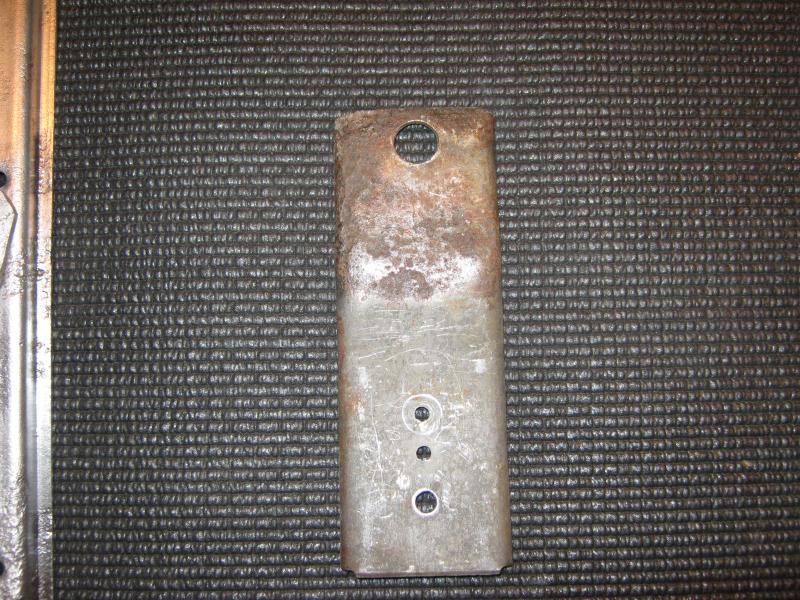
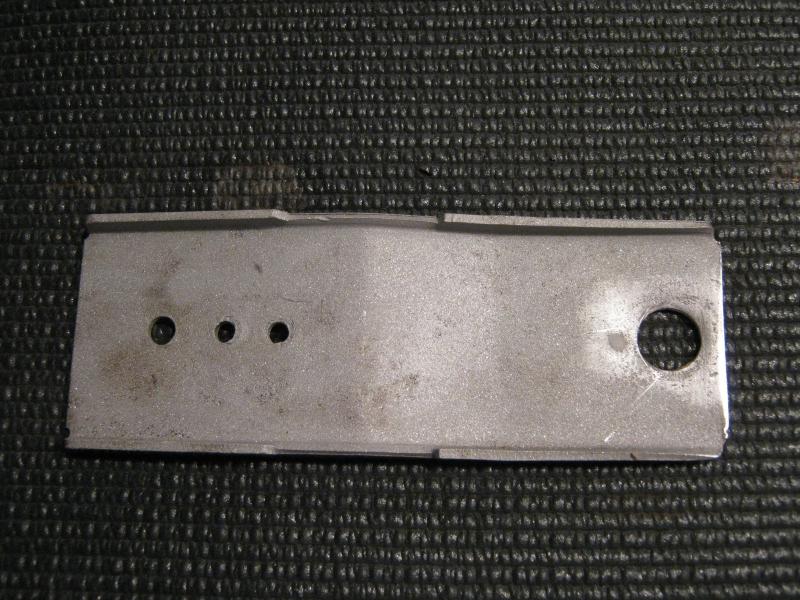
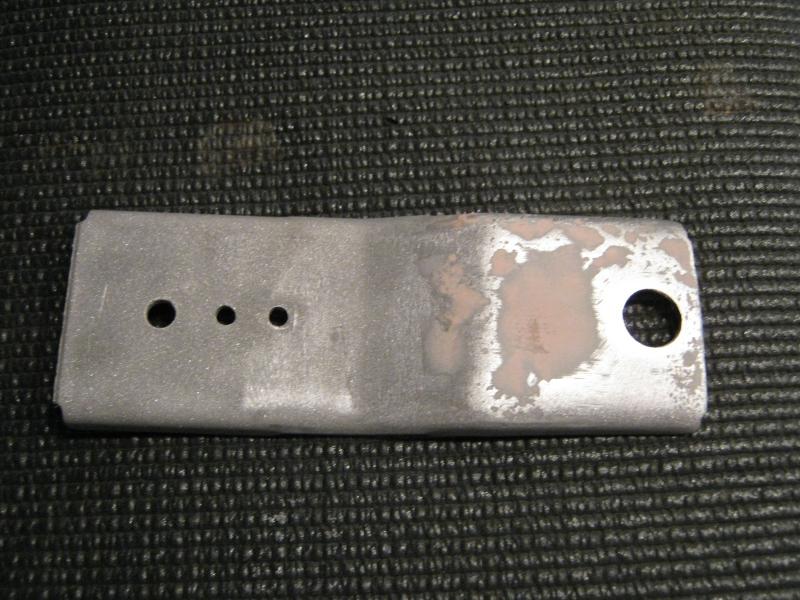
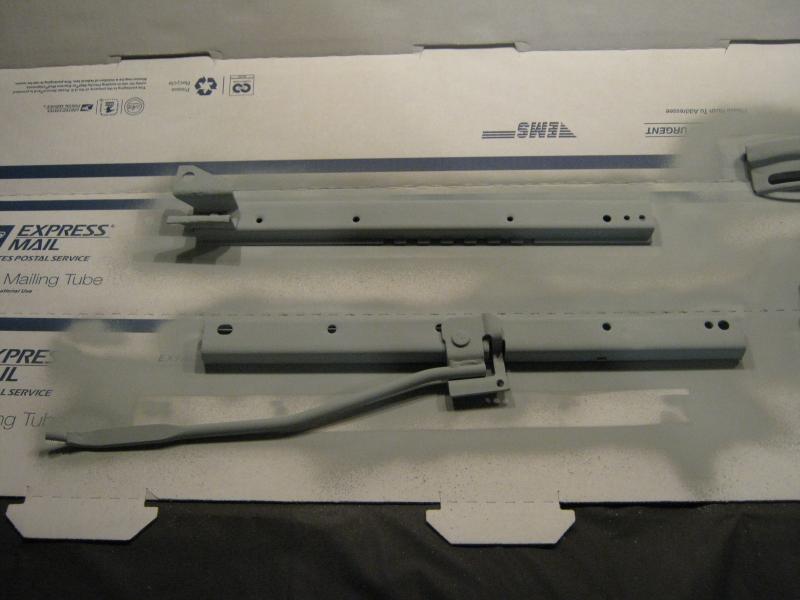
I did not like the rotting steel I found on the front bracket so I removed it and have taken one of my tracks and have removed the same bracket from it as a donor to this set. The first two pictures show the front and back of the donor bracket which I will blast, wire brush and prime tomorrow.
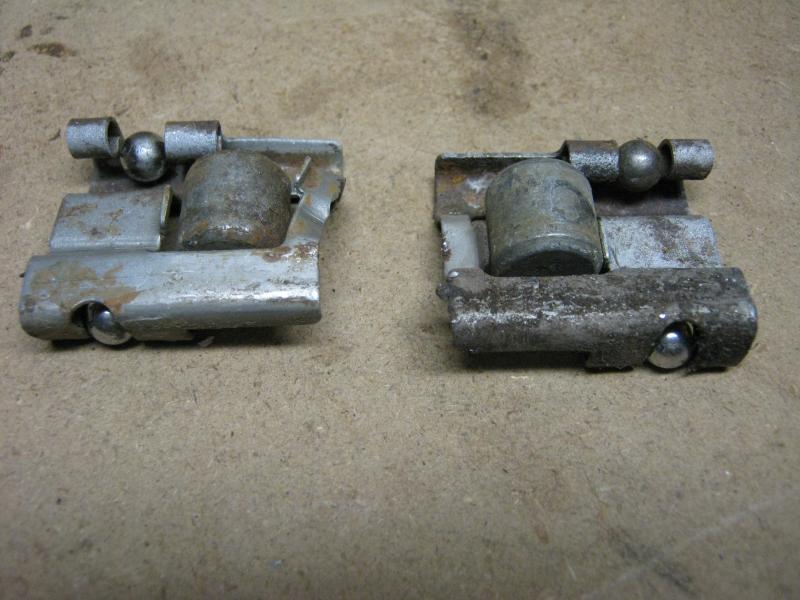
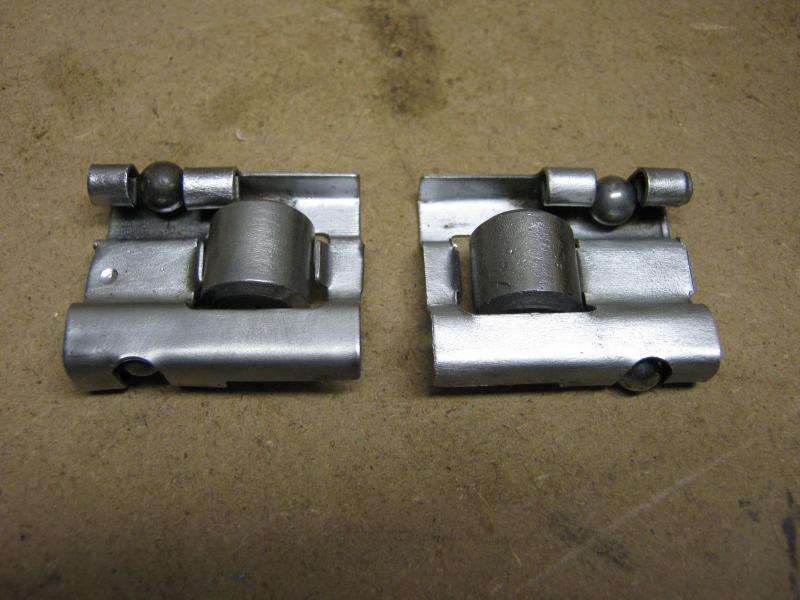
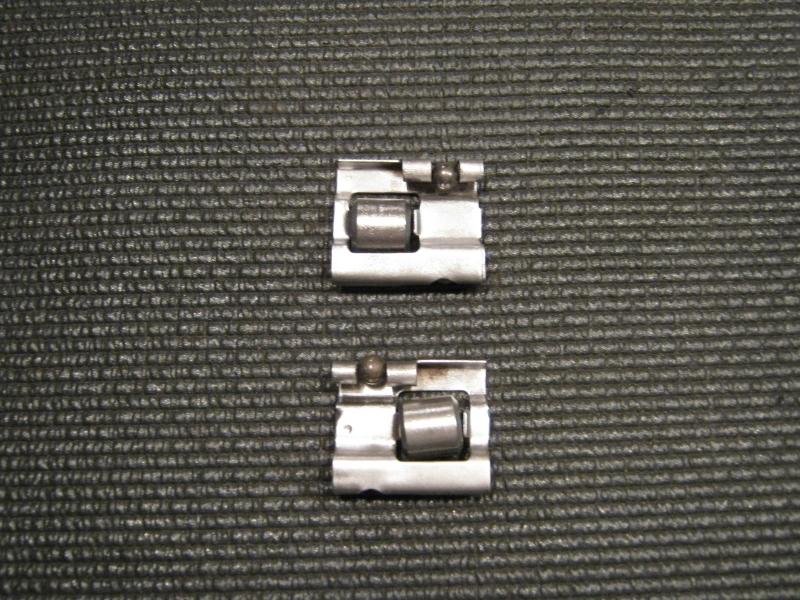
The third and forth pictures show the roller assemblies cleaned up and ready for use once again. I had to re-form the metal and clean and wire wheel them a bit but they look good and function nicely now so they should be ready to go back into service on this track.
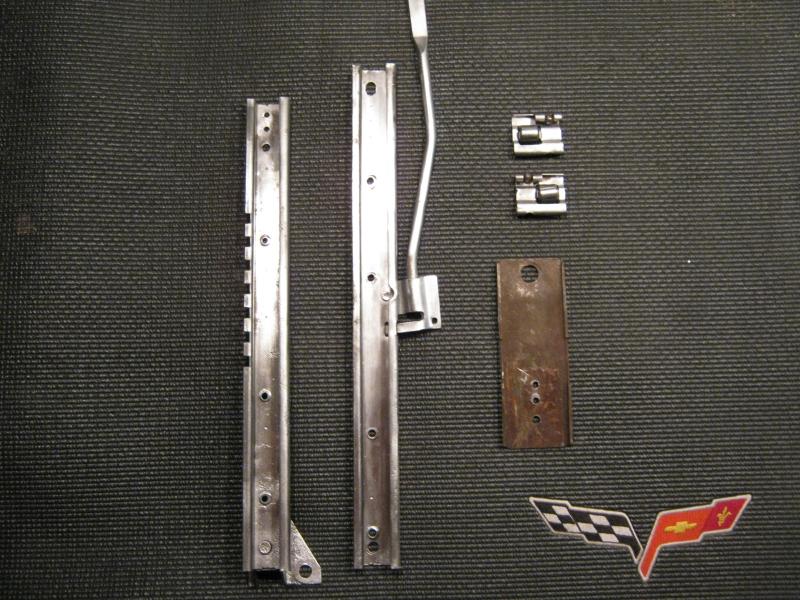
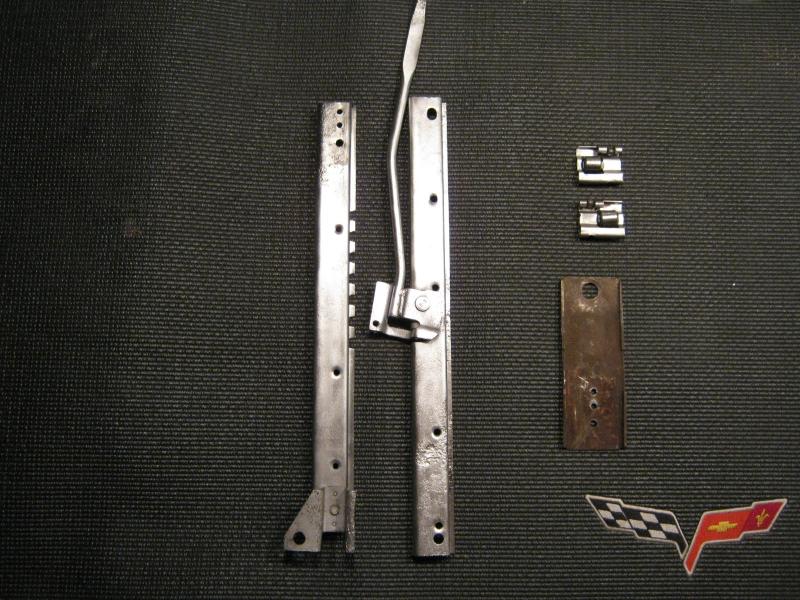
Here is the track after I wire wheel brushed it completely inside and out. I put the track halves together and flipped them so you could see the tracks sitting along side of the donor bracket and the roller guide clip assemblies.
You can see that I have smoothed the internal dimples so that they do not interfere with the roller assembly for putting them back together.
They actually cleaned up very nicely and I will determine whether to blast them inside and out, or just outside to smooth out the outer surface...I'll decide that tomorrow.
I have located what I believe to be a good solution for putting the brackets back together and I will share more on that soon. I spoke to the manufacturer of the solution parts today and they are sending me 100 in the mail which I will receive early next week. More on that soon.
Until then I hope you have enjoyed this thus far and stay tuned, we have more work to do.
David
I did not like the rotting steel I found on the front bracket so I removed it and have taken one of my tracks and have removed the same bracket from it as a donor to this set. The first two pictures show the front and back of the donor bracket which I will blast, wire brush and prime tomorrow.
The third and forth pictures show the roller assemblies cleaned up and ready for use once again. I had to re-form the metal and clean and wire wheel them a bit but they look good and function nicely now so they should be ready to go back into service on this track.
Here is the track after I wire wheel brushed it completely inside and out. I put the track halves together and flipped them so you could see the tracks sitting along side of the donor bracket and the roller guide clip assemblies.
You can see that I have smoothed the internal dimples so that they do not interfere with the roller assembly for putting them back together.
They actually cleaned up very nicely and I will determine whether to blast them inside and out, or just outside to smooth out the outer surface...I'll decide that tomorrow.
I have located what I believe to be a good solution for putting the brackets back together and I will share more on that soon. I spoke to the manufacturer of the solution parts today and they are sending me 100 in the mail which I will receive early next week. More on that soon.
Until then I hope you have enjoyed this thus far and stay tuned, we have more work to do.
David
04-21-2011, 11:25 PM
#30
Senior Member
Thread Starter
Member Since: Jan 2008
Location: Easton, PA
Posts: 12,154
Received 2,031 Likes
on
1,103 Posts
St. Jude Donor '10
I admire your devotion to detail with these tracks.
I've always taken the easiest route with them.
-soak in degreaser, thinner, gasoline whatever to disolve the old grease and crud.
-lubricate with good penetrant and hammer ends if necessary to free movement.
-degrease again, rinse and let dry.
-sandblast, moving the rails to try and get all areas inside and out.
-rinse with water and operate until all abrasive is gone.
-soak in phosphoric acid (OSPHO etc., a rust converter and paint prep)
-let drip dry on end
-paint liberally (inside) with semi rustoleum, turning end for end while operating mechanism (dipping would be a good alternative)
-let drip dry on end
-paint a nice semi finish coat on outside
-lube rollers, ***** while operating.
Always ended up operating at least as good as new
The mc chain lube is great. I've got some from the early 70's that is so sticky and stringy that it will pull a string about a foot long and won't run.
EP 140 gear lube works well too mixed with moly-d paste.
The best ep slow movement lubricant by far is Moly-d
Google and read it's characteristics.
CRC makes a dry spray moly-d that's pretty good. Here is some more variants like wire rope lube etc
http://www.tsmoly.com/catalog/produc...roducts_id=275
http://www.tsmoly.com/catalog/produc...products_id=89
Keep in mind that with the springy front mounts, the only contact inside the rails should be the rollers and ***** so any paint inside should remain.
Years ago when it was common and cheap I had some cad plated and it worked out well, perhaps some black oxide today would be a good choice too.
Have fun with the project.
I've always taken the easiest route with them.
-soak in degreaser, thinner, gasoline whatever to disolve the old grease and crud.
-lubricate with good penetrant and hammer ends if necessary to free movement.
-degrease again, rinse and let dry.
-sandblast, moving the rails to try and get all areas inside and out.
-rinse with water and operate until all abrasive is gone.
-soak in phosphoric acid (OSPHO etc., a rust converter and paint prep)
-let drip dry on end
-paint liberally (inside) with semi rustoleum, turning end for end while operating mechanism (dipping would be a good alternative)
-let drip dry on end
-paint a nice semi finish coat on outside
-lube rollers, ***** while operating.
Always ended up operating at least as good as new
The mc chain lube is great. I've got some from the early 70's that is so sticky and stringy that it will pull a string about a foot long and won't run.
EP 140 gear lube works well too mixed with moly-d paste.
The best ep slow movement lubricant by far is Moly-d
Google and read it's characteristics.
CRC makes a dry spray moly-d that's pretty good. Here is some more variants like wire rope lube etc
http://www.tsmoly.com/catalog/produc...roducts_id=275
http://www.tsmoly.com/catalog/produc...products_id=89
Keep in mind that with the springy front mounts, the only contact inside the rails should be the rollers and ***** so any paint inside should remain.
Years ago when it was common and cheap I had some cad plated and it worked out well, perhaps some black oxide today would be a good choice too.
Have fun with the project.
David
 04-22-2011, 06:24 PM
#32
Senior Member
Thread Starter
Member Since: Jan 2008
Location: Easton, PA
Posts: 12,154
Received 2,031 Likes
on
1,103 Posts
St. Jude Donor '10
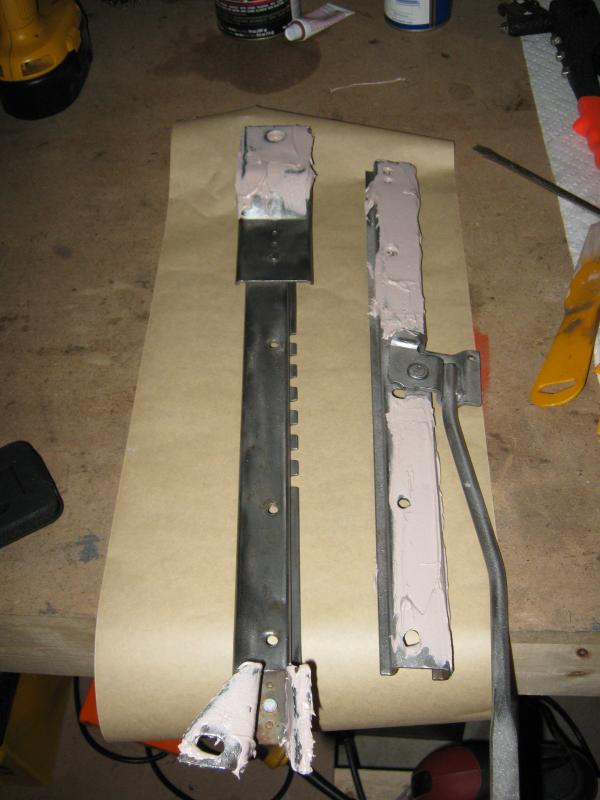
I wanted to do my best to take the remaining three donor tracks and do what I could to catch up to the first track that I started. I worked for about five hours today and though it doesn't look significant I did manage to get the other three tracks opened up, media blasted, wire brushed, and body filler applied. At the same time I finished the new donor front bracket and got it into primer. The first track set is in primer now as well and will stay at that point until the remaining tracks are in primer, which according to my schedule will be tomorrow.
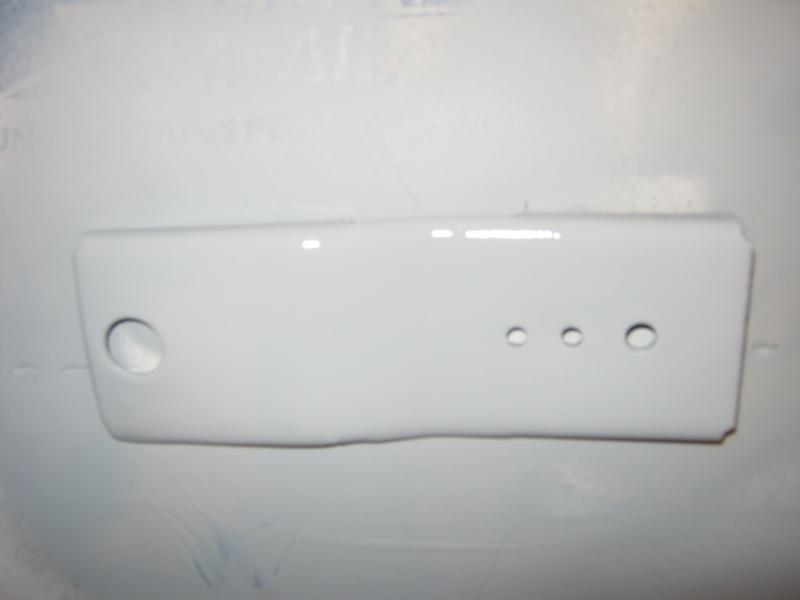
The first two pictures show my donor front bracket with filler and ready to prime.
The third and forth pictures are the priming of this bracket.

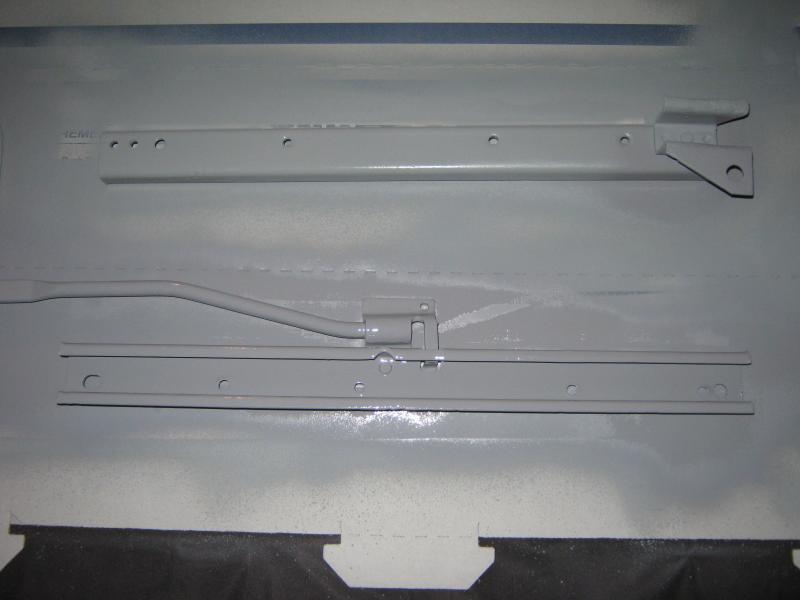
And the first bracket pair have been put in primer as well so I will show those here.
So lets move on to the other three brackets...
The first two pictures show my donor front bracket with filler and ready to prime.
The third and forth pictures are the priming of this bracket.
And the first bracket pair have been put in primer as well so I will show those here.
So lets move on to the other three brackets...
04-22-2011, 06:32 PM
#33
Senior Member
Thread Starter
Member Since: Jan 2008
Location: Easton, PA
Posts: 12,154
Received 2,031 Likes
on
1,103 Posts
St. Jude Donor '10
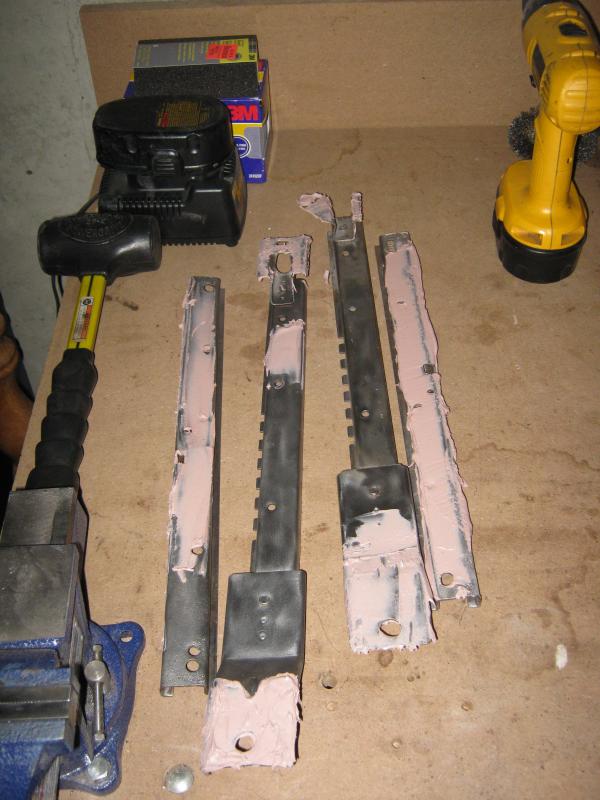
Here are the other three bracket sets having just been drilled and then opened up to see the inside of the tracks.
Picture one is the set drilled. Picture two is the brackets side by side.
Picture three is two of the the last three brackets. Both had been media blasted, the left one has also been wire brushed after media blasting. I wanted to show the difference in the look after the second step takes place.
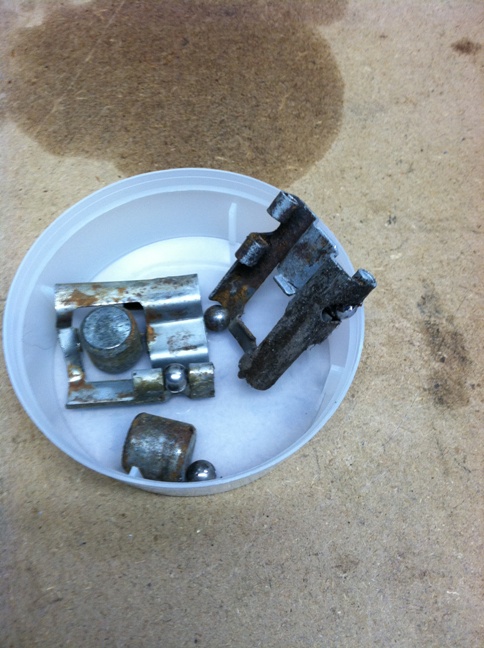
And here are the internal track clips, rollers and ball bearings.
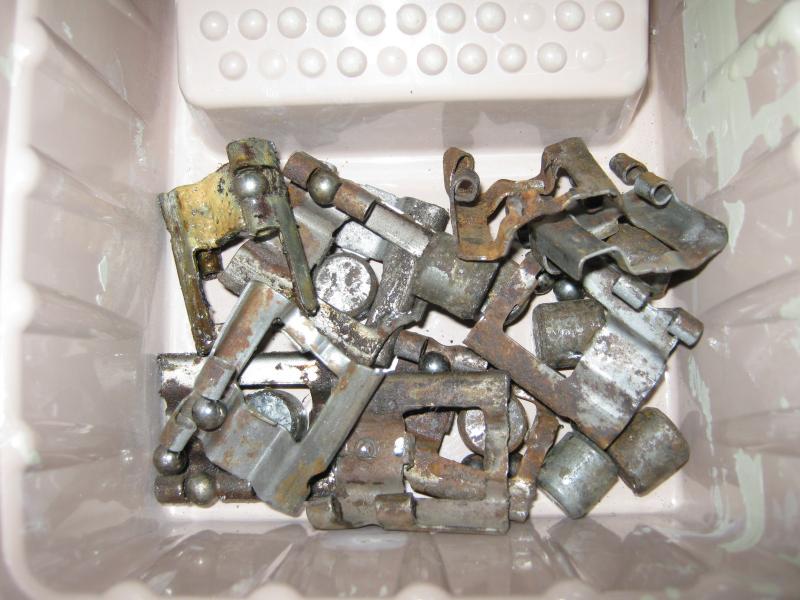
These are in various shapes from rusty, to greasy, to bent. I'll have my work cut out for me with these but first I will soak them overnight in Simple Green, full strength.
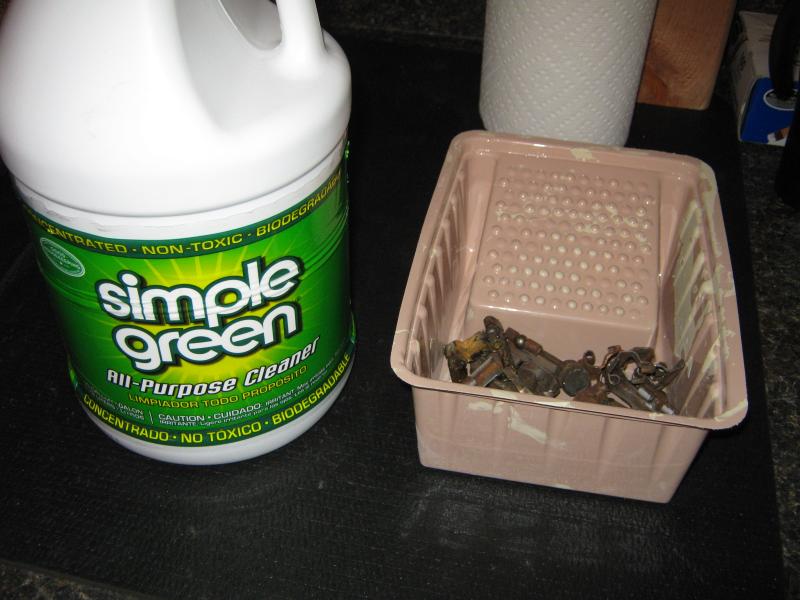
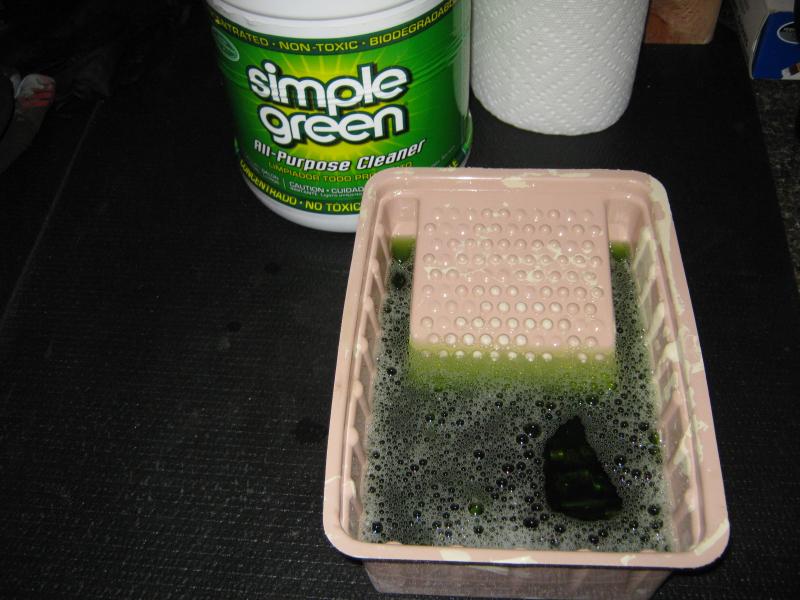
I did this with the previous parts and it worked really well so why not let these take a nice bath and see if we can get the process moving for tomorrow.
Picture one is the set drilled. Picture two is the brackets side by side.
Picture three is two of the the last three brackets. Both had been media blasted, the left one has also been wire brushed after media blasting. I wanted to show the difference in the look after the second step takes place.
And here are the internal track clips, rollers and ball bearings.
These are in various shapes from rusty, to greasy, to bent. I'll have my work cut out for me with these but first I will soak them overnight in Simple Green, full strength.
I did this with the previous parts and it worked really well so why not let these take a nice bath and see if we can get the process moving for tomorrow.
04-22-2011, 06:37 PM
#34
Senior Member
Thread Starter
Member Since: Jan 2008
Location: Easton, PA
Posts: 12,154
Received 2,031 Likes
on
1,103 Posts
St. Jude Donor '10
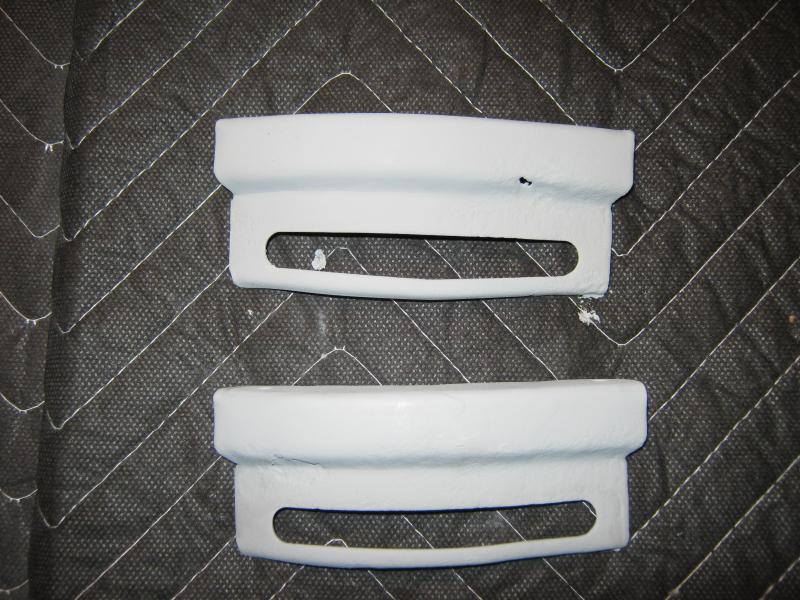
This is a short posting and the last one for tonight. The tracks are not really a cosmetic item but I wanted them to look as nice as I could given my limited body work knowledge so I took the tracks that had quite a bit of surface pitting and decided to see if we could make them look nice by filling in the low spots (not very deep actually) with body filler and then sand this out smoothly in the morning.
I got all the parts coated before the filler set up but I had to work fast. I used this on the front guides and it came out nice, so I thought I woud try it here as well. I will update this with pictures tomorrow as I move to get all the tracks to the primer stage tomorrow.
Thanks for watching.
David
04-23-2011, 03:38 AM
#35
Burning Brakes

G'day David,
Nice thread, very informative. I had mine acid dipped and zinc plated. When I got them back, I poked some Timken hi temp premium red wheel bearing grease into the track on the tip of a screwdriver while the track was at its extremes of travel. They work smooth as a babies bum.
Nice thread, very informative. I had mine acid dipped and zinc plated. When I got them back, I poked some Timken hi temp premium red wheel bearing grease into the track on the tip of a screwdriver while the track was at its extremes of travel. They work smooth as a babies bum.
04-23-2011, 07:22 AM
#36
Senior Member
Thread Starter
Member Since: Jan 2008
Location: Easton, PA
Posts: 12,154
Received 2,031 Likes
on
1,103 Posts
St. Jude Donor '10
G'day David,
Nice thread, very informative. I had mine acid dipped and zinc plated. When I got them back, I poked some Timken hi temp premium red wheel bearing grease into the track on the tip of a screwdriver while the track was at its extremes of travel. They work smooth as a babies bum.
Nice thread, very informative. I had mine acid dipped and zinc plated. When I got them back, I poked some Timken hi temp premium red wheel bearing grease into the track on the tip of a screwdriver while the track was at its extremes of travel. They work smooth as a babies bum.
 04-23-2011, 08:34 AM
#37
Team Owner

Member Since: Sep 2006
Location: Westminster Maryland
Posts: 30,173
Likes: 0
Received 2,878 Likes
on
2,515 Posts
Hi David,
Nice, thorough work.
Lot's of very interesting pictures and information again!!! Some parts I've never seen before since I never saw a track taken apart
Until you started to fill the pitting I was hoping you might decide to re-plate the bases and 'feet' like the originals. It gives a nice 'industrial' look that's seen when you slide the seat all the way forward or rearward.
Regards,
Alan
Since the tracks were dated, can you find any date correlation to the configuration variations your seeing?
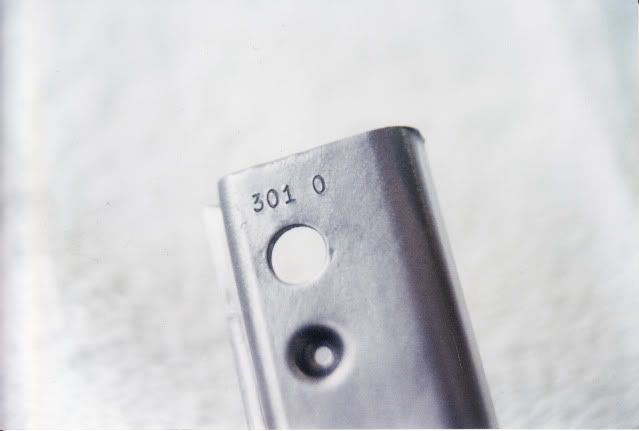
Maganese Phosphate Plating (Parkerizing)
Nice, thorough work.
Lot's of very interesting pictures and information again!!! Some parts I've never seen before since I never saw a track taken apart
Until you started to fill the pitting I was hoping you might decide to re-plate the bases and 'feet' like the originals. It gives a nice 'industrial' look that's seen when you slide the seat all the way forward or rearward.
Regards,
Alan
Since the tracks were dated, can you find any date correlation to the configuration variations your seeing?
Maganese Phosphate Plating (Parkerizing)
04-23-2011, 08:47 AM
#38
Senior Member
Thread Starter
Member Since: Jan 2008
Location: Easton, PA
Posts: 12,154
Received 2,031 Likes
on
1,103 Posts
St. Jude Donor '10
Hey Alan. Not really restoring these tracks back to the original look, but rather taking tracks headed for the rubbish bin and trying to bring them back into service capable. The pitting on these parts was bad on two, pretty good on one, and rusted through on one. I will re-install the front bracket on with a part from one of my tracks and will use hex head screw and lock nut to hold it in place. I would never open up a track that was true and original and of high value for NCRS like your tracks, wouldn't want to damage them. What grease are you using in your tracks Alan? Looks to be substantial and pretty viscous. Have you had good success with it?
Edit: I forgot to answer your question on the date coding. Some of these do have date codes, I'll try to document that as well as I had intended to, just got caught up in the work.
Thanks for sharing.
David
Edit: I forgot to answer your question on the date coding. Some of these do have date codes, I'll try to document that as well as I had intended to, just got caught up in the work.
Thanks for sharing.
David
04-23-2011, 09:21 AM
#39
Team Owner

Firstly, may I say thank you for a very informative thread. An awful lot of work goes into your restoration work as well as its documentation. I am sure many on the Forum appreciate your efforts.
When I redid my 1974 seats in 2008 I simply cleaned the tracks, hit them with some semi-gloss rust paint, and lubed them where it seemed appropriate (or even where not). I don't recall, or did not look for, rollers and *****. I didn't know they were there! A bit of a careless approach.
All has worked well since although the driver's seat never gets moved. Perhaps I should "exercise" it a bit more.
Thanks again!
04-23-2011, 09:36 AM
#40
Senior Member
Thread Starter
Member Since: Jan 2008
Location: Easton, PA
Posts: 12,154
Received 2,031 Likes
on
1,103 Posts
St. Jude Donor '10
Firstly, may I say thank you for a very informative thread. An awful lot of work goes into your restoration work as well as its documentation. I am sure many on the Forum appreciate your efforts.
When I redid my 1974 seats in 2008 I simply cleaned the tracks, hit them with some semi-gloss rust paint, and lubed them where it seemed appropriate (or even where not). I don't recall, or did not look for, rollers and *****. I didn't know they were there! A bit of a careless approach.
All has worked well since although the driver's seat never gets moved. Perhaps I should "exercise" it a bit more.
Thanks again!
When I redid my 1974 seats in 2008 I simply cleaned the tracks, hit them with some semi-gloss rust paint, and lubed them where it seemed appropriate (or even where not). I don't recall, or did not look for, rollers and *****. I didn't know they were there! A bit of a careless approach.
All has worked well since although the driver's seat never gets moved. Perhaps I should "exercise" it a bit more.
Thanks again!
David