
The Inner Workings of Seat Tracks - Post 1 of 3
 04-23-2011, 09:54 AM
#41
Team Owner


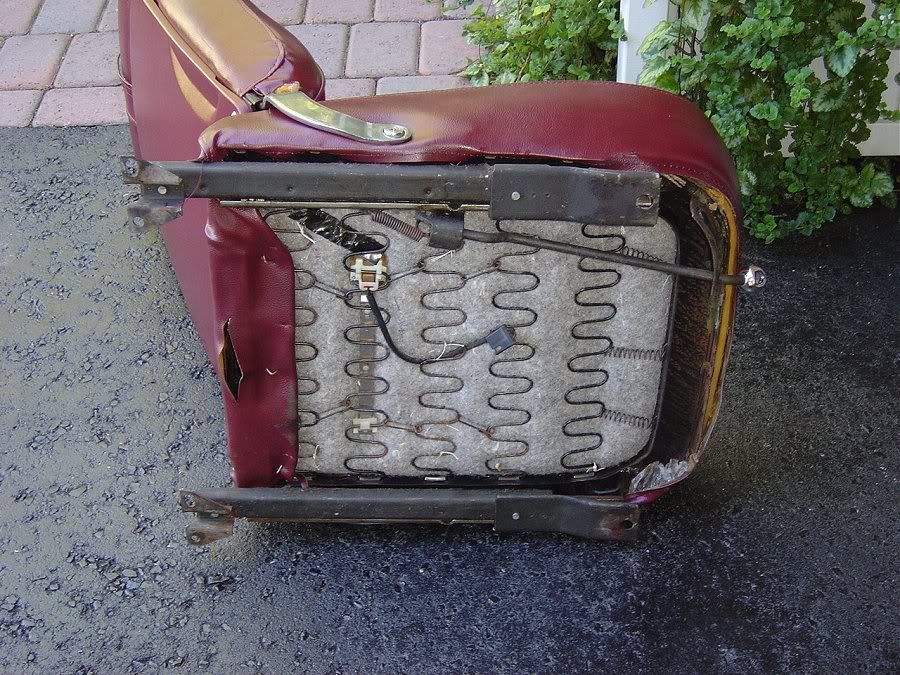
You might enjoy seeing a 1974 seat with the seat belt interlock wiring/sensor. A one-year only abomination legislated out of existence by the US government mid-1975. This is pre-restoration and the tracks were in pretty fair condition. The floor bolts are came out nicely and went back in with anti-seize.
 04-23-2011, 10:16 AM
#42
Senior Member


Thread Starter
Member Since: Jan 2008
Location: Easton, PA
Posts: 12,154
Received 2,031 Likes
on
1,103 Posts
St. Jude Donor '10

Thank you Paul, your picture confirms the rear track on the 74 for me AND you just confirmed the mix of grooved front track bracket and flat track bracket installed on the 74 too, so thank you for that picture. I am taking a break from the tracks for this morning and headed out to do some birthday shopping with my Sears Tools Gift card. There must be something at Sears in the form of tools that I need.  Almost always is.
More on the tracks tonight, when I get back I intend to jump back in and hope to have all the four tracks done in paint by the end of the weekend. I am awaiting my rivets which will be next week. I'll explain what I am looking at then to all, work or not, you will see it here.
Thanks for watching and commenting folks, nice to know you like the show.
Have a good Saturday.
David
Almost always is. More on the tracks tonight, when I get back I intend to jump back in and hope to have all the four tracks done in paint by the end of the weekend. I am awaiting my rivets which will be next week. I'll explain what I am looking at then to all, work or not, you will see it here.
Thanks for watching and commenting folks, nice to know you like the show.
Have a good Saturday.
David
04-23-2011, 10:22 AM
#43
Senior Member
Thread Starter
Member Since: Jan 2008
Location: Easton, PA
Posts: 12,154
Received 2,031 Likes
on
1,103 Posts
St. Jude Donor '10
74 tracks from a picture posted by Paul 74 shows the detail of the correct rear brackets and the flat correct front brackets for this car.
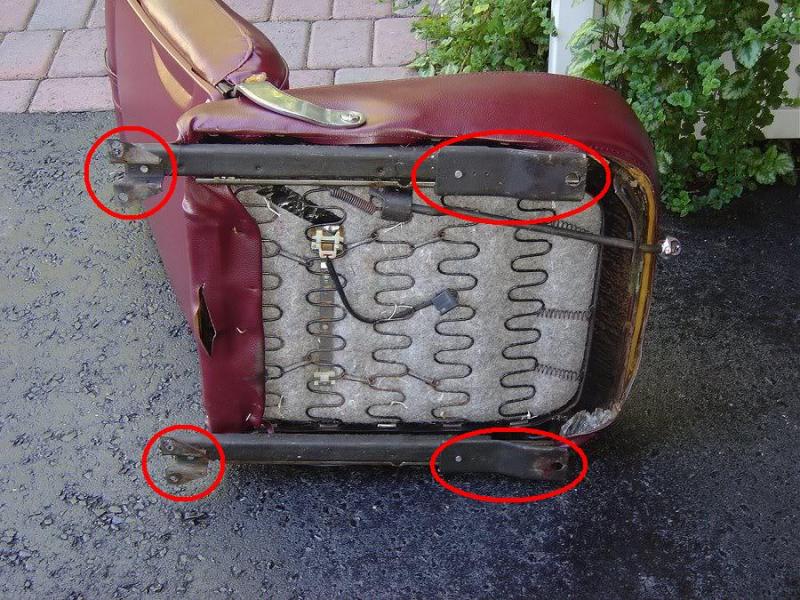
Why you ask? Because I am trying to identify the tracks I have here and this set just helped clear up a single mystery for me, so thank you again Paul. Much appreciated.
Why you ask? Because I am trying to identify the tracks I have here and this set just helped clear up a single mystery for me, so thank you again Paul. Much appreciated.
04-23-2011, 11:15 AM
#44
Melting Slicks


Impressive documentation. thanks....
This will assist me as I would like to consider a fire extinguisher mount for teh front area of the seat. I want one that connects to the seat itself or moving portion of the seat track so that the seat can still be moved forward and backwards.
Good job - and thanks again.

This will assist me as I would like to consider a fire extinguisher mount for teh front area of the seat. I want one that connects to the seat itself or moving portion of the seat track so that the seat can still be moved forward and backwards.
Good job - and thanks again.
04-23-2011, 04:43 PM
#45
Senior Member
Thread Starter
Member Since: Jan 2008
Location: Easton, PA
Posts: 12,154
Received 2,031 Likes
on
1,103 Posts
St. Jude Donor '10
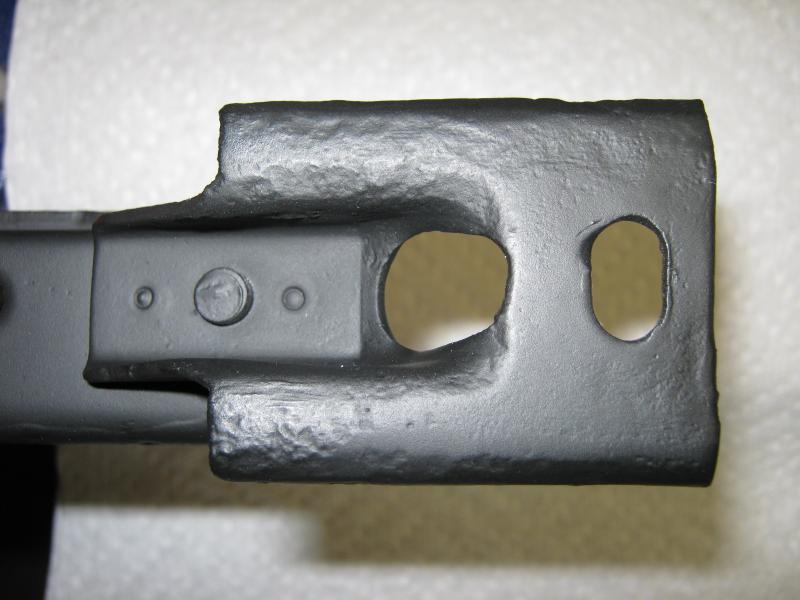
Glad you like it sir. I was thinking about what you were suggesting and if you could mount a bracket to the two outermost holes you should be able to go straight out, then down, with a bracket and mount the fire extinguisher bracket to it. I am speaking of these two holes here.
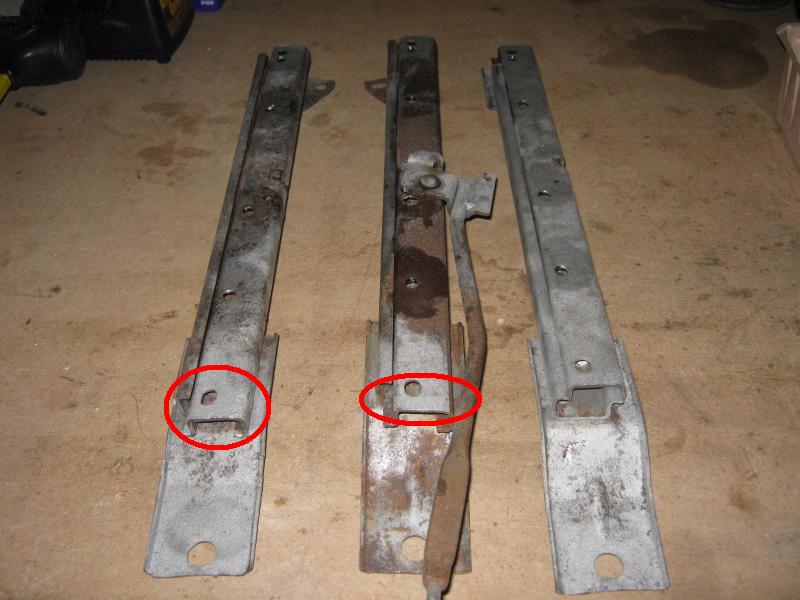
Not positive, but it seems logical to me. Let me know what you come up with, sounds interesting.
David
Not positive, but it seems logical to me. Let me know what you come up with, sounds interesting.
David
04-23-2011, 04:51 PM
#46
Melting Slicks
Hi David...
Yes - and your pics are just what I needed....
But I do think it will work - maybe a flat 'T' pattern bracket. Will keep you all posted. Keep going on your thread.
Yes - and your pics are just what I needed....
But I do think it will work - maybe a flat 'T' pattern bracket. Will keep you all posted. Keep going on your thread.
04-23-2011, 07:30 PM
#47
Senior Member
Thread Starter
Member Since: Jan 2008
Location: Easton, PA
Posts: 12,154
Received 2,031 Likes
on
1,103 Posts
St. Jude Donor '10
I am flat out beat tonight so I will only post one series of six pictures and will continue tomorrow after some rest. Today was a messy but productive day. Let me begin by saying never again will I put body filler on a track. It helped in some areas, caused huge issues in other areas, and the mess from cleaning it up took me two hours to clean. Like I said, never again, from now on I will either grind on them a little or just consider the blemishes as honor marks.
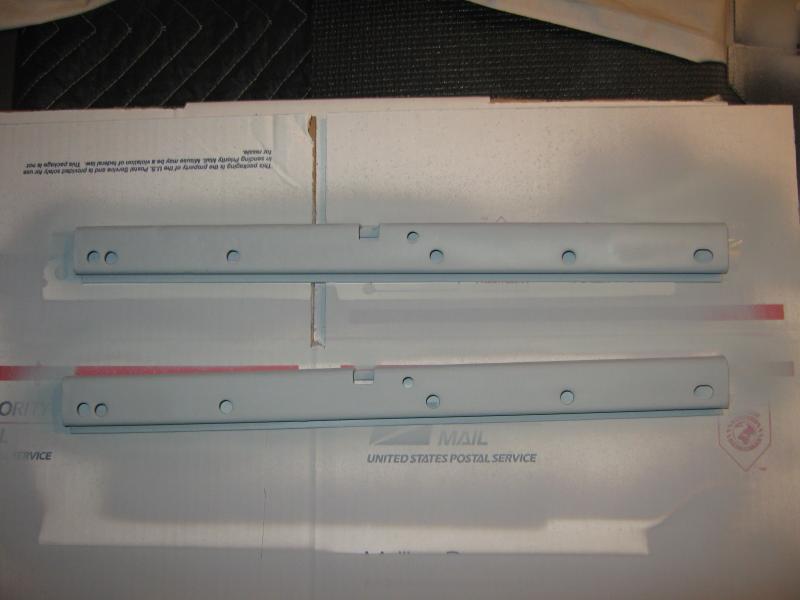
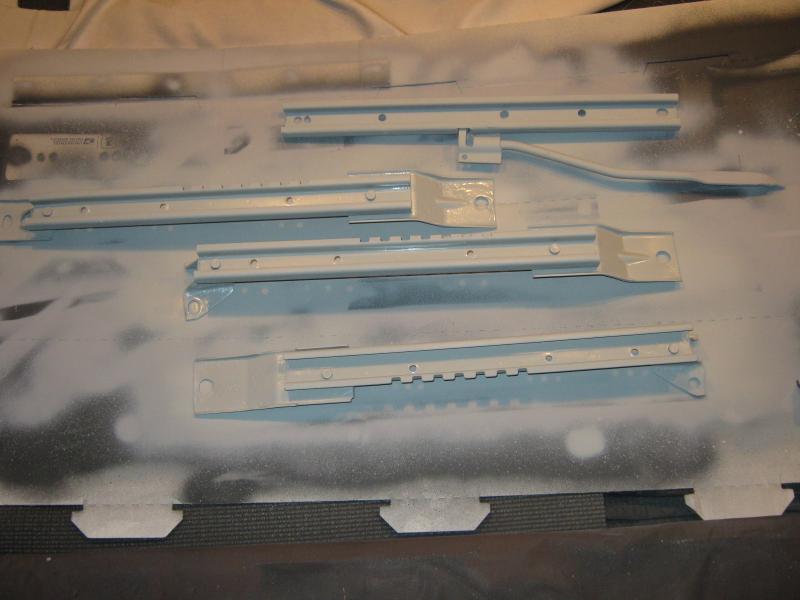
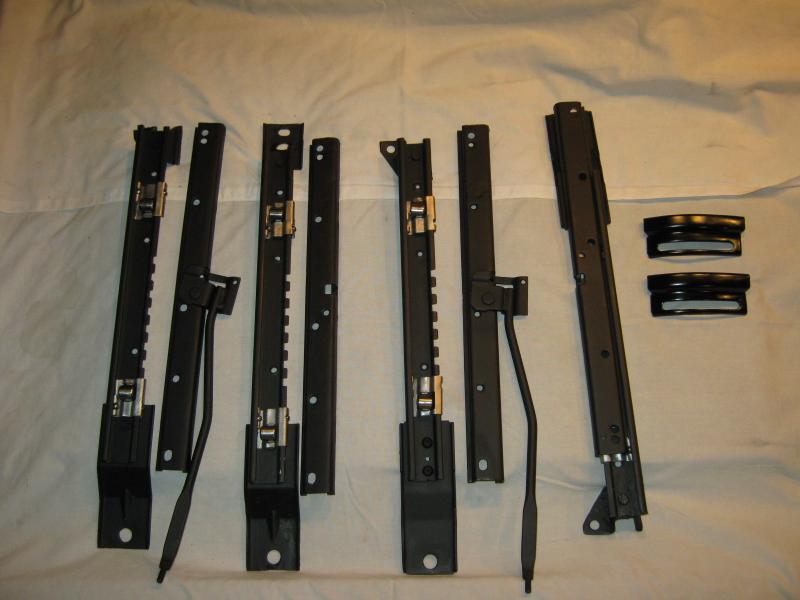
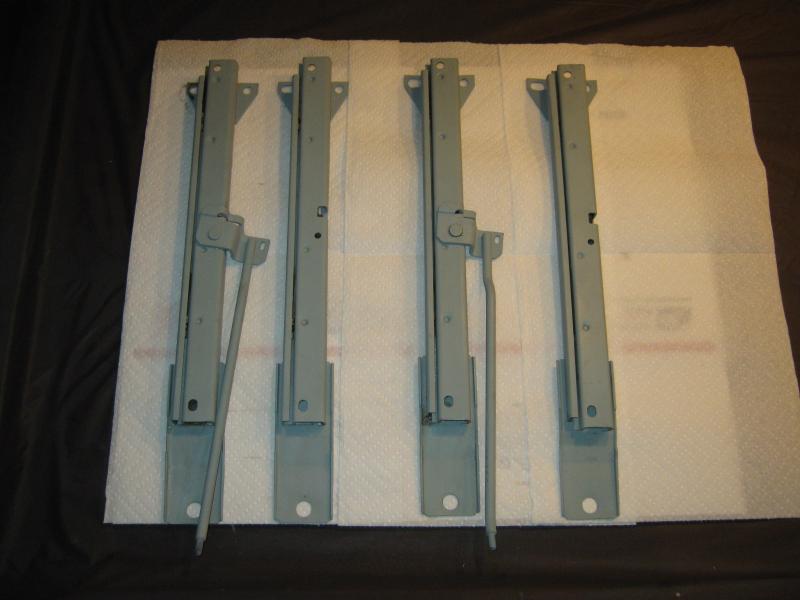
That being said I did manage to get the three remaining tracks cleaned, buffed, and in primer today. They will spend the night in a nice warm area drying. Here are two pictures of the parts in primer.
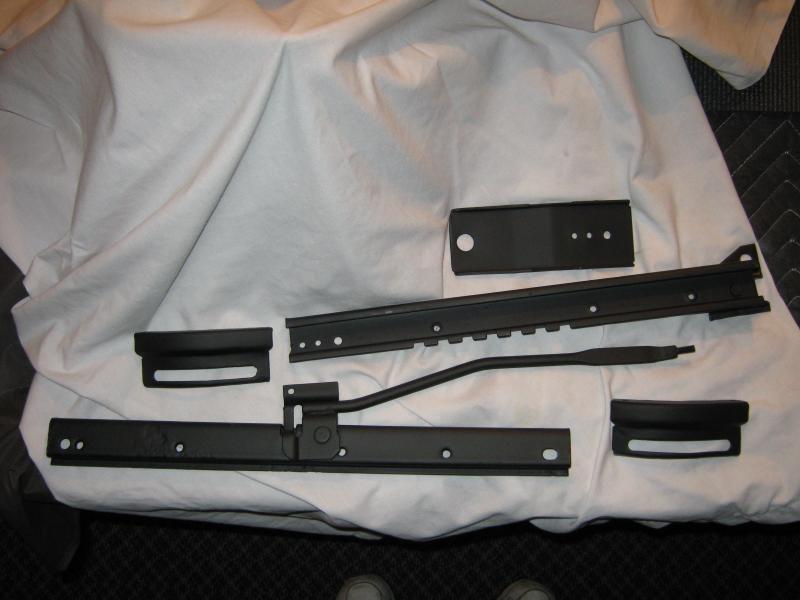
And here is a picture of the first track set which I managed to get in paint today. I got both halves of the track, the front bracket, and the two guides done and in paint.
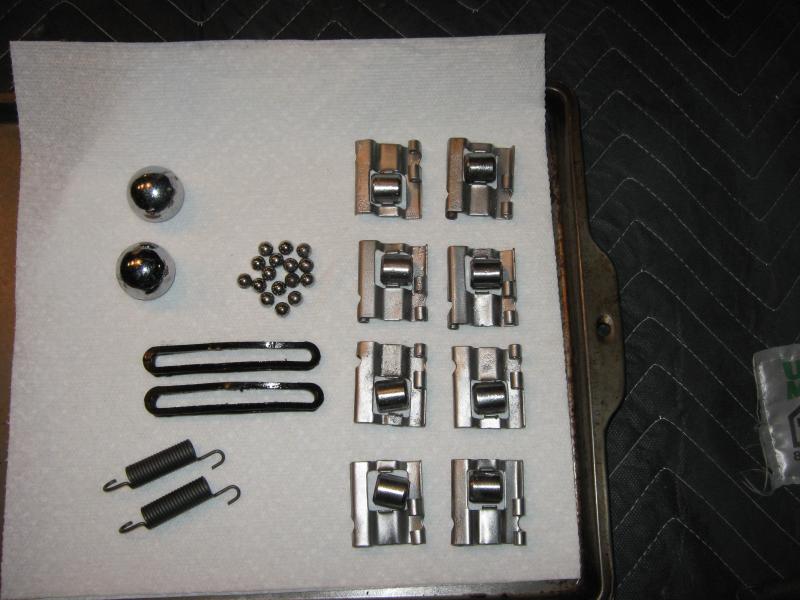
And here lined up and ready for service are the eight (8) spring clip roller brackets; the sixteen (ball bearings), and the eight (8) roller bearings. Also you will see two new seat adjuster springs and the original chrome coated handles and the plastic liners for the guides. I have some minor adjustments to make to these parts but they are cleaned, polished, straightened, and ready for service.
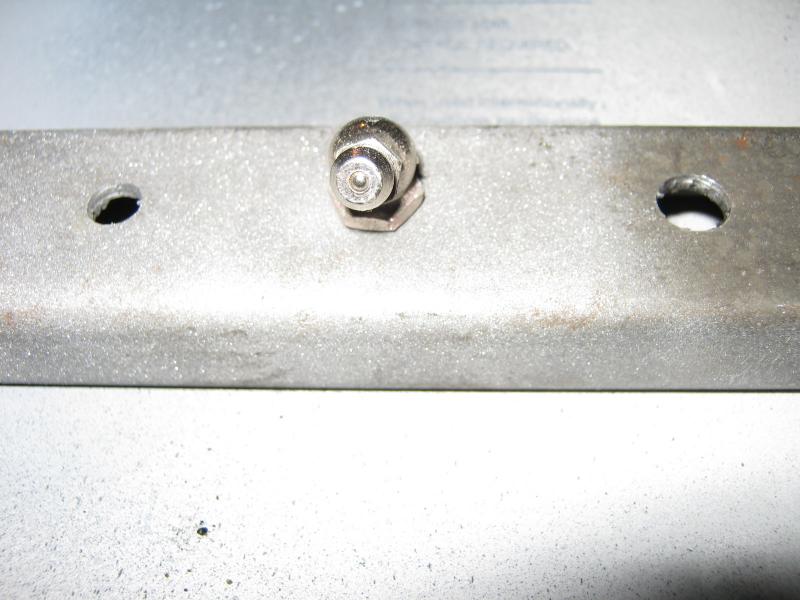
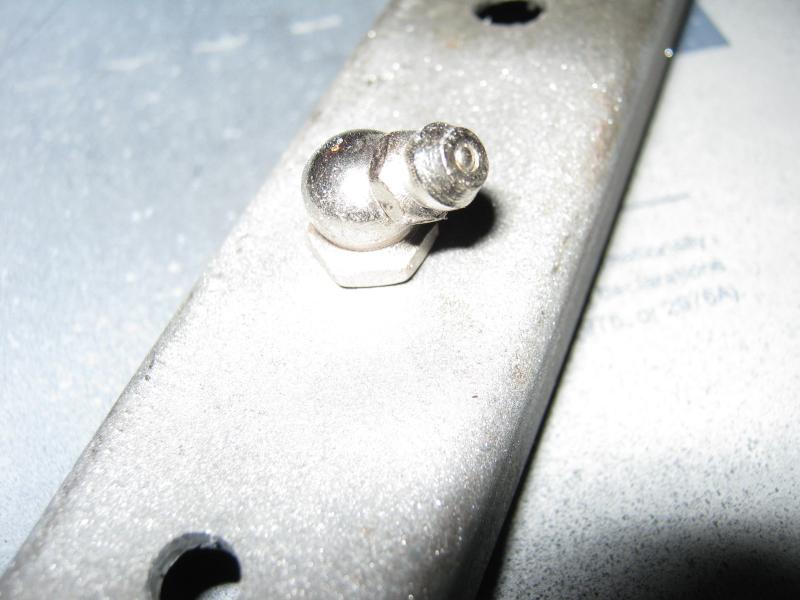
I also had a little time to try my theory on greasing the tracks in the future. I purchased some Zerk fittings, then drilled and tapped a hole on the top portion of the top track rail, then threaded the Zerk into position. Holds nicely. Not sure if we will use this method in the future but it appears to be an option where the dimples used to be. We will confirm this before long.
So not many pictures but one heck of a long day and I am glad to have the parts in primer and on their way tomorrow to completion, at least until my rivets arrive. I'll explain that tomorrow, I'm hungry and need to find something to eat. Have a great Sunday to you all and stay tuned.
David
04-24-2011, 11:33 PM
#48
Senior Member
Thread Starter
Member Since: Jan 2008
Location: Easton, PA
Posts: 12,154
Received 2,031 Likes
on
1,103 Posts
St. Jude Donor '10
Good day again today with family and little bits of work on the tracks that I wanted to share with you all. I can see the finish line approaching and it feels pretty good.
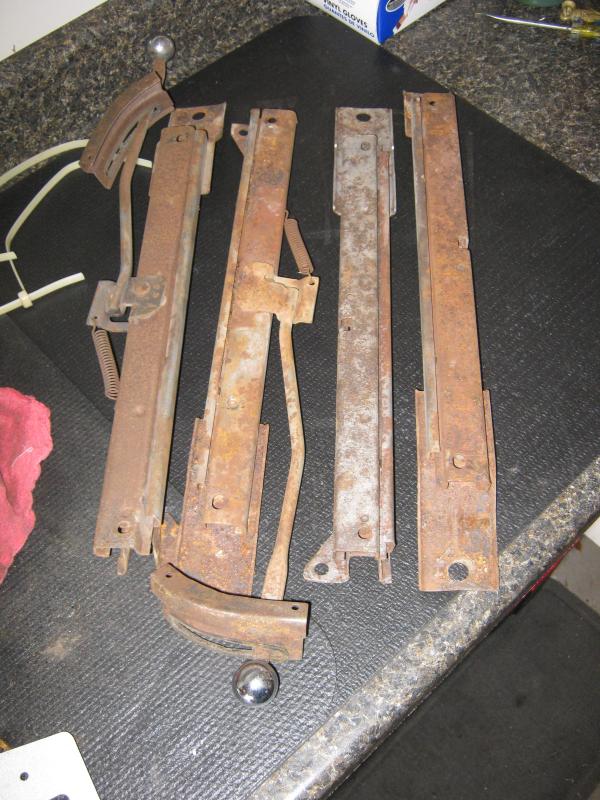
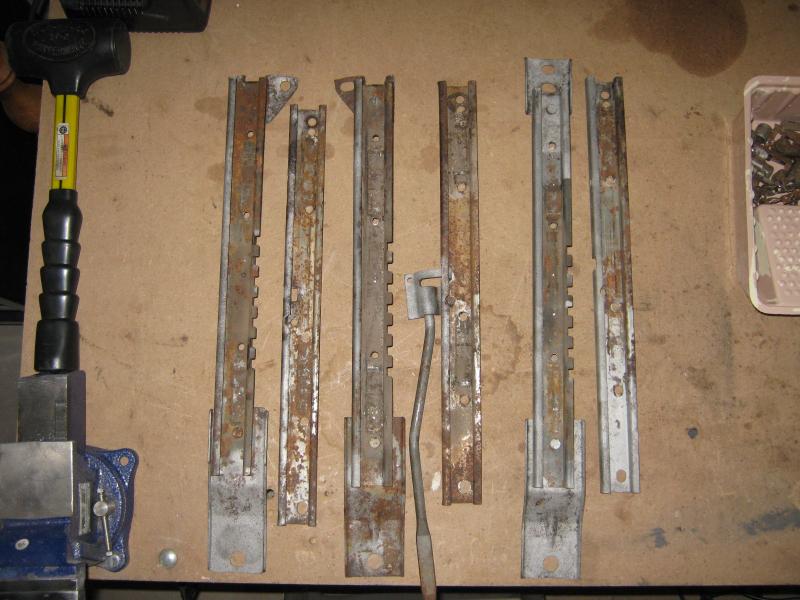
As a reminder, this was my starting point about two weeks ago.
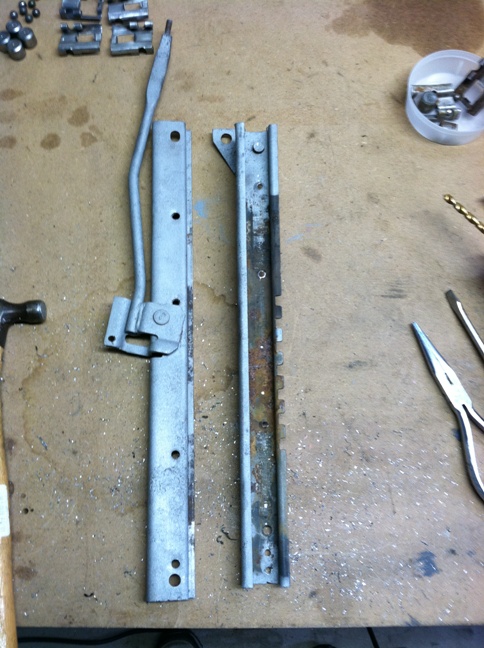
This is a picture taken of the first track through the process. I had to remove the front bracket because it had rusted through as you may remember. I'll show you it repaired in the second of two posts tonight.
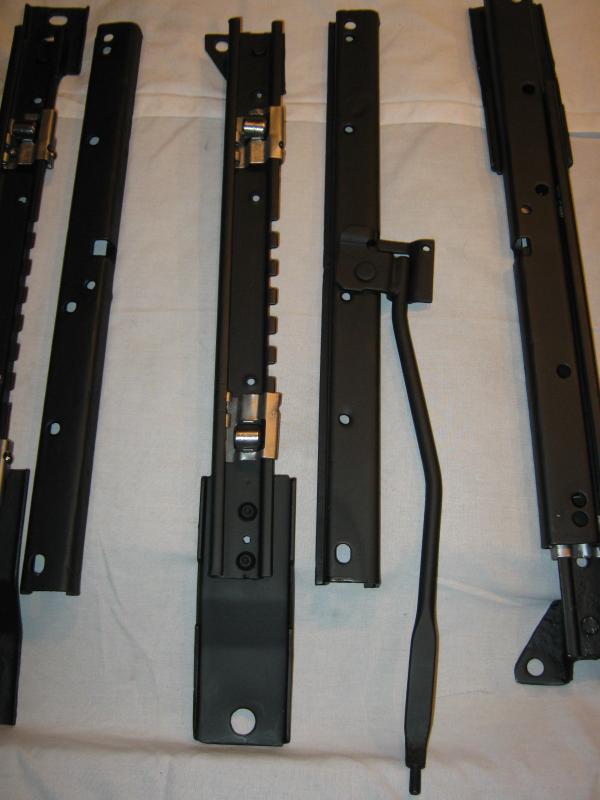
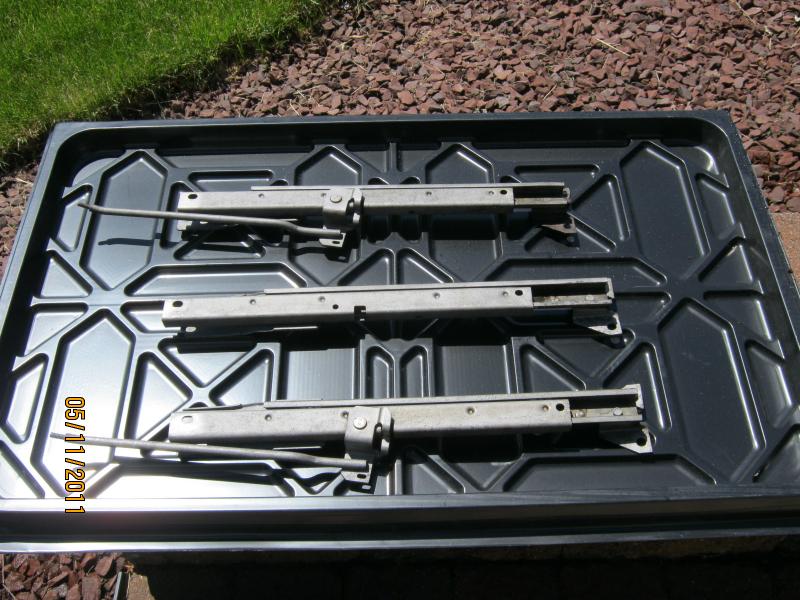
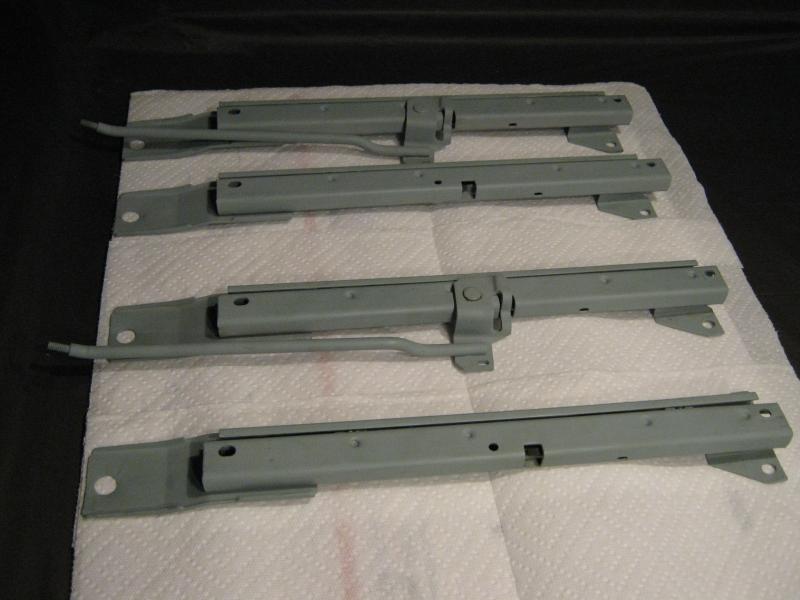
Here are the tracks as they stand right now.
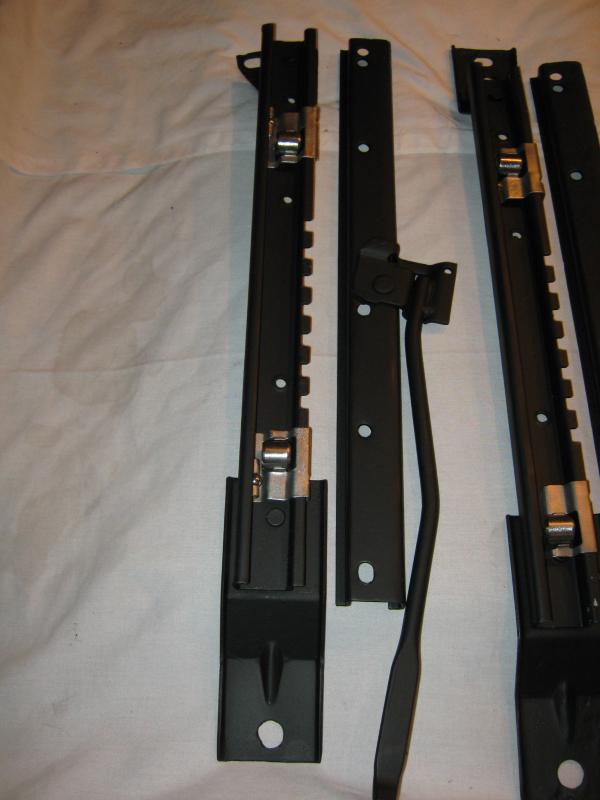
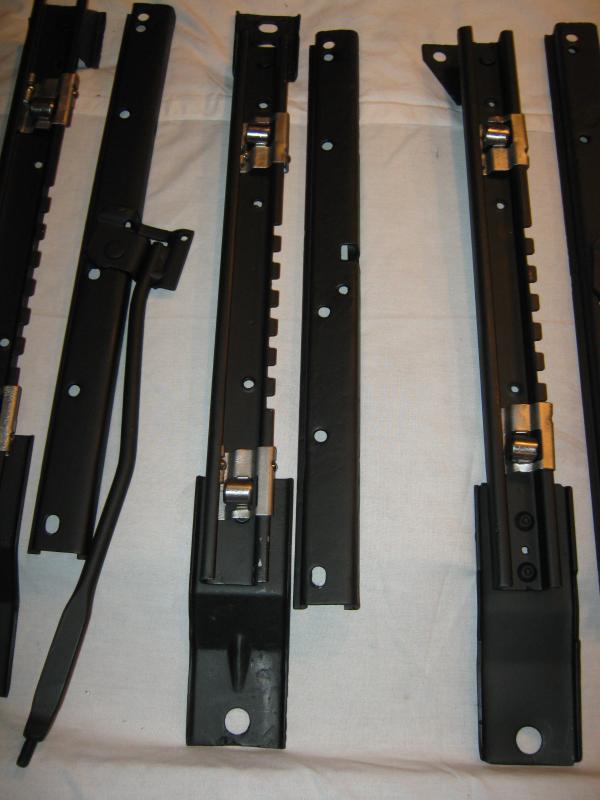
I call this the second group through shot.
And here they are lined up next to the guides which I will cover in the second posting.
All roller clips are adjusted and functioning well. All ball bearings are in now and working well. I have not slid them together yet because a paint decision is needed by the owner of the tracks. Flat black as shown now on the tracks, or semi-gloss black as shown on the guides.
More on posting two shortly. What do you think thus far?
David
As a reminder, this was my starting point about two weeks ago.
This is a picture taken of the first track through the process. I had to remove the front bracket because it had rusted through as you may remember. I'll show you it repaired in the second of two posts tonight.
Here are the tracks as they stand right now.
I call this the second group through shot.
And here they are lined up next to the guides which I will cover in the second posting.
All roller clips are adjusted and functioning well. All ball bearings are in now and working well. I have not slid them together yet because a paint decision is needed by the owner of the tracks. Flat black as shown now on the tracks, or semi-gloss black as shown on the guides.
More on posting two shortly. What do you think thus far?
David
04-24-2011, 11:49 PM
#49
Senior Member
Thread Starter
Member Since: Jan 2008
Location: Easton, PA
Posts: 12,154
Received 2,031 Likes
on
1,103 Posts
St. Jude Donor '10
On this second posting I just wanted to show you before and after pictures of some of the parts of this makeover.
This is the first track through that had rusted through on the front bracket. I removed the old bracket and used a donor track front bracket as a replacement. I assembled the front bracket using two grade eight 1/4" bolts and lock screws on the underside of the track. The angle of the track prevents the bolts from hitting.
A closer view shows the two bolts placed and the finished front bracket repaired. Came out pretty nice I think. The bolts do not prevent putting the spring clip in place but once you put the roller ball in the assembly it cannot move forward of the bolt head, which works as it was intended.
So there you have it, we now await the arrival of our drive style blind rivets for installation when the tracks are put back together and finished. Then touch up paint, and a photo shoot before shipping them back to their owner in Florida. Should be back in his hands by next weekend if all goes well.
Thanks for watching and stay tuned for more soon.
David
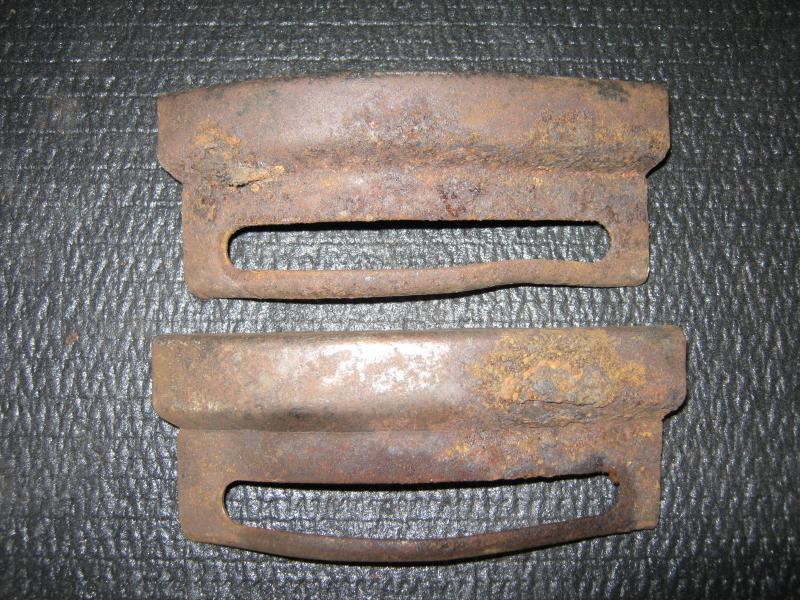
These were the front guides that came with the tracks. Both had damage and one of them was rusted through.
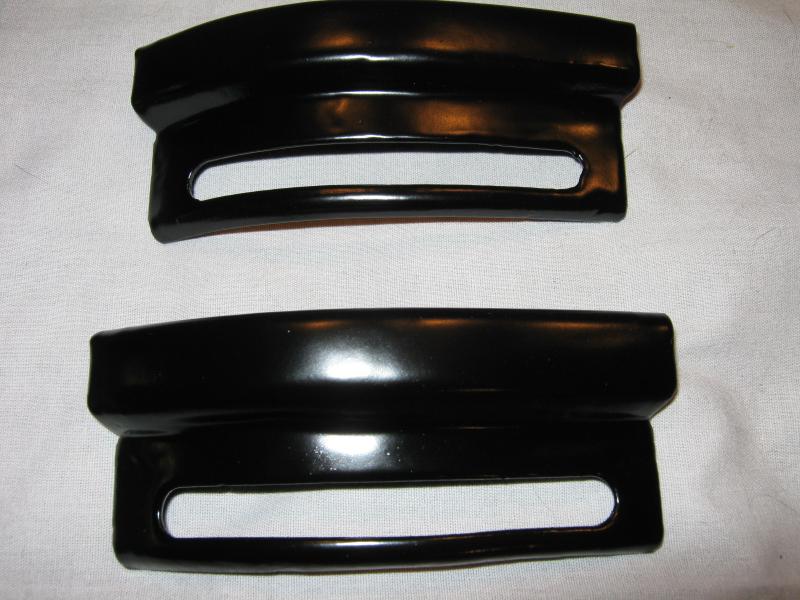
I think they look much better now and would be glad to put these on my 71 project car, but will remove mine and give them this same treatment now that I see how these came out. Mine are nice, these are nicer. I also used a semi-gloss black on the brackets to see how the owner liked this look versus the flat black. His call, if he wants all flat, flat they will be, and I'll apply a final clear coat flat. If he wants all semi-gloss, then I will apply a semi-gloss clear coat over the black.
These were the spring clips, roller bearings and roller ***** removed from the tracks.
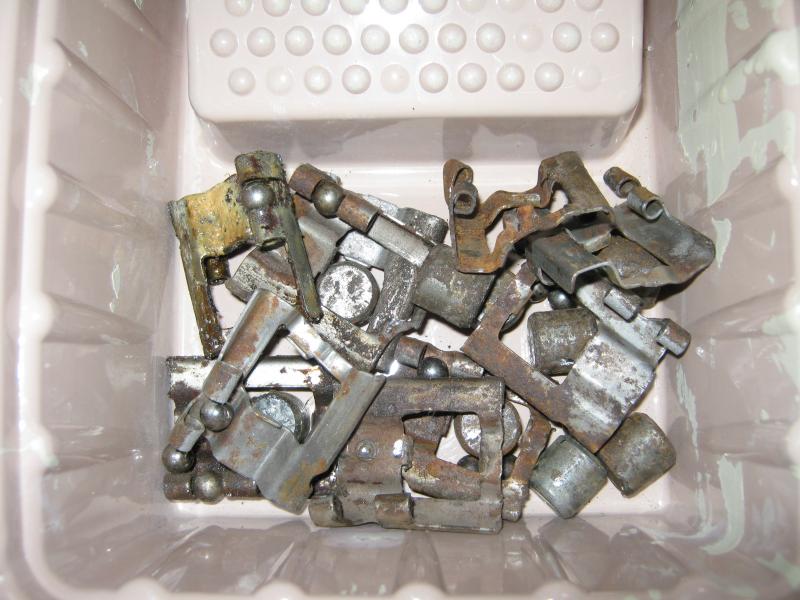
And these are from yesterday before begining to adjust final fit and function. Easy to install no, but once installed correctly they move freely. Lubrication will help as well as a hard clear coat finishing coat.

This is the first track through that had rusted through on the front bracket. I removed the old bracket and used a donor track front bracket as a replacement. I assembled the front bracket using two grade eight 1/4" bolts and lock screws on the underside of the track. The angle of the track prevents the bolts from hitting.
A closer view shows the two bolts placed and the finished front bracket repaired. Came out pretty nice I think. The bolts do not prevent putting the spring clip in place but once you put the roller ball in the assembly it cannot move forward of the bolt head, which works as it was intended.
So there you have it, we now await the arrival of our drive style blind rivets for installation when the tracks are put back together and finished. Then touch up paint, and a photo shoot before shipping them back to their owner in Florida. Should be back in his hands by next weekend if all goes well.
Thanks for watching and stay tuned for more soon.
David
These were the front guides that came with the tracks. Both had damage and one of them was rusted through.
I think they look much better now and would be glad to put these on my 71 project car, but will remove mine and give them this same treatment now that I see how these came out. Mine are nice, these are nicer. I also used a semi-gloss black on the brackets to see how the owner liked this look versus the flat black. His call, if he wants all flat, flat they will be, and I'll apply a final clear coat flat. If he wants all semi-gloss, then I will apply a semi-gloss clear coat over the black.
These were the spring clips, roller bearings and roller ***** removed from the tracks.
And these are from yesterday before begining to adjust final fit and function. Easy to install no, but once installed correctly they move freely. Lubrication will help as well as a hard clear coat finishing coat.
04-25-2011, 08:47 AM
#50


Dave,
I just read the entire POST! The transformation is incredible.
As a tribute to you, your desire to learn and freely share the information, I'm donating the Seat Tracks to you with the intention you sell them for the highest price possible so you can purchase any needed equipment/supplies.
I'm delighted to have been part of your project.........
And BTW I have another set of tracks that need a little love and you can use them to further hone your skills.
TI
04-25-2011, 10:46 AM
#51
Senior Member
Thread Starter
Member Since: Jan 2008
Location: Easton, PA
Posts: 12,154
Received 2,031 Likes
on
1,103 Posts
St. Jude Donor '10
Thank you TI, this is a very generous offer and I appreciate it very much.
I know that these parts came from a 1975 or 1976 parts car so I think I will replace the one odd ball in the group and make it fit with the theme of the other tracks.
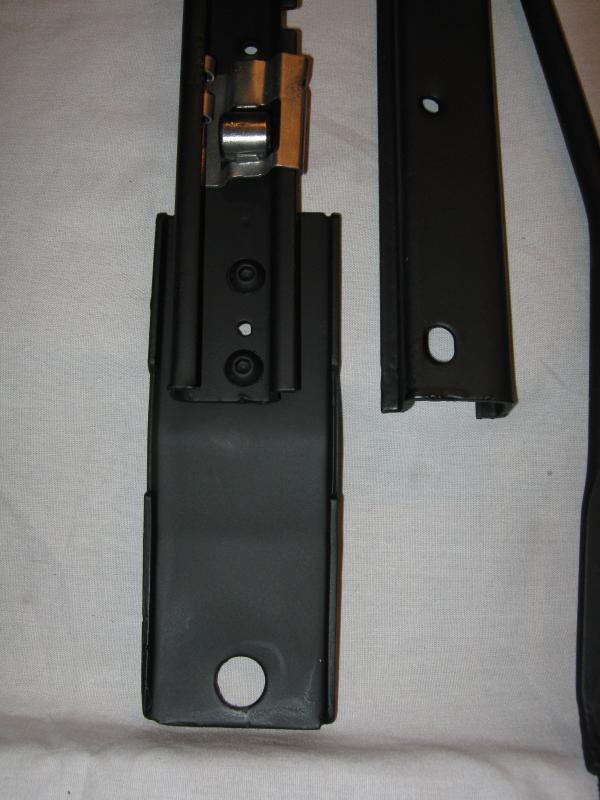
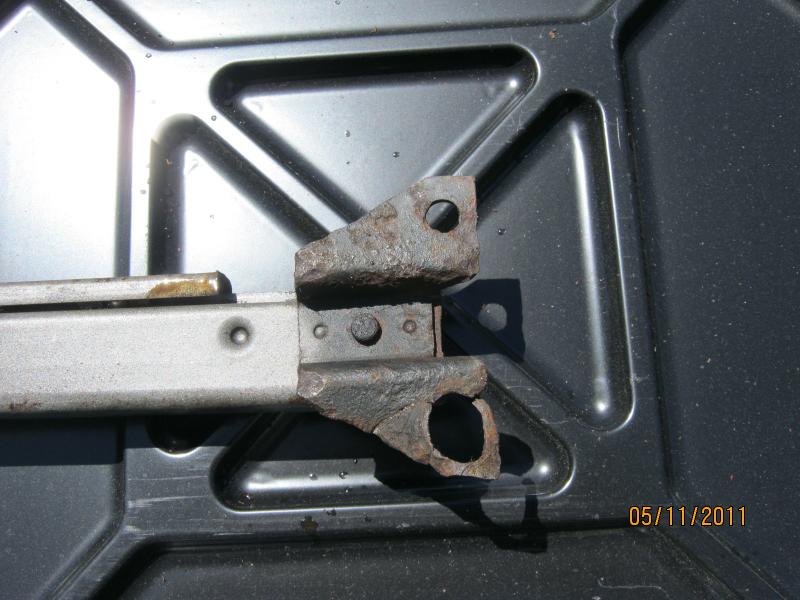
I call this one the "odd Man Out" because of the rear flange differences from the others in the set.
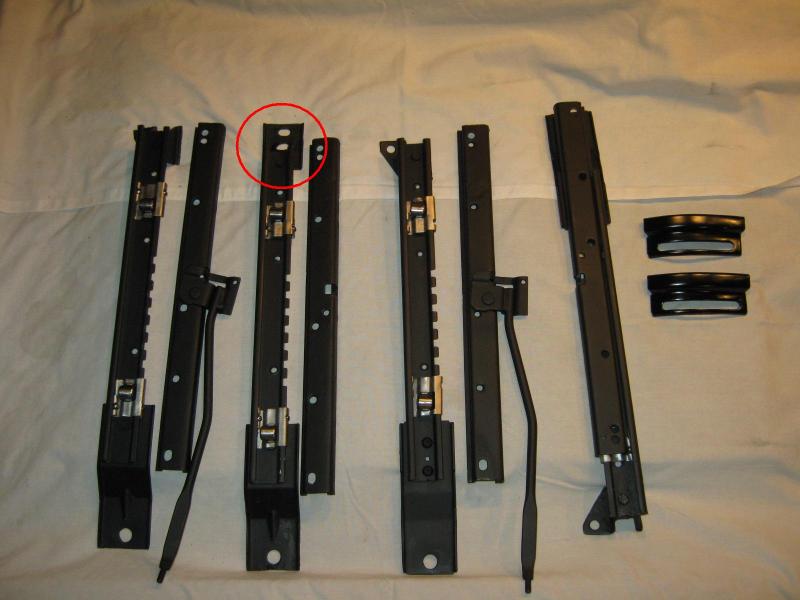
I'll remove this flange and replace it with the correct one I purchased from Paragon.
The bracket I will use is this one that I will clean up and paint to match the track.
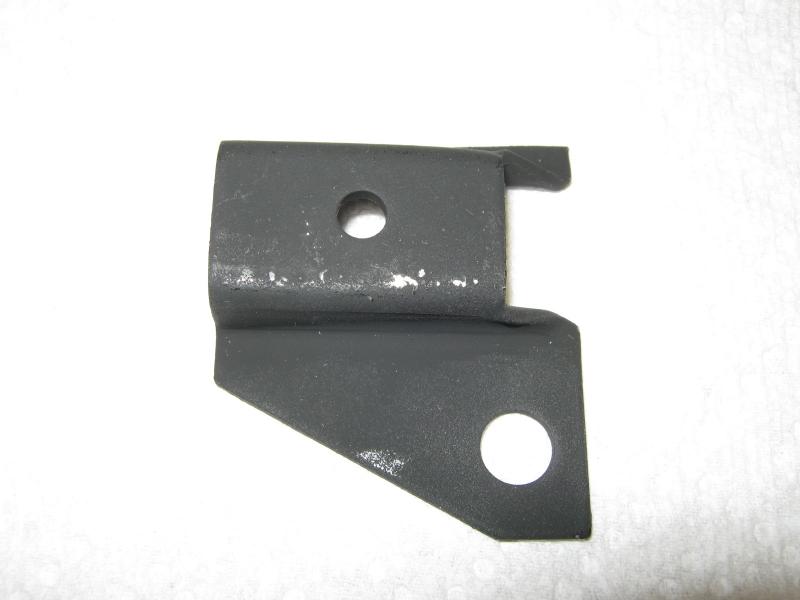
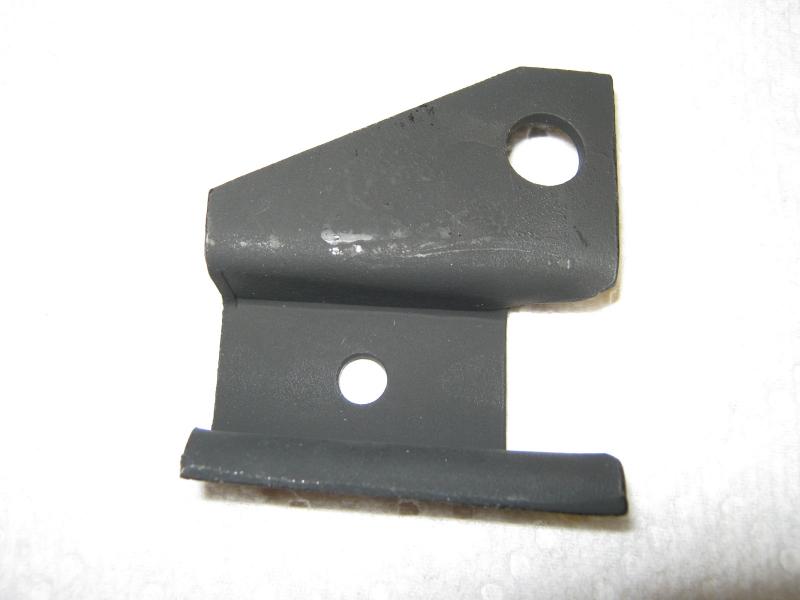
I will mount it using the same style grade eight bolts and lock nuts I used on the other part. I also want to give a little more attention to the front flange on this same part to see if we can smooth that out a little more.
While I wait for rivets to arrive I will get this change out completed and report back soon.
Thanks again TI, I appreciate your offer, it is what makes this community so special to me and the forum such a great way to communicate to those that care about these cars. If you have suggestions on any aspect of this work please let me know, I am all ears.
More soon and best regards,
David Howard
AllC34Me
I know that these parts came from a 1975 or 1976 parts car so I think I will replace the one odd ball in the group and make it fit with the theme of the other tracks.
I call this one the "odd Man Out" because of the rear flange differences from the others in the set.
I'll remove this flange and replace it with the correct one I purchased from Paragon.
The bracket I will use is this one that I will clean up and paint to match the track.
I will mount it using the same style grade eight bolts and lock nuts I used on the other part. I also want to give a little more attention to the front flange on this same part to see if we can smooth that out a little more.
While I wait for rivets to arrive I will get this change out completed and report back soon.
Thanks again TI, I appreciate your offer, it is what makes this community so special to me and the forum such a great way to communicate to those that care about these cars. If you have suggestions on any aspect of this work please let me know, I am all ears.
More soon and best regards,
David Howard
AllC34Me
 04-25-2011, 08:20 PM
#53
Burning Brakes

G'day to you as well, and thank you for this information. I have heard of the Timken products but had not considered it for this application, but I certainly will now. Do you think having a small access hole would help any in applying the product inside the track? Could I ask how long you have been riding on them since having them dipped and plated? All will help in the information gathering phase for me and thank you for sharing. Best regards, David Howard
Sorry for the delay in replying. I have yet to insatll the seats back into the car, as I am doing some further resto work and trying to sort out a poor rhd conversion. As far as the lubrication point is concerned though, I think that anything that makes maintenance easier, would be a god send. The main cause for the tracks lack of lubrication is, that it is so difficult to do and usually requires the seat removal.
Mark
04-25-2011, 11:35 PM
#54
Senior Member
Thread Starter
Member Since: Jan 2008
Location: Easton, PA
Posts: 12,154
Received 2,031 Likes
on
1,103 Posts
St. Jude Donor '10
One important element of reporting as we learn is to be faithful to the truth and report the bad along with the successes. Today while attempting to put one of the slide assemblies together I damaged one of the spring clip holders. I am evaluating how it got hung up and will see how to prevent this in the future. I was hoping to show you assembled tracks tonight but rather I am reporting that I have more to learn before I can do the final assembly. I have designated another of my old tracks as a volunteer for being cut apart tomorrow so I can see what the interference is and how to avoid it. I will report back when I learn more. One thing about me you should know is I don't quit easily. I'll work through this and make it right yet. So stay tuned and I promise to be back soon with what I have learned. For now, sleep is calling me. Thanks for watching.
David Howard
David Howard
04-26-2011, 04:25 PM
#55
Senior Member
Thread Starter
Member Since: Jan 2008
Location: Easton, PA
Posts: 12,154
Received 2,031 Likes
on
1,103 Posts
St. Jude Donor '10
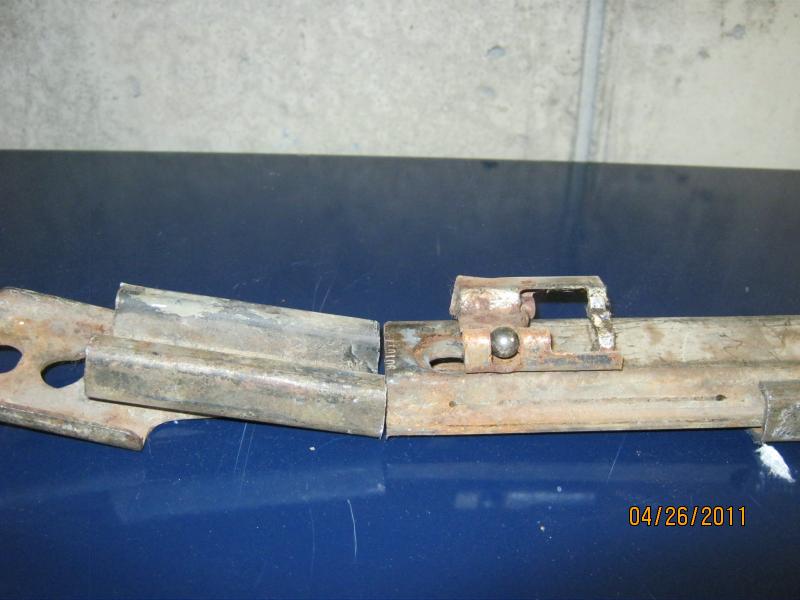
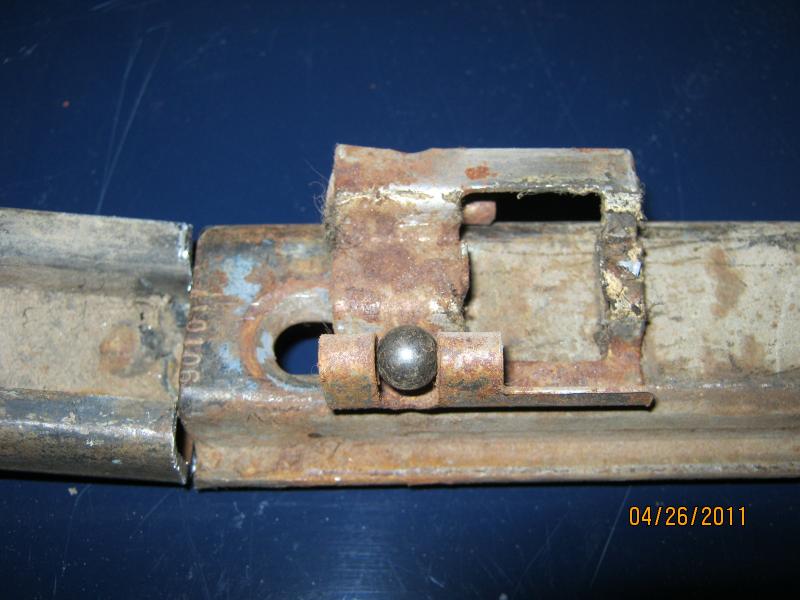
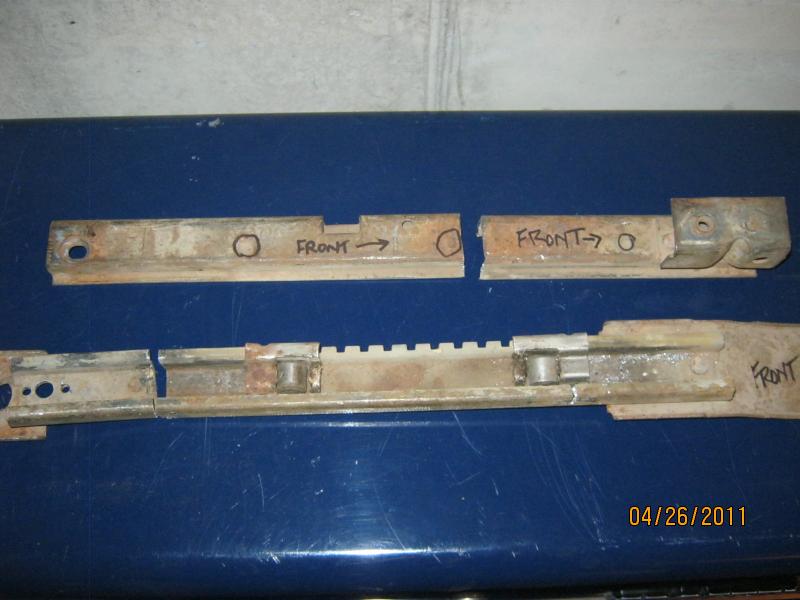
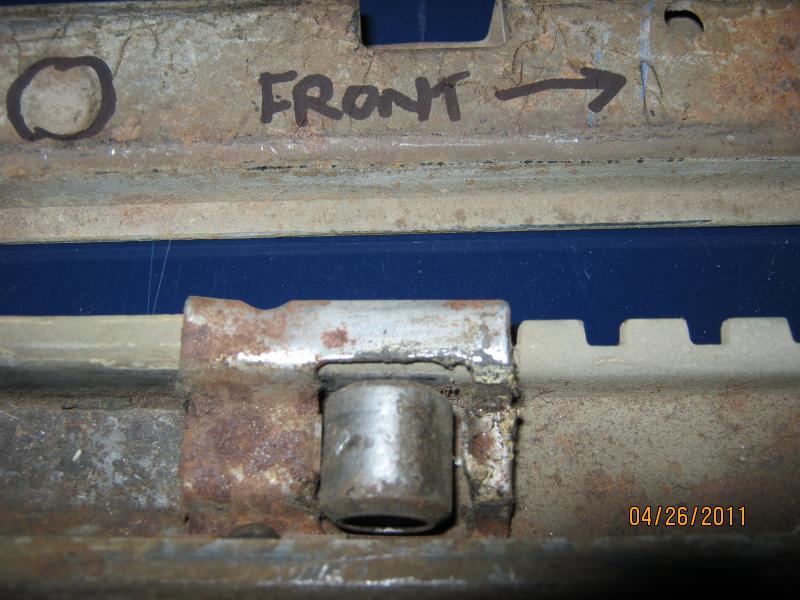
Last night I reported some damage to the spring clip when I attempted to put the seat track back together. Here are three pictures to show you the damage. What I learned was that the rollers will keep on rolling if they don't have the dimples in place to prevent them from doing so and mine got hung up in the seat adjuster.
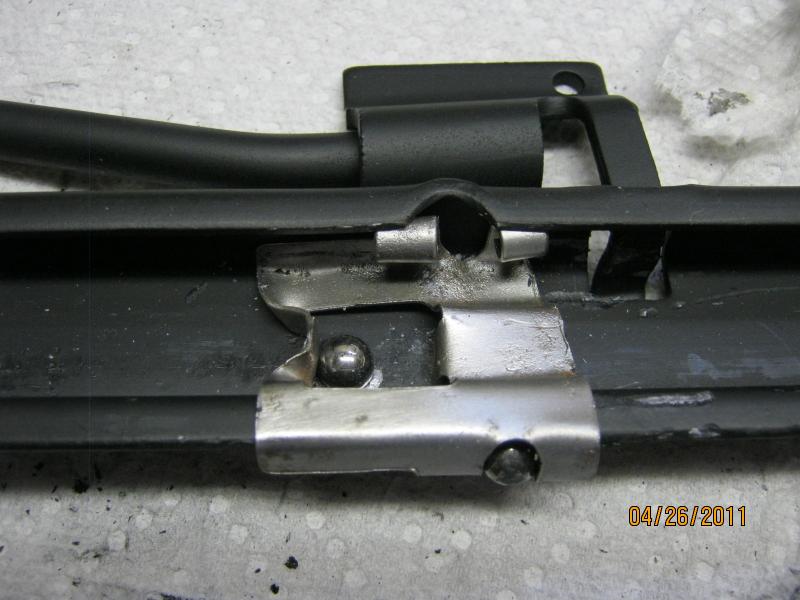
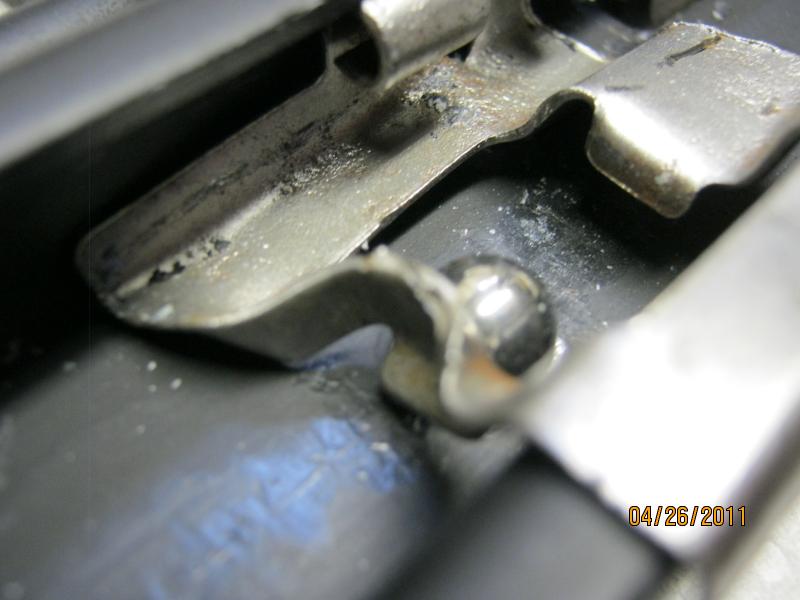
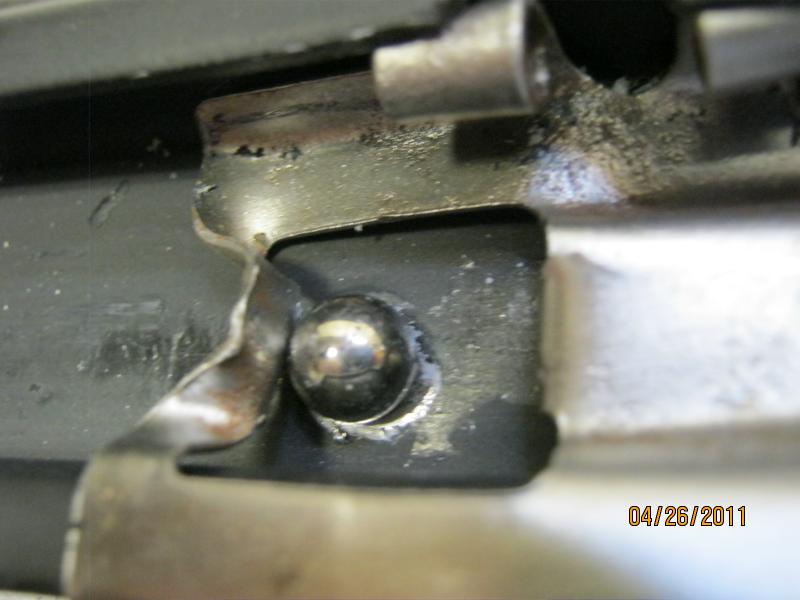
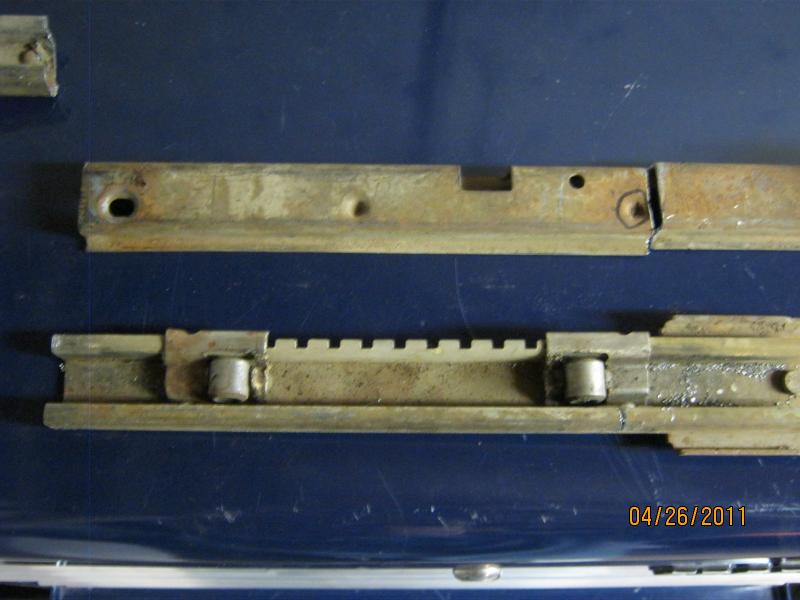
So I realized that there are two ways in which a spring clip can be installed, that is, a wide area, and a narrow area, and I did not know which way was correct to put the tracks back together. So I did the only logical thing I could think of and that was to cut another of my tracks apart and see how they are installed. I took the third volunteer track of my eight tracks total and cut it apart.
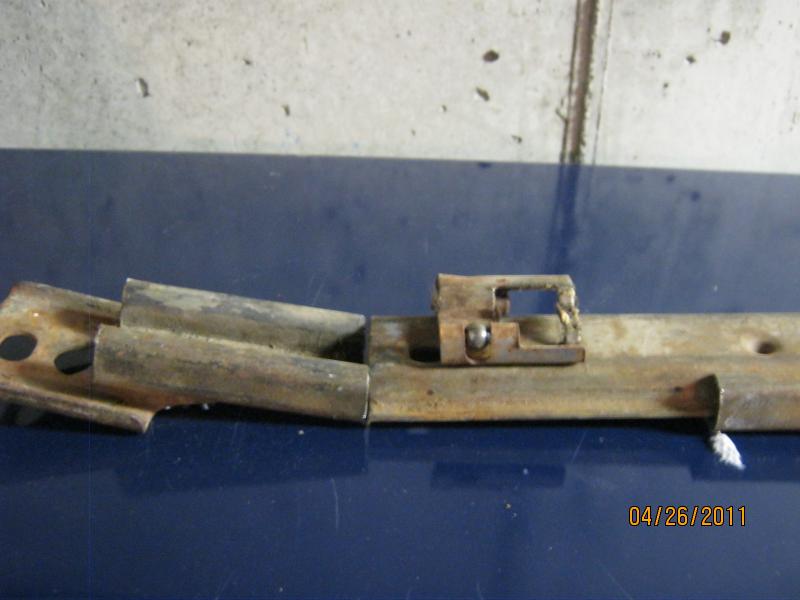
Then I measured the dimples, and the location of each of the two spring clips inside the assembly to see which of the dimples does the stopping on the assembly. I got it. Now to test that I really did have it I need to confirm the location and direction of each spring clip, and try it again.
So I realized that there are two ways in which a spring clip can be installed, that is, a wide area, and a narrow area, and I did not know which way was correct to put the tracks back together. So I did the only logical thing I could think of and that was to cut another of my tracks apart and see how they are installed. I took the third volunteer track of my eight tracks total and cut it apart.
Then I measured the dimples, and the location of each of the two spring clips inside the assembly to see which of the dimples does the stopping on the assembly. I got it. Now to test that I really did have it I need to confirm the location and direction of each spring clip, and try it again.
04-26-2011, 04:47 PM
#56
Senior Member
Thread Starter
Member Since: Jan 2008
Location: Easton, PA
Posts: 12,154
Received 2,031 Likes
on
1,103 Posts
St. Jude Donor '10
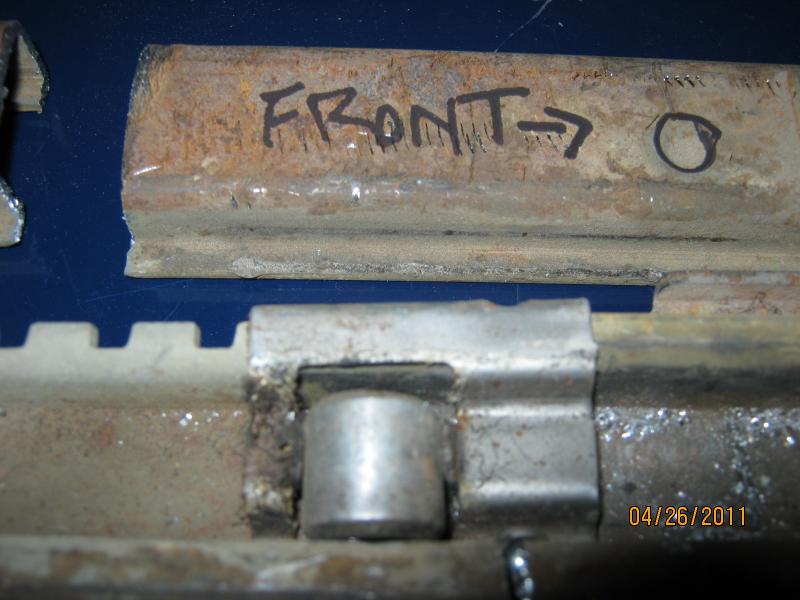
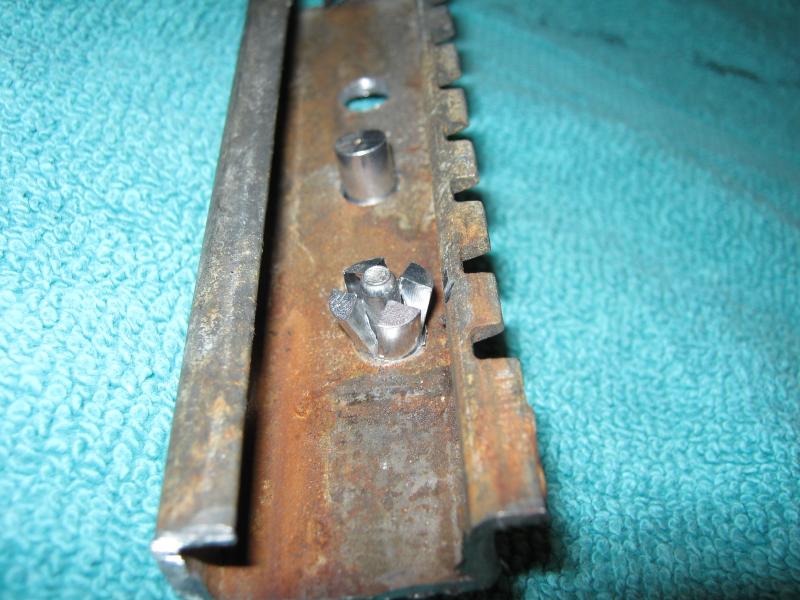
I took the cut track and laid the spring clips so I could see which direction they normally face when the track is assembled. I then marked the dimples that engage with the spring clip roller when it is moving, then marked the front direction of the track, then took what I learned and applied it to my disassembled track.
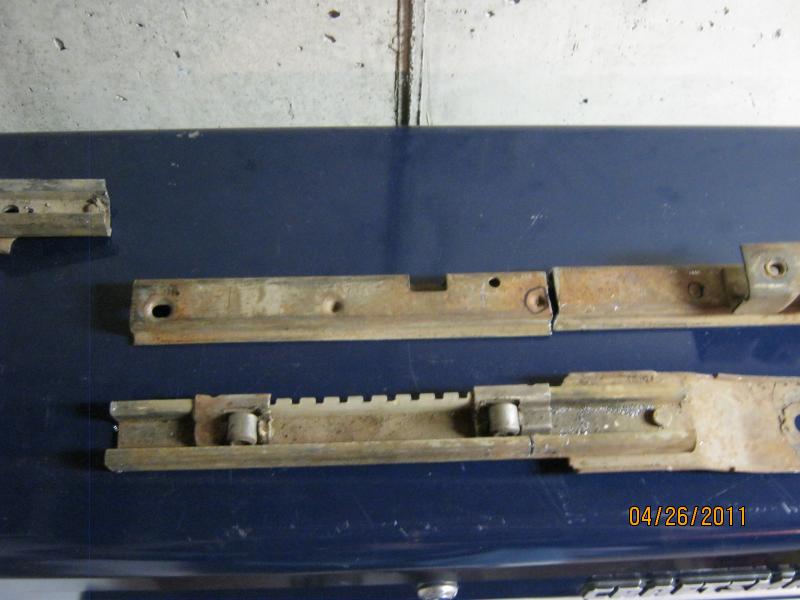
When I did it as I saw it in the cut track #3 it went back together just fine. I did learn something else which I will share here and which will be considered further while still awaiting the arrival of my rivets.
Firstly, the nuts you see in this picture are just holding a machine head bolt with a button head and allen head. I did that because it doesn't take much inside the track to cause enough interference with the roller to stop the track from advancing. These worked fine for me to confirm the function of the rivets when they are installed. It worked. The tracks went together pretty easily when I used the track with the rear bracket removed. When I tried to assemble to a track with original mounting brackets on it they interfered and no way was it going back together. So what did this teach me, a lot.

First of all we can now determine the sequence of assembly of the tracks to have been clips with ***** and rolers into the track with the top rail already having the dimples in the part. If they didn't have that the rollers would go beyond the spot to assure they would work, so we know this has to be true.
Secondly, we can now confirm that the front OR the read brackets were riveted after the tracks were assembled. Now the front and back brackets are also spot welded to the assembly which tells me the last item to be done on the tracks was rivets. The brackets were most likely applied much earlier.
Thirdly we know that the top dimples would have been put in the track after assembled or it could not have been assembled with them in, and, it was either before or after or during the rivet setting stage.
Fourthly we know that the bottom and tops of all the tracks remain pretty much unchanged for the C-3 era tracks unit after 1979. What I mean is if you take the rear bracket off, take the front bracket off, and take the adjuster handle off you have one upper track slide, and one lower track slide, and they are all the same. They even made it so you just added the handle to a non handled assembly. It also means that if you buy tracks that are not correct for your car you can most likely modify them to fit buy removing and replacing the front bracket, rear bracket, or both.
Anyway, a lot to digest here and sorry for the long post, I just wanted to pass along what I learned from all this in hopes it might help one or more of you as you work on your tracks, etc. Flexibility is always a good thing.
I am testing some other theories out as well but not on the good tracks, I'll do that with my tracks and see how it works first. No need ruining perfectly good tracks.
Thanks for watching.
David
When I did it as I saw it in the cut track #3 it went back together just fine. I did learn something else which I will share here and which will be considered further while still awaiting the arrival of my rivets.
Firstly, the nuts you see in this picture are just holding a machine head bolt with a button head and allen head. I did that because it doesn't take much inside the track to cause enough interference with the roller to stop the track from advancing. These worked fine for me to confirm the function of the rivets when they are installed. It worked. The tracks went together pretty easily when I used the track with the rear bracket removed. When I tried to assemble to a track with original mounting brackets on it they interfered and no way was it going back together. So what did this teach me, a lot.
First of all we can now determine the sequence of assembly of the tracks to have been clips with ***** and rolers into the track with the top rail already having the dimples in the part. If they didn't have that the rollers would go beyond the spot to assure they would work, so we know this has to be true.
Secondly, we can now confirm that the front OR the read brackets were riveted after the tracks were assembled. Now the front and back brackets are also spot welded to the assembly which tells me the last item to be done on the tracks was rivets. The brackets were most likely applied much earlier.
Thirdly we know that the top dimples would have been put in the track after assembled or it could not have been assembled with them in, and, it was either before or after or during the rivet setting stage.
Fourthly we know that the bottom and tops of all the tracks remain pretty much unchanged for the C-3 era tracks unit after 1979. What I mean is if you take the rear bracket off, take the front bracket off, and take the adjuster handle off you have one upper track slide, and one lower track slide, and they are all the same. They even made it so you just added the handle to a non handled assembly. It also means that if you buy tracks that are not correct for your car you can most likely modify them to fit buy removing and replacing the front bracket, rear bracket, or both.
Anyway, a lot to digest here and sorry for the long post, I just wanted to pass along what I learned from all this in hopes it might help one or more of you as you work on your tracks, etc. Flexibility is always a good thing.
I am testing some other theories out as well but not on the good tracks, I'll do that with my tracks and see how it works first. No need ruining perfectly good tracks.
Thanks for watching.
David
The following users liked this post:
74_stingray (11-14-2020)
04-27-2011, 09:17 PM
#57
Senior Member
Thread Starter
Member Since: Jan 2008
Location: Easton, PA
Posts: 12,154
Received 2,031 Likes
on
1,103 Posts
St. Jude Donor '10
My rivets arrived today and tonight I did a quick performance test to see how well a dive blind rivet might work to seal the tracks up after assembly.
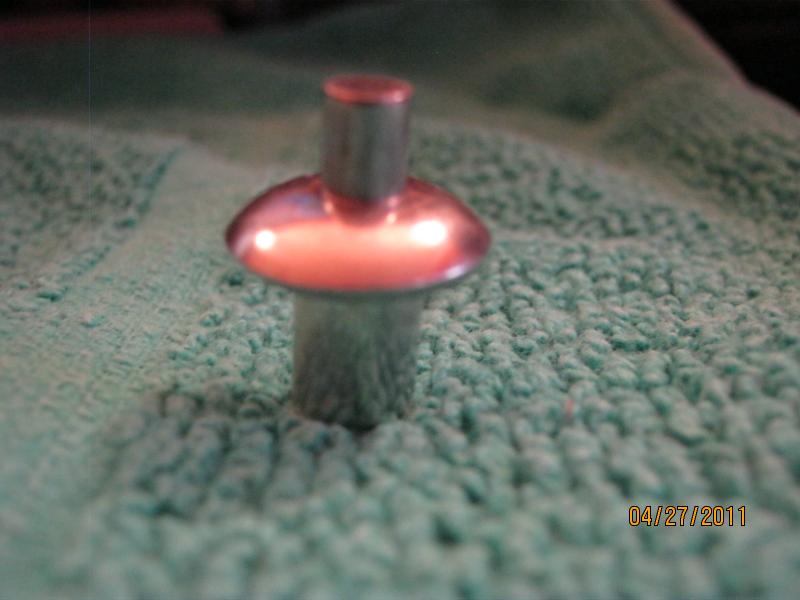
A drive rivet is a rivet that has a stem which extends above the top of the rivet. That stem extends into the rivet and when driven in further it opens the rivet and pinches the metal from behind the blind hole. The key to success with this type of rivet is having the thinkness known and matching the rivet to that thickness to assure a good seal.
I tested a 5/16" blind hole drive rivet tonight on the track. This is what it looks like.
Here I drilled three 5/16" holes in the top of the track and then removed the burrs from the holes. I left one hole open, place a rivet in the middle hole but did not activate it, and then put a second rivet in the third hole and hit the stem to see what it would do.
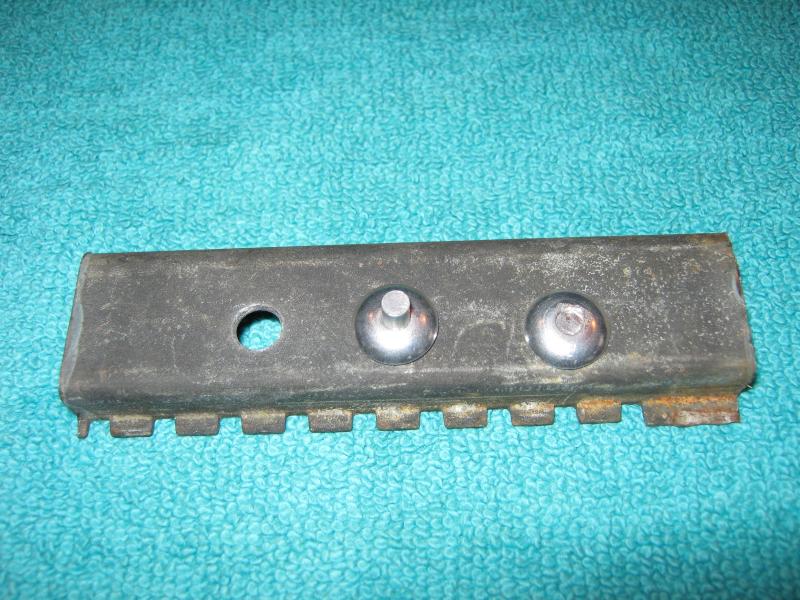
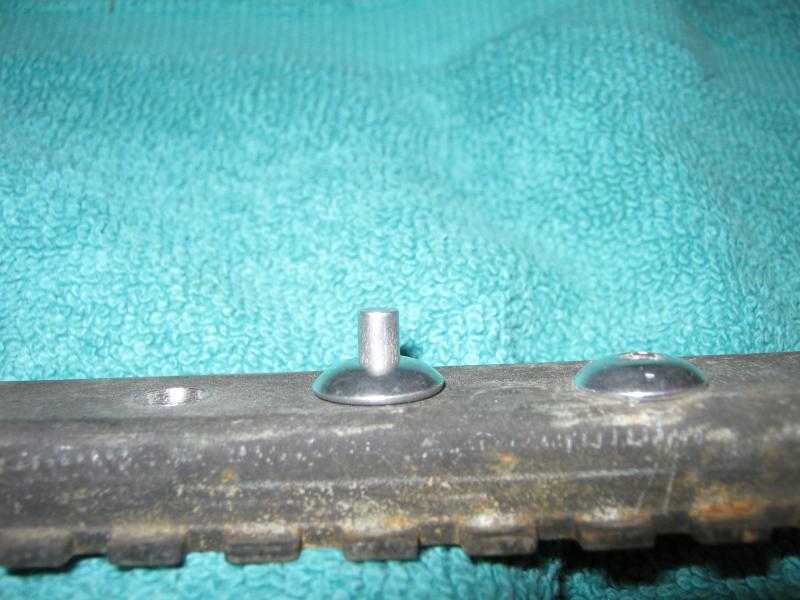
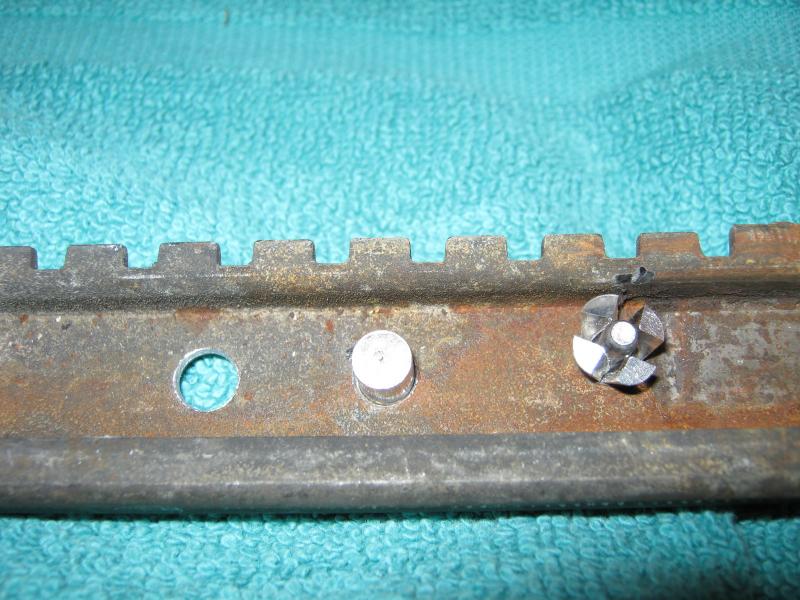
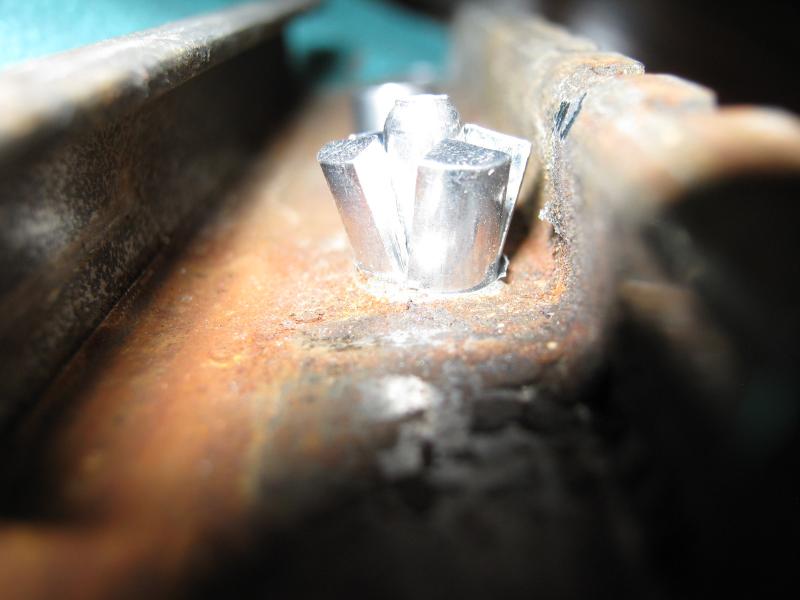
Here you see the unopened rivet and the opened rivet from inside the track.
I then used force to see if I could bend the rivet from inside when adjusting a seat and it did not damage the rivet.
This kind of blind hole rivet is exactly what is needed to seal up the track when finished. There are some interferrence issues still that I am working through now, but we will consider this test a success.
Thanks for watching and more soon.
David
A drive rivet is a rivet that has a stem which extends above the top of the rivet. That stem extends into the rivet and when driven in further it opens the rivet and pinches the metal from behind the blind hole. The key to success with this type of rivet is having the thinkness known and matching the rivet to that thickness to assure a good seal.
I tested a 5/16" blind hole drive rivet tonight on the track. This is what it looks like.
Here I drilled three 5/16" holes in the top of the track and then removed the burrs from the holes. I left one hole open, place a rivet in the middle hole but did not activate it, and then put a second rivet in the third hole and hit the stem to see what it would do.
Here you see the unopened rivet and the opened rivet from inside the track.
I then used force to see if I could bend the rivet from inside when adjusting a seat and it did not damage the rivet.
This kind of blind hole rivet is exactly what is needed to seal up the track when finished. There are some interferrence issues still that I am working through now, but we will consider this test a success.
Thanks for watching and more soon.
David
04-30-2011, 09:47 AM
#58
Senior Member
Thread Starter
Member Since: Jan 2008
Location: Easton, PA
Posts: 12,154
Received 2,031 Likes
on
1,103 Posts
St. Jude Donor '10
If you disassemble your tracks the way I have shown make sure you remove either the rear or front bracket from the track. If both brackets remain on the track you will have your hands full getting them back together. When I removed the rear bracket from one of the tracks I was able to re-assemble the track. I am currently touching up the tracks and will have an example to show by the end of the weekend. I will also post suggestions from what I have learned in this effort. Bottom line is pretty simple though, unless you need to have the tracks apart there is no need to disassemble them for repair. More on this shortly and it is good news.
Thanks and best regards,
David
Thanks and best regards,
David
05-10-2011, 08:11 PM
#59
Senior Member
Thread Starter
Member Since: Jan 2008
Location: Easton, PA
Posts: 12,154
Received 2,031 Likes
on
1,103 Posts
St. Jude Donor '10
Please forgive the delay. My project list grew too large, too fast and I had to deal with three things before I could get back onto the track project. I will update this further shortly and again I apologize for the delay. Learned a lot on this one, I hope you did too. 
David
David
05-13-2011, 07:50 AM
#60
Senior Member
Thread Starter
Member Since: Jan 2008
Location: Easton, PA
Posts: 12,154
Received 2,031 Likes
on
1,103 Posts
St. Jude Donor '10
I am still working on these tracks because honestly I did not like what the rivets did to the performance, so I am still working out ideas to improve the performance of the tracks while keep them as stock as possible. In the mean time, I am working on another set of tracks for TeaEye and have them at the stage of primer now. They are working feely now (after understanding how the inner wheels and springs work this was a bit easier this time) and then cleaning them up to remove all solvents before painting. These have two new rear brackets attached now and once I tried this method I really liked how they turned out.
So more will be posted and I appreciate your patience while I try a few more "experiments" to see if we can get a successful rebuild outcome.
Stay tuned.
David
So more will be posted and I appreciate your patience while I try a few more "experiments" to see if we can get a successful rebuild outcome.
Stay tuned.
David