
The Inner Workings of Seat Tracks - Post 1 of 3
 05-16-2011, 01:15 PM
#61


Don't know if this will be helpful, but the last two sets track sets I had that needed work went into the ultrasonic cleaner with rust remover and simple green. after 2 hours the water was filthy.....drained, added fresh water and repeated the process for a a few more hours, rinsed and used an air hose to dry it out. sat is outside in the sun for the afternoon until it was completely dry. What a huge difference. a wire wheel to make it look better then prime and paint..... Some motorcycle chain grease and they were good to go.......
Gary
Gary
 05-16-2011, 04:29 PM
#62
Senior Member


Thread Starter
Member Since: Jan 2008
Location: Easton, PA
Posts: 12,154
Received 2,031 Likes
on
1,103 Posts
St. Jude Donor '10

Don't know if this will be helpful, but the last two sets track sets I had that needed work went into the ultrasonic cleaner with rust remover and simple green. after 2 hours the water was filthy.....drained, added fresh water and repeated the process for a a few more hours, rinsed and used an air hose to dry it out. sat is outside in the sun for the afternoon until it was completely dry. What a huge difference. a wire wheel to make it look better then prime and paint..... Some motorcycle chain grease and they were good to go.......
Gary
Gary
Good suggestion here, so thank you again.

David
05-21-2011, 09:38 AM
#63
Senior Member
Thread Starter
Member Since: Jan 2008
Location: Easton, PA
Posts: 12,154
Received 2,031 Likes
on
1,103 Posts
St. Jude Donor '10
I took all that I had been able to learn from the seat track disassembly, assembly, cleaning, repairing, priming and painting and managed to finish this set of four seat tracks for a 1974 for TeaEye. I will be sending them back to him for his personal use with new back brackets on two of the tracks, new springs, new adjuster ***** and lots of hours media blasting. I learned a lot from doing this work and I am going to take that information and apply it to my own 1971 seat tracks that I did previously, but not as nicely as I did this set. So thanks goes out to TeaEye for his help in this program, and more will be investigated and completed in the days ahead but for now I agree with many that have posted here, clean them up really well if you can and don't disassemble them unless you must to get to broken components.
Thanks again to you all and have a great weekend and following week.
Best regards,
David
Thanks again to you all and have a great weekend and following week.
Best regards,
David
09-04-2011, 01:44 AM
#64


Thanks, Dave, for this wealth of information on a very hard to replace part.
Have you seen any other GM brand's seat rails that could be used as a substitute either as a complete unit or to steal parts from as a donor? One of my four brackets is really bad and paper thin from the rust. I was ready to risk life and limb to fabricate something in steel that might not look correct, but would be strong and safe. Safety must come first of course.
Thanks again for your interest in helping all of us with this global problem.
Carl
09-05-2011, 06:02 PM
#65
Senior Member
Thread Starter
Member Since: Jan 2008
Location: Easton, PA
Posts: 12,154
Received 2,031 Likes
on
1,103 Posts
St. Jude Donor '10
Thanks, Dave, for this wealth of information on a very hard to replace part.
Have you seen any other GM brand's seat rails that could be used as a substitute either as a complete unit or to steal parts from as a donor? One of my four brackets is really bad and paper thin from the rust. I was ready to risk life and limb to fabricate something in steel that might not look correct, but would be strong and safe. Safety must come first of course.
Thanks again for your interest in helping all of us with this global problem.
Carl
Have you seen any other GM brand's seat rails that could be used as a substitute either as a complete unit or to steal parts from as a donor? One of my four brackets is really bad and paper thin from the rust. I was ready to risk life and limb to fabricate something in steel that might not look correct, but would be strong and safe. Safety must come first of course.
Thanks again for your interest in helping all of us with this global problem.
Carl
Send me a picture and maybe I can help you with that bracket. I have replaced several now and they are held with grade eight bolts and very strong. Let me know if I can help further.
David
09-26-2012, 08:27 AM
#67
Team Owner

Member Since: Sep 2006
Location: Westminster Maryland
Posts: 30,173
Likes: 0
Received 2,878 Likes
on
2,515 Posts
Hi TG,
Originally the slides were plated (zinc?), and the rest of track, base, and feet were phosphated.
Since you've blasted yours I'd think they will need some type of coating to stop the rust.
Regards,
Alan
Originally the slides were plated (zinc?), and the rest of track, base, and feet were phosphated.
Since you've blasted yours I'd think they will need some type of coating to stop the rust.
Regards,
Alan
09-28-2012, 07:35 AM
#69
Intermediate


Member Since: Jul 2012
Posts: 45
Likes: 0
Received 0 Likes
on
0 Posts
Alan, hello. Right or wrong, I decided to blast them. After that I put them in my parts washer to clean them, then primed, painted and lubed them up. They work great! I just wire wheeled the seat frames and painted them. So far I'm enjoying the fun!
09-28-2012, 11:53 AM
#70
Burning Brakes

Member Since: Mar 2010
Location: Surrey British Columbia
Posts: 987
Likes: 0
Received 6 Likes
on
6 Posts
This has been a great thread. Lots of valuable info. Makes me appreciate the fact that my tracks were in great shape. I just needed to glass bead them then paint and lube them. They work just fine.
One thing though, Richard Prince's restoration guide book claims that the seat tracks were painted black in the 80 Vettes. I've owned two 80's. The first was brand new right off the lot. About a year after buyng the car I noticed some scratches on the front of the driver's side track. The tracks were claret in color, same as the interior. The only way that I could color match the paint was to go to a Chevy dealership and they recommended a burgandy exterior touch-up paint bottle as it would be a close match. I can recall this quite clearly.
I purchased my second 80 three years ago. The interior was oyster white. When I removed the seat tracks I found the tops to be painted white and the bottoms were unpainted with just some minor rust issues underneath. So I can attest to the fact that on two 80 Corvettes the tracks were not black. Go figure...
09-04-2014, 04:09 PM
#71
Intermediate
Hi guys, I realise this is a two year old post, but maybe someone can help me with a relative problem in my C3 �69 seat tracks. I have the mechanical tracks, (no power seats), they do move freely and are both in very good condition, except one thing: Both seats have a PLAY, i.e. they move back and forth by about 5 millimetres (or 3/16�). This is for Both seats, not only the drivers, more so, it occurs in any notch of the track. I�ve had the car since �69 and as far back as I can remember, this was always the case, very annoying when breaking or accelerating hard.
I removed the tracks but have not yet disassembled them, but from what I can see, there is no wear in the metal notch that locks into the recesses. Anyone had this problem and any ideas on how to fix this?
Thanks ahead for any help!
I removed the tracks but have not yet disassembled them, but from what I can see, there is no wear in the metal notch that locks into the recesses. Anyone had this problem and any ideas on how to fix this?
Thanks ahead for any help!
09-04-2014, 10:24 PM
#72
Senior Member
Thread Starter
Member Since: Jan 2008
Location: Easton, PA
Posts: 12,154
Received 2,031 Likes
on
1,103 Posts
St. Jude Donor '10
GRL88, if you send me a couple of pictures of your seat tracks I will help if I can. I would not disassemble the tracks, that causes all kinds of issues. I suspect your issue is either the mounting of the track to the seat, or the mounting of your track to the floor. I have heard of guys having wear in the floorboard and the bolts moving there. If you install the tracks to your seat and cannot flex them then consider installing the tracks without the seat attached to the floor and see if you can determine the movement is there. Process of elimination but it has worked for others in the past. Let me know what you find and if I can help any further.
Best regards,
David Howard
AllC34Me
Best regards,
David Howard
AllC34Me
09-05-2014, 04:54 PM
#73
Intermediate
Thanks for your prompt response AllC34Me!
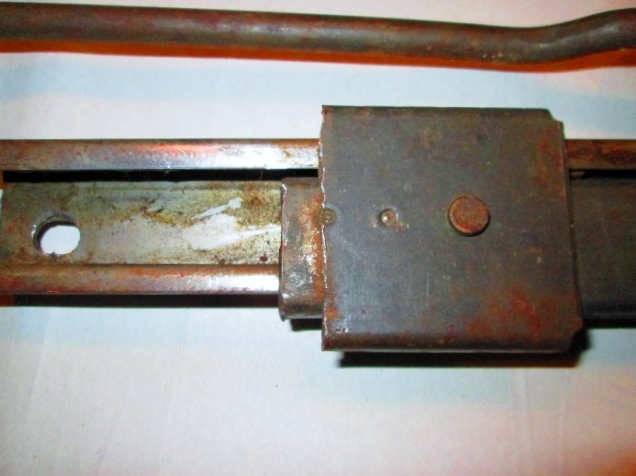
I have removed both rails from the car and as you can see the're in good condition and move freely back and forth; with some lubrication they will be like new.
here is tthe pic.
Attachment 47824766
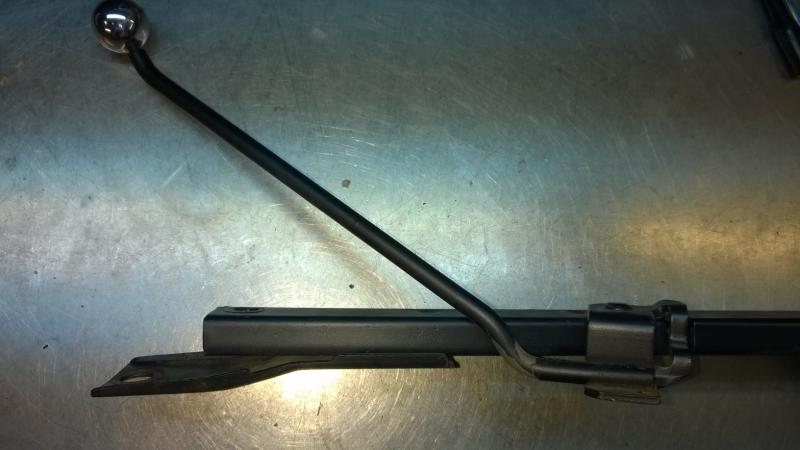
After closer inspection I have determined that the back and forth slack movement, right where the part of the moving arm, fits into the square recesses of the notched rail. There is some wear on the moving arm part that has come with time, but i can see that there was play there ever when it was new, maybe a factory fault. The wear is mainly on the moving arm and not in the square recesses, as it occurs on all the recesses along the rail.
Here is the pic:
Attachment 47824767
I plan to remove the moving arm and do some careful add-on welding and then grinding the moving arm protrusion, so that it fits properly into the square nothces; I trust that this will solve the problem.
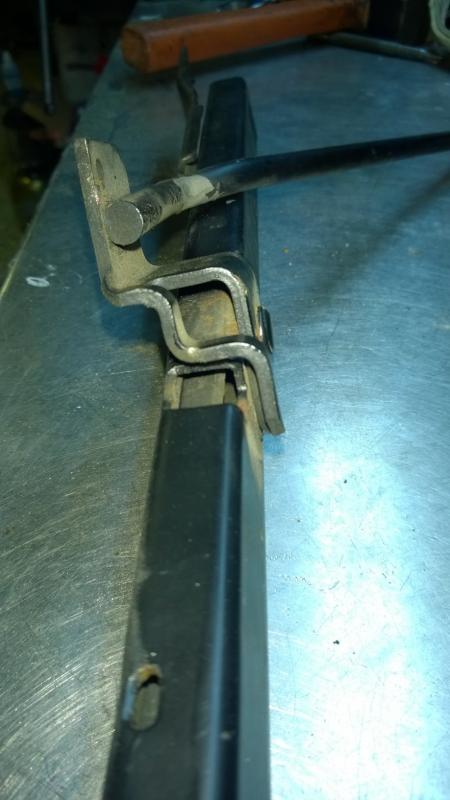
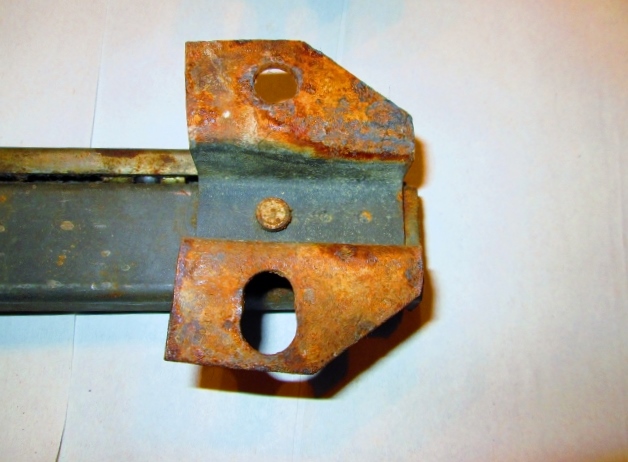
My question then is how to remove the moving arm that is held in place with a rivet, here is the pic:
Attachment 47824768
I am afraid that when removing the rivet, the lower part will fall into the rails and I won't be able to take it out, blocking the mechanism. Any ideas? I read that I can drill out the punched recesses so the rails come apart, but do I need to drill all of them?
I have removed both rails from the car and as you can see the're in good condition and move freely back and forth; with some lubrication they will be like new.
here is tthe pic.
Attachment 47824766
After closer inspection I have determined that the back and forth slack movement, right where the part of the moving arm, fits into the square recesses of the notched rail. There is some wear on the moving arm part that has come with time, but i can see that there was play there ever when it was new, maybe a factory fault. The wear is mainly on the moving arm and not in the square recesses, as it occurs on all the recesses along the rail.
Here is the pic:
Attachment 47824767
I plan to remove the moving arm and do some careful add-on welding and then grinding the moving arm protrusion, so that it fits properly into the square nothces; I trust that this will solve the problem.
My question then is how to remove the moving arm that is held in place with a rivet, here is the pic:
Attachment 47824768
I am afraid that when removing the rivet, the lower part will fall into the rails and I won't be able to take it out, blocking the mechanism. Any ideas? I read that I can drill out the punched recesses so the rails come apart, but do I need to drill all of them?
09-05-2014, 05:04 PM
#74
Race Director

I hose down seat tracks with PB Blaster lube, work them back and forth for a while until they feel "free" then spray with motorcycle chain lube and they usually work well but, I live in the Peoples Republik of Kalifornia so rust usually insn't an issue here (dry off all external run-off.) In the past I have used spray lithium grease but, have found the MC chain spray is superior for lubrication.
09-07-2014, 05:29 PM
#75
Intermediate
Problem resolved!
I didnt have to remove the moving arm after all, I just bent the moving lever so that I could easily spot-weld it right where it needed.
Here are the pics for anyone with the same problem!
I didnt have to remove the moving arm after all, I just bent the moving lever so that I could easily spot-weld it right where it needed.
Here are the pics for anyone with the same problem!
01-02-2015, 05:46 AM
#76
Senior Member
Thread Starter
Member Since: Jan 2008
Location: Easton, PA
Posts: 12,154
Received 2,031 Likes
on
1,103 Posts
St. Jude Donor '10
I was requested to assist with a seat tracks from a 1968 being restored and I said I would do what I could to help bring them back.
Here is a picture of the damaged tracks upon arrival.
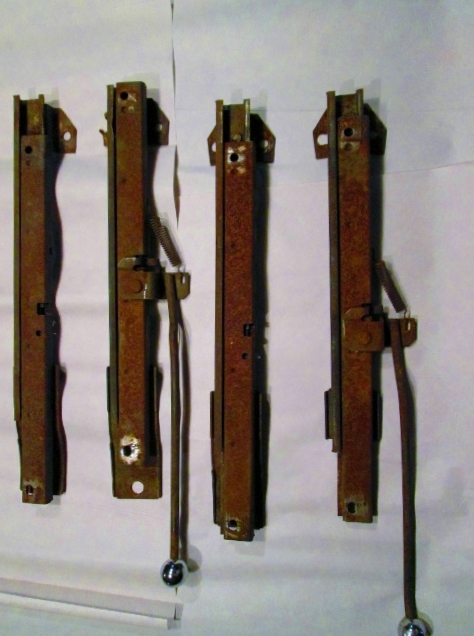
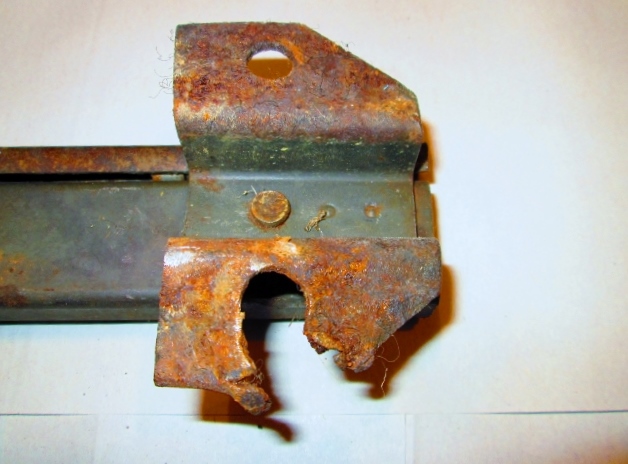
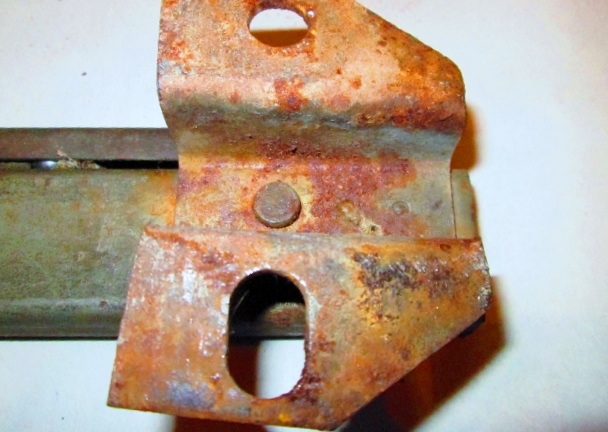
These didn't move very smoothly at all and one was stuck in place but not something I have not dealt with before. With the rarity of finding good aftermarket parts getting tougher every year I hate to see these tracks get thrown out when they can be restored and put back into good working order.
Initially I thought I would replace one rear and one front bracket on this set and be able to restore the others without removal. After closer inspection I was not confident that enough metal was remaining (after removing the rust) to trust their performance in an accident or for longer term use. I made the decision to replace all the feet, front and rear, which took the job from medium to difficult, but the end product will be a much better and safer product.
Here is a picture of the damaged tracks upon arrival.
These didn't move very smoothly at all and one was stuck in place but not something I have not dealt with before. With the rarity of finding good aftermarket parts getting tougher every year I hate to see these tracks get thrown out when they can be restored and put back into good working order.
Initially I thought I would replace one rear and one front bracket on this set and be able to restore the others without removal. After closer inspection I was not confident that enough metal was remaining (after removing the rust) to trust their performance in an accident or for longer term use. I made the decision to replace all the feet, front and rear, which took the job from medium to difficult, but the end product will be a much better and safer product.
01-02-2015, 05:55 AM
#77
Senior Member
Thread Starter
Member Since: Jan 2008
Location: Easton, PA
Posts: 12,154
Received 2,031 Likes
on
1,103 Posts
St. Jude Donor '10
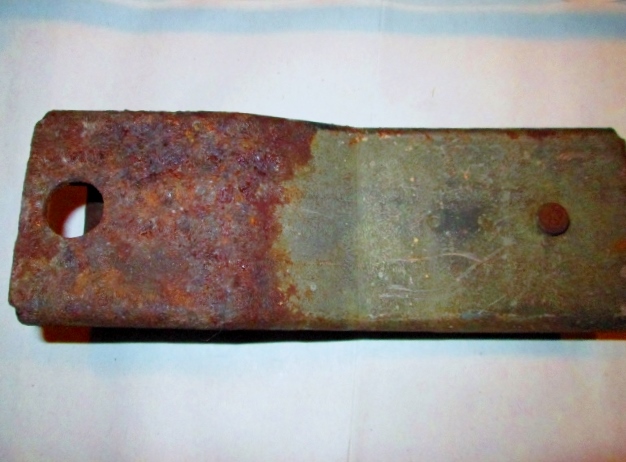
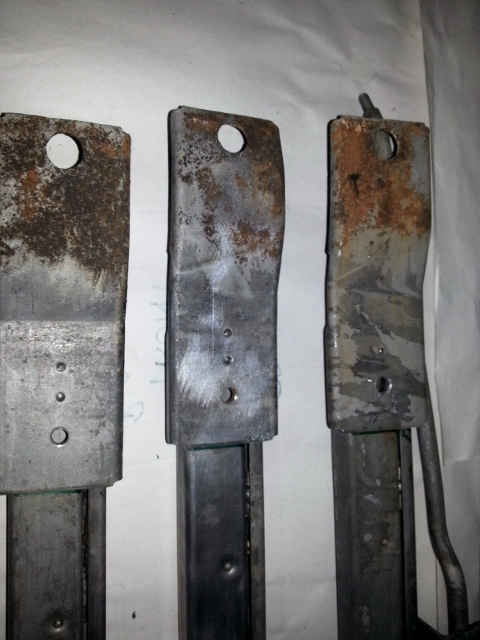
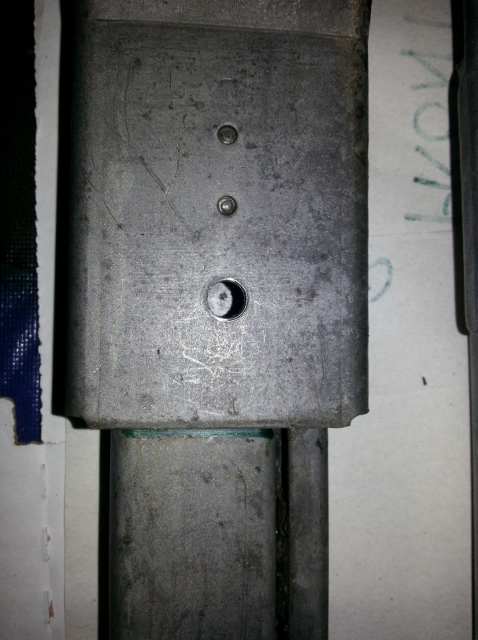
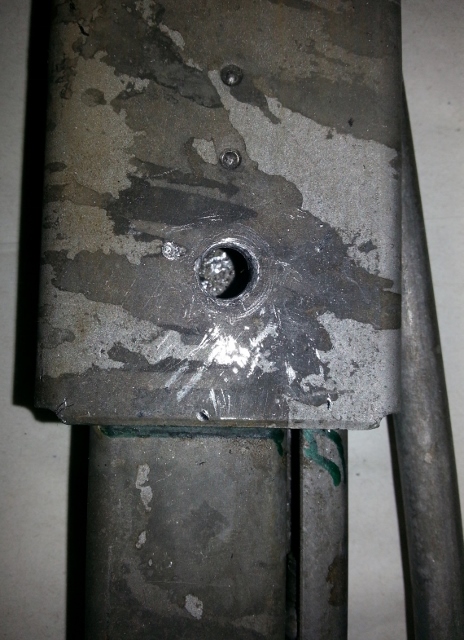
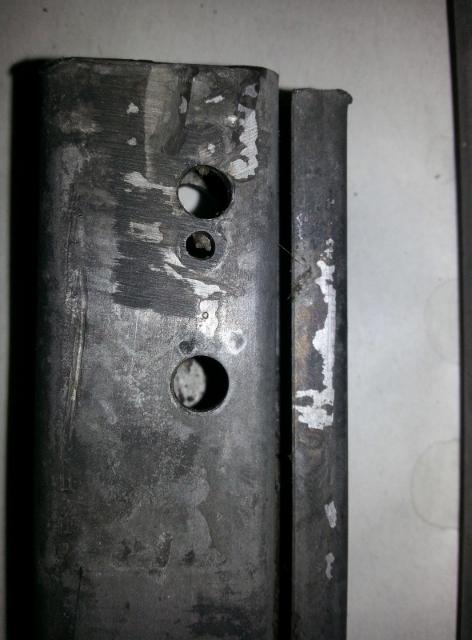
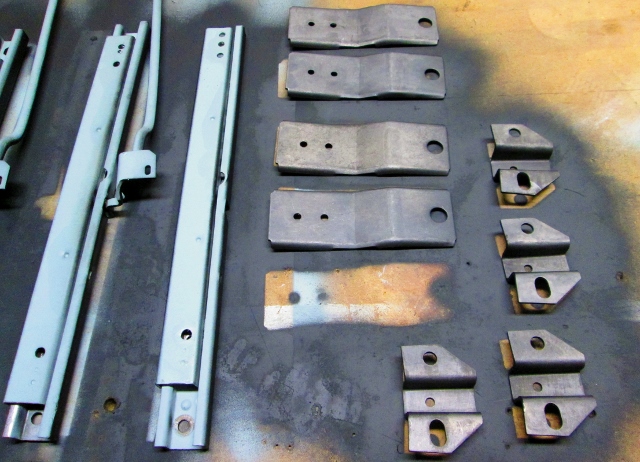
Here are some pictures of the parts after the rust has been removed and having made the decision to replace all of the feet you can see the rivet has been drilled out but the welds are still on these parts. You have to be careful when removing the feet so as not to damage the bottom portion of the rail or it will not move smoothly when completed. I learned this on my practice rails some time ago. No issue with these rails, they came off cleanly.
01-02-2015, 06:02 AM
#78
Senior Member
Thread Starter
Member Since: Jan 2008
Location: Easton, PA
Posts: 12,154
Received 2,031 Likes
on
1,103 Posts
St. Jude Donor '10
After removing the feet I then took the rails and high pressure cleaned them inside and out. This gets dust, dirt, grime out of the inside of the track. You have to work the track forwards and backwards at this point in order to get all the grease and dirt out and this is where you can smash fingers so be careful when doing it. This is the messy part of the repair. My wife said I had grease dots on every square inch of my arms, face, etc. and made me shower again, but the rails were clean.
After removing the grease I wire brushed the rail assemblies and then I like to prime them to get a good coating of protective material on the base metal. Now before this step I use a small nylon rope and lay it in the gap between the parts so primer (and later paint) don't go into the area where the bearing rollers roll.
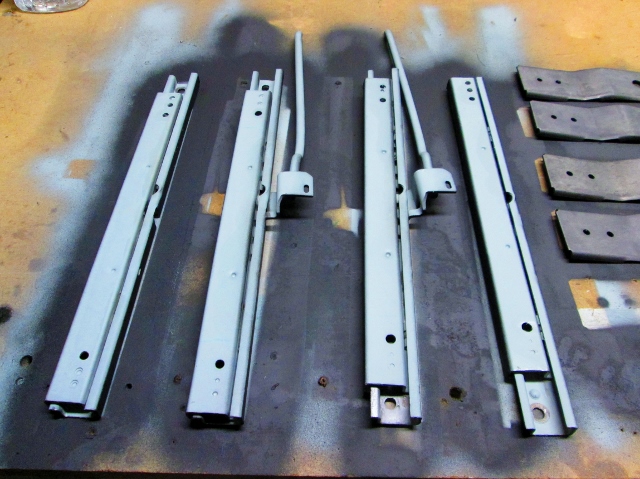
You can see by the paper on my bench top that I was working on two sets of rails and had the new feet ready to prime as well. The new parts come with a coating that doesn't like paint much, so I remove this coating and prime and paint the feet along with the rails.
NOTE: I do use primer and paint on the inside of the tracks where the rollers do not touch. This assures any water getting in the seat well does not migrate up the end of the railing.
After removing the grease I wire brushed the rail assemblies and then I like to prime them to get a good coating of protective material on the base metal. Now before this step I use a small nylon rope and lay it in the gap between the parts so primer (and later paint) don't go into the area where the bearing rollers roll.
You can see by the paper on my bench top that I was working on two sets of rails and had the new feet ready to prime as well. The new parts come with a coating that doesn't like paint much, so I remove this coating and prime and paint the feet along with the rails.
NOTE: I do use primer and paint on the inside of the tracks where the rollers do not touch. This assures any water getting in the seat well does not migrate up the end of the railing.
Last edited by AllC34Me; 01-02-2015 at 06:06 AM.
01-02-2015, 06:12 AM
#79
Senior Member
Thread Starter
Member Since: Jan 2008
Location: Easton, PA
Posts: 12,154
Received 2,031 Likes
on
1,103 Posts
St. Jude Donor '10
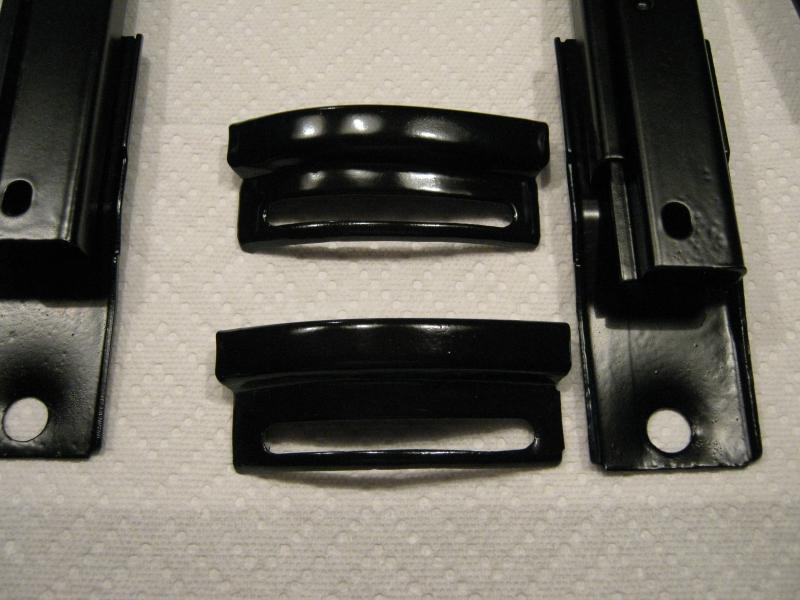
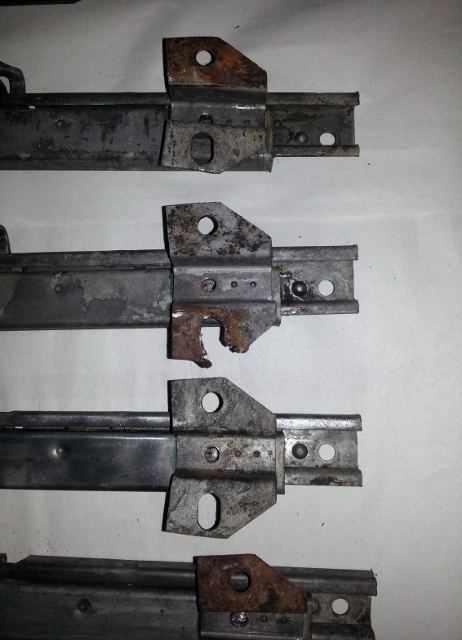
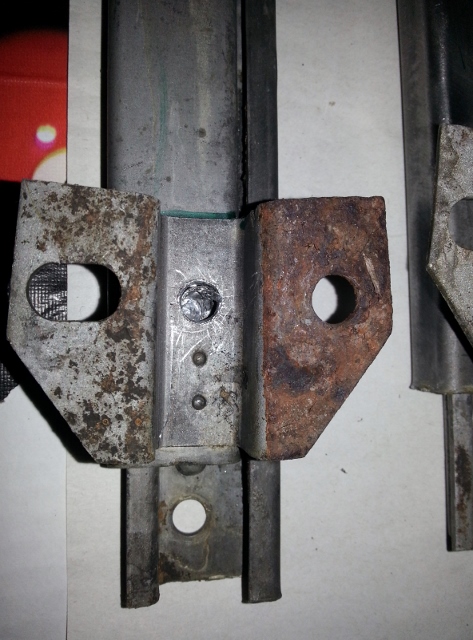
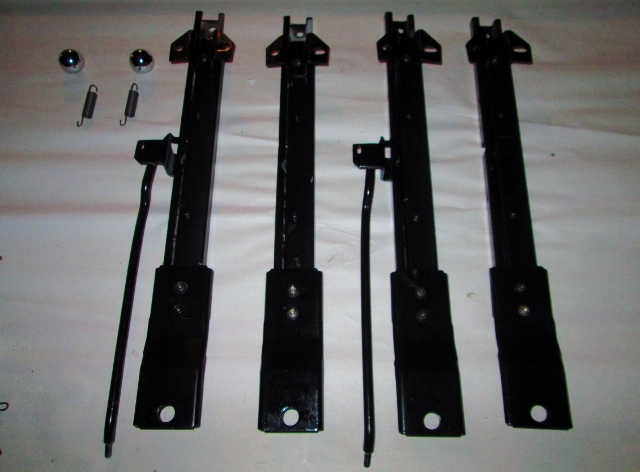
These are the assemblies with the rear feet installed. Notice that the hex head bolt is on the outside of the railing, and the lock nut is on the inside of the railing. The lock nut serves as the stop spot for motion with the railing just as the rivet did on the original part. The same is true on the front foot.
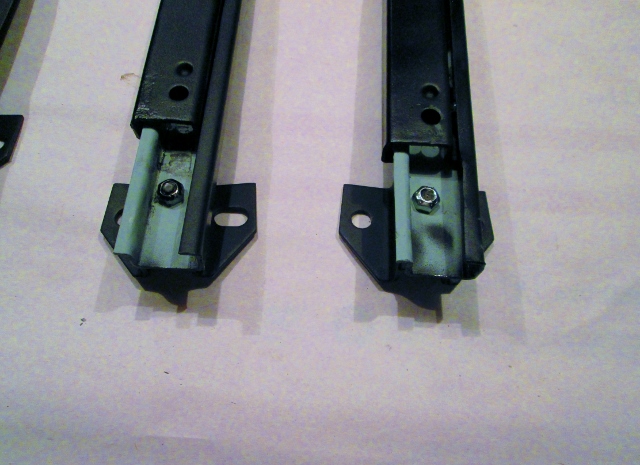

Here you see I have shown where primer is applied to the inside of the rail as I discussed on the previous post. This will be covered with paint before the job is done and no primer will be seen. I have put a top coat of paint on the parts here and that helps with handling the parts through assembly and to assure there is primer and paint between the parts before assembly. Getting primer between the legs and rails is important, so assembling them before priming and painting is not recommended if you want to prevent further rusting.
Here you see I have shown where primer is applied to the inside of the rail as I discussed on the previous post. This will be covered with paint before the job is done and no primer will be seen. I have put a top coat of paint on the parts here and that helps with handling the parts through assembly and to assure there is primer and paint between the parts before assembly. Getting primer between the legs and rails is important, so assembling them before priming and painting is not recommended if you want to prevent further rusting.
01-02-2015, 06:18 AM
#80
Senior Member
Thread Starter
Member Since: Jan 2008
Location: Easton, PA
Posts: 12,154
Received 2,031 Likes
on
1,103 Posts
St. Jude Donor '10
I realized after I took these pictures that they are dark and hard to make out the details so I may try to take some more as the tracks are not completed yet, but getting very close.
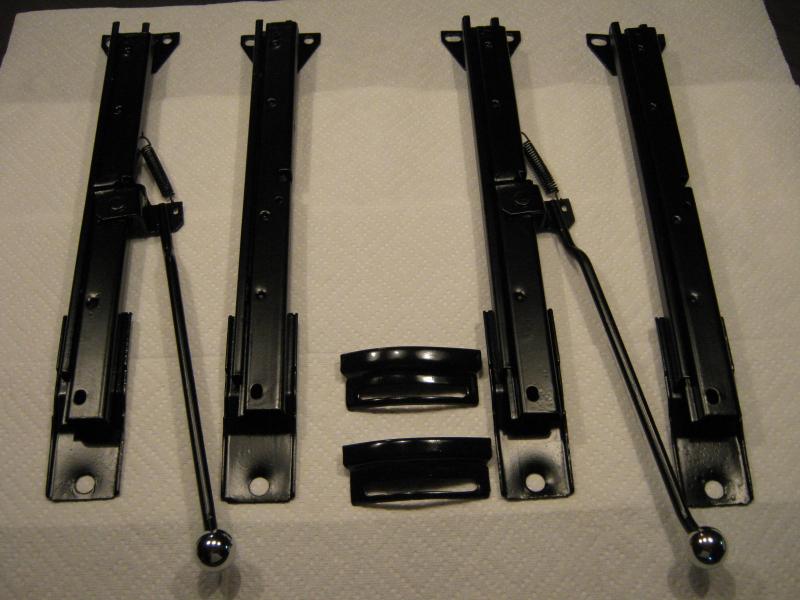
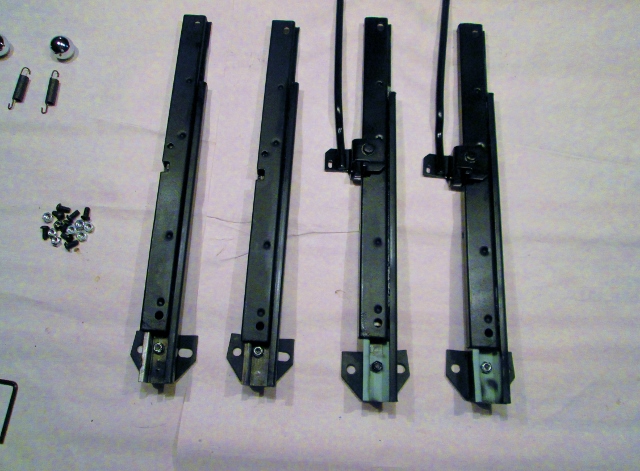
Here the front and rear feet are now installed and the assemblies are ready for surface preparation and final painting. That step is taking place today, but here are some pictures of them anyway and more will be shown soon.
Bottom side of tracks.
Top side of tracks.
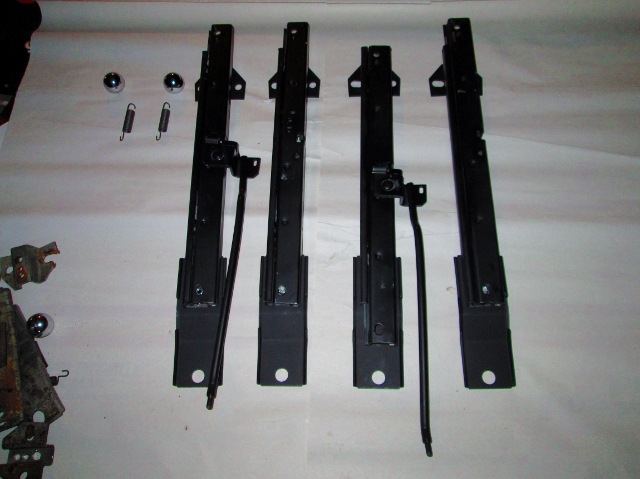
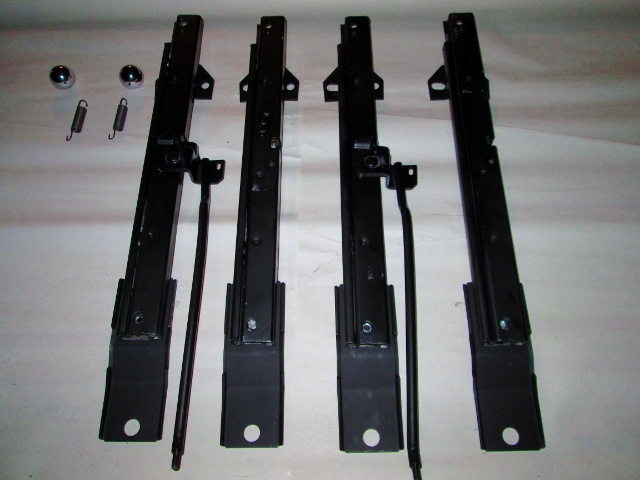
New springs and new adjuster lever ***** will be added when completed and these tracks will be ready to head back to their original owner on Monday.
As with almost every pair of tracks I have restored now these were a bit more work than I anticipated but I love bringing them back to good working order.
More soon and thanks for watching.
David
Here the front and rear feet are now installed and the assemblies are ready for surface preparation and final painting. That step is taking place today, but here are some pictures of them anyway and more will be shown soon.
Bottom side of tracks.
Top side of tracks.
New springs and new adjuster lever ***** will be added when completed and these tracks will be ready to head back to their original owner on Monday.
As with almost every pair of tracks I have restored now these were a bit more work than I anticipated but I love bringing them back to good working order.
More soon and thanks for watching.
David