
My 1977 Project - Body off restoration
 12-28-2013, 02:15 PM
#221
Racer


Thread Starter


Looking great! Super nice job on the fuel tank portion - very clean. Wish I could weld like that 
I'm not used to seeing surface rust pop up that fast here in AZ... like on the u-joints etc. I'm guessing you must be close to the ocean. Excellent build project - can't wait to see more.
Adam
I'm not used to seeing surface rust pop up that fast here in AZ... like on the u-joints etc. I'm guessing you must be close to the ocean. Excellent build project - can't wait to see more.
Adam
Lol... I wish i could weld like that too!.. The tank was made to my specs but welded by a pro. I have nowhere near that skill!
As for the flash rust... it was like that within a few weeks. In Florida... it's just a fact of life. The humidity is the culprit. I live 10 miles in-land.
 12-28-2013, 08:14 PM
#222
Instructor

Member Since: Sep 2013
Location: Oklahoma City Oklahoma
Posts: 246
Likes: 0
Received 0 Likes
on
0 Posts
St. Jude Donor '14
I am a HVAC tech....when i flare or bend hard copper, I first heat it with my torch to anneal the metal for easier forming....would that process be detrimental to stainless?
12-28-2013, 08:20 PM
#223
Racer
Thread Starter
Some more progress today. Today, since we can't move forward with the fuel lines, I decided to move to the front.
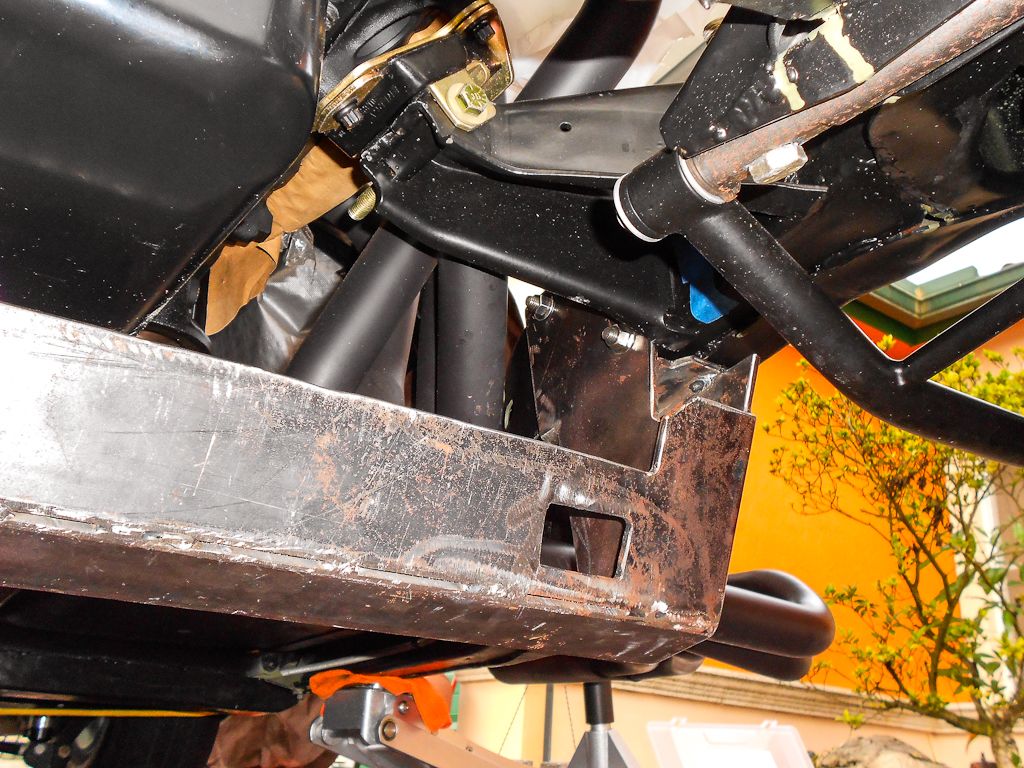
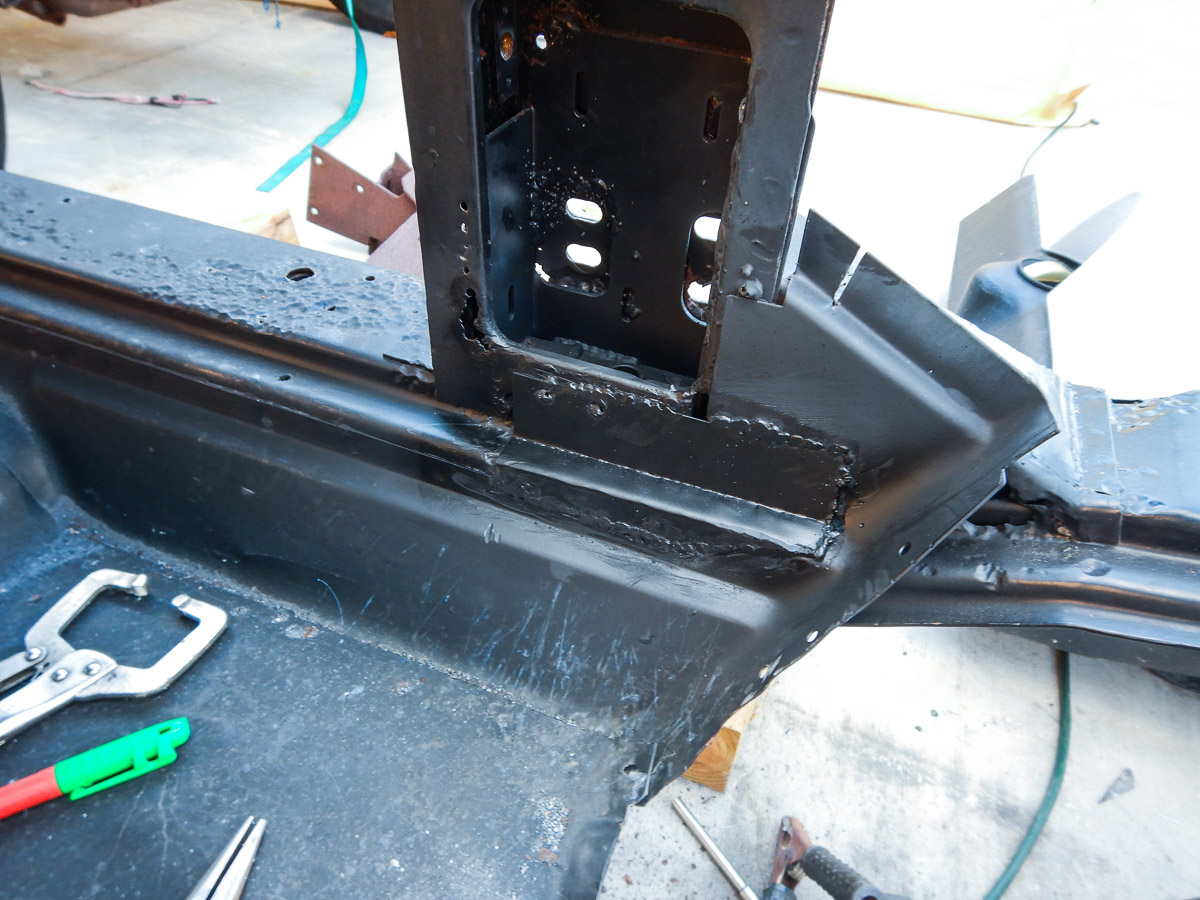
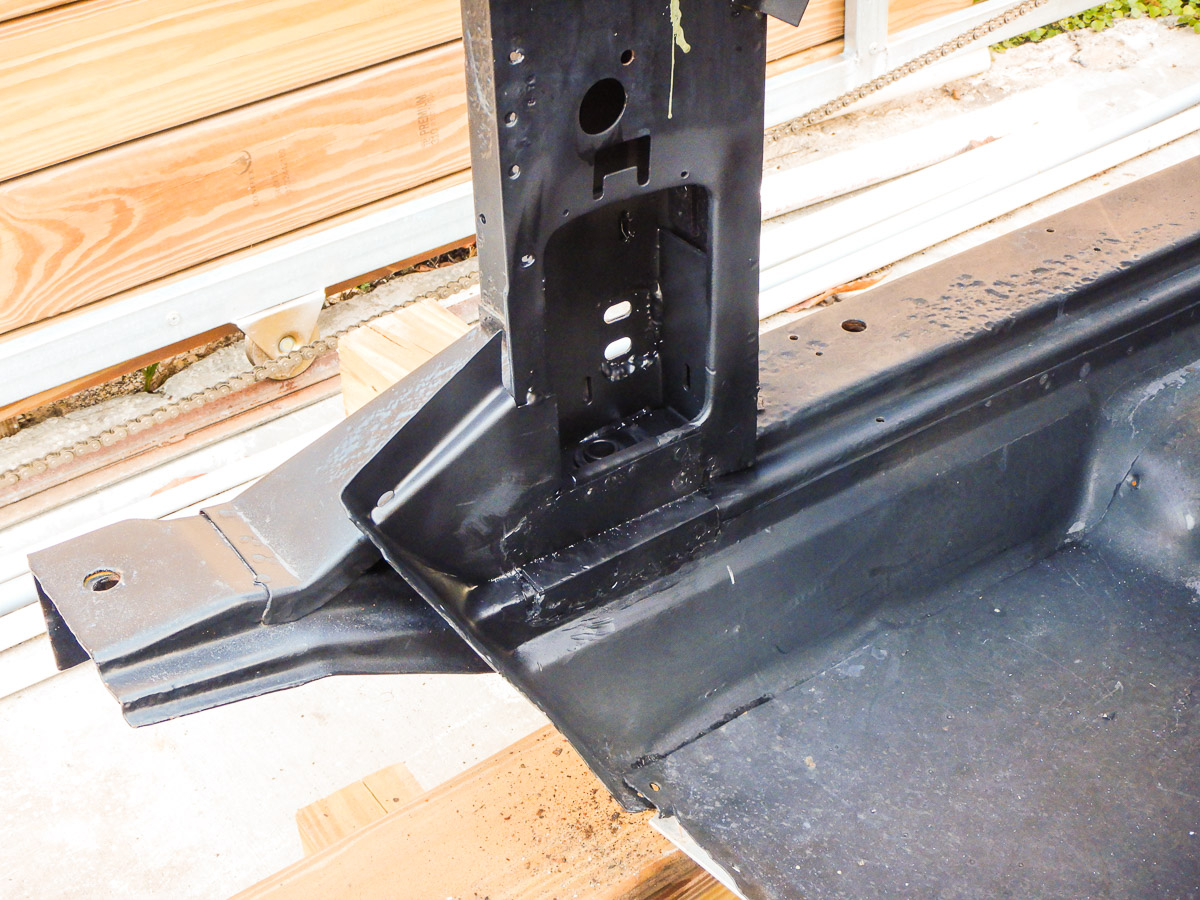
When we started the build we decided to go with a rack and pinion conversion. However, rather than buying something off the shelf, we decided to make a custom bracket. A few months back we (the consultant/builder/guru working with me and I) started to mock up a custom bracket to mount up the rack and pinion we are using on the car. The design has a few things in mind. First, we wanted something that spanned from frame rail to frame rail rather than being two separate mounts on each side of the car. The second thing we wanted was a bracket that was very rigid. To that end we created a box end on the driver's side and put in a gusset on the passenger side. The last thing we did was add a lower plate to, again, add rigidity. The lower plate will also allow me to add a skid plate that will protect the rack.
Once we had the design done I had some thin plate steel water jet cut to the specs. I then spot welded together a mock up bracket. From there, once I knew the bracket was good, I had a final piece made out of 1/4 inch steel. We had a metal fabricator do it right... lol... not my welding...
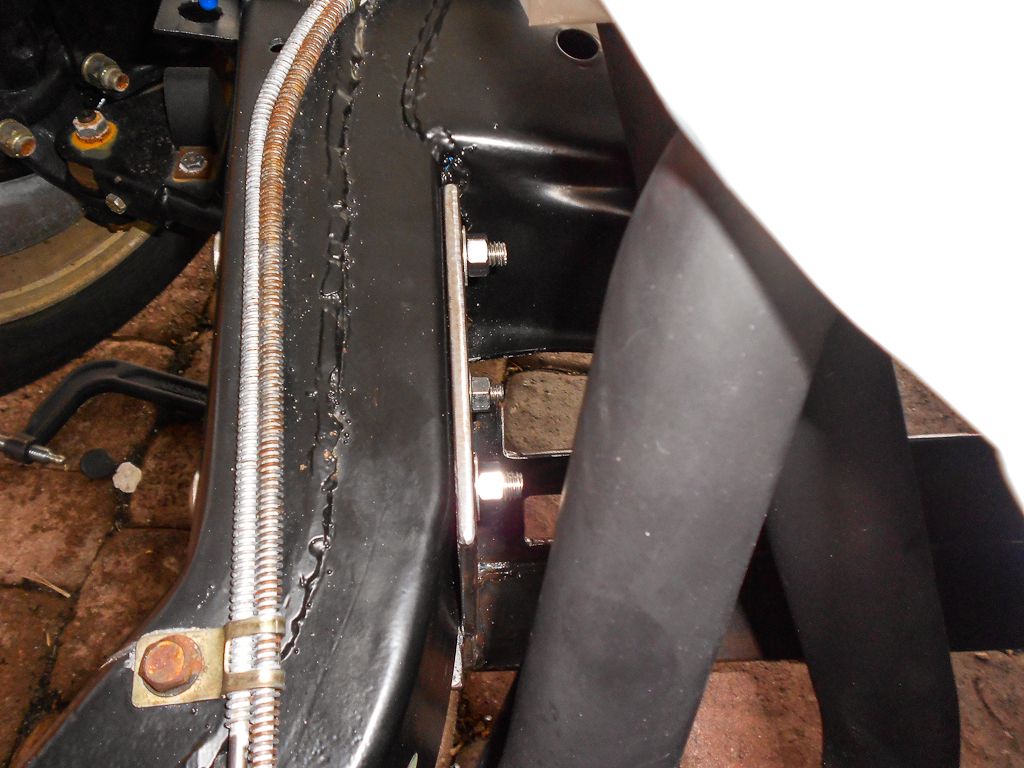
So what I did today was to position the finished bracket into place. I then drilled the driver's side bolt holes. We are using three 3/8 carriage bolts on each side. The holes being used on the frame are all the original steering mounting points. Now that this is done, next step is to have the rack mounting plates put on. Those will be drilled and tapped to take the rack brackets.
This is the driver's side of the bracket mounted to the frame. You can see the lower suspension arm. It's a Van Steel arm. The bracket box on this side rides up against the frame and when bolted in cannot rotate or move in any direction. It is also cut to clear the weld point for the engine mount. You can also see the headers leading to the side pipes in the back.
This is the passenger side. On this side it is just a shaped plate that slides in around the engine mount bracket. Three bolts here as well. You can see the gusset on this side where the plate coming across meets the upright that attaches to the frame rail. The oil pan is what you see in the foreground on the upper right corner.
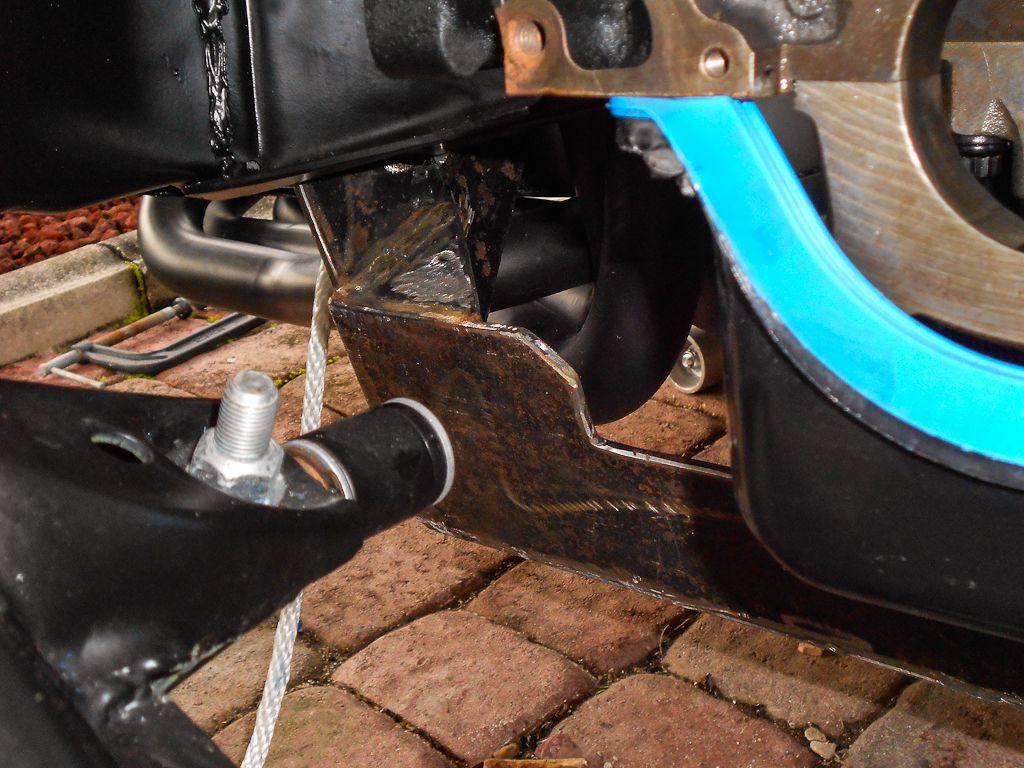
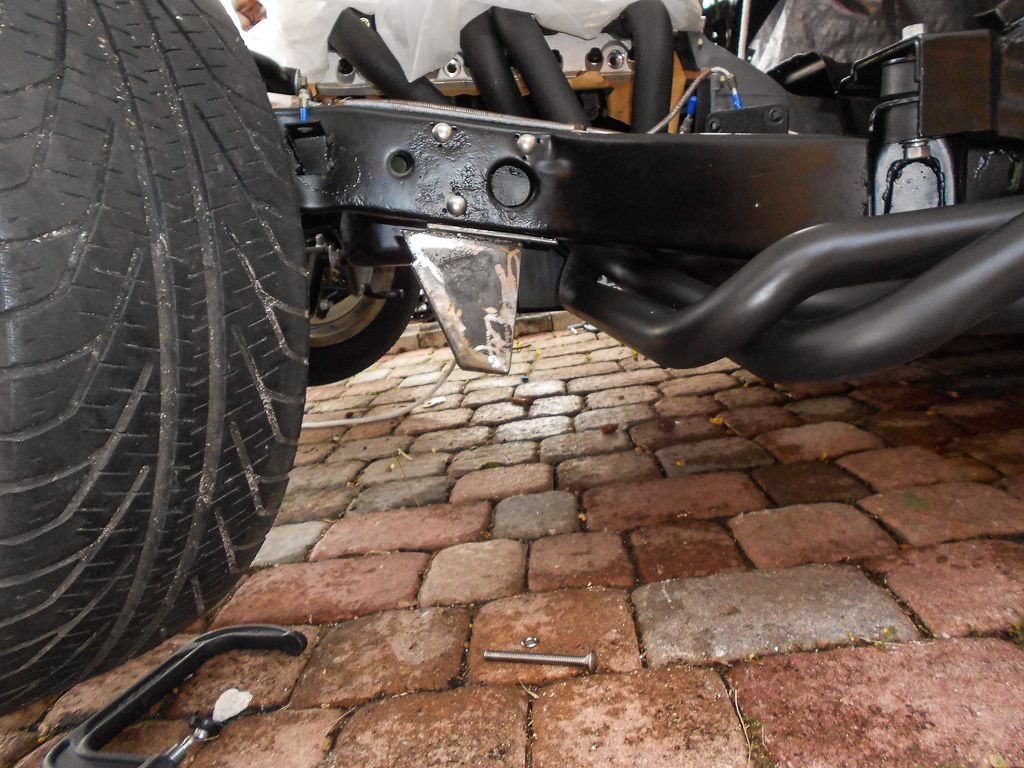
This is the driver's side and the bolts used. It also gives you a frame of reference for the position of the lower portion of the bracket in relation to the headers and side pipes. The car is jacked up, but you can see how much lower the bracket is than the pipes. I figure it is about an inch to two inches lower than the side pipes.
This is the driver's side from above.
This is the shot of the whole thing in place. First from a bit of an angle.
This shot is from straight on in front.
From here... Once everything is finished off, I will have it blasted and powder coated to match the frame and other components.
When we started the build we decided to go with a rack and pinion conversion. However, rather than buying something off the shelf, we decided to make a custom bracket. A few months back we (the consultant/builder/guru working with me and I) started to mock up a custom bracket to mount up the rack and pinion we are using on the car. The design has a few things in mind. First, we wanted something that spanned from frame rail to frame rail rather than being two separate mounts on each side of the car. The second thing we wanted was a bracket that was very rigid. To that end we created a box end on the driver's side and put in a gusset on the passenger side. The last thing we did was add a lower plate to, again, add rigidity. The lower plate will also allow me to add a skid plate that will protect the rack.
Once we had the design done I had some thin plate steel water jet cut to the specs. I then spot welded together a mock up bracket. From there, once I knew the bracket was good, I had a final piece made out of 1/4 inch steel. We had a metal fabricator do it right... lol... not my welding...
So what I did today was to position the finished bracket into place. I then drilled the driver's side bolt holes. We are using three 3/8 carriage bolts on each side. The holes being used on the frame are all the original steering mounting points. Now that this is done, next step is to have the rack mounting plates put on. Those will be drilled and tapped to take the rack brackets.
This is the driver's side of the bracket mounted to the frame. You can see the lower suspension arm. It's a Van Steel arm. The bracket box on this side rides up against the frame and when bolted in cannot rotate or move in any direction. It is also cut to clear the weld point for the engine mount. You can also see the headers leading to the side pipes in the back.
This is the passenger side. On this side it is just a shaped plate that slides in around the engine mount bracket. Three bolts here as well. You can see the gusset on this side where the plate coming across meets the upright that attaches to the frame rail. The oil pan is what you see in the foreground on the upper right corner.
This is the driver's side and the bolts used. It also gives you a frame of reference for the position of the lower portion of the bracket in relation to the headers and side pipes. The car is jacked up, but you can see how much lower the bracket is than the pipes. I figure it is about an inch to two inches lower than the side pipes.
This is the driver's side from above.
This is the shot of the whole thing in place. First from a bit of an angle.
This shot is from straight on in front.
From here... Once everything is finished off, I will have it blasted and powder coated to match the frame and other components.
12-29-2013, 10:41 AM
#224
Racer
Thread Starter
Since on the flare, it is a cone and it had a tool to form it, I was afraid that heating it might create a split. However, now that it's 1-0 in favor of the stainless line, I'll heat it for round two... lol
01-19-2014, 05:26 PM
#225
Racer

Holy cow, you went all out!!! AWESOME build to bring a dead vette back to life. I have to ask, seeing your area in the background.. Are you not getting any flack from the H.O.A!!!
01-19-2014, 07:20 PM
#226
Great build, thanks for the detail 
01-20-2014, 01:41 PM
#227
Racer
Thread Starter
Neighbors are all friends and pretty cool about the whole thing anyway. They ae more interested in the progress anyway! They're all dying to see it done.
 06-20-2015, 08:37 AM
#229
Racer
Thread Starter
Yes ladies and gentlemen..... It is not a mistake, this thread has been updated! The car still exists. It will be finished. No....it is not another "never finished and sold off" project. This car will get done!
So in 18 months not a great deal was done, but last night we did take a step forward. Believe it or not. While it is not a huge step... it is something that had to be done and it is a step in the right direction!
Last night we dry fitted the firewall and body back onto the frame. I must say that after so much time off the car and so much patching and small spot repairs done, I was afraid I was going to fight it. Particularly the firewall. On that, I had done a great deal of repair work. More than repair, reconstruction. There was complete sections missing from it. Particularly where it met the floor on the birdcage and where the body bonds to the firewall or cowl. Those sections need to have the profile to match for the bodywork so they could marry up to it.
Another area of concern was the birdcage. If you guys shoot back to the early posts, you'll see a lot of welding and fabrication went into the repairs of that. The firewall mates up to the fabrication I did at the lower windshield corners. The rear section of the body work also comes up into the birdcage. I was a bit worried that it would not be perfect and that there would be some shifting or warping in the frame that would not let me get everything on right.
In the end, it all was great. The fit was dead on. The firewall to the frame/birdcage (which I had seen already, to be fair), the rear clip to the birdcage and the front clip to the firewall all mated very nicely. Even the move of the fuel fill was perfect and met the filler neck on the tank perfectly. Frankly, I was surprised at how well it all lined up. Bottom line I will be able to move forward.
Anyway.... here are the pictures. Apologies for the grainy look... I was just running out of light but had to get a shot. This is the first time the car has REMOTELY resembled a Corvette in almost 4 years!
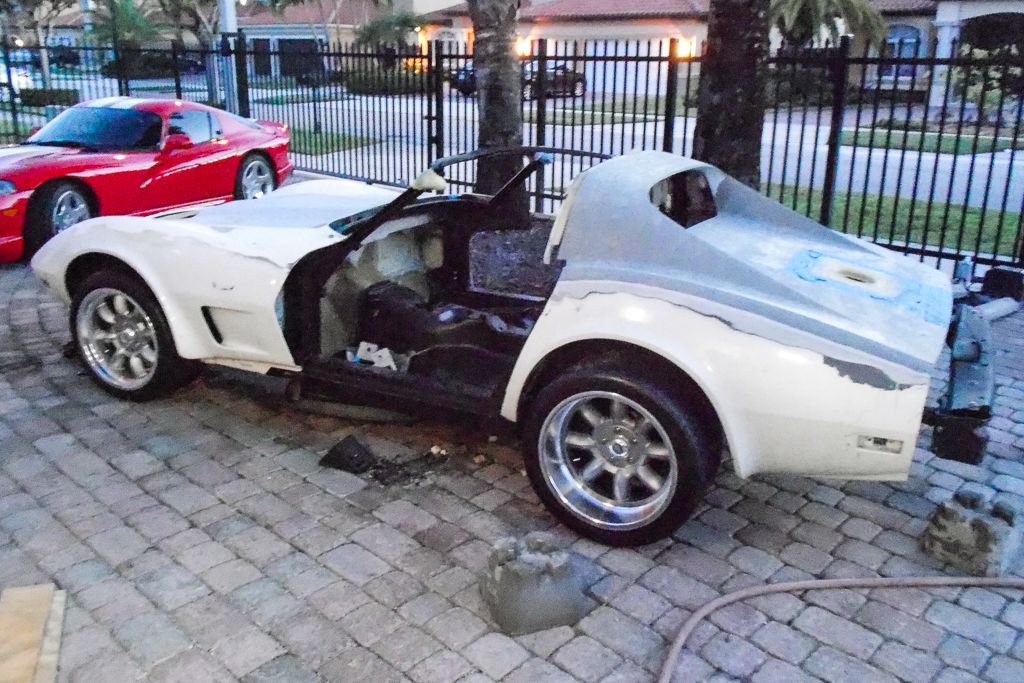
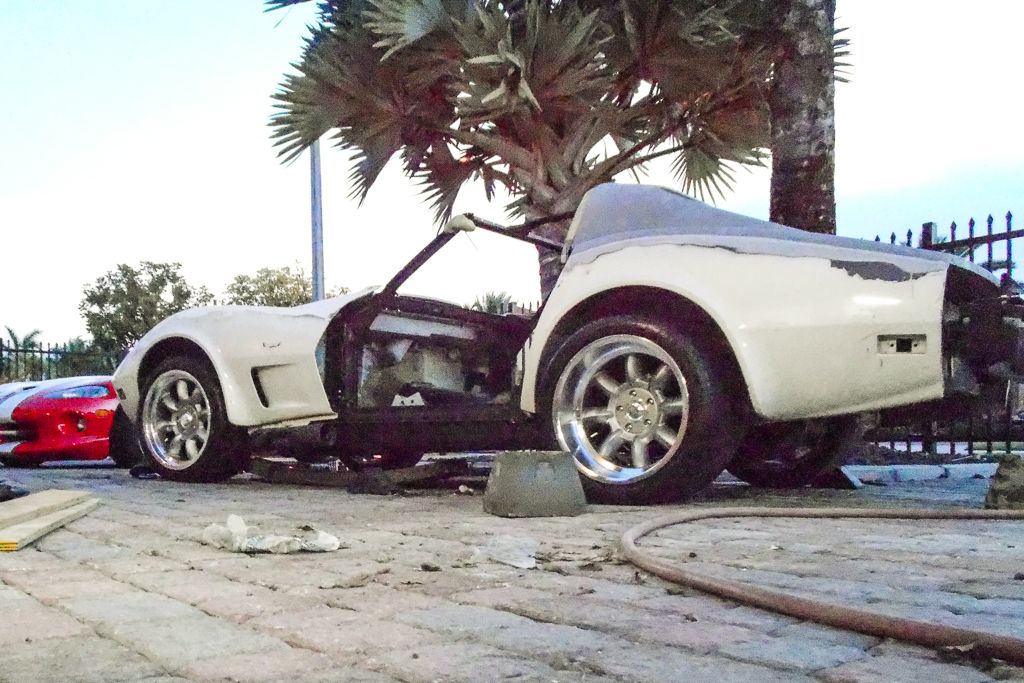
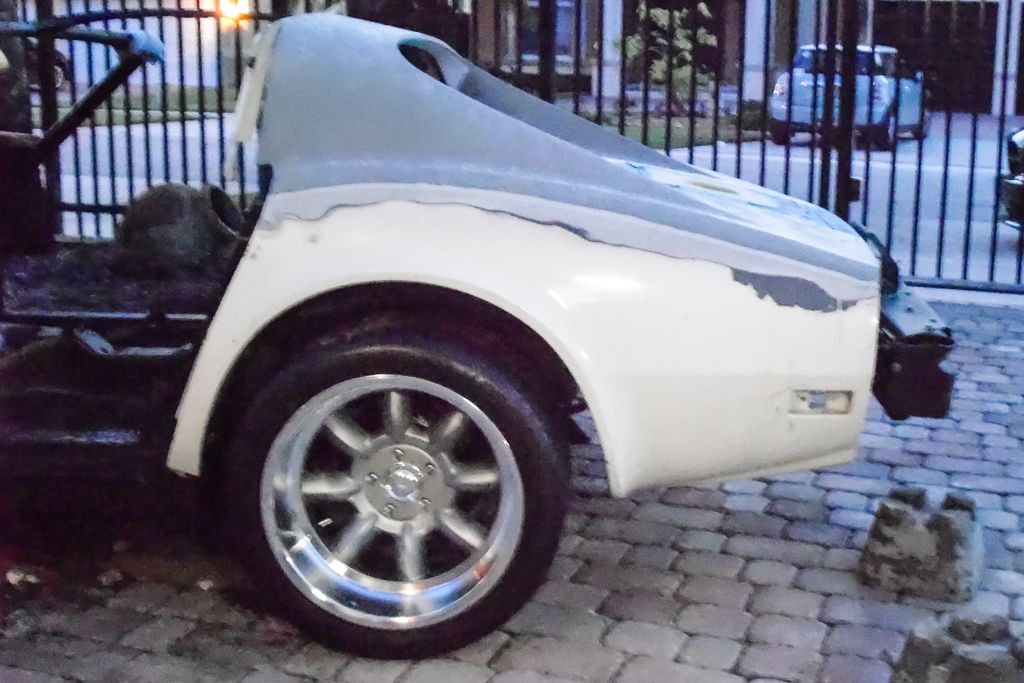
This last shot is just to show the amount the new wheel/tire combo sticks out. It's hard to tell in the shot because it's a bit difficult to line up. The tires are outboard of the fenders about 2" right now. Those are 335 rears! No worries though.... the flares will take that up real nice.

Right now I am really stoked! The wheels/tires with the body on there looks FREAKING AWESOME! It's tough to see, but the side pipes are there and they look badass. Yeah the ride height is stupid high because there is no weight in the car (engine is not complete so it's missing a ton of weight) and the coil overs have not been set right.... but holy crap.... I can see it..... It's a Corvette again!
So in 18 months not a great deal was done, but last night we did take a step forward. Believe it or not. While it is not a huge step... it is something that had to be done and it is a step in the right direction!
Last night we dry fitted the firewall and body back onto the frame. I must say that after so much time off the car and so much patching and small spot repairs done, I was afraid I was going to fight it. Particularly the firewall. On that, I had done a great deal of repair work. More than repair, reconstruction. There was complete sections missing from it. Particularly where it met the floor on the birdcage and where the body bonds to the firewall or cowl. Those sections need to have the profile to match for the bodywork so they could marry up to it.
Another area of concern was the birdcage. If you guys shoot back to the early posts, you'll see a lot of welding and fabrication went into the repairs of that. The firewall mates up to the fabrication I did at the lower windshield corners. The rear section of the body work also comes up into the birdcage. I was a bit worried that it would not be perfect and that there would be some shifting or warping in the frame that would not let me get everything on right.
In the end, it all was great. The fit was dead on. The firewall to the frame/birdcage (which I had seen already, to be fair), the rear clip to the birdcage and the front clip to the firewall all mated very nicely. Even the move of the fuel fill was perfect and met the filler neck on the tank perfectly. Frankly, I was surprised at how well it all lined up. Bottom line I will be able to move forward.
Anyway.... here are the pictures. Apologies for the grainy look... I was just running out of light but had to get a shot. This is the first time the car has REMOTELY resembled a Corvette in almost 4 years!
This last shot is just to show the amount the new wheel/tire combo sticks out. It's hard to tell in the shot because it's a bit difficult to line up. The tires are outboard of the fenders about 2" right now. Those are 335 rears! No worries though.... the flares will take that up real nice.
Right now I am really stoked! The wheels/tires with the body on there looks FREAKING AWESOME! It's tough to see, but the side pipes are there and they look badass. Yeah the ride height is stupid high because there is no weight in the car (engine is not complete so it's missing a ton of weight) and the coil overs have not been set right.... but holy crap.... I can see it..... It's a Corvette again!
Last edited by luisv; 02-01-2021 at 07:05 PM.


 02-02-2021, 12:17 PM
#234
Racer
Thread Starter
So we are back at it!!!!
It's been sitting for a few years. It made the move to a new house with the family. It's sat and survived a hurricane and a couple of very close hurricane passes. It sat through a family loss. It did weather a little but we can and will correct it. Hopefully this time we will get it finished. Wife (it's her car) has asked if we can get it finished for her birthday right around Thanksgiving. We'll do our best to make that happen. Next post will be some quick shots of how it sits today.
Fingers crossed and I will be posting some questions for the experts soon.
So let's get this moving again!
02-02-2021, 12:51 PM
#235
Racer
Thread Starter
Just realized that I will have to re-link the photos from the past posts.
Arrrrrgh! freaking Photobucket morons. I paid for the service then they decided later not to allow forum links and I had to migrate. I HATE PHOTOBUCKET.... so.... give me some time and I'll re-link all the photos again.
Arrrrrgh! freaking Photobucket morons. I paid for the service then they decided later not to allow forum links and I had to migrate. I HATE PHOTOBUCKET.... so.... give me some time and I'll re-link all the photos again.
02-02-2021, 10:01 PM
#236
Racer
Thread Starter
So this is where we sit today. Unfortunately, weathering from Florida sun and storms coupled with some crappy covers and simply sitting, we get the following results. Good news is that the powder coat is easily “revived” with a little elbow grease. Some of the corrosion we have will now have to be dealt with. Some is surface corrosion, some is a bit deeper. Bottom line, nothing is fatal and I can get the car back to how it looked at the end of 2015 when I last worked on it.
We pulled the body off again. As a recap, nothing had been adhered. So everything was simply lying in place. It came apart easy.
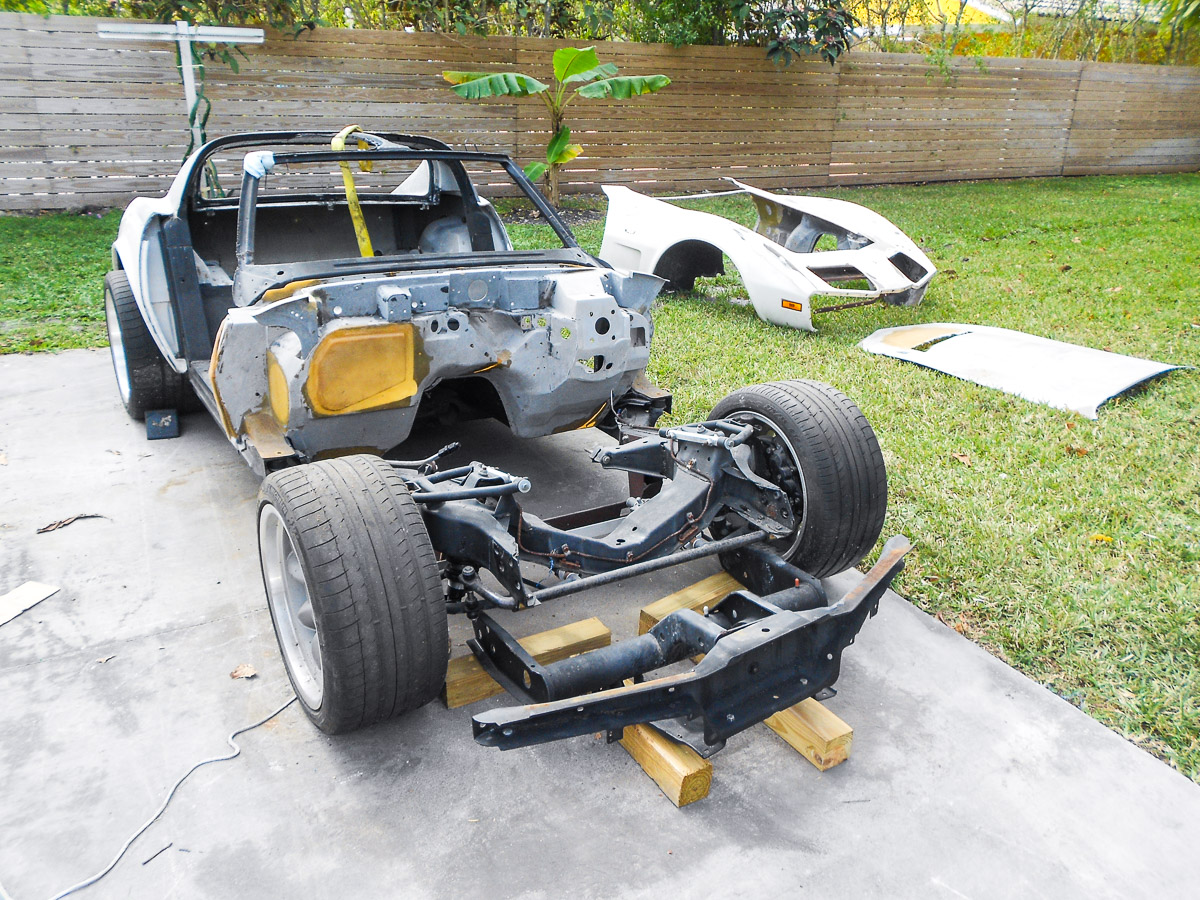
If you see, the chassis and birdcage is dusty and a little dull.
The wheels are just dirty. Tires are pull-off, old tires from our 2002 Viper. They will get replaced before we drive the car.
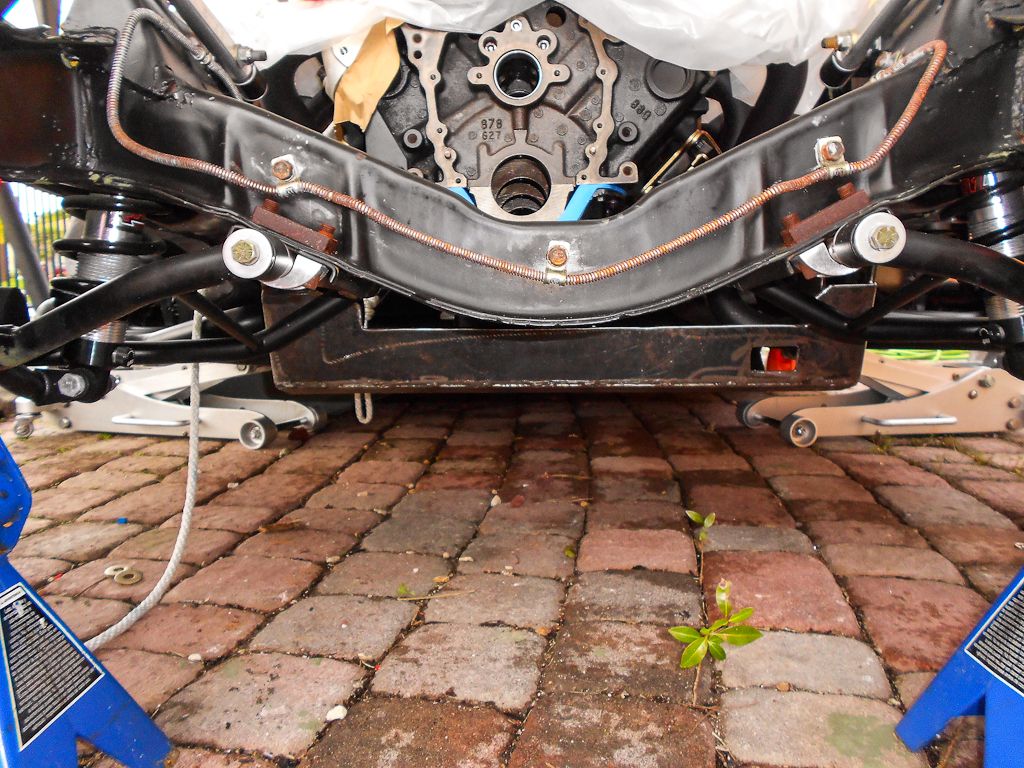
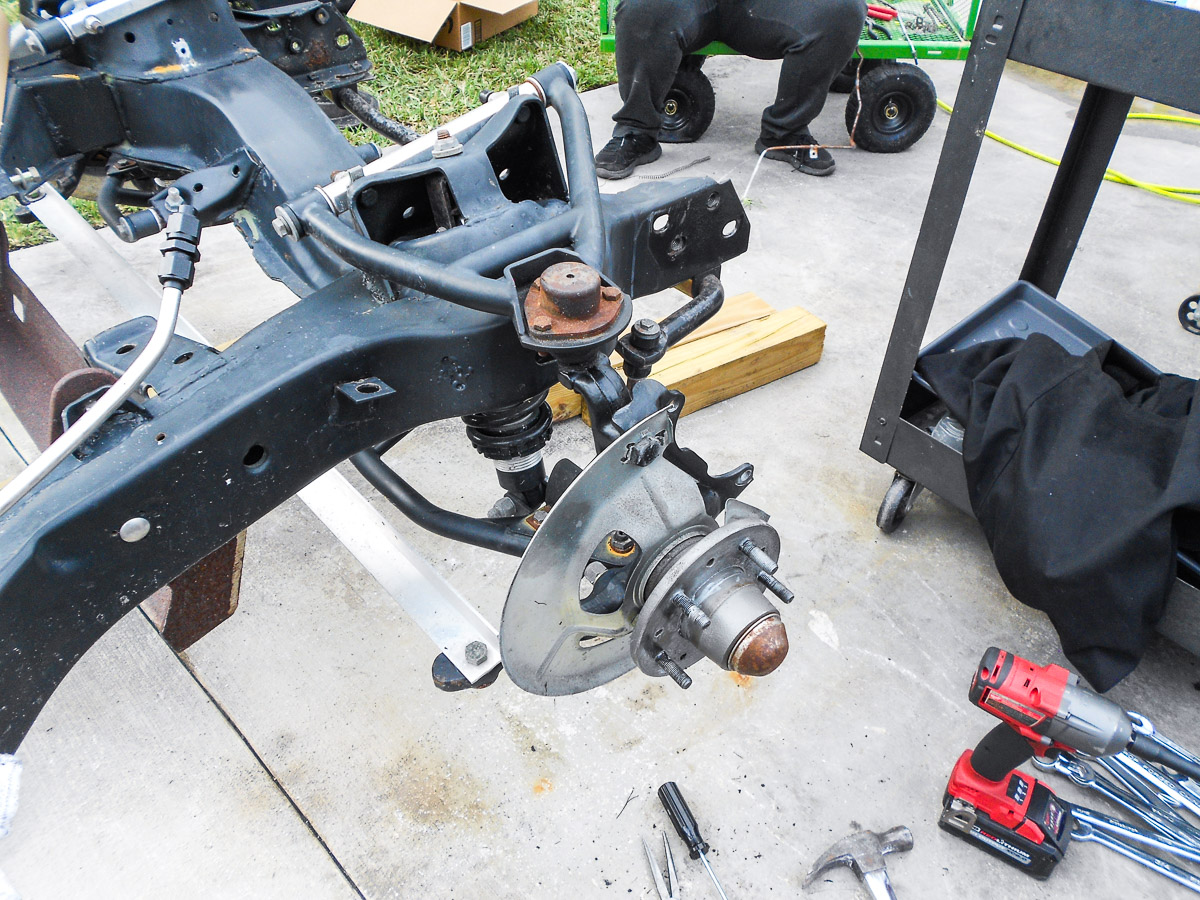
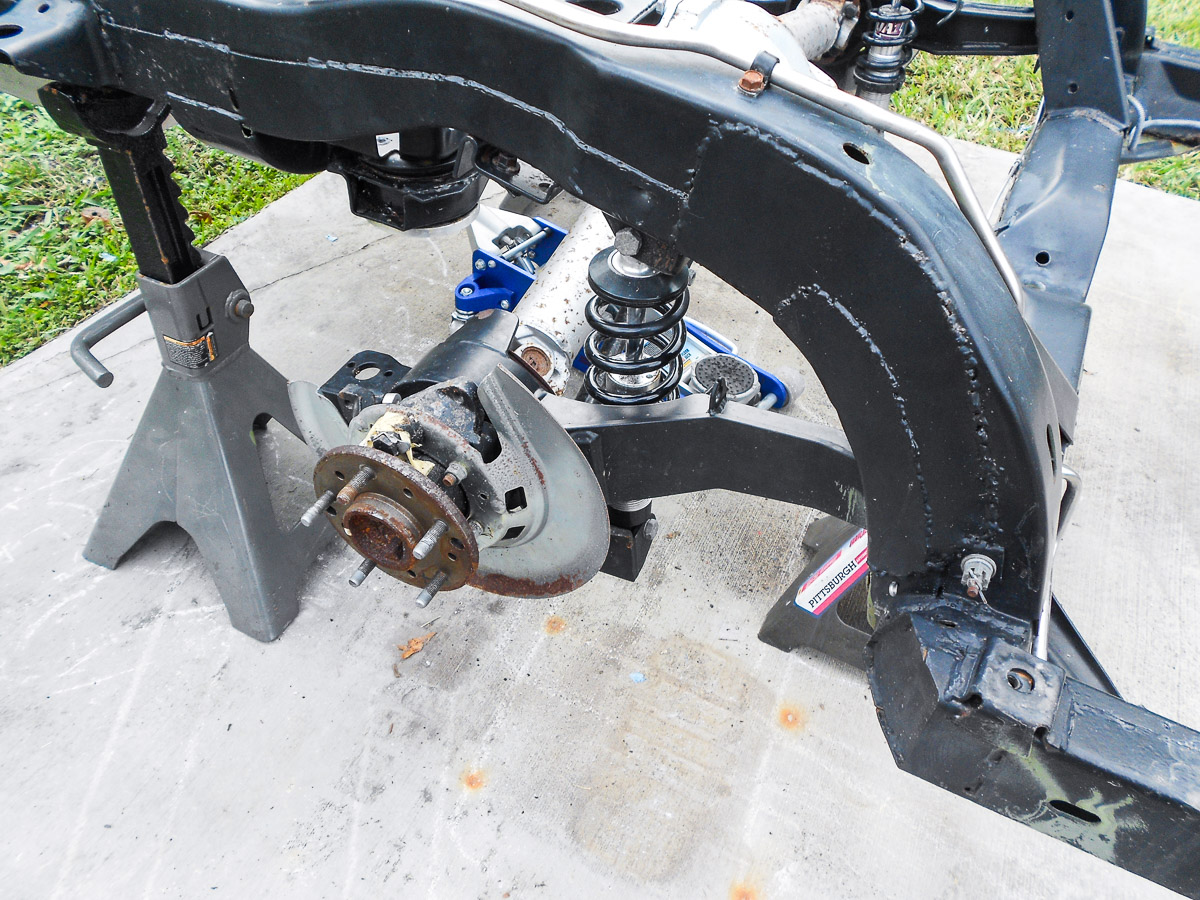
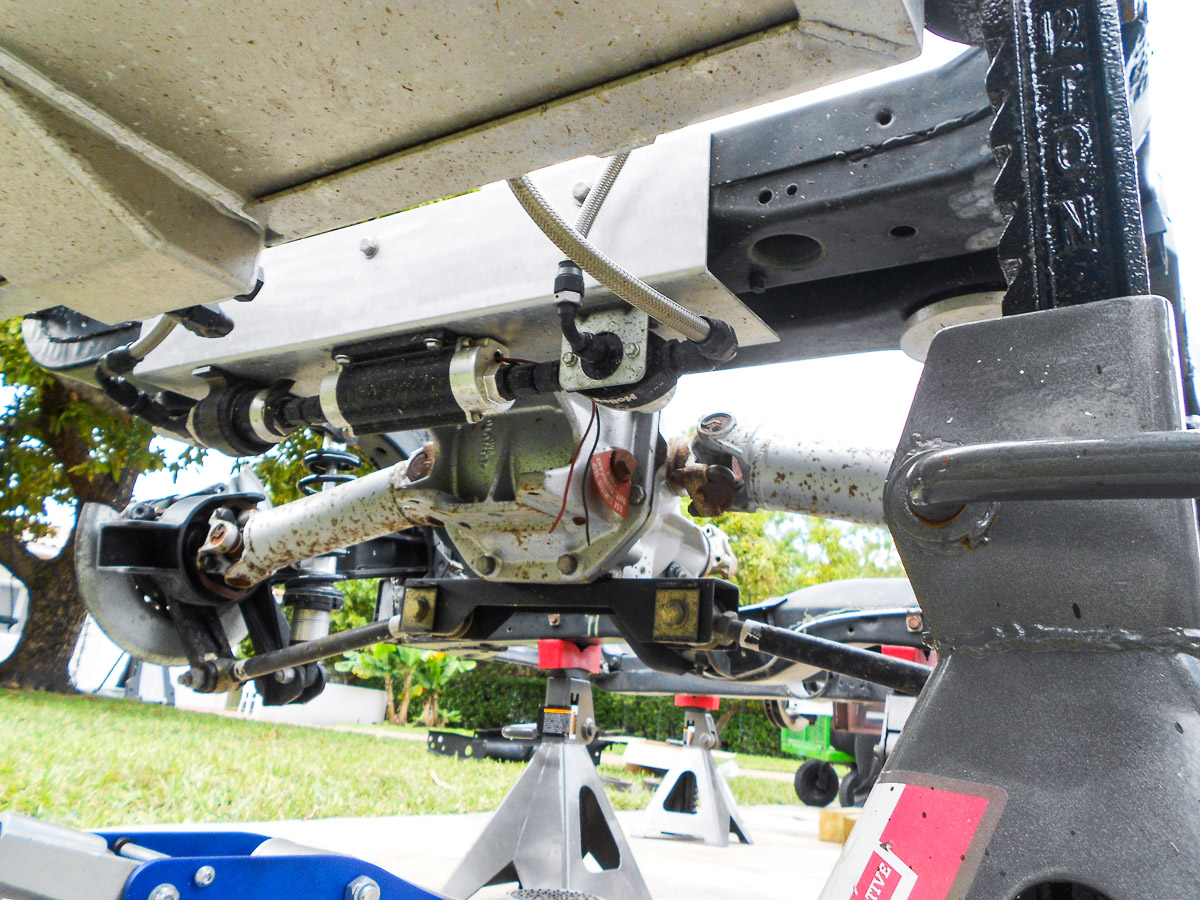
Started to disassemble the front suspension. The upper ball joint casing is rusted, but I’ll clean that all up and paint. The rest is again, just cleaning and some polish to get it back to life.
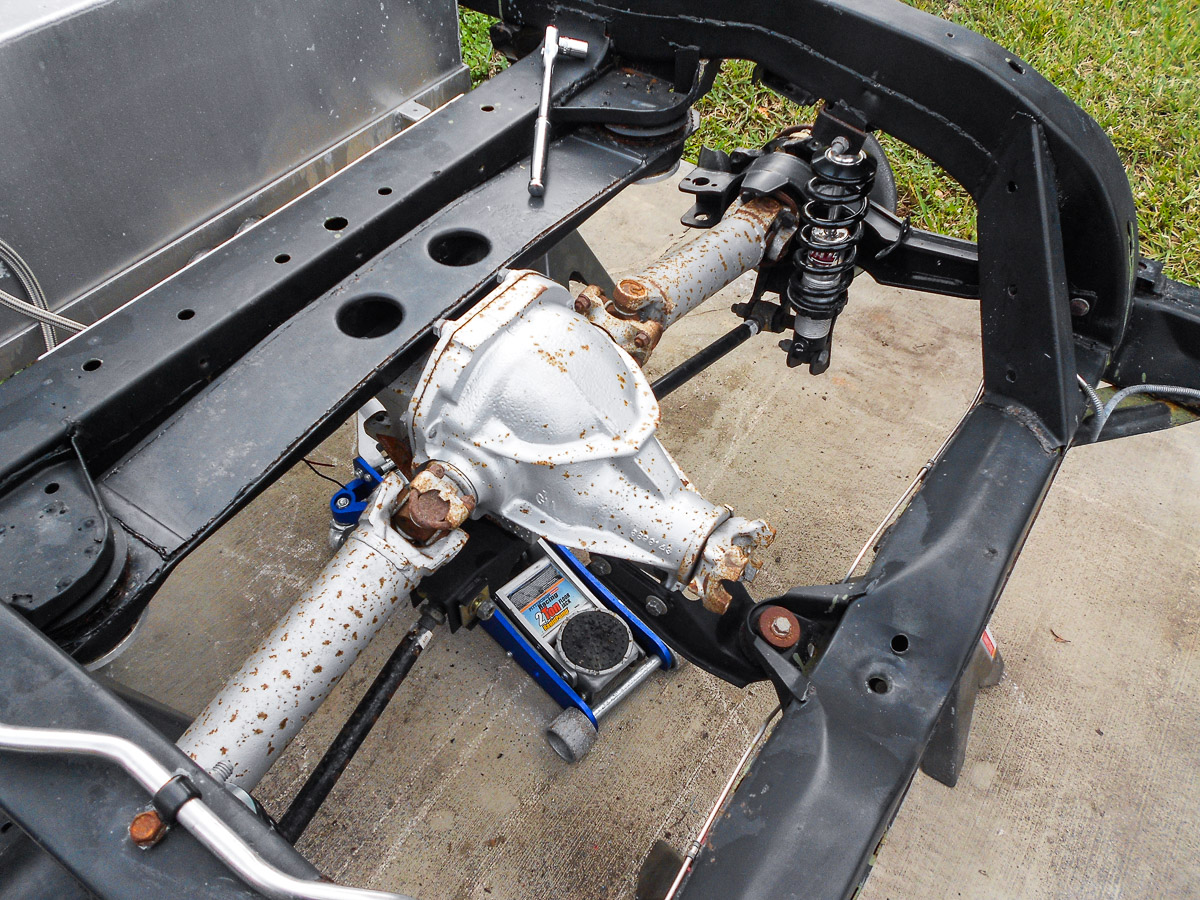
The rear suspension, differential and half shafts started getting some surface rust. Funny thing is that the diff is powder coated and the half shafts are painted. Both have the exact same surface rust. Makes one wonder.
We pulled the body off again. As a recap, nothing had been adhered. So everything was simply lying in place. It came apart easy.
If you see, the chassis and birdcage is dusty and a little dull.
The wheels are just dirty. Tires are pull-off, old tires from our 2002 Viper. They will get replaced before we drive the car.
Started to disassemble the front suspension. The upper ball joint casing is rusted, but I’ll clean that all up and paint. The rest is again, just cleaning and some polish to get it back to life.
The rear suspension, differential and half shafts started getting some surface rust. Funny thing is that the diff is powder coated and the half shafts are painted. Both have the exact same surface rust. Makes one wonder.
02-02-2021, 10:10 PM
#237
Racer
Thread Starter
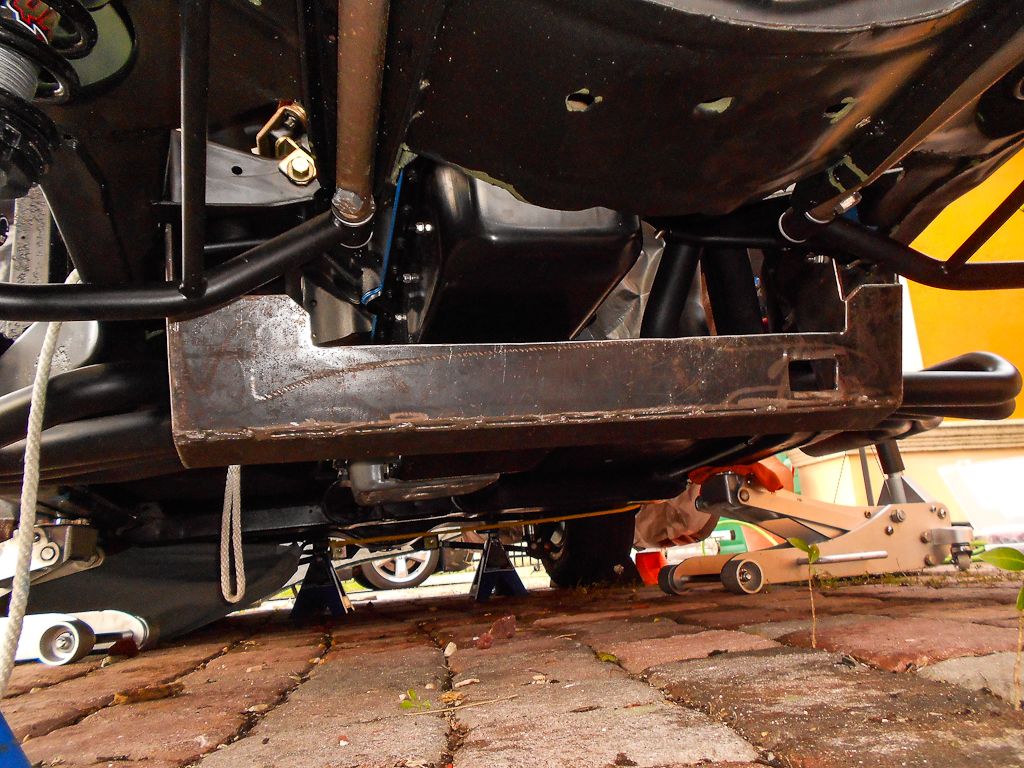
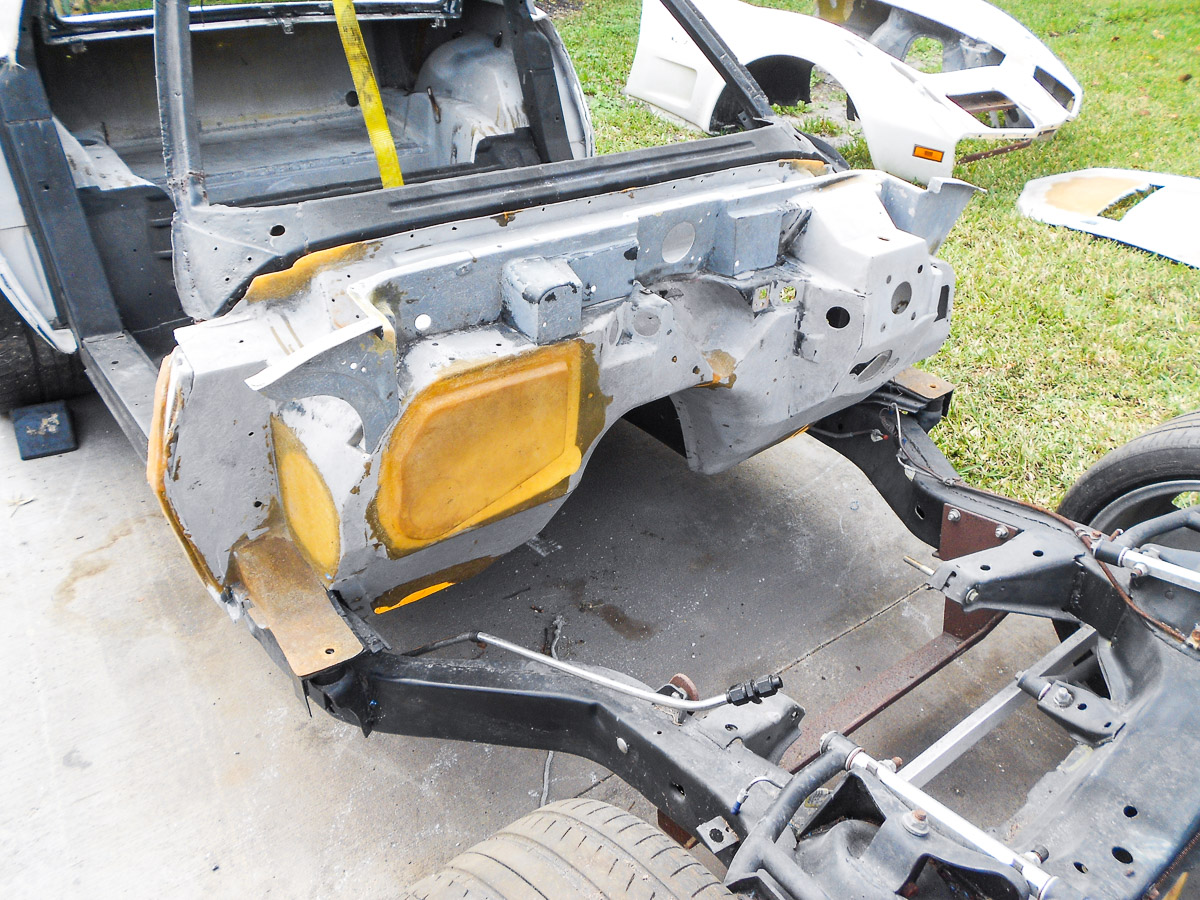
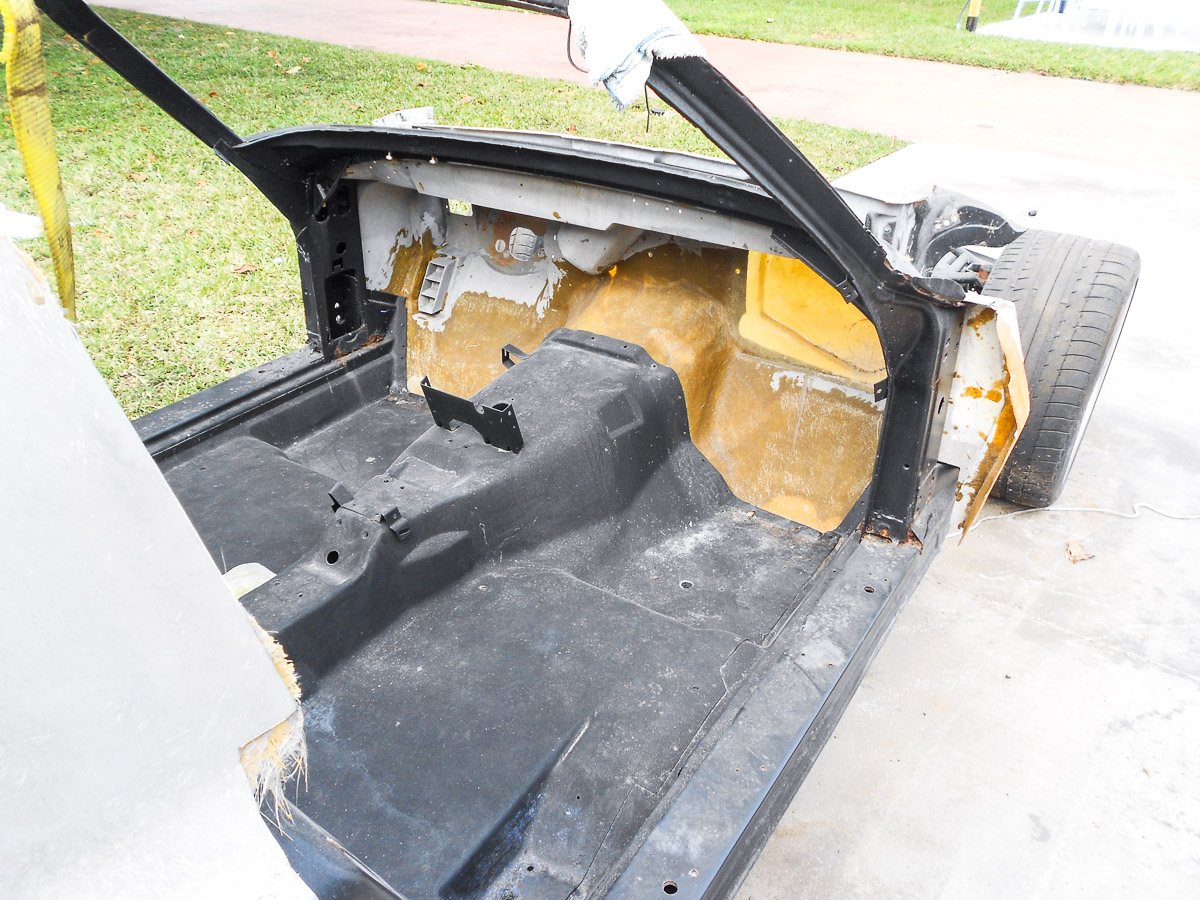
The last few photos are the fuel system that was left on the chassis. The fuel line and fittings are in place and the system is closed so there is nothing getting in there. We’ll get the tanka good once over before we finish.
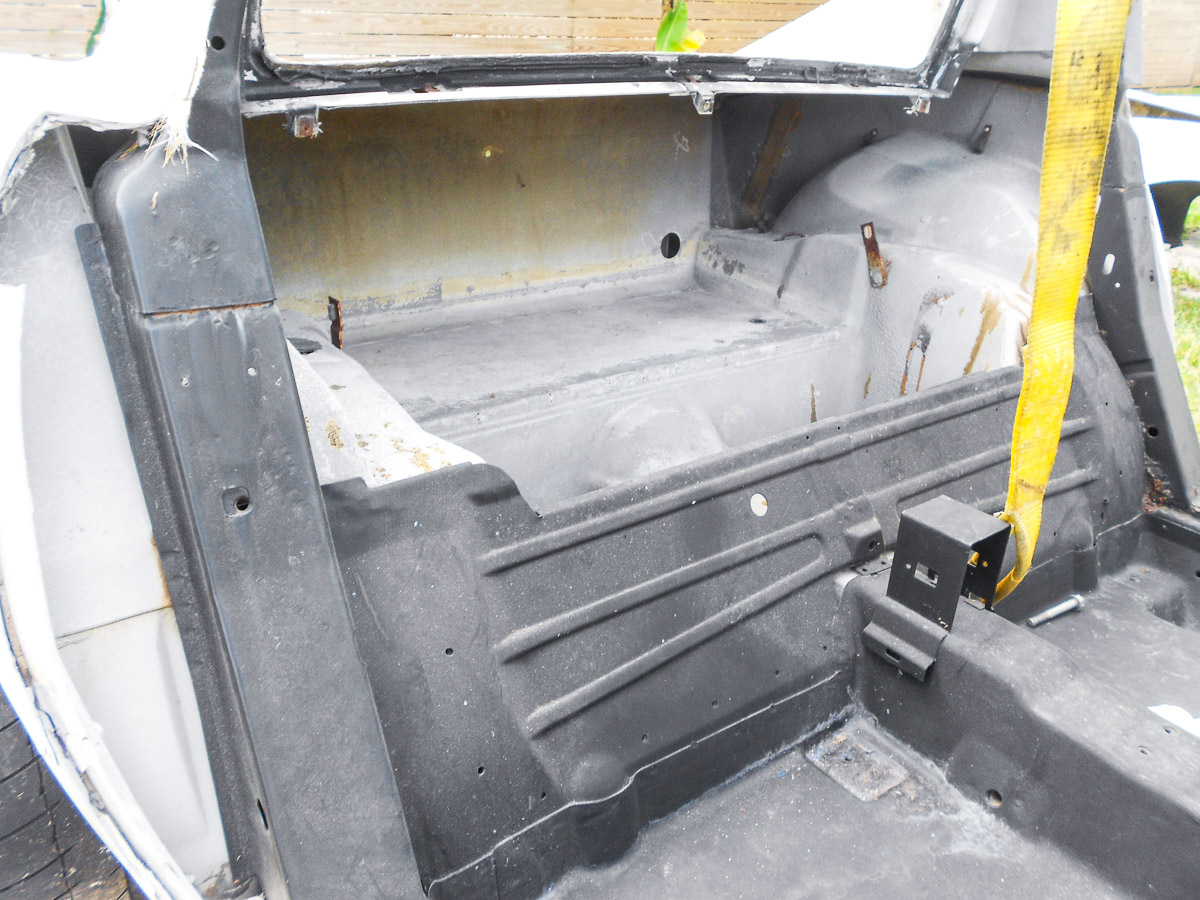
What we decided on that was to go with a tank of more than 20 gallons dropped into the frame significantly. We have eliminated the spare tire and will be placing a protective steel plate sloping up to cover everything, For now, this is how it looks.
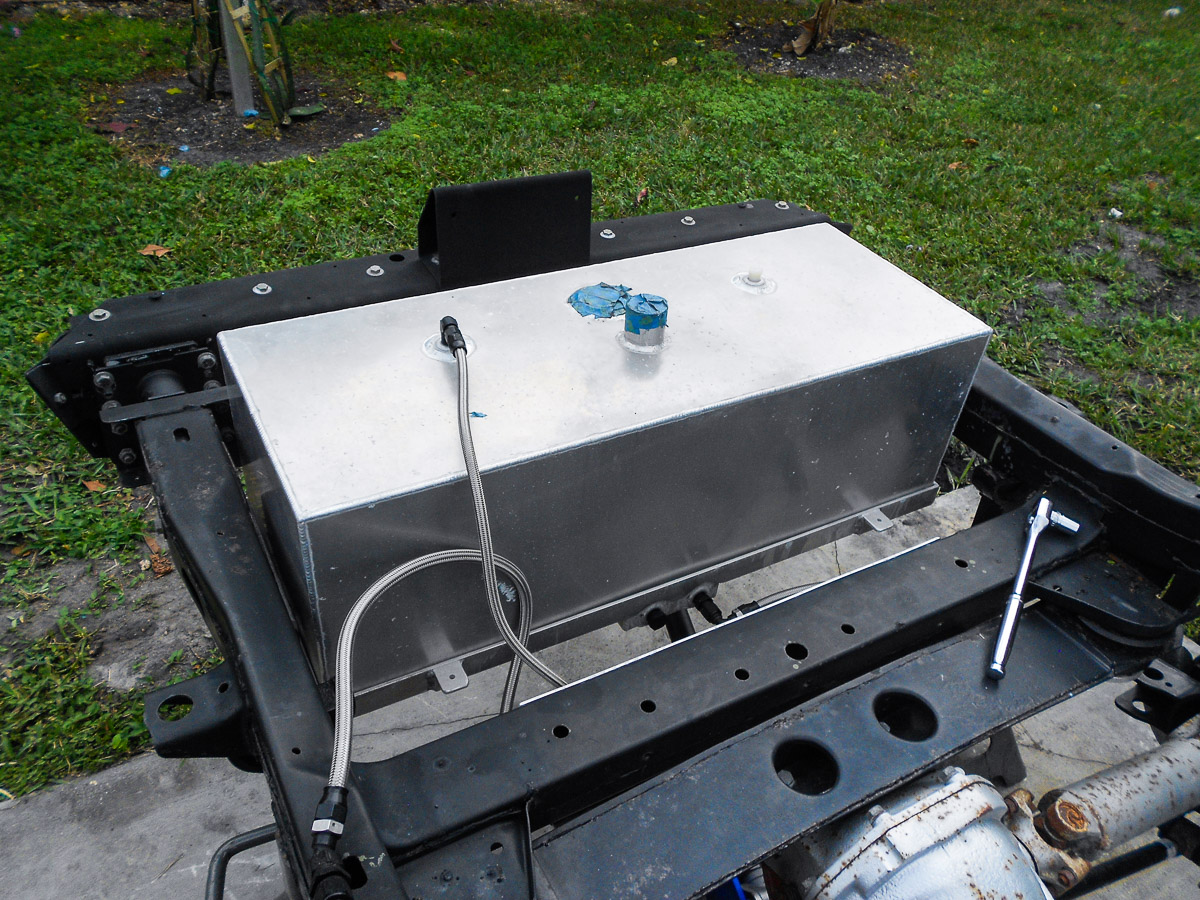
What you see on the fuel pump, regulator and filter is simply surface dirt. Came right off.
Anyway, that’s where we sit. I have already begun small things so I’ll begin to post some things soon.
What we decided on that was to go with a tank of more than 20 gallons dropped into the frame significantly. We have eliminated the spare tire and will be placing a protective steel plate sloping up to cover everything, For now, this is how it looks.
What you see on the fuel pump, regulator and filter is simply surface dirt. Came right off.
Anyway, that’s where we sit. I have already begun small things so I’ll begin to post some things soon.
02-17-2021, 10:29 AM
#238
Racer
Thread Starter
So here's an update for work done since the last post.
We decided that, first, working in the Florida Sun, even in the winter when it was in the low 70's a few days is brutal. Second, we did not want to start getting things nice again and then expose them completely to the rains and sun made sense. Therefore, we bought and put up a portable garage from Harbor Freight. It cost us $169 with a member coupon and assembled it in about 4 hours. It is completely watertight and we've already been hit with a few rains. It also keeps the car and us (when working on it) out of the sun. A couple of good shop fans and it's OK. To improve on the structure we hit all the slip-fit joints with self tapping screws and anchored it to the ground at all 8 legs. We should be good to go while we build!
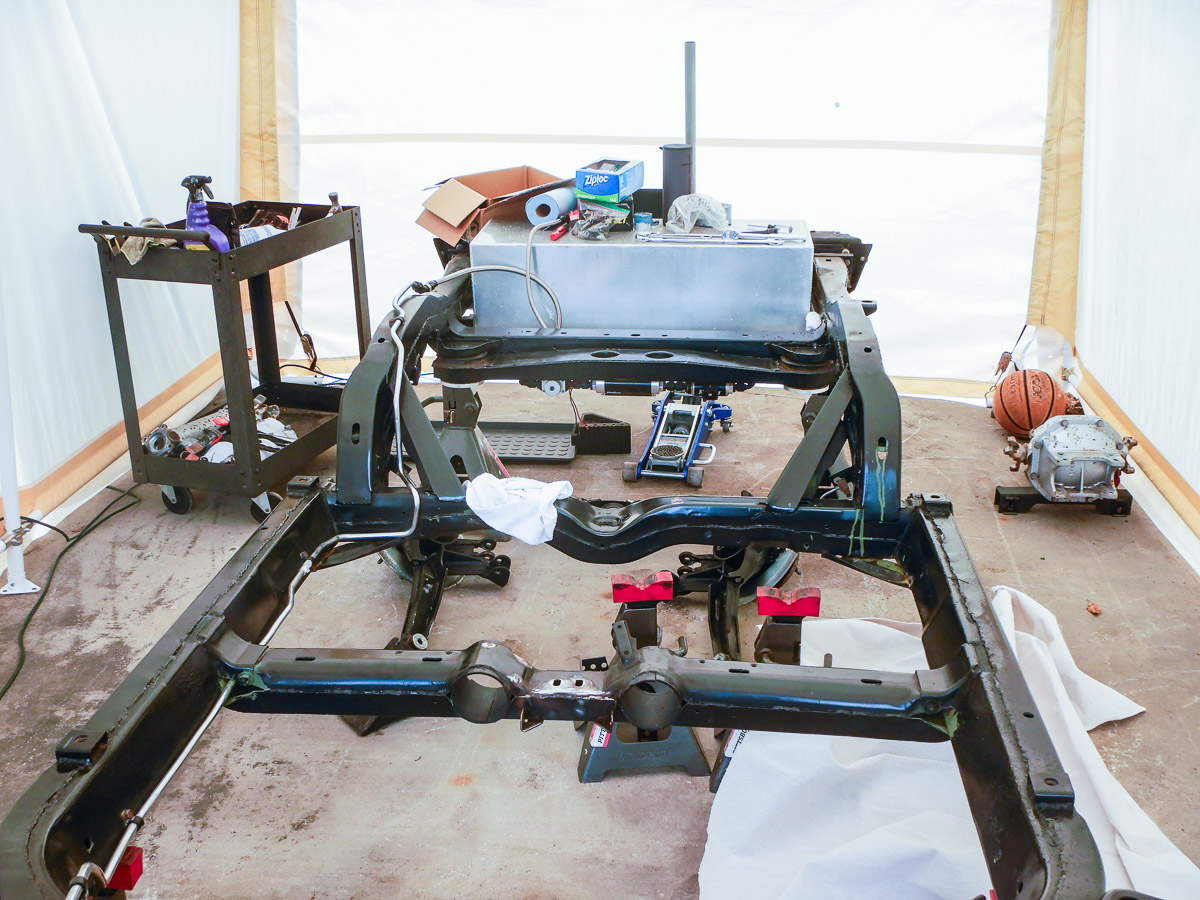
Moving on to why you all are here, the Vette.So we completely went back to the bare frame with the exception of leaving the fuel system in place. There was surface rust everywhere and it made no sense leaving the build like that. So to correct it we roughed up all the surfaces and cleaned off all the surface rust we found. We then hit all the parts with Eastwood Rust Encapsulator as a primer and then hit the parts with a couple of coats of Eastwood Extreme Chassis Black paint. The finish is an exact match for the powder coated frame so, looking at it after I was done, it is next to impossible to tell the difference in the finish. This is awesome because it allowed me to hit a few parts of the frame without having to repaint the entire frame.
I also did the front suspension, trailing arms, mounting hardware for the suspension, differential, and differential mounting brackets. Besides the out side of the frame we went ahead and resprayed the interior of the frame and birdcage again with Eastwood Internal Frame Coating. We had done that and it held up fine, but we figured a new coat would not hurt. We went with the black this time (it was not available in black before) and recovered all the interior of the frame.
Bottom line, we got everything back to looking like it was right after I got it back from the powder coater years back.
We decided that, first, working in the Florida Sun, even in the winter when it was in the low 70's a few days is brutal. Second, we did not want to start getting things nice again and then expose them completely to the rains and sun made sense. Therefore, we bought and put up a portable garage from Harbor Freight. It cost us $169 with a member coupon and assembled it in about 4 hours. It is completely watertight and we've already been hit with a few rains. It also keeps the car and us (when working on it) out of the sun. A couple of good shop fans and it's OK. To improve on the structure we hit all the slip-fit joints with self tapping screws and anchored it to the ground at all 8 legs. We should be good to go while we build!
Moving on to why you all are here, the Vette.So we completely went back to the bare frame with the exception of leaving the fuel system in place. There was surface rust everywhere and it made no sense leaving the build like that. So to correct it we roughed up all the surfaces and cleaned off all the surface rust we found. We then hit all the parts with Eastwood Rust Encapsulator as a primer and then hit the parts with a couple of coats of Eastwood Extreme Chassis Black paint. The finish is an exact match for the powder coated frame so, looking at it after I was done, it is next to impossible to tell the difference in the finish. This is awesome because it allowed me to hit a few parts of the frame without having to repaint the entire frame.
I also did the front suspension, trailing arms, mounting hardware for the suspension, differential, and differential mounting brackets. Besides the out side of the frame we went ahead and resprayed the interior of the frame and birdcage again with Eastwood Internal Frame Coating. We had done that and it held up fine, but we figured a new coat would not hurt. We went with the black this time (it was not available in black before) and recovered all the interior of the frame.
Bottom line, we got everything back to looking like it was right after I got it back from the powder coater years back.
02-17-2021, 10:43 AM
#239
Racer
Thread Starter
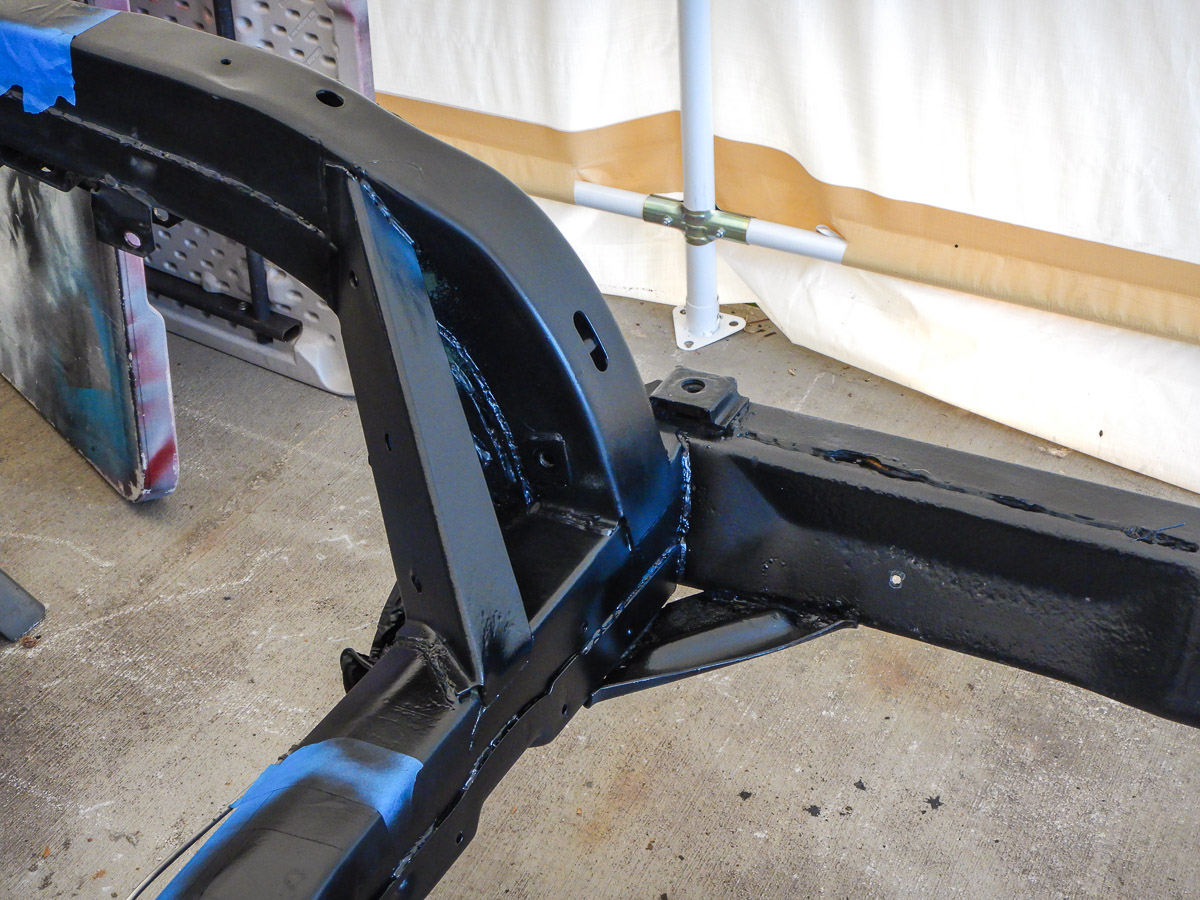
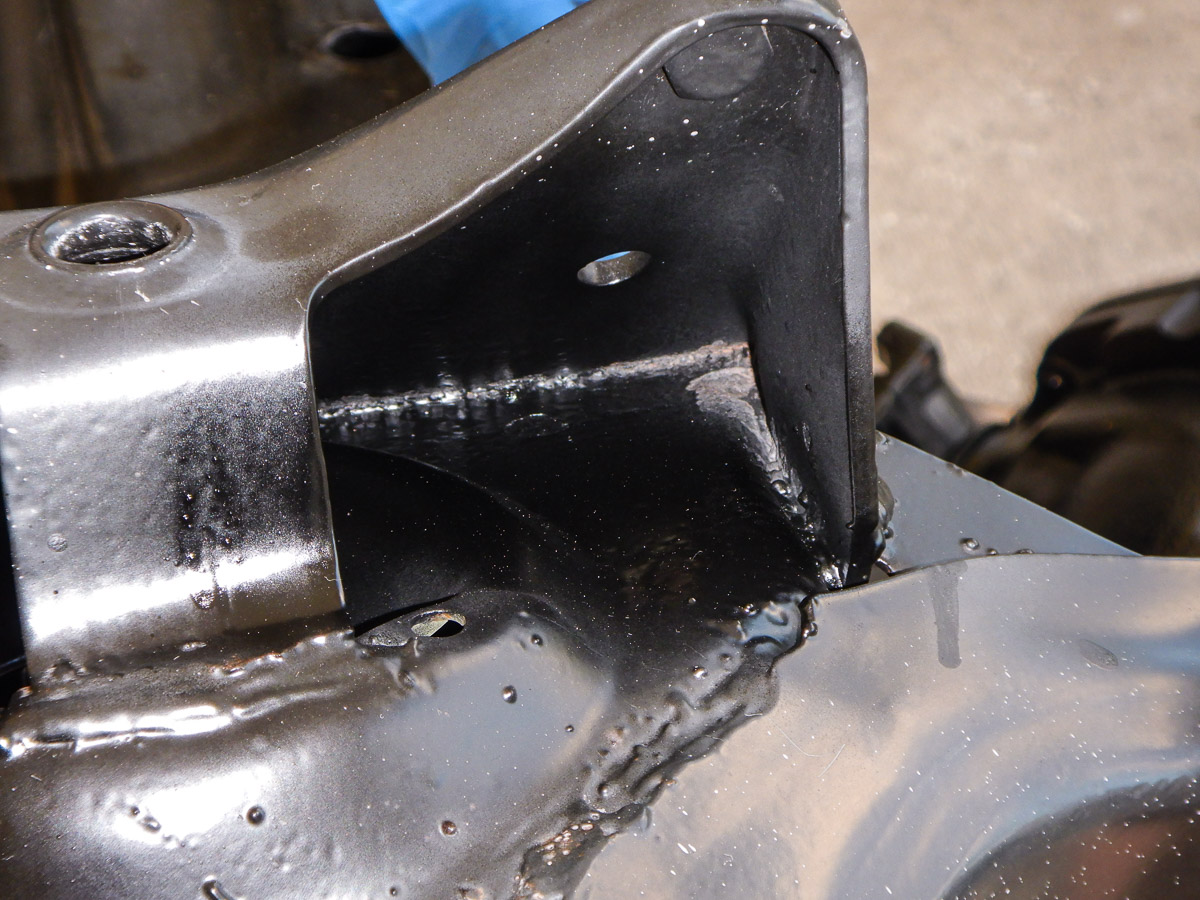
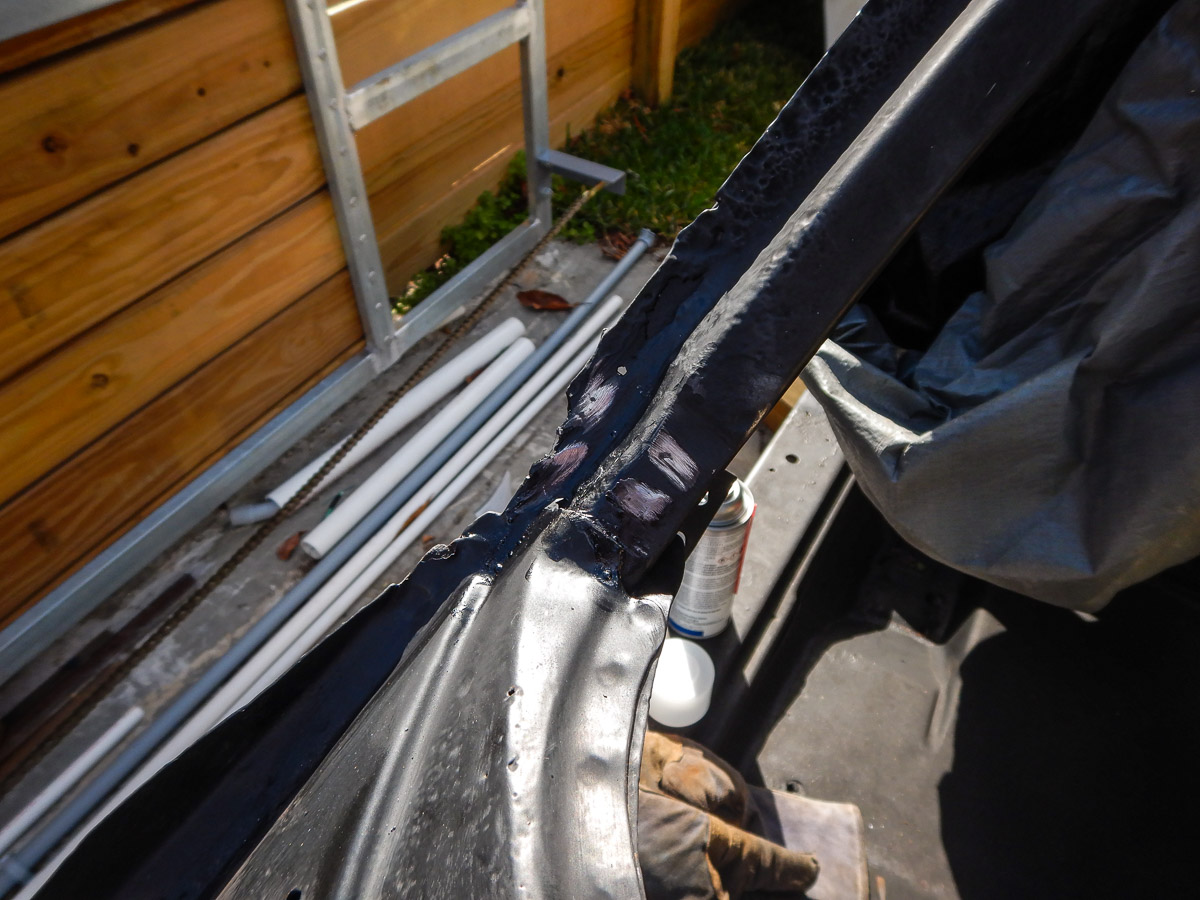
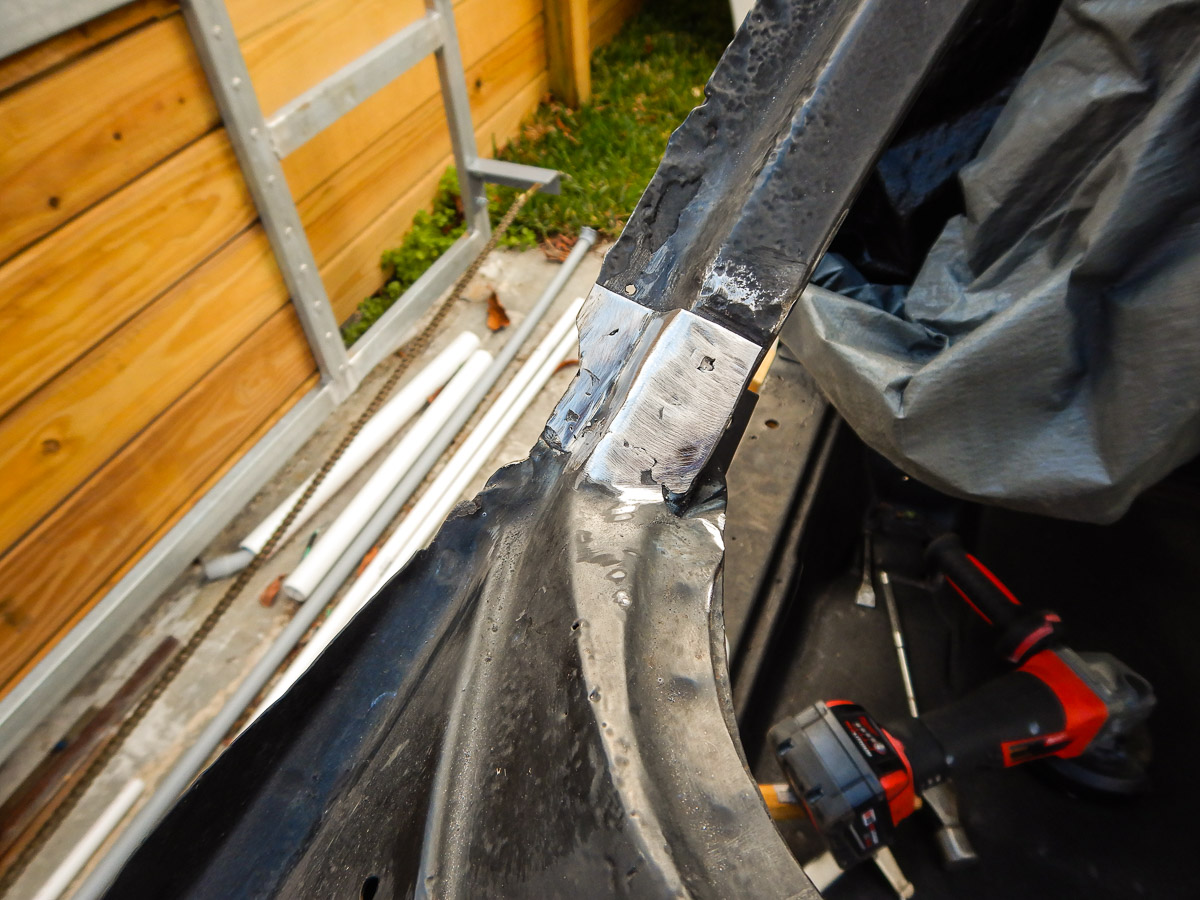
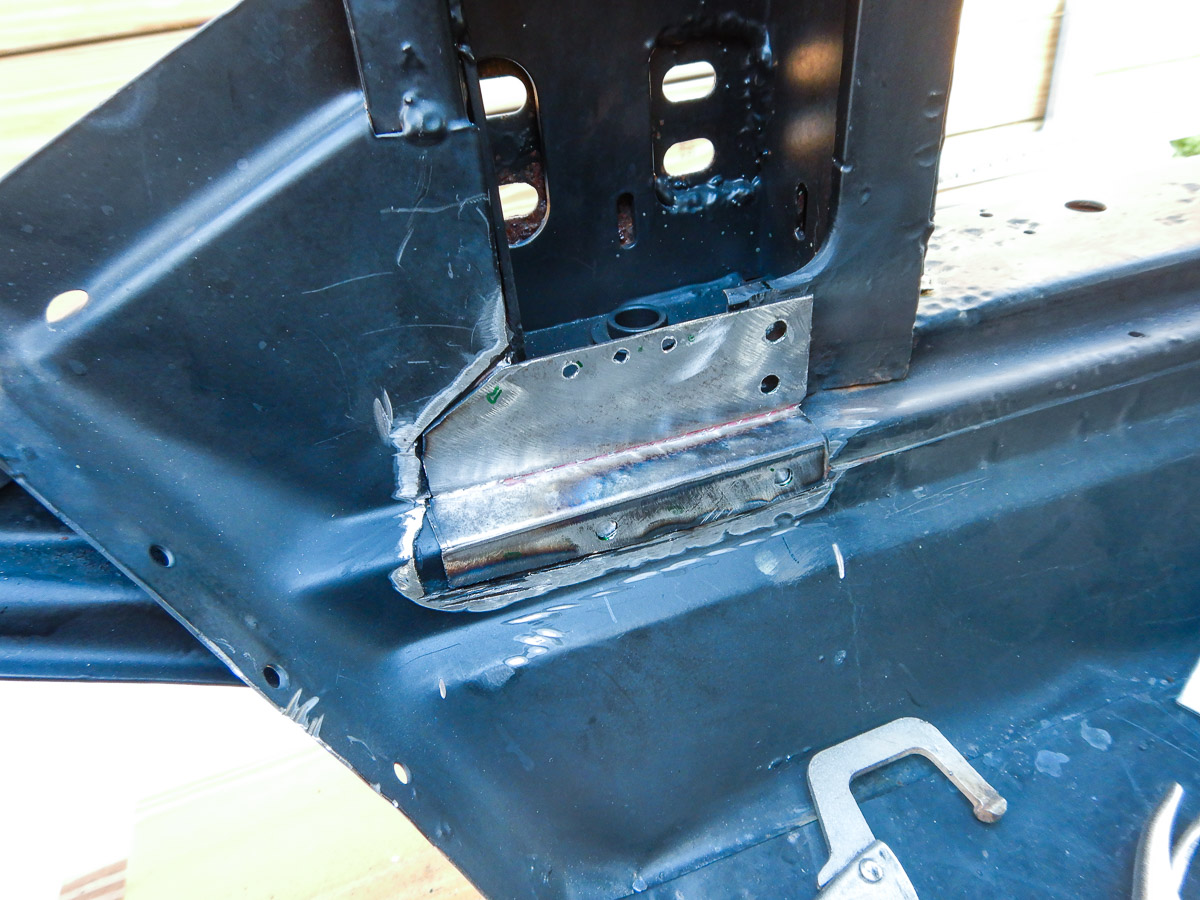
In addition to the frame, I needed to address a few things on the birdcage. It held up really well but since it was not completely watertight with the doors and glass in place, we inevitably got some rust pop up that was swelling up from under the powder coating. This was on the right side windshield pillar and on the base of the two a-pillars.
To address the issue I cut and peeled back the top layer of metal where the lower windshield frame and right side upright are welded together. That revealed the metal underneath to be OK. Some pitting but solid. I cleaned off the area well and then hit it with some encapsulator. I then hit a few spots with the wire wheel to expose bare metal again. That's where I will weld the new plate back on.
I then took some plate and cut and bent a new piece. I drilled a few holes to spot weld with. That would get well sanded and prepped with encapsulator as well on the back side. This is to avoid the rust from coming back from between the plates.
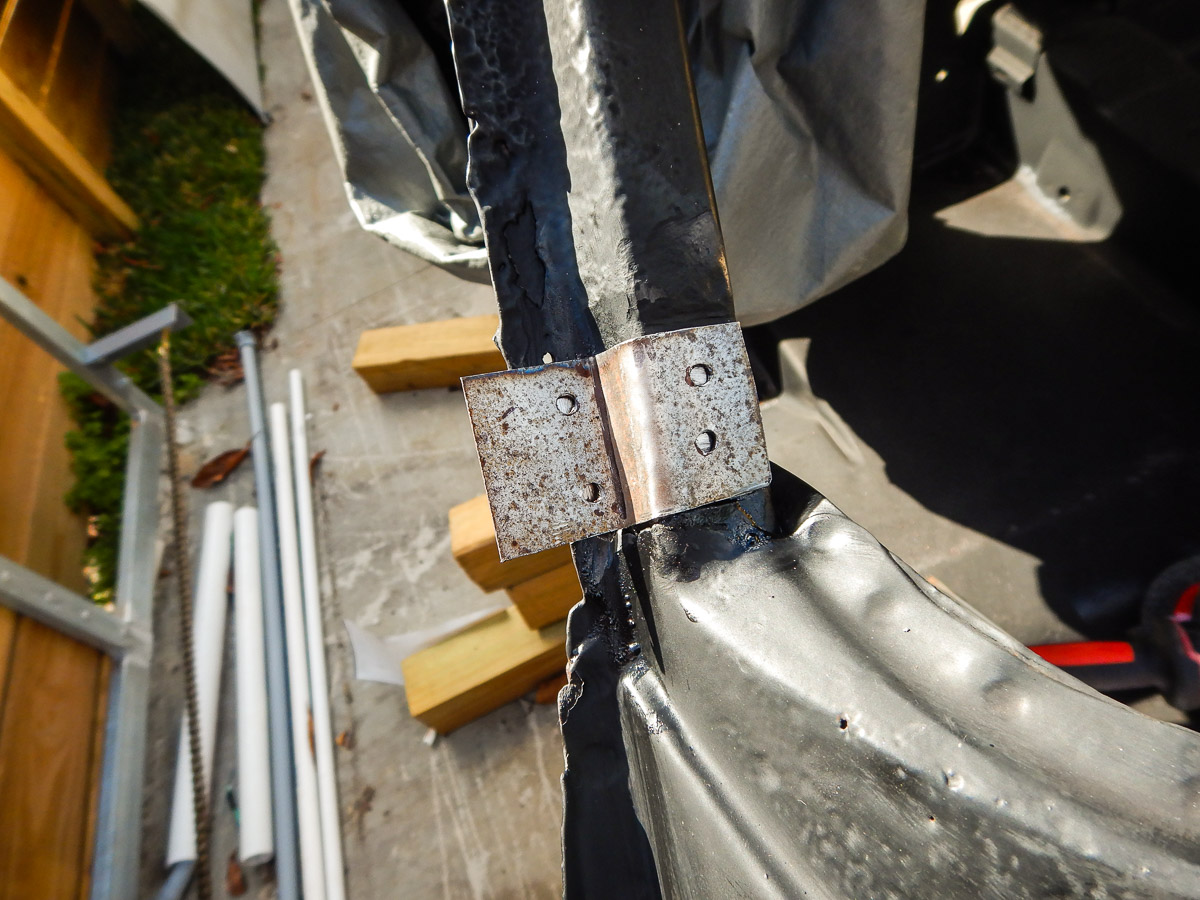
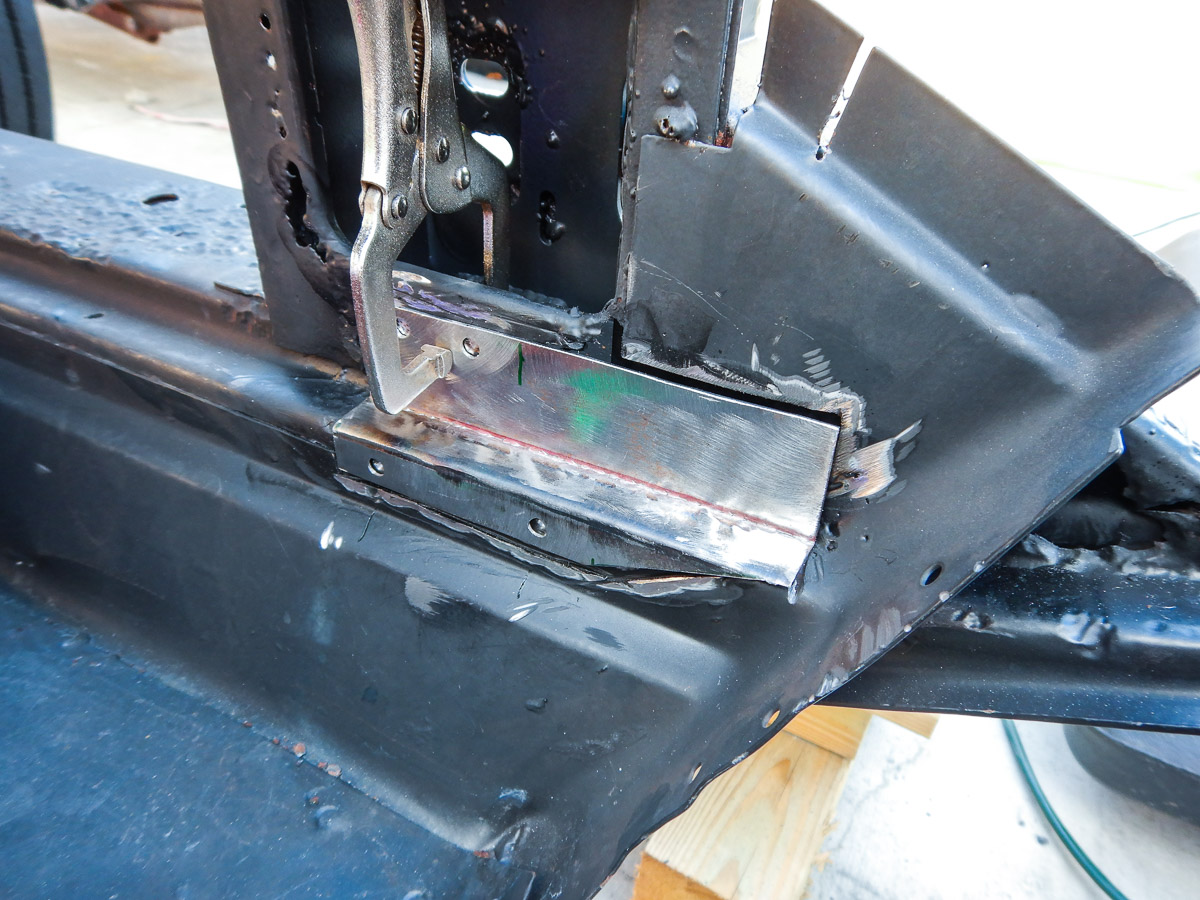
Then I spot weld the part in.
Once that is in, I hammer it to fit to the existing frame rail tightly.
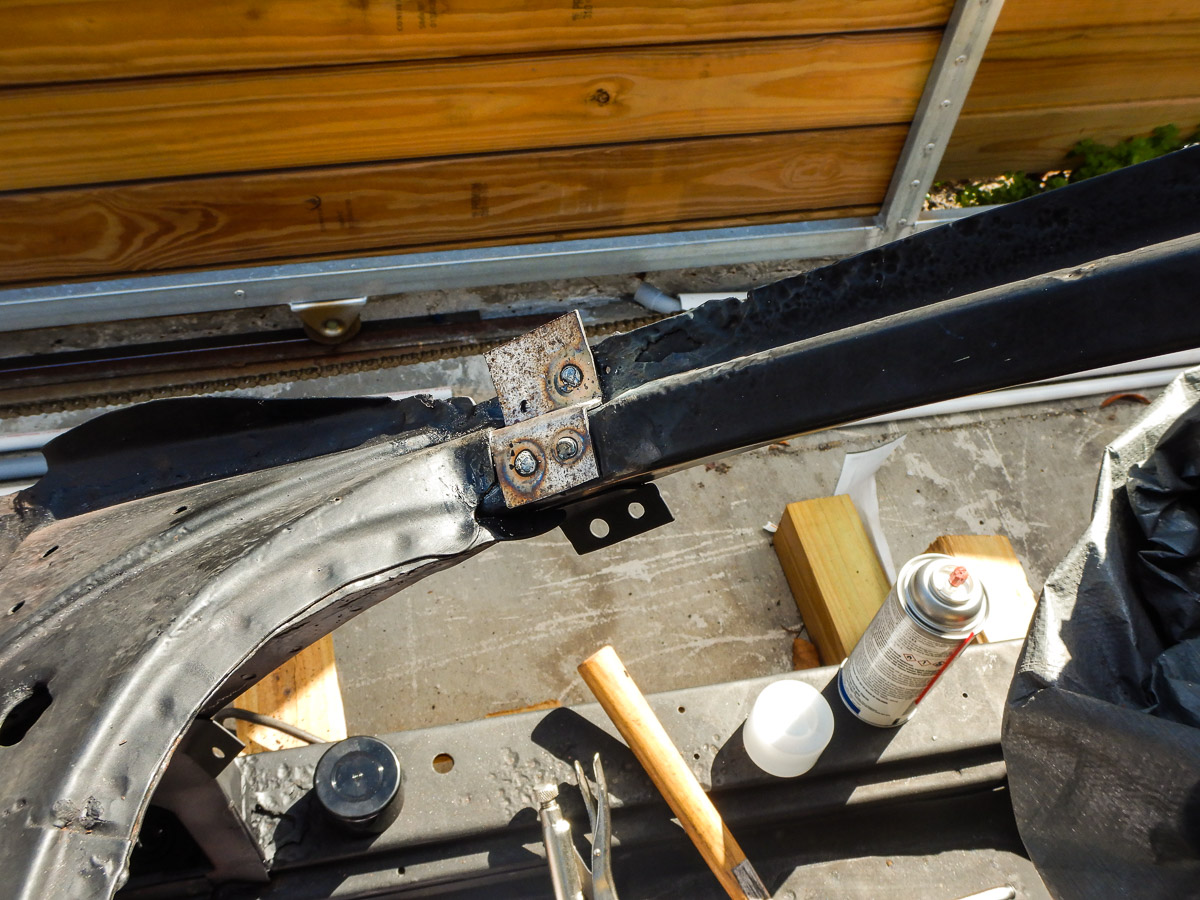
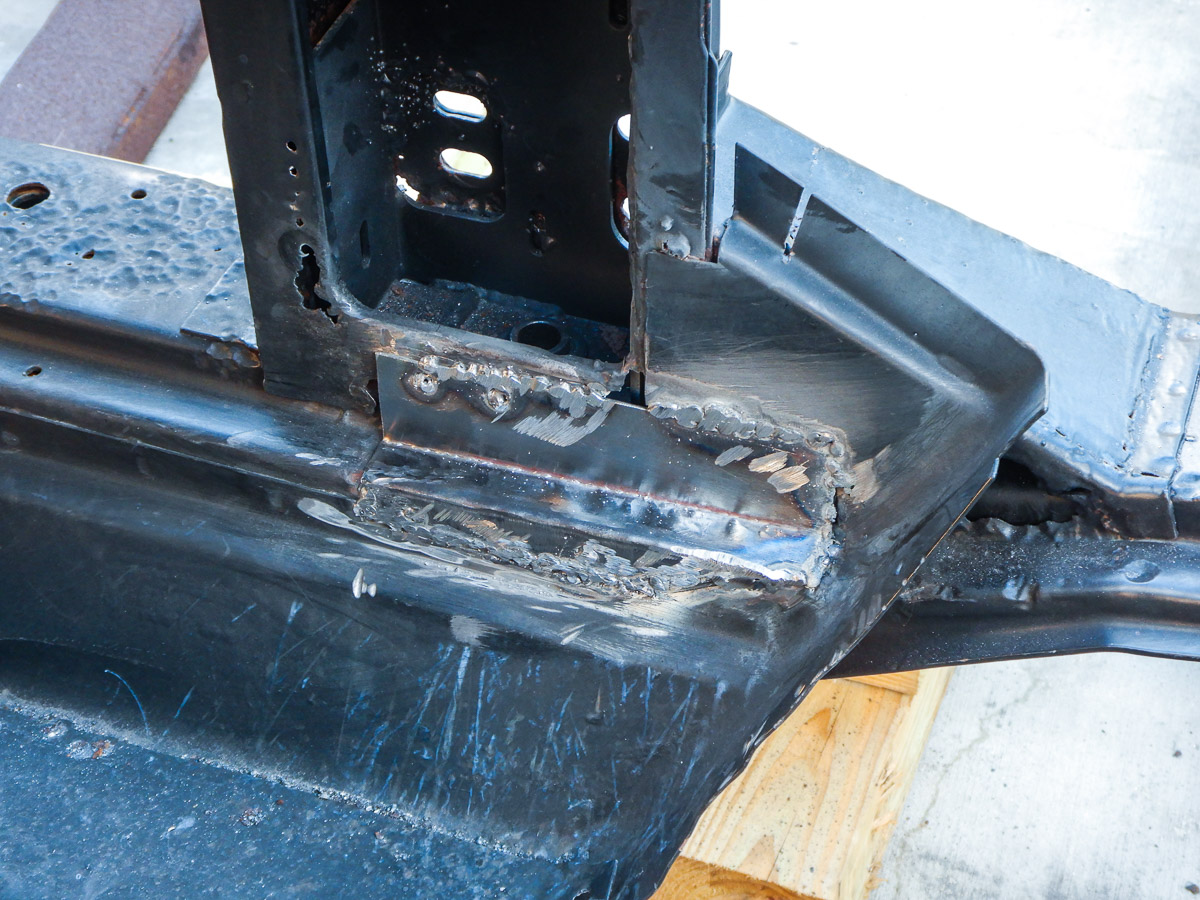
I then clean the bottom edge metal on lower cage where I will stitch weld the new piece and existing lower plate together. I then grind everything smooth and I'm ready for the encapsulator and chassis black above it.
To address the issue I cut and peeled back the top layer of metal where the lower windshield frame and right side upright are welded together. That revealed the metal underneath to be OK. Some pitting but solid. I cleaned off the area well and then hit it with some encapsulator. I then hit a few spots with the wire wheel to expose bare metal again. That's where I will weld the new plate back on.
I then took some plate and cut and bent a new piece. I drilled a few holes to spot weld with. That would get well sanded and prepped with encapsulator as well on the back side. This is to avoid the rust from coming back from between the plates.
Then I spot weld the part in.
Once that is in, I hammer it to fit to the existing frame rail tightly.
I then clean the bottom edge metal on lower cage where I will stitch weld the new piece and existing lower plate together. I then grind everything smooth and I'm ready for the encapsulator and chassis black above it.
The following users liked this post:
AdamMeh (02-17-2021)
02-17-2021, 11:01 AM
#240
Racer
Thread Starter
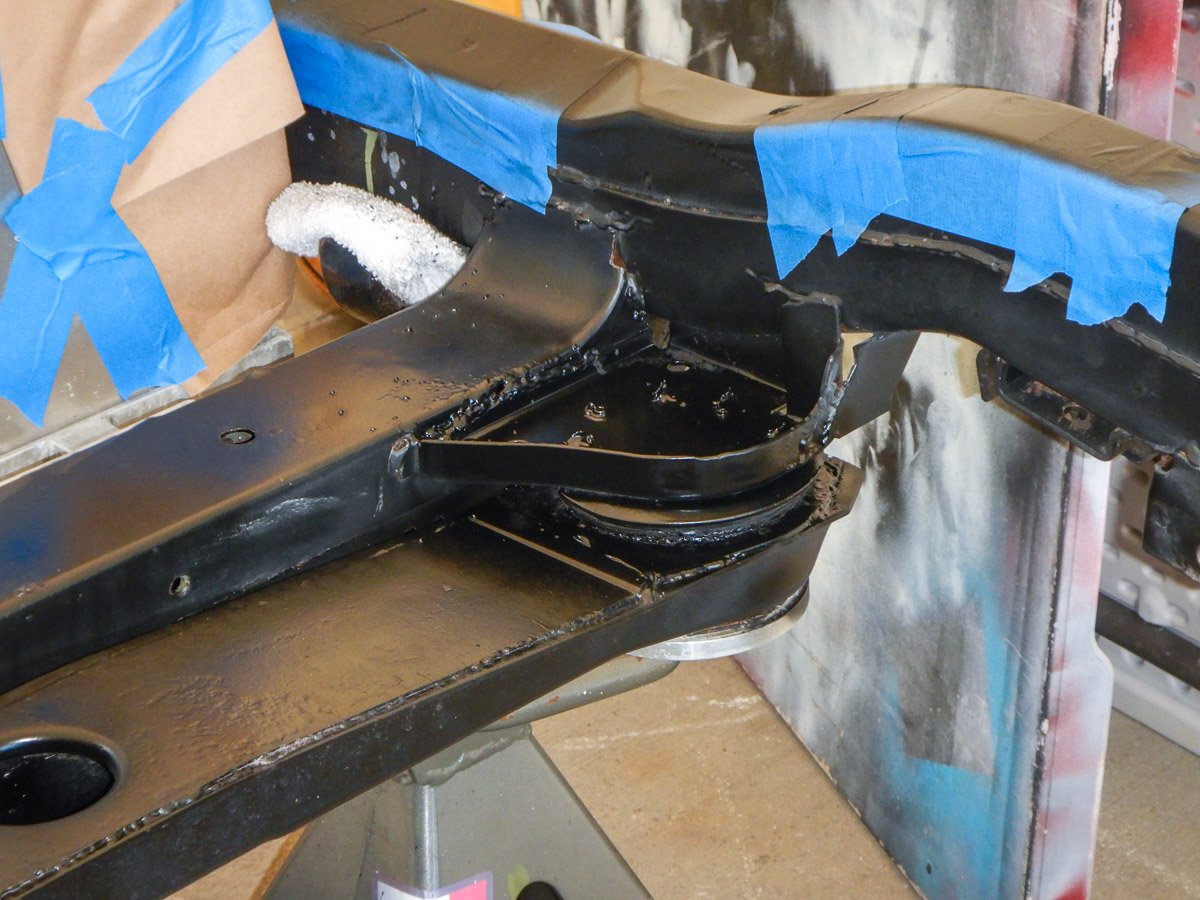
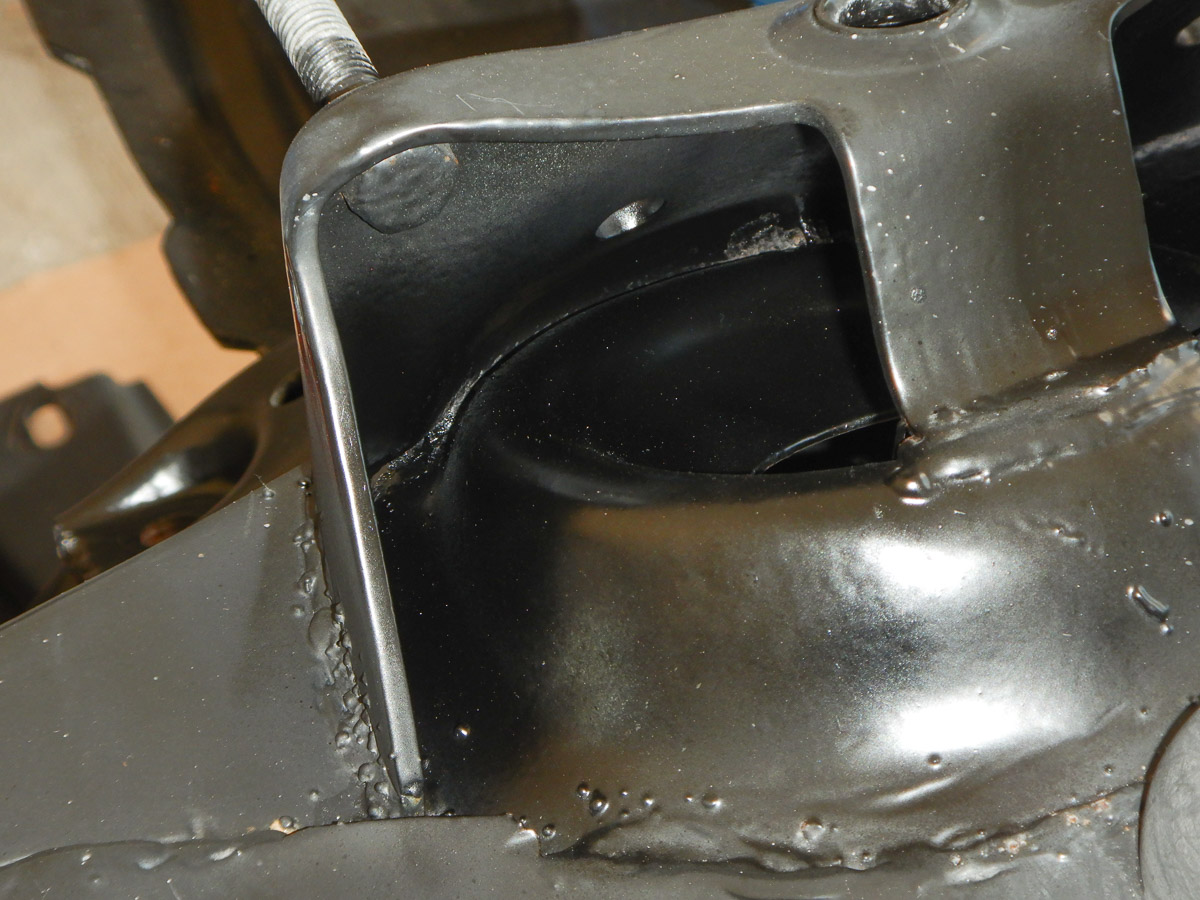
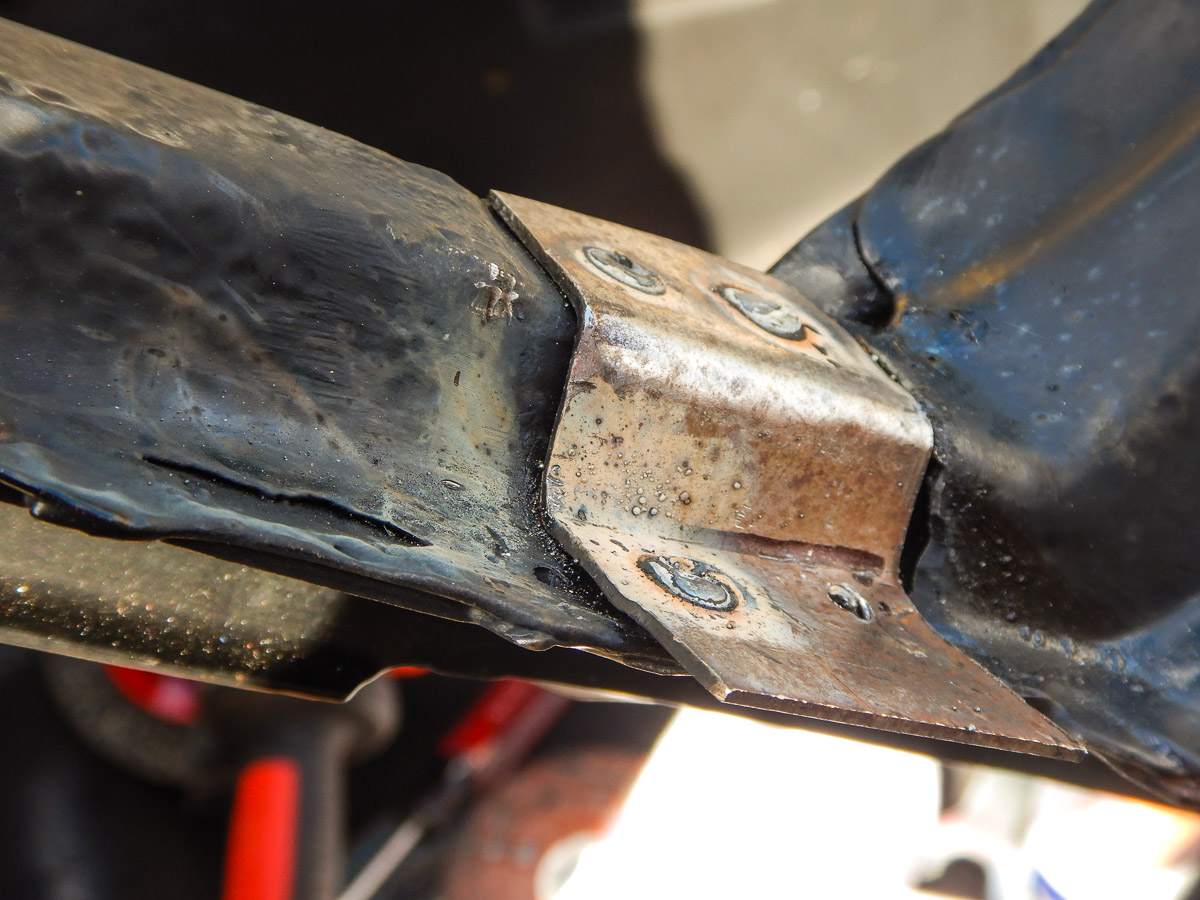
At the bottom of the a-pillars it is a similar job. I remove the upper plate metal, which is basically part of the floor pan, exposing the metal behind it. Here it was mostly fine but there was some loss of metal. I got all the rust out and then repainted the area. Again, I clean off a few places where I will be spot welding back in the new part. There is sufficient material in the back side to make a good repair so I went forward. All of this will eventually need to get body sealer in all the seams which will stop water from getting back in there in the end.
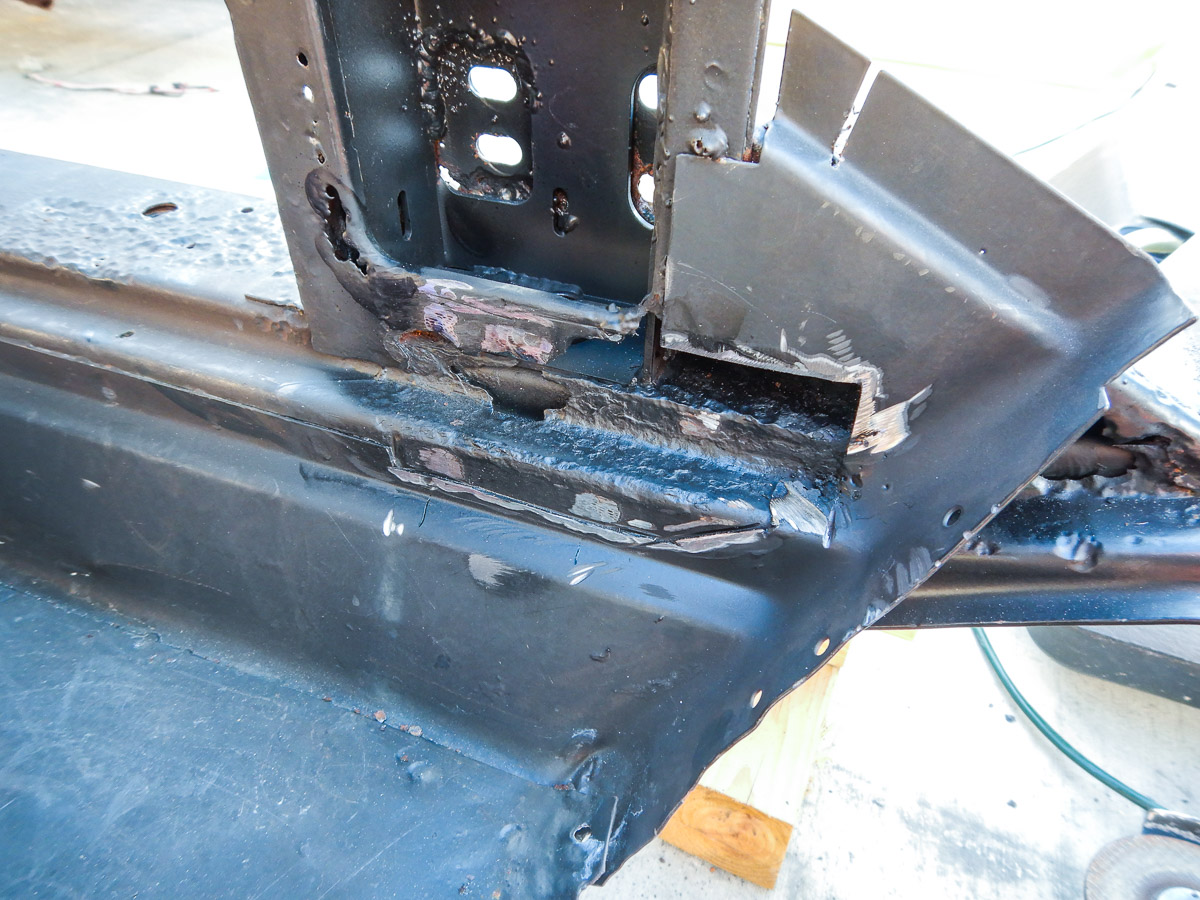
Here is the plate steel I cut and shaped to match what I removed. Again, I paint the backside so that I do everything I can to prevent rust from get between the plates again. The bare sections are to allow me to make a good spot weld.
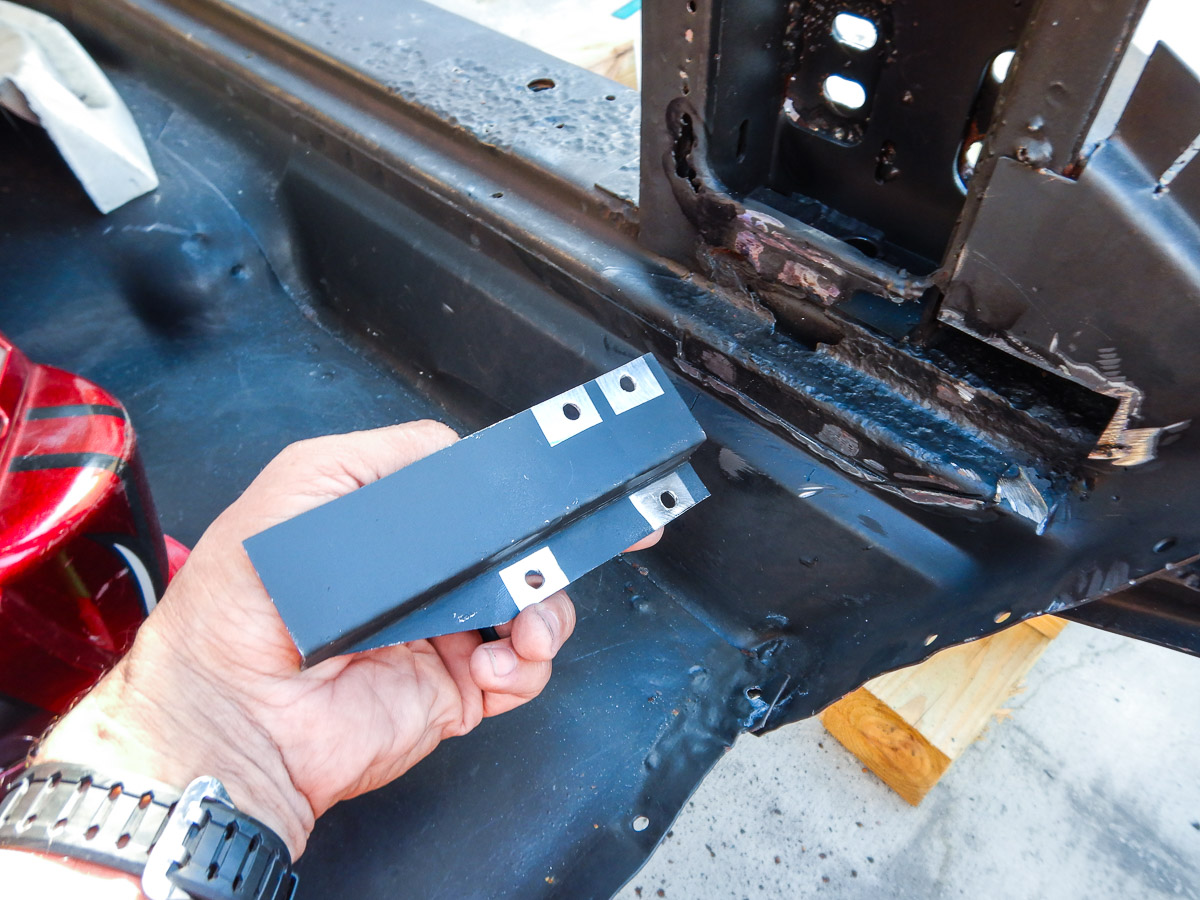
On the passenger side, the same thing. Here, however, the inner plate (with the bent lip) is missing. I will weld in that piece as well to complete this side.

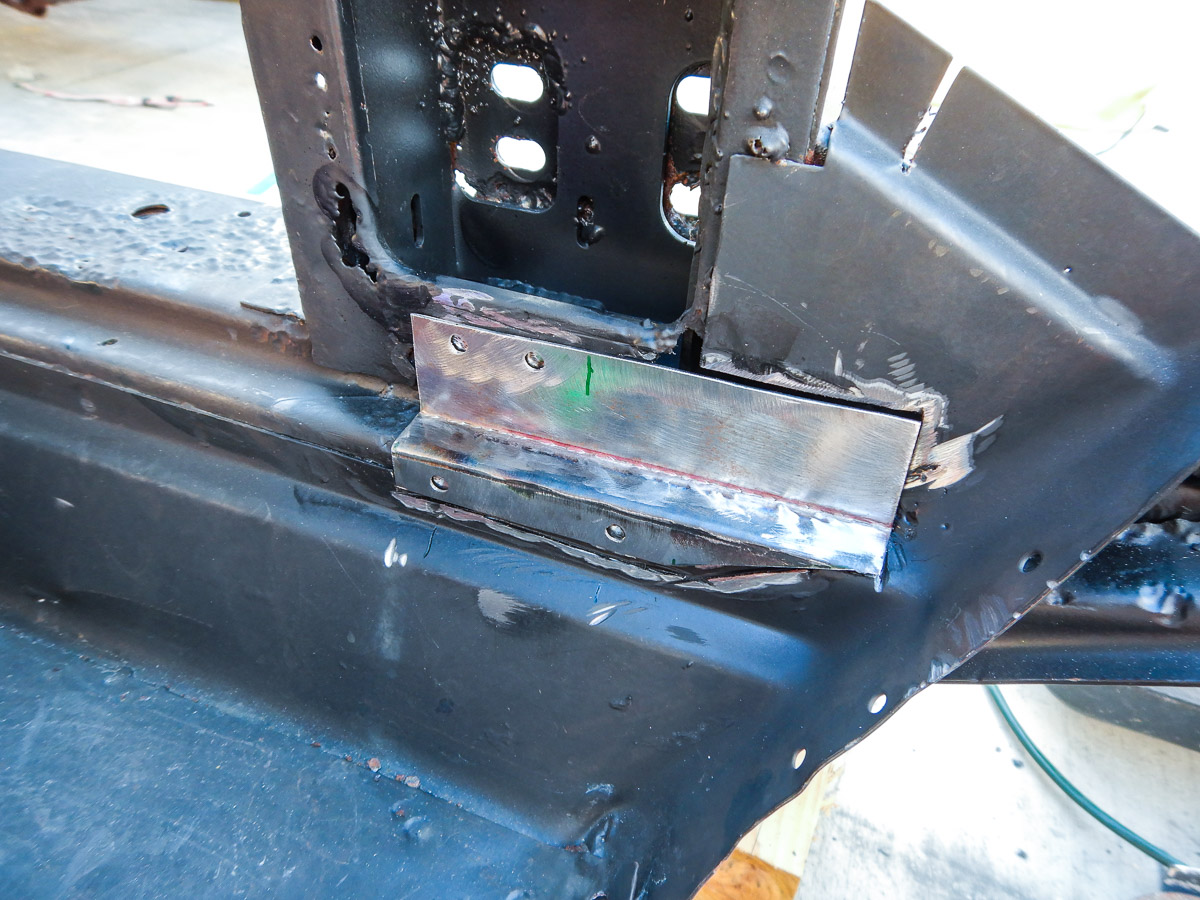
The parts (this is driver's side again) are held in place and spot welded in a couple of places.
I then hammer and shape it as I go and then stitch weld the seams.
The passenger side welded:
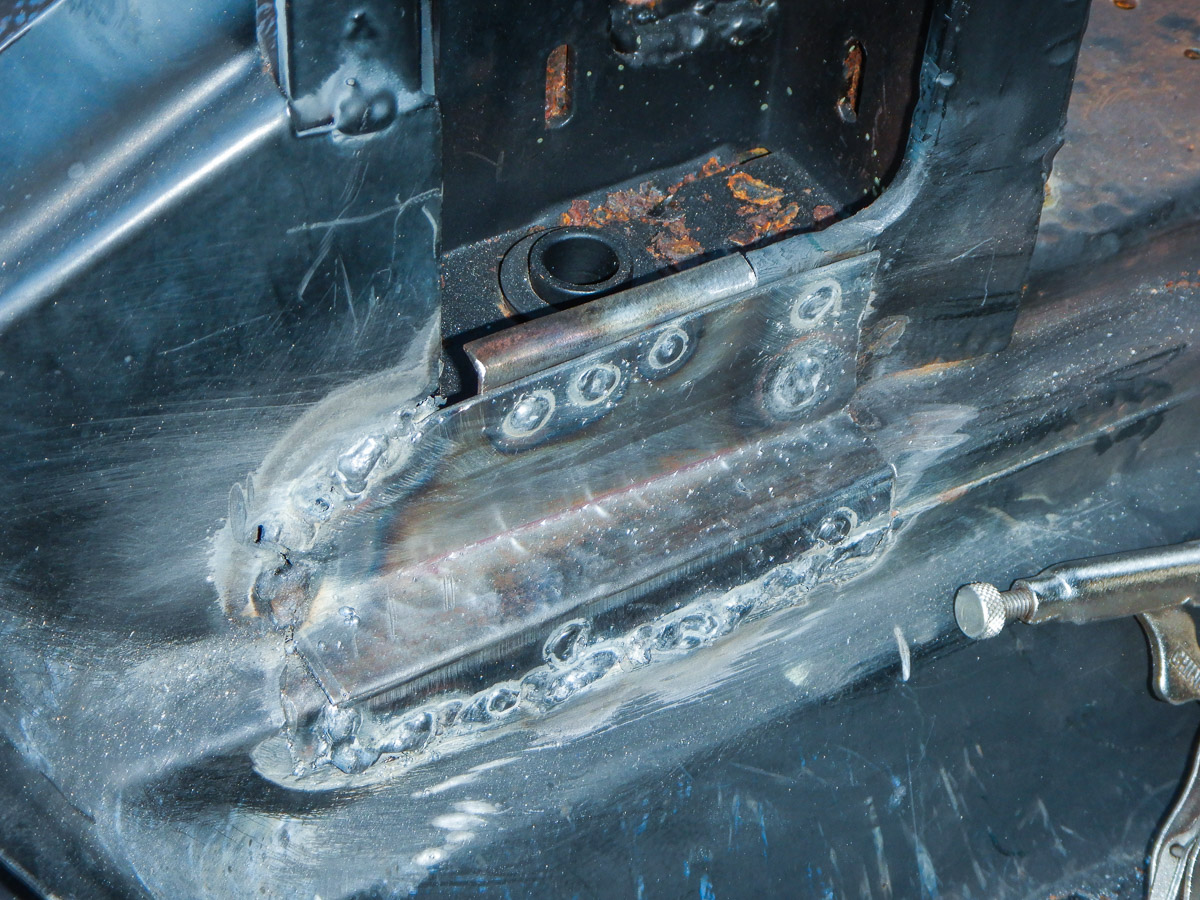
Ultimately, I clean the welds a bit and then paint the top side.
I do not go nuts with making these absolutely perfect because they will get covered in Dynamat, then the sound deadner and last the carpet. No sense in going nuts here. Bottom line, all the rust that was coming though is gone and we are ready to go.
Here is the plate steel I cut and shaped to match what I removed. Again, I paint the backside so that I do everything I can to prevent rust from get between the plates again. The bare sections are to allow me to make a good spot weld.
On the passenger side, the same thing. Here, however, the inner plate (with the bent lip) is missing. I will weld in that piece as well to complete this side.
The parts (this is driver's side again) are held in place and spot welded in a couple of places.
I then hammer and shape it as I go and then stitch weld the seams.
The passenger side welded:
Ultimately, I clean the welds a bit and then paint the top side.
I do not go nuts with making these absolutely perfect because they will get covered in Dynamat, then the sound deadner and last the carpet. No sense in going nuts here. Bottom line, all the rust that was coming though is gone and we are ready to go.
The following users liked this post:
J Bennett (02-17-2021)