
My 1977 Project - Body off restoration
 07-06-2011, 08:22 AM
#41
Melting Slicks


Luisv
Take a look at this maybe you can get some ideas http://www.vettemod.com/forum/showth...age+transplant

Take a look at this maybe you can get some ideas http://www.vettemod.com/forum/showth...age+transplant
 07-06-2011, 12:16 PM
#42
Racer


Thread Starter


Luisv
Take a look at this maybe you can get some ideas http://www.vettemod.com/forum/showth...age+transplant
Take a look at this maybe you can get some ideas http://www.vettemod.com/forum/showth...age+transplant
http://www.digitalcorvettes.com/foru...ad.php?t=92370
This link showed me that we can do it assuming we can take the rear boxes behind the seat. Once that is out, we knock out some rivets and glue in the rear and then the glue seam along the outside edge. Once we get the rear mounting bolts off... the rear assembly should come out as one part.
Looks good to getting the rear out this weekend! Thanks to everyone for the help...
07-06-2011, 07:15 PM
#44
Pro


I have not had a chance to update my site in a while, but I do have a few pictures of disassembly down to the birdcage. Perhaps it might help as well.
You can check it out here:
http://www.vettemod.org/
ikwhite
You can check it out here:
http://www.vettemod.org/
ikwhite
07-06-2011, 07:25 PM
#45
Pro
Yes you can take off as a unit I have done several.
ikwhite
ikwhite
I've been to his page... Some awesome stuff... They take off the deck and quarter panels individually.
The question I have on the rear clip/deck is whether or not I can take the deck and quarter panels off as a unit. I have no major body work to do (in terms of reparation) to the rear. As a result, taking off the rear deck and rear quarters as an assembly would be far better for me.
What I need to do is get to the birdcage...
07-06-2011, 07:28 PM
#46
Melting Slicks
I have not had a chance to update my site in a while, but I do have a few pictures of disassembly down to the birdcage. Perhaps it might help as well.
You can check it out here:
http://www.vettemod.org/
ikwhite
You can check it out here:
http://www.vettemod.org/
ikwhite

Last edited by Roco71; 07-06-2011 at 08:26 PM.
07-06-2011, 07:43 PM
#47
Pro
I really see no advantage to cutting the tub boxes, makes no sense to me just more work as it will come off as a unit. Just remove all adhesive with heat gun like you have been doing and drill out a few rivets it's not difficult at all just takes some patients and you can have it apart in an evening.
ikwhite
ikwhite
07-06-2011, 08:05 PM
#48
Pro
Thanks for the complement. It's really not to hard to take our cars apart and I always joke about how I can completely disassemble it to the ground using only a heat gun, putty knife, drill and a few wrenches, it's the getting everything back together that takes a lot more skill, time and money, and unfortunately many don't make it for various reasons. I wish the OP the best and look forward to seeing his project progress, as I have been there and I am still doing that five and a half years later.
ikwhite
ikwhite
07-06-2011, 08:21 PM
#49
Pro
One other suggestion to the OP is once you have your birdcage out you might consider checking out having it dipped. The dipper I deal with also final dips in a protictive coating this in my opinion should help to keep the rust out of the inside of the windsheild frame from returning.
ikwhite
ikwhite
07-07-2011, 01:54 PM
#50
Racer
Thread Starter
I have not had a chance to update my site in a while, but I do have a few pictures of disassembly down to the birdcage. Perhaps it might help as well.
You can check it out here:
http://www.vettemod.org/
ikwhite
You can check it out here:
http://www.vettemod.org/
ikwhite
I now am confident the unit will come out as one part. This is so much better and will allow me to really simplify matters.
One other suggestion to the OP is once you have your birdcage out you might consider checking out having it dipped. The dipper I deal with also final dips in a protictive coating this in my opinion should help to keep the rust out of the inside of the windsheild frame from returning.
ikwhite
ikwhite
On the dipping of the bird cage... I had though about that but I am glad you mention it. My concern was the internal rust. Obviously, the powder coating won't get completely inside of the frame. I do have two questions on that...
- What kind of dipping? I am assuming we are talking hot-dip galvanize.... right?
- I understand the dipping get powdercoated over? I was told the only issue is that I need to mention it when I take it. Apparently they must avoid "quenching" the part in the end.
Last point.... what should I expect to pay for this? Ball park.... of couirse... I was given a broad number of $350 to $500 for it. Does that seem right?
OP = Luis... LOL...
Thanks again!!!
Last edited by luisv; 07-07-2011 at 01:58 PM.
07-07-2011, 06:49 PM
#51
Racer
Thread Starter
My plan is to have a book bound with everything so that we have a good recrod of what's in the car. Two reasons, one is car shows. We participate in a number of them in South Florida so we'd like to have that "edge" over the competition. Second, potential resale value. We want to make sure everybody sees how we did it, what parts we used and the attention to detail. Hopefully, we can keep the value higher as a result. In the end.... if somebody plunks down a good enough offer... I'll moe onto project #2.... LOL....
Benefit for the forum and those that follow... I'll be able to really detail what we've done for everyone so they can learn from the obstacles we overcome as well.
07-08-2011, 04:22 AM
#52
Pro
Luis as to the dipping, no I was not referring to galvanize dip, but to a process I looked into where they were going to dip my under carriage frame and birdcage to remove all rust, paint, etc... I think it was an acid dip, which would be used instead of sandblasting, they do this to whole car bodies as well, then they dip in some form of rust resistant primer. My under carriage frame (but not the birdcage) would have then gone to powder coating. This was over 5 years ago and I think I was quoted somewhere around $1200 dollars for this. There is a fellow who did galvanize his birdcage on the forum, but I don't remember who that was you could do a search for both on the forum. I am not sure I would recommend to anyone that they powder coat their birdcage, one you will never see it, two I am not sure that is what I would want beneath my windshield for a bonding substructure, three all the fiberglass parts that will be re-bonded to the cage need a good surface to adhere to and I personally don't think powder coating is that surface, powder coat is just a plastic coating incased over the bare metal with no adhesion to the bare metal it is applied to. I used an epoxy primer coating for its excellent rust protection which does bond to the metal it is applied to, and then an epoxy adhesive Fusor 127 EZ to bond the panels back on. Fusor 127 can be applied over primer without sanding which is a bonus. I assure you my panels will not be dis-bonding anytime soon. I can definitely see powder coating the frame for show purposes only, but not the birdcage for the very reasons I mention above. Ultimately it is your car and some will no doubt disagree, but just wanted to run it past you, as I did a lot of research and flip flopping before deciding what to do with mine.
ikwhite
On the dipping of the bird cage... I had though about that but I am glad you mention it. My concern was the internal rust. Obviously, the powder coating won't get completely inside of the frame. I do have two questions on that...
- What kind of dipping? I am assuming we are talking hot-dip galvanize.... right?
- I understand the dipping get powdercoated over? I was told the only issue is that I need to mention it when I take it. Apparently they must avoid "quenching" the part in the end.
Last point.... what should I expect to pay for this? Ball park.... of couirse... I was given a broad number of $350 to $500 for it. Does that seem right?
OP = Luis... LOL...
Thanks again!!!
07-08-2011, 11:18 AM
#53
Racer
Thread Starter
Luis as to the dipping, no I was not referring to galvanize dip, but to a process I looked into where they were going to dip my under carriage frame and birdcage to remove all rust, paint, etc... I think it was an acid dip, which would be used instead of sandblasting, they do this to whole car bodies as well, then they dip in some form of rust resistant primer. My under carriage frame (but not the birdcage) would have then gone to powder coating. This was over 5 years ago and I think I was quoted somewhere around $1200 dollars for this. There is a fellow who did galvanize his birdcage on the forum, but I don't remember who that was you could do a search for both on the forum. I am not sure I would recommend to anyone that they powder coat their birdcage, one you will never see it, two I am not sure that is what I would want beneath my windshield for a bonding substructure, three all the fiberglass parts that will be re-bonded to the cage need a good surface to adhere to and I personally don't think powder coating is that surface, powder coat is just a plastic coating incased over the bare metal with no adhesion to the bare metal it is applied to. I used an epoxy primer coating for its excellent rust protection which does bond to the metal it is applied to, and then an epoxy adhesive Fusor 127 EZ to bond the panels back on. Fusor 127 can be applied over primer without sanding which is a bonus. I assure you my panels will not be dis-bonding anytime soon. I can definitely see powder coating the frame for show purposes only, but not the birdcage for the very reasons I mention above. Ultimately it is your car and some will no doubt disagree, but just wanted to run it past you, as I did a lot of research and flip flopping before deciding what to do with mine.
ikwhite
ikwhite
On the dipping and galvanize, made a few calls and got some info. The process (very simplified) basically cleans the parts in two steps. First is the degreasing portion. This takes care of the grease and dirt. This is a non-acid clean. Then comes the acid bath which chemically cleans the steel. This is where the rust gets cleaned off. Box components like chassis must have holes in them (our chassis has plenty) where the air can escape so the part gets well bathed in the acid. Once it is cleaned it goes to the hot galvanize bath. That is where we get the zinc coating. Most parts then get "quenched" which cools the part down but also adds an oily residue. If I am going to paint the part, we simply do not quench it.
This process will run me about $300 based on the weight of the birdcage and chassis. For that price, given the other trouble and expense I am going to go through, it's definately getting done. It will simply give me an even longer life span to the restoration.
Now on the powedercoating... you got me thinking... The reason I was powedercoating the birdcage was for added protection (rust prevention) and asthetics as a secondary benefit. We don't really see the birdcage much but we do see sections of it around the windshield where the trim does not cover it. Ultimately, however, you are right... you won't see it much. It is definately more a rust preventive.
As for the adhesion... there I am curious. At the front end, the clip adheres to the firewall... right? And the firewall is held in place with a combination of rivets and a different adhesive. At the rear, the rear clip adheres more to the birdcage... i think.... I'll find out tomorrow.... I am not trying to contradict you... I am really just wondering... you have more experience than I do!
In the end... could I "roughen" the bonding points on the birdcage? ... or mask the bonding strip when powdercoating?... I figure if those sections are "exposed" the bonding material itself will protect the metal. Especially if I am galvanizing....... the metal will be protected even if I don't powedercoat the edges....
BTW... the suggestion of dipping the frames led me to get some homework done on that. Once I got the details from my local providers it was an easy call to do this. The bottom line is that the galvanizing of the parts will protect the inside of the frames that I would normally not be able to protect..... Thanks!
Last edited by luisv; 07-08-2011 at 11:27 AM.
07-17-2011, 09:22 AM
#54
Racer
Thread Starter
Allright... so after some homework and following recommendations here and some exploratory work on the car itself, we started on the back half of the car.
The plan was to get as much off the rear of the car as possible to allow us to remove the rear clip off the birdcage and chassis. While it seemed possible, we soon found out that, on this car.... it would not be so easy. I'll explaing that when we get there..
For now. The rear bumber had to come off.
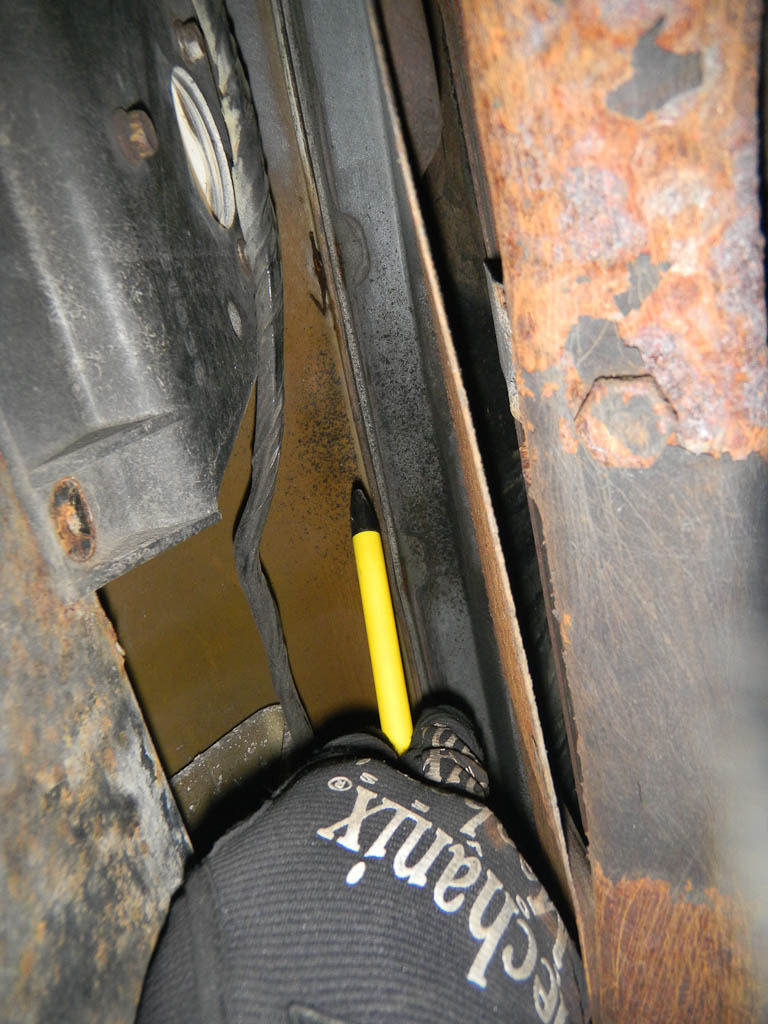
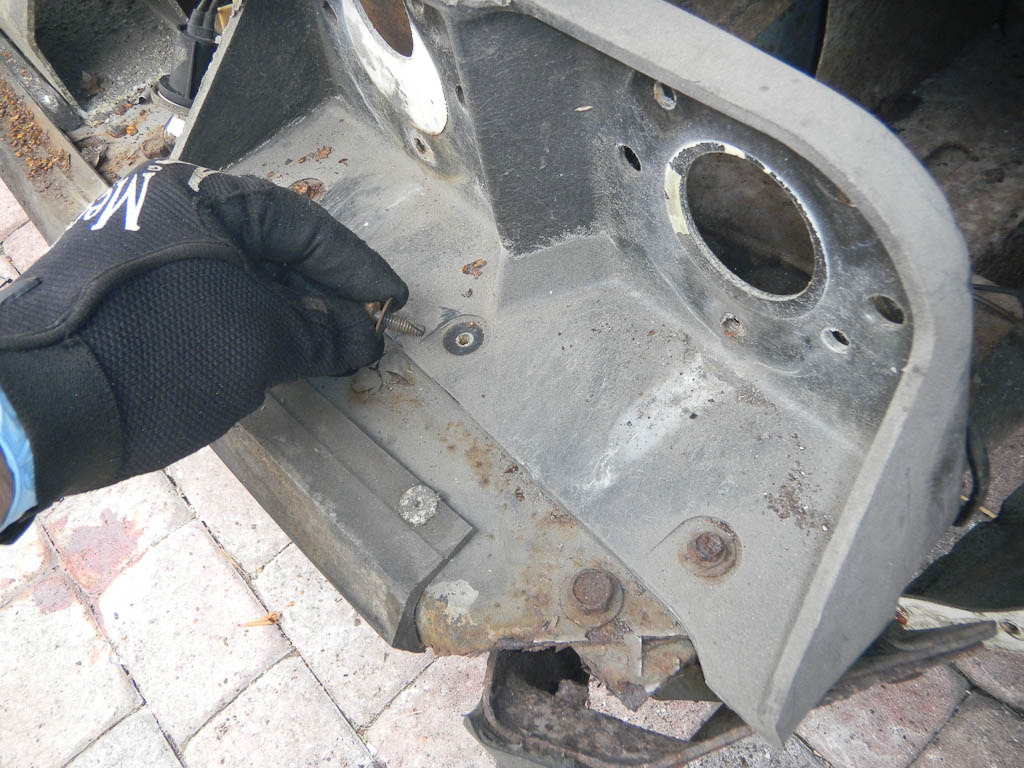
To do that you need to remove a ton of screws. The bumpers, both front and rear, have screws along the perimeter that keep the gap minimal. Problem is that they rust...... a lot. When this gets reassembled... that will be a point of improvement. For now... the back.
The photo is taken from the floor up into the back bumper. The pen is pointing to the bracket that has a dozen screws all around the perimeter of the bumper.
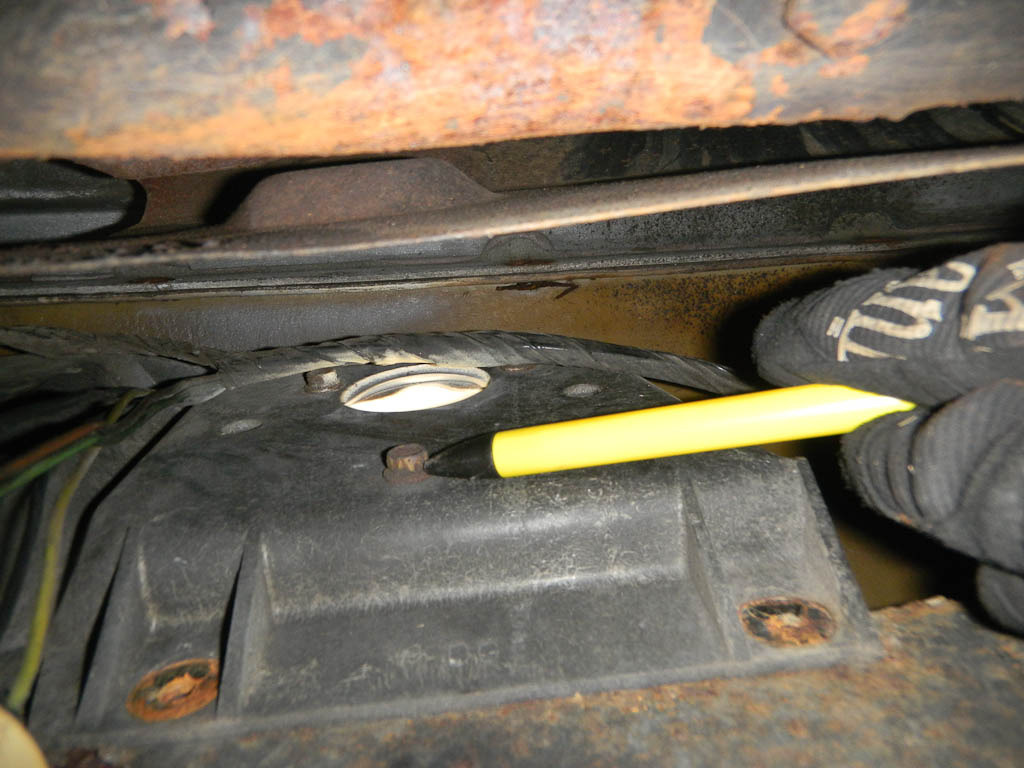
The next set of bolts... At the lights. Another shot of the inside of the bumper. Surprise.... some of these are rusted as well. Those were so bad they had to be cut out... Not simple but a high speed rotary tool did it. These bolts hold the rear lamp assembly brackets. Those brackets rusted completely. There are 12 bolts total... talk about overkill.

Once those are out you have three more in the license plate location. Did I say overkill?

Once those are out.... the bumper cover (as I should have called it to begin with) comes off. The bumper itself is the steel bar...
The plan was to get as much off the rear of the car as possible to allow us to remove the rear clip off the birdcage and chassis. While it seemed possible, we soon found out that, on this car.... it would not be so easy. I'll explaing that when we get there..
For now. The rear bumber had to come off.
To do that you need to remove a ton of screws. The bumpers, both front and rear, have screws along the perimeter that keep the gap minimal. Problem is that they rust...... a lot. When this gets reassembled... that will be a point of improvement. For now... the back.
The photo is taken from the floor up into the back bumper. The pen is pointing to the bracket that has a dozen screws all around the perimeter of the bumper.
The next set of bolts... At the lights. Another shot of the inside of the bumper. Surprise.... some of these are rusted as well. Those were so bad they had to be cut out... Not simple but a high speed rotary tool did it. These bolts hold the rear lamp assembly brackets. Those brackets rusted completely. There are 12 bolts total... talk about overkill.
Once those are out you have three more in the license plate location. Did I say overkill?
Once those are out.... the bumper cover (as I should have called it to begin with) comes off. The bumper itself is the steel bar...
Last edited by luisv; 02-02-2021 at 02:00 PM.
07-17-2011, 09:43 AM
#55
Racer
Thread Starter
This next section was pretty straight forward.... about time... LOL...
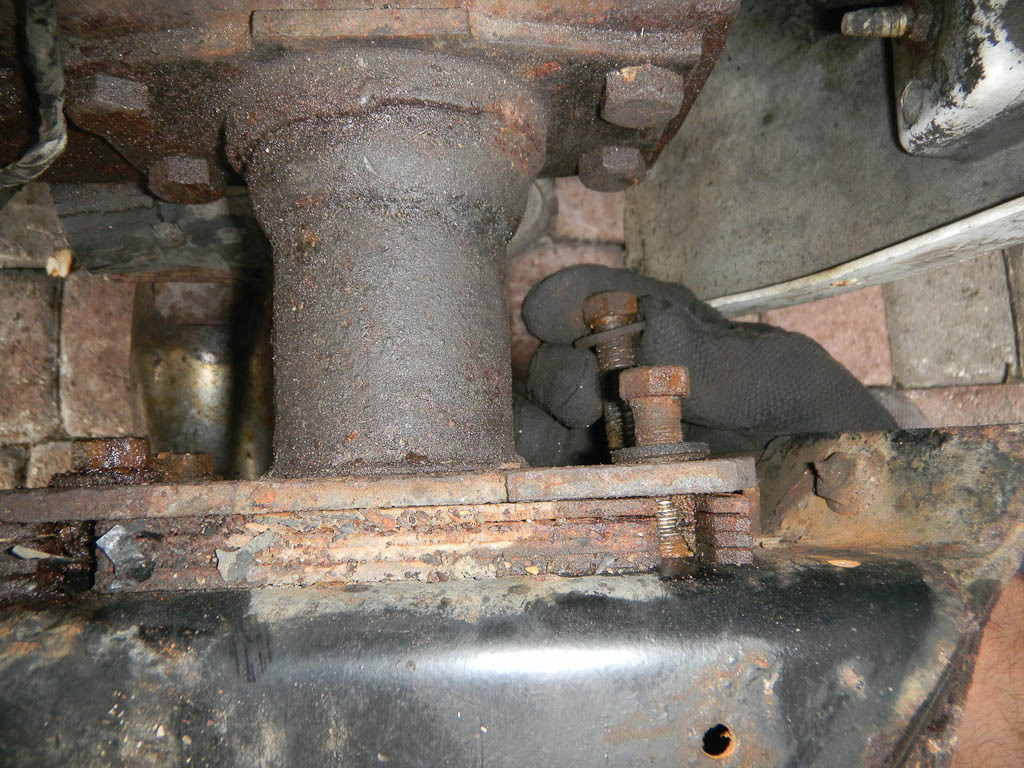
I started on the removal of the rear bumper (steel chassis mounted). I took off the tail light brackets. That was simple enough. Four bolts and they were out. I had to get a bolt removal tool for a couple, but no big deal.
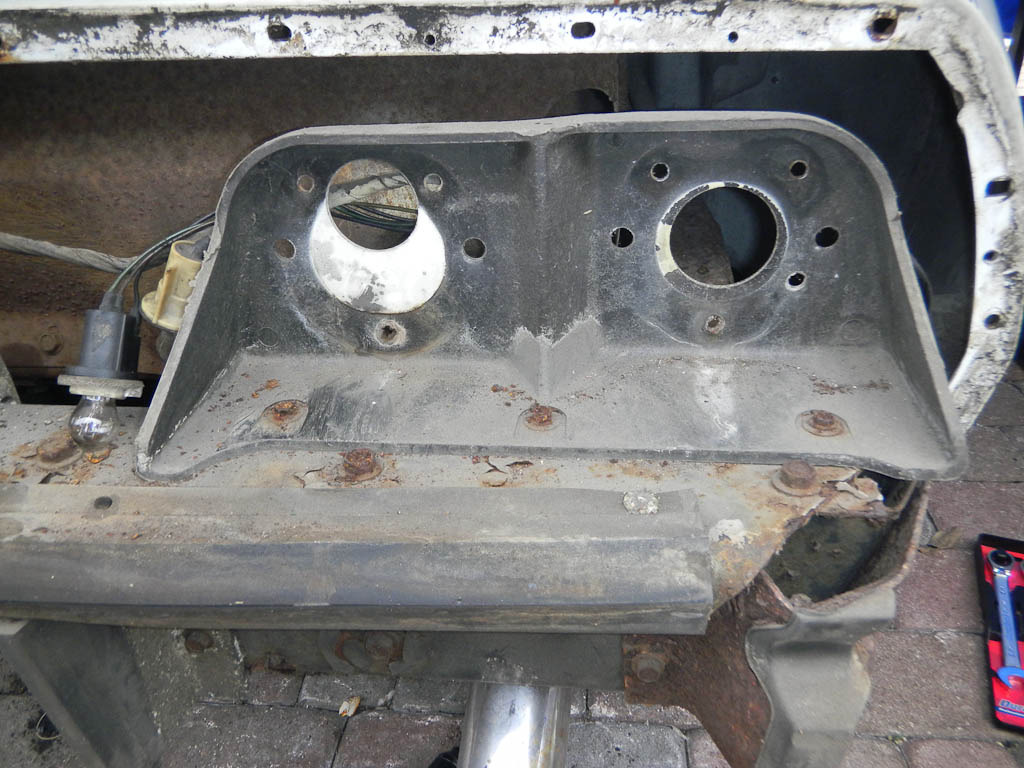
The bumper itself is held in place with 8 bolts on two brackets (left and right side). There are shims in there to set the space out. In my case, four on each side. Some WD40 and they broke loose.
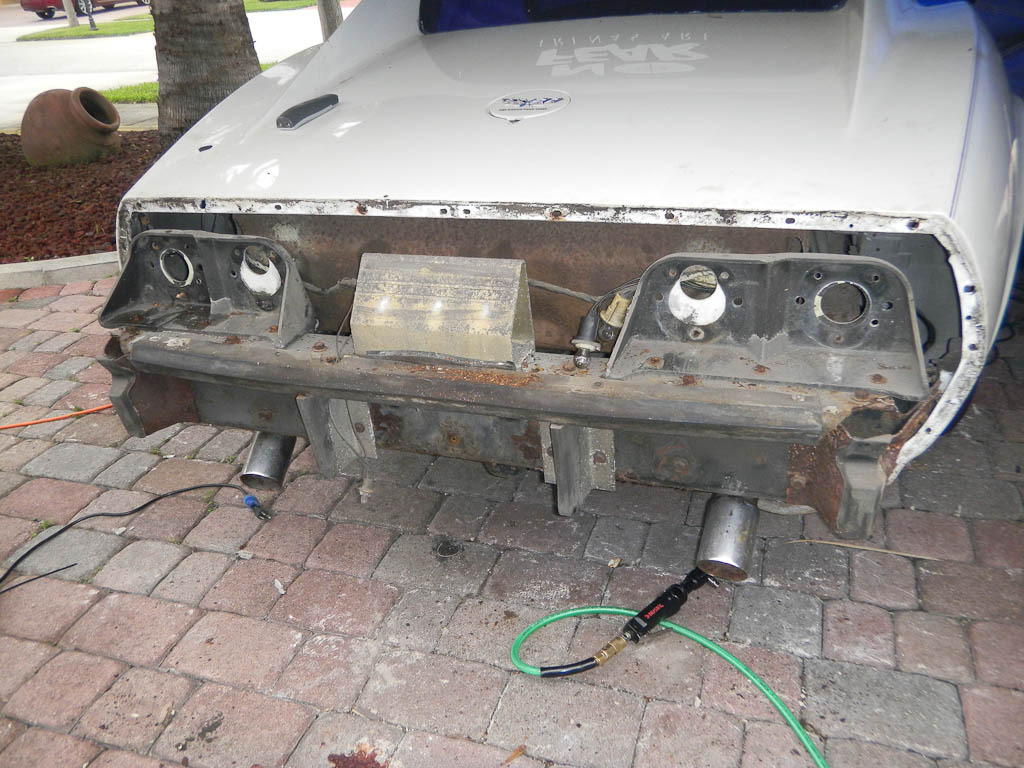
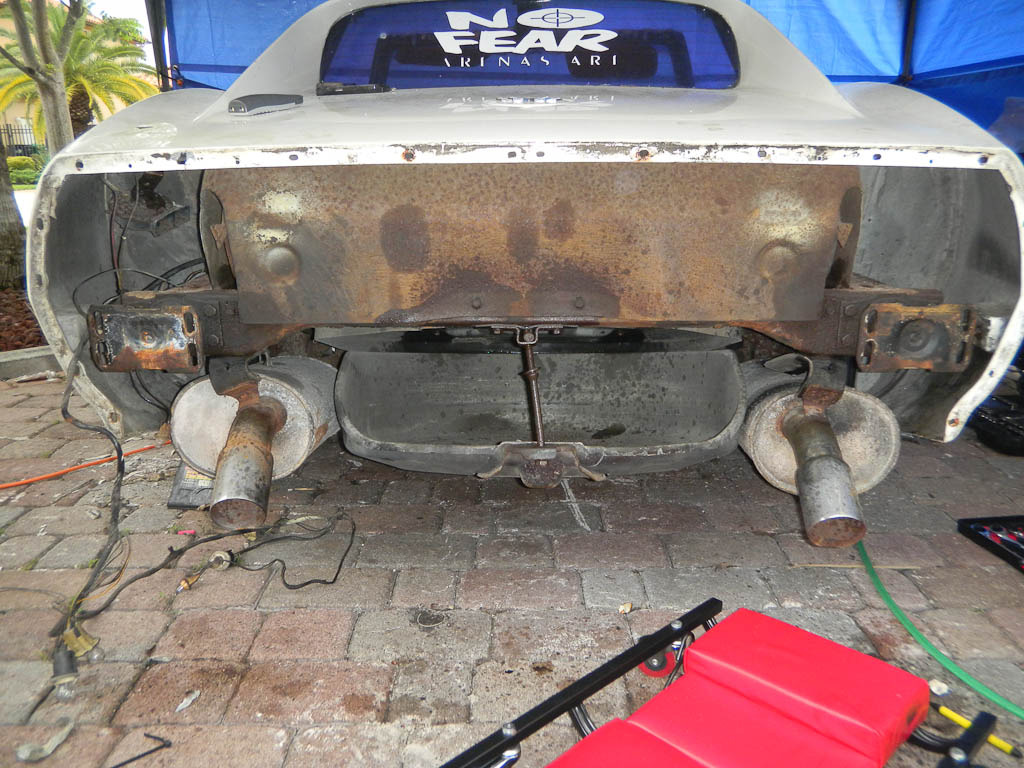
The rear.... bumperless......
I started on the removal of the rear bumper (steel chassis mounted). I took off the tail light brackets. That was simple enough. Four bolts and they were out. I had to get a bolt removal tool for a couple, but no big deal.
The bumper itself is held in place with 8 bolts on two brackets (left and right side). There are shims in there to set the space out. In my case, four on each side. Some WD40 and they broke loose.
The rear.... bumperless......
Last edited by luisv; 02-02-2021 at 02:02 PM.
07-17-2011, 10:26 AM
#56
Racer
Thread Starter
OK... so now the back is reasonably clear. Since we had some freinds over we worked on the car in sections. A few of us hit the glued section at the bird cage while the others took out the gas tank and got the wires out from the back so that we could get the rear clip completely free.
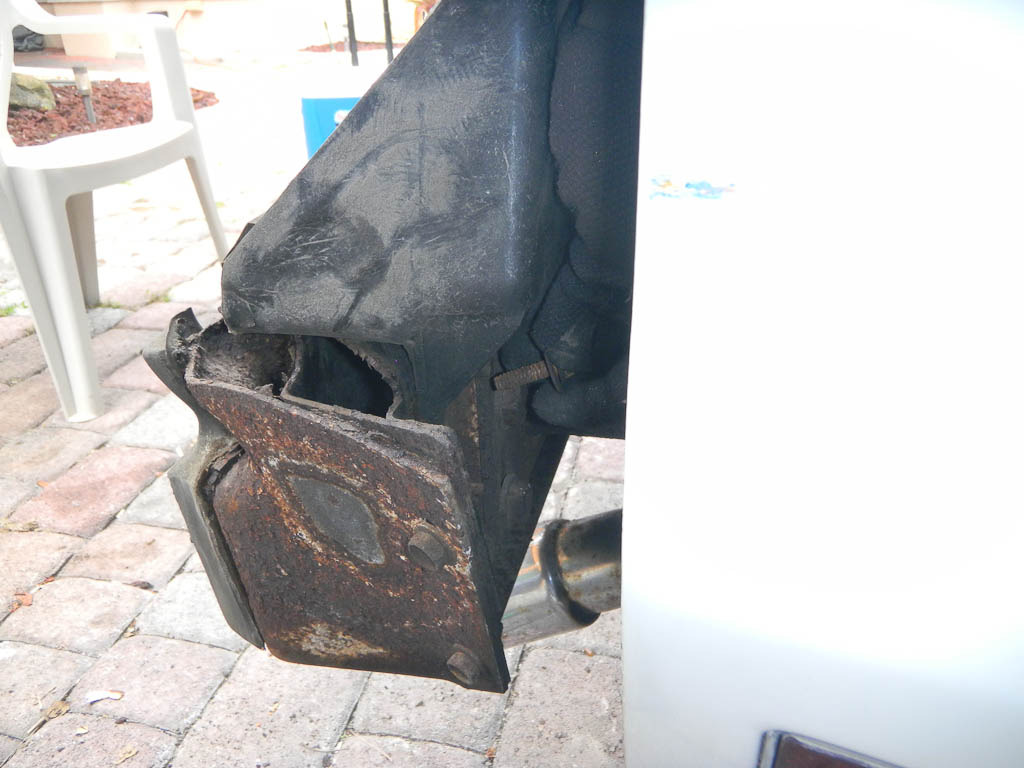
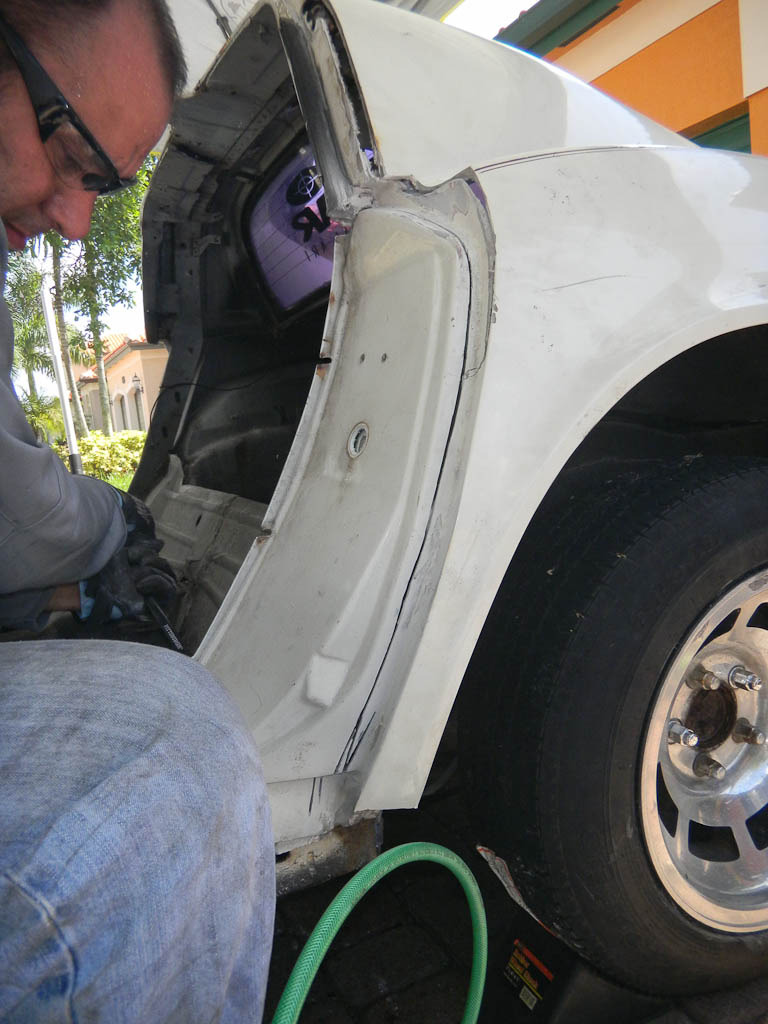
The glued section was the biggest problem we had in the rear. The front came off very easily. We heated it up and carefully went through the a painters tool (5-in-1 tool) and scrapers. The front came off with no problem. When we tried the same on the back... it did not give. No matter how much heat.... it would not come off. Almost as if a different adhesive was used. In the end, it was the case. At least, that we could tell, the color of the adhesive on the sides of the rear was different than the one across the top. There was some minor damage and we'll have to replace parts, but it had to come off. So here was our fight....
We hit the sides with the sander to find the joints. These show you what we were looking at.
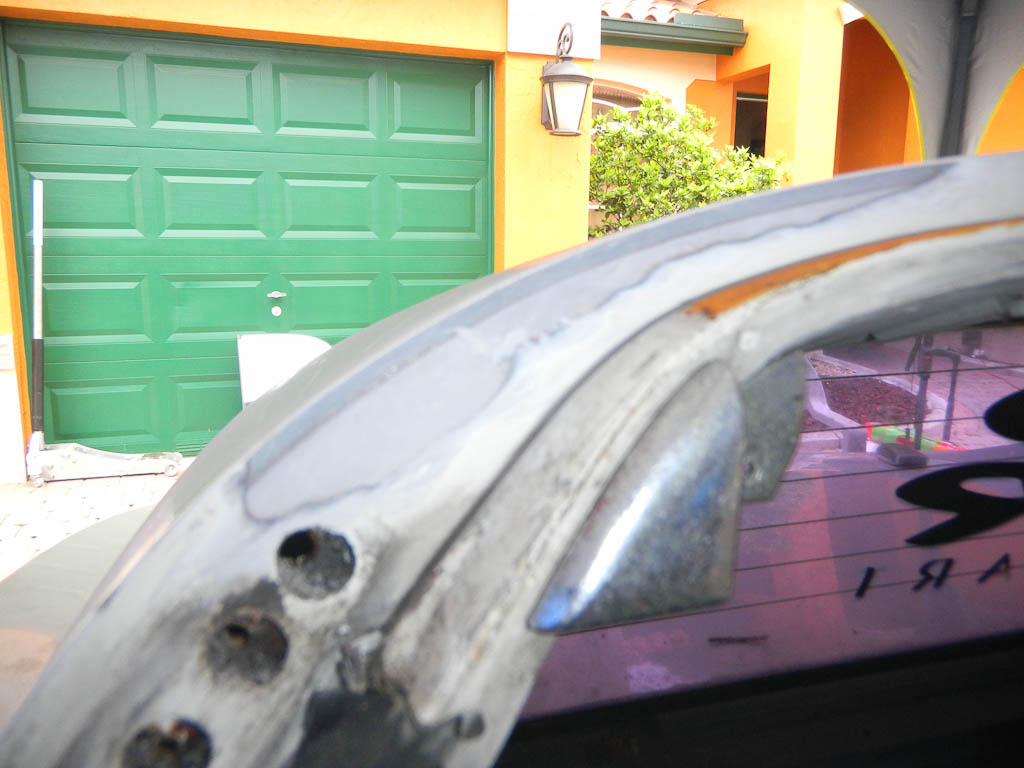
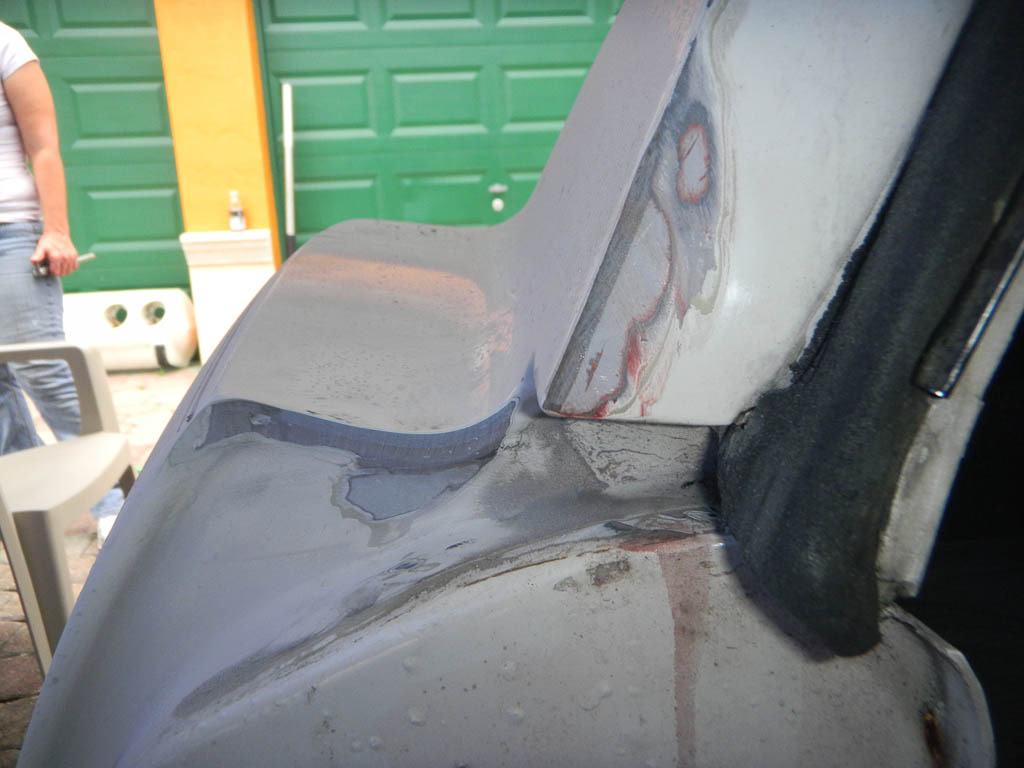
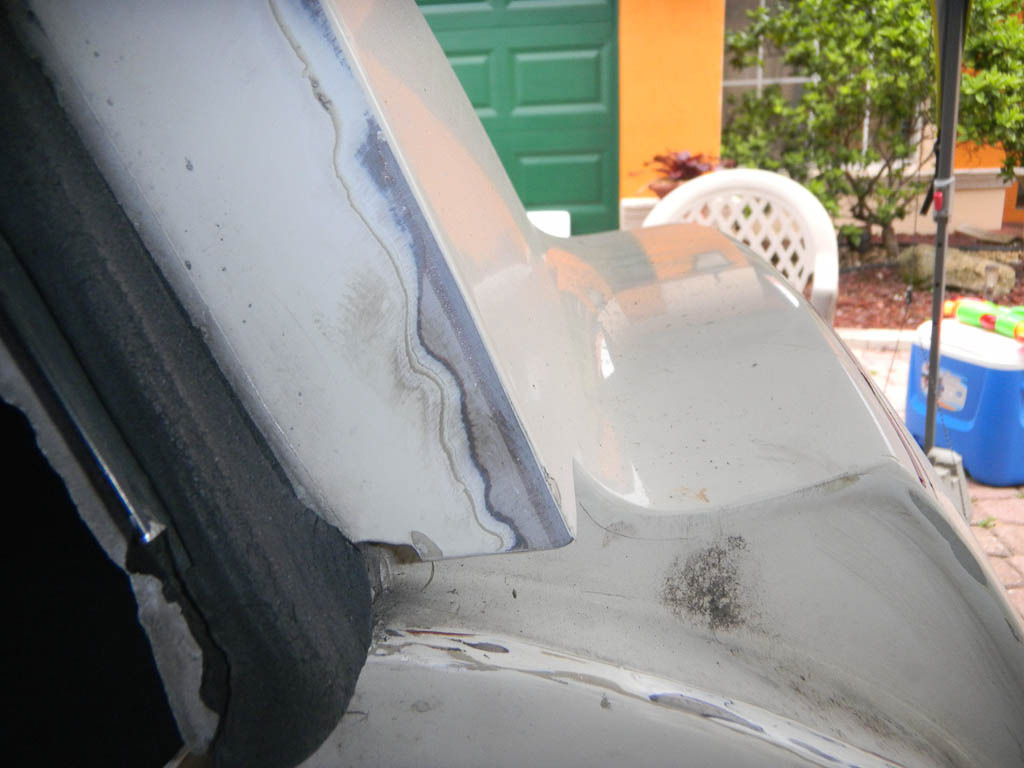
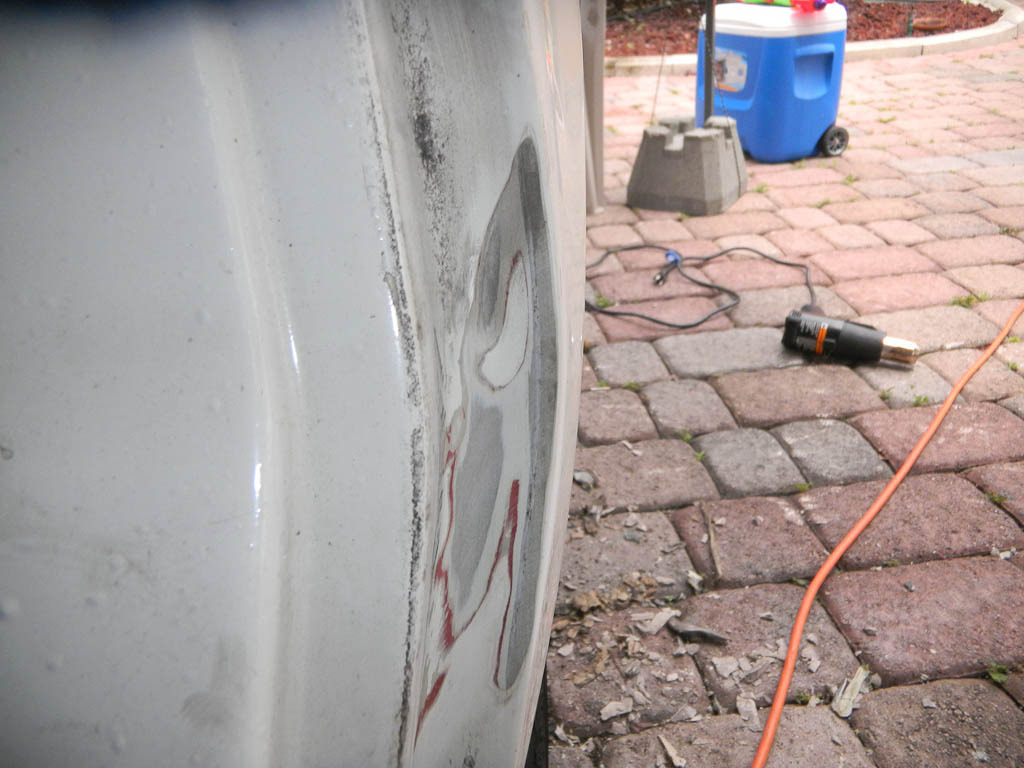
We then started to get the joints free... that is where we ran into trouble.
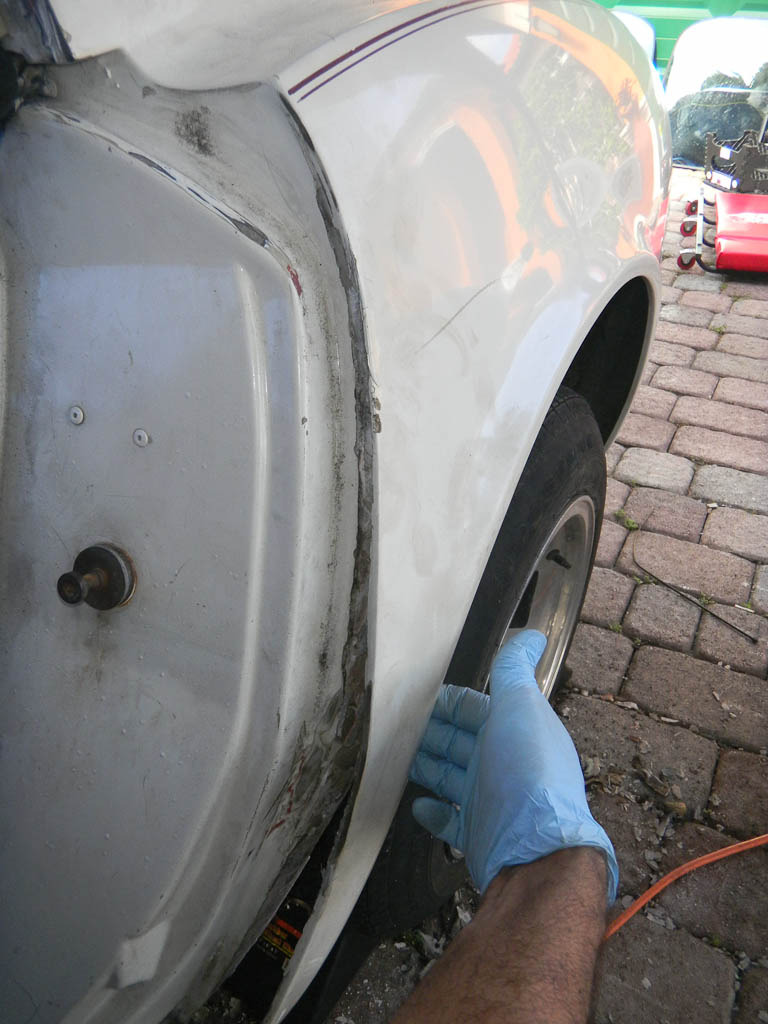
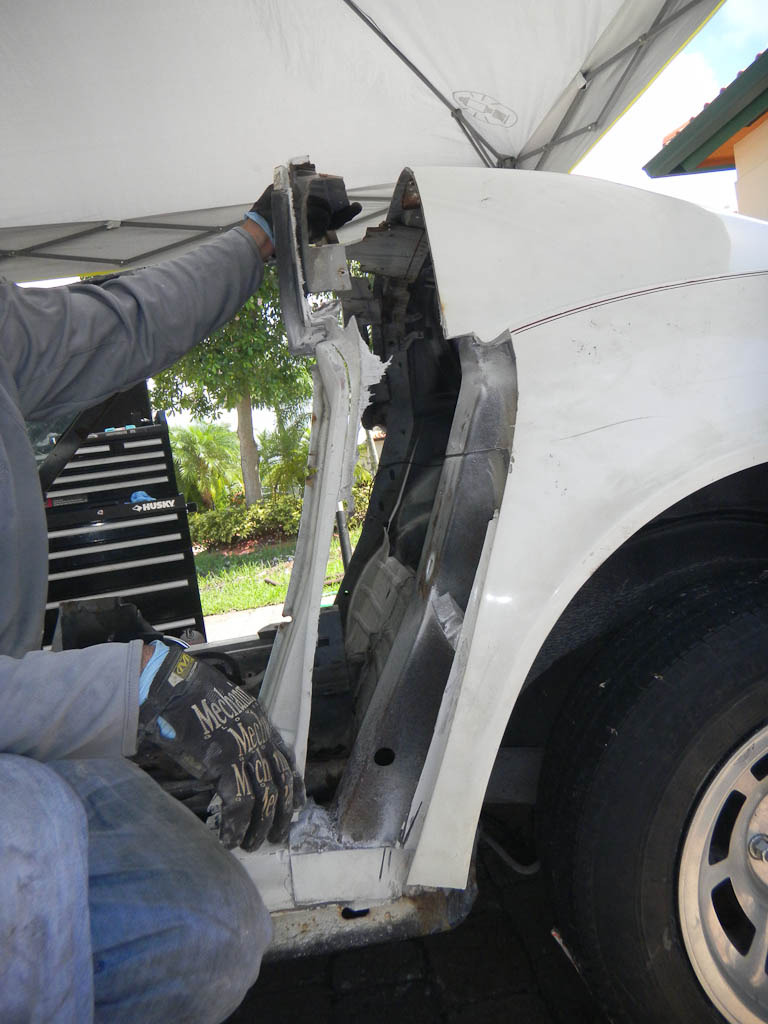
The break was jagged and damaging the rear quarter panels... so I decided to sacrifice the door jamb and bonding strips. I pulled the cutter out. Here's what we finally did.
The glued section was the biggest problem we had in the rear. The front came off very easily. We heated it up and carefully went through the a painters tool (5-in-1 tool) and scrapers. The front came off with no problem. When we tried the same on the back... it did not give. No matter how much heat.... it would not come off. Almost as if a different adhesive was used. In the end, it was the case. At least, that we could tell, the color of the adhesive on the sides of the rear was different than the one across the top. There was some minor damage and we'll have to replace parts, but it had to come off. So here was our fight....
We hit the sides with the sander to find the joints. These show you what we were looking at.
We then started to get the joints free... that is where we ran into trouble.
The break was jagged and damaging the rear quarter panels... so I decided to sacrifice the door jamb and bonding strips. I pulled the cutter out. Here's what we finally did.
Last edited by luisv; 02-02-2021 at 02:06 PM.
07-17-2011, 10:32 AM
#57
TheCorvetteBen
Great progress. I bet it takes a long time to remove the rear clip from the birdcage when you actually care about not messing it up. the only one I have ever cut off was a total parts car, so I went to town on it lol.
Oh btw I have a nice rust free set of tail light brackets (all four) that I would be willing to sell you. PM me with an offer if interested
Oh btw I have a nice rust free set of tail light brackets (all four) that I would be willing to sell you. PM me with an offer if interested
07-17-2011, 10:37 AM
#58
Racer
Thread Starter
To get here we had to do a few things that I did not include above. Most notably, the pop rivets at the birdcage. There are quite a few and they all have to be drilled out. I found that using a bolt removal tool on the rivet heads works very well.
There seven on each side (pass and driver) of the interior, behind where the seats would be and at the door jambs. There are four behind each seat. They can be hidded behind the paint/coating so some sanding is in order to find the heads. The next two are at the door jamb near the strikers. Easy to find. The last one (seventh) is hidden. The only way to find it is to pry out on the inside where the wheel well hits the back of the birdcage. Stick a flashlight in there and you'll see rivet. To get it, sand/grind away the undercoating in the wheel well where the rivet would be. It took a bit, but I found them and drilled them out.
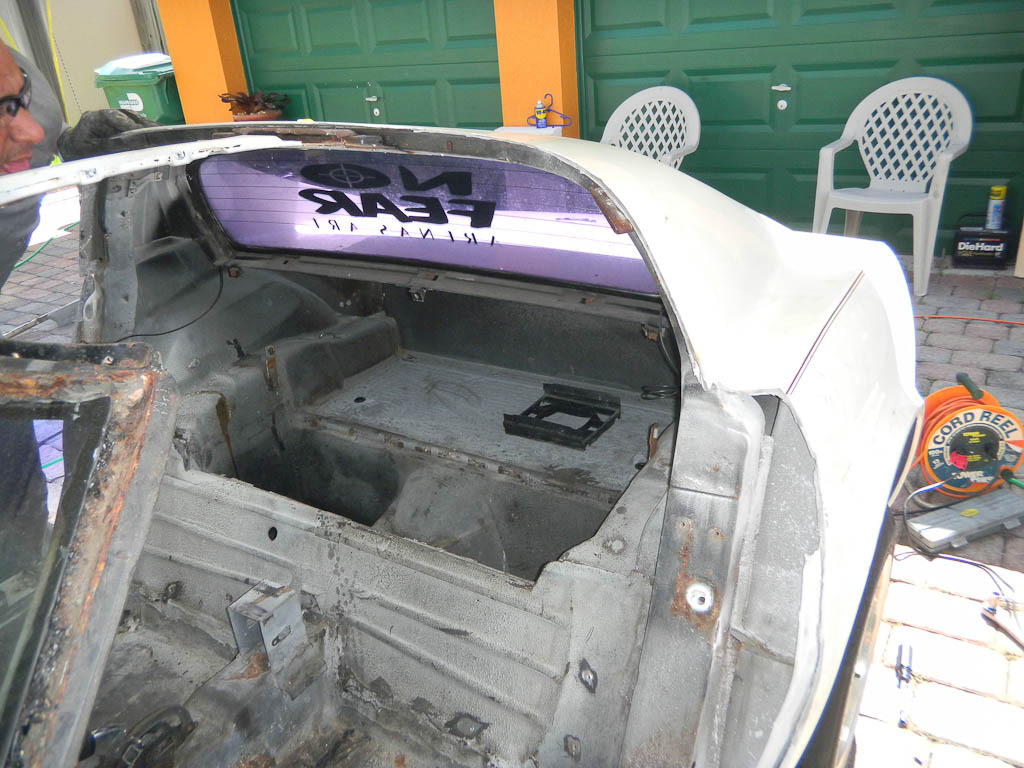
With that the rear end clip is completely loose and is all as a single unit. (Upper deck, quarter panels, wheel wells and storage area) Unfortunately, we have to move the bird cage to get the thing out. So.... next step.
I have to head out and work on the car now...... so I'll fill you all in on the progress later tonight.... Hopefully.... we'll be down to the chassis tonight.... everything off.
There seven on each side (pass and driver) of the interior, behind where the seats would be and at the door jambs. There are four behind each seat. They can be hidded behind the paint/coating so some sanding is in order to find the heads. The next two are at the door jamb near the strikers. Easy to find. The last one (seventh) is hidden. The only way to find it is to pry out on the inside where the wheel well hits the back of the birdcage. Stick a flashlight in there and you'll see rivet. To get it, sand/grind away the undercoating in the wheel well where the rivet would be. It took a bit, but I found them and drilled them out.
With that the rear end clip is completely loose and is all as a single unit. (Upper deck, quarter panels, wheel wells and storage area) Unfortunately, we have to move the bird cage to get the thing out. So.... next step.
I have to head out and work on the car now...... so I'll fill you all in on the progress later tonight.... Hopefully.... we'll be down to the chassis tonight.... everything off.
07-17-2011, 05:35 PM
#59
Pro
What it takes is a lot of controlled, concentrated heat to the point where the paint will probably bubble in the area you are working, a great deal of patients, and a good long "thin" scraper. Once hot enough the place that you are concentrating the heat should either let go, or the scraper slide in with ease, no force is needed nor wanted and there for very little to no damage to the panel. One problem that you will run into is where you get it hot enough that the panel is soft and easy to damage with your scraper, but not quite hot enough for the adhesive to let go, and you try to force the scraper a bit in an attempt to remove it, which will result in tearing the panel. You do not have to worry that the panel is getting soft it will harden back up once the heat is removed, just make sure not to try and force the scraper, again it should slide with ease. I have yet to resort to cutting a bonded panel to remove it, having said that the door lock pillar and the top of the door skins are a couple of pain in the butt places to dis-bond, as there is a lot of bonding adhesive used in those spots, but it's completely possible to do without cutting. Also I would like to add my very first door lock pillar was not so pretty either, but I found using the above methods made a big difference at least for me.
I hope this all makes sense even if the advise comes a little late for Luisv perhaps it will help someone else.
ikwhite
I hope this all makes sense even if the advise comes a little late for Luisv perhaps it will help someone else.
ikwhite
Great progress. I bet it takes a long
time to remove the rear clip from the birdcage when you actually care about not messing it up. the only one I have ever cut off was a total parts car, so I went to town on it lol.
Oh btw I have a nice rust free set of tail light brackets (all four) that I would be willing to sell you. PM me with an offer if interested
07-17-2011, 11:16 PM
#60
Racer
Thread Starter
What it takes is a lot of controlled, concentrated heat to the point where the paint will probably bubble in the area you are working, a great deal of patients, and a good long "thin" scraper. Once hot enough the place that you are concentrating the heat should either let go, or the scraper slide in with ease, no force is needed nor wanted and there for very little to no damage to the panel. One problem that you will run into is where you get it hot enough that the panel is soft and easy to damage with your scraper, but not quite hot enough for the adhesive to let go, and you try to force the scraper a bit in an attempt to remove it, which will result in tearing the panel. You do not have to worry that the panel is getting soft it will harden back up once the heat is removed, just make sure not to try and force the scraper, again it should slide with ease. I have yet to resort to cutting a bonded panel to remove it, having said that the door lock pillar and the top of the door skins are a couple of pain in the butt places to dis-bond, as there is a lot of bonding adhesive used in those spots, but it's completely possible to do without cutting. Also I would like to add my very first door lock pillar was not so pretty either, but I found using the above methods made a big difference at least for me.
I hope this all makes sense even if the advise comes a little late for Luisv perhaps it will help someone else.
ikwhite
I hope this all makes sense even if the advise comes a little late for Luisv perhaps it will help someone else.
ikwhite
The issue was on the sides. The heat was in there. The paint was just beginning to bubble up and yet the scraper and painters tool would not even make a dent at the joint. The glue would simply not soften up. I think I mentioned it above as well... the glue is a different color as well. It's not the lighter off white color from the front and top. It seems to be a deeper grey.
In any event.... for those reading this.... I have to admit I think there was an issue on the sides of my rear clip. For the most part, as mentioned above by IK and what I mentioned in the section of the front clip... it's all about heating it correctly and working smart and patient. It will come off.
I just did the firewall today with some freinds... and it was just as easy, in fact, easier than anything else I have taken off. I will post on that most likely tomorrow.... time for bed...
Thanks for all the support and helpful comments!!! It really has made this a good experience...