
testing temperature gauge and sending unit on a '71
 07-31-2011, 06:39 PM
#1
Burning Brakes

Thread Starter

On my '71 I have these new components:
The sending unit is basically a grounding point with less resistance as the heat goes up correct? There are 3 wires to the back of the gauge itself. If I take the wire off the sending unit and ground it to the chassis, should the gauge max out?
My electrical diagram shows 3 wires to the gauge:
- coolant temperature sending unit
- front lamp harness (sending unit wire)
- temperature gauge
The sending unit is basically a grounding point with less resistance as the heat goes up correct? There are 3 wires to the back of the gauge itself. If I take the wire off the sending unit and ground it to the chassis, should the gauge max out?
My electrical diagram shows 3 wires to the gauge:
- Black (ground)
- Dark Green (from sending unit)
- Pink (+12v)
 07-31-2011, 09:20 PM
#2
Race Director

Key to ON
Remove wire from sender-needle should go past full
ground the sender wire-needle should go cold
With the engine hot what does the sender read in ohms ?
Remove wire from sender-needle should go past full
ground the sender wire-needle should go cold
With the engine hot what does the sender read in ohms ?
08-07-2011, 11:15 PM
#4
Burning Brakes
Thread Starter
A little work interruption as I was out in the Pacific Northwest (Seattle & Bellingham) all last week, and with yard work yesterday and today, didn't get around to it until this evening.
I went out and took a measurement of the Dark Green wire at the gauge console connector at several different times. Here are the readings:
.600 kΩ with engine off and I believe I had the key out
.370 kΩ at first engine start
.260 kΩ this is when the reading went back up as I think the thermostat for the radiator kicked in and some cold water rushed in.
.272 kΩ was steady at reading for a bit
.230 kΩ this was soon after I turned the engine off
.208 kΩ was the lowest reading I encountered after the engine was off
So at least I know the sensor is at least fluctuating with actual engine temperature. Now if the sensor is good, and both the old and new gauges are good, and I'm still not getting my needle to move at all, I'm wondering if that little flat resistor looking thing might be the issue.
The new gauge I put in had a piece of plain PCB between the 2 prongs in back of the gauge. When I used that piece, the needle when powered went well past the highest reading on the gauge. So I stuck in the old board between the two posts and when powered read back at the lowest level but never moved. I'm wondering if that piece is bad and why the new gauge didn't come with a correct one.
I'll try to get some pictures up of the 2 different PCB connectors.
08-07-2011, 11:47 PM
#5
Burning Brakes
Thread Starter
As I Google around on this issue, I'm finding I'm about the zillionth person to find their sendor isn't calibrated correctly in ohms for their gauge.
I bought my part #8454 from Paragon Corvette. It said in the notes "Temperature sender switch, w/ "AC-MADE IN USA" logo. Correct reproduction provides accurate resistance,connection, and gauge display.".
Maybe they weren't quite accurate in their description?
I bought my part #8454 from Paragon Corvette. It said in the notes "Temperature sender switch, w/ "AC-MADE IN USA" logo. Correct reproduction provides accurate resistance,connection, and gauge display.".
Maybe they weren't quite accurate in their description?
Last edited by StingrayLust; 08-07-2011 at 11:51 PM.
08-08-2011, 01:19 AM
#6
Le Mans Master


Roger is the man on this. None of the replacements out there are correctly calibrated. Here are some good threads with more info. Worth the read.
http://forums.corvetteforum.com/c3-t...ender-pic.html
http://forums.corvetteforum.com/c3-t...uge-stuff.html
http://forums.corvetteforum.com/c3-t...uld-share.html
http://forums.corvetteforum.com/c3-t...e-success.html
http://forums.corvetteforum.com/c3-t...ender-pic.html
http://forums.corvetteforum.com/c3-t...uge-stuff.html
http://forums.corvetteforum.com/c3-t...uld-share.html
http://forums.corvetteforum.com/c3-t...e-success.html
The following users liked this post:
CamaroRick (05-03-2017)
08-08-2011, 02:18 AM
#7
Burning Brakes
Thread Starter
SteveG, thanks for the links, unfortunately they were sobering!!!  Looks like my sender is pretty far away from reading the correct ohms on a semi-warm idling engine, no wonder the needle never moved.
It sounds like the best of the bunch is the WT203Z? But even with that it sounds like it's not a 100% cure without additional electrical work.
Looks like my sender is pretty far away from reading the correct ohms on a semi-warm idling engine, no wonder the needle never moved.It sounds like the best of the bunch is the WT203Z? But even with that it sounds like it's not a 100% cure without additional electrical work.
08-08-2011, 03:23 AM
#8
Burning Brakes
Thread Starter
From the previous threads SteveG posted, it looks like Roger tested a couple different venders sender units. I looked at the Zip site and the one there, M-3518, states the following:
As others have said long before me, who knew something so simple could be so difficult.
Does your Corvette's temperature gauge read correctly? For years the only available temperature sending units were GM/DELCO, and for years they were not calibrated correctly. Zip Products has new reproduction sending units designed as original with original type terminal connection, housing and resistance (thermistor). Our new sending units produce accurate gauge readings.
I'd be curious to know if their statement about it being a "new reproduction" is just false advertising and is just another knock-off of existing bad senders.As others have said long before me, who knew something so simple could be so difficult.
08-08-2011, 09:22 AM
#9
Safety Car


you are also making some assumptions that may be skewing your data.
1. your ohm meter ( chinese $15.95 from autozone ) may not be accurate.
2. Your temperature sending unit may not be resisting correctly thruout the range.
3. your temperature sending unit may need to be on the head and not on the intake manifold ( or the other way around.)
4. your temperature gauge wiring may have a certian resistance to it from being old
5. try a hotter thermostat. my car had all the same problems and I had a 160 degree thermostat in my car, the needle would barely move off of cold. then I put a 195 thermostat in and now the needle moves to about half way. but now i traded off a hotter engine. the car actually spits coolant out just about every time I park it after a good drive. and the carb get too hot and boils away the gas too, making it hard starting if i leave it sit more than 5 minutes with a hot engine.
it is all a bunch of tradeoffs...
08-08-2011, 11:08 AM
#10
Team Owner

#1 Your gauge is working and you have seen it swing freely throughout its range. The resistance component on the back may not be correct, but the gauge itself is fine.
#2 The sending unit is working 'as expected'. It may, or may not, be calibrated correctly for your gauge/resistor, but it displays variable resistance as the temperature of the engine changes.
To resolve your problem the resistor on the back of the gauge needs to be resized so that the gauge will read [approximately] correctly when at normal operating temperature.
Remove the resistor (thing mounted to the two connections on the back of the gauge) and measure its resistance with your ohmmeter. Also, you need to take accurate gauge readings to match the 'engine warm-up' resistance readings you got from the sensor. Try to capture the gauge readings at about the same points in the warm-up cycle as when you got the sensor readings. These data can be used, along with the gauge component resistance to figure out what resistor needs to be placed on the back of your gauge to get it to read reasonably well. Remember, the purpose of the gauge is NOT to provide you with ACCURATE temperature readings....it is to provide a way for you to know when the coolant system is operating "normally" and/or when it is behaving "differently". If we can get your gauge to measure reasonably well at normal running temps AND to show when temps go significantly higher/lower, then the gauge will be doing its job.
Get those data and put in another post and/or send me a PM. We well try to get you working again.
08-17-2011, 09:34 PM
#11
Burning Brakes
Thread Starter
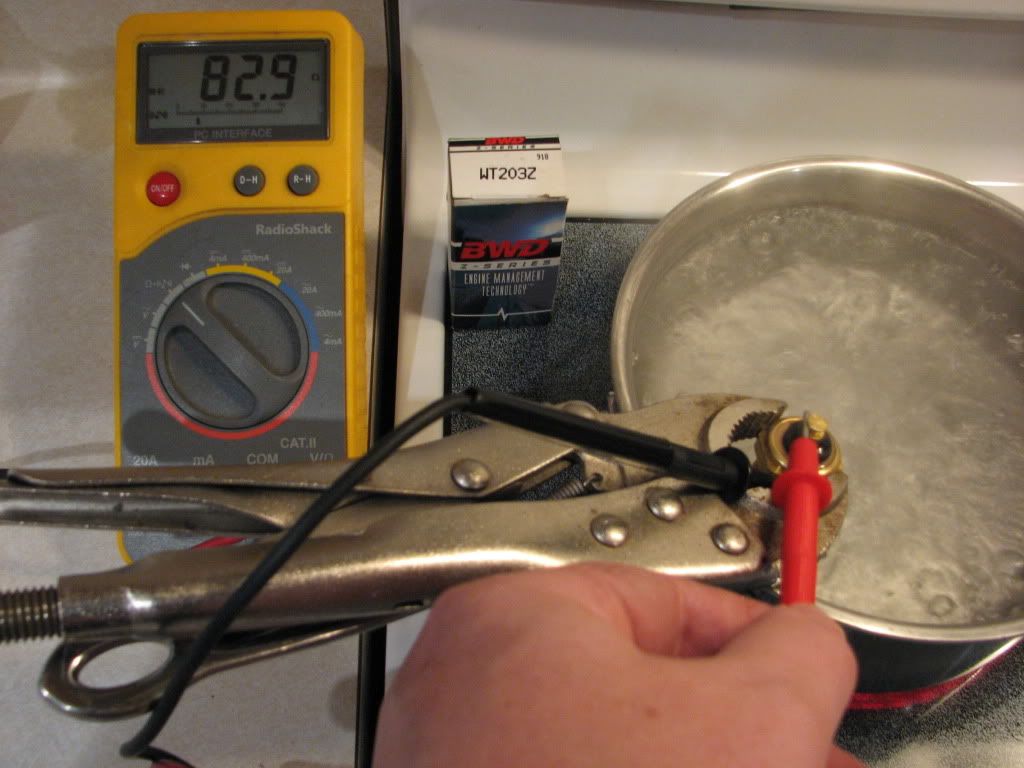
So tonight I went to AdvanceAuto and bought the BWD WT203Z coolant temp sensor. After reading about what these things should read, I decided to test mine against what it should read at water boiling temperature. I believe the reading should be between 79-82 ohms. Mine was 82.9. I'll install it this weekend and see if that helps with my gauge not reading anything. Of course I'll have to make an adapter to connect it to my pin connector.
08-17-2011, 10:16 PM
#12
Race Director
That's a pretty good reading,I bet you could get it a little lower with something other than the heavy vise grips holding it. The vise grips don't let the sender get as hot as it could.
I think you'll get a good reading once installed in the head.
I've been very carefully grinding the contact down to a pin type,its a tiny bit short but works fine.
Let us know how your gauge reads.
I think you'll get a good reading once installed in the head.
I've been very carefully grinding the contact down to a pin type,its a tiny bit short but works fine.
Let us know how your gauge reads.
08-20-2011, 07:59 PM
#13
Burning Brakes
Thread Starter
Just to finish this thread off. I finally have a working temp gauge. I replaced my sender with the 203z and started the motor. I let it idle for about 4-5 minutes and then revved it up higher to get the temp up. I then shut off the motor and measured at the gauge connector a couple minutes later, to let the engine heat soak, and it read about 98 ohms. I plugged the connector into the gauge and the needle moved to about the first mark or 155 degrees.
I know the gauge itself it pretty accurate as I went to Radio Shack tonight and bought a 68 and 10 ohm resistor and grounded the gauge signal post with them and the needle read just past the 210 mark which is spot on.
Three things I didn't originally check when I first started out on this project.
#1 - I had changed the radiator from the 18" to a 26" one and just letting it idle wasn't getting it hot enough. I had to rev it higher for several minutes to get the temp up to where it would make the needle move
#2 - I hadn't tested the resistor across the gauge posts. It's close to perfect as I think it read somewhere around 86 ohms, supposed to be 90 I believe.
#3 - I think the original owner didn't have the gauge connected correctly. I believe there should have been an insulator between the back gauge housing and the 90 ohm resistor that goes between the two posts. That was missing and probably created some of my gauge problems.
I'm going to buy a new pot and test my sender I got from Paragon to see what ohm reading I get at boiling.
Thanks to everyone for their help.

