
Full tilt lives
 12-29-2011, 11:20 AM
#21
Instructor

Thread Starter
Cruzin,
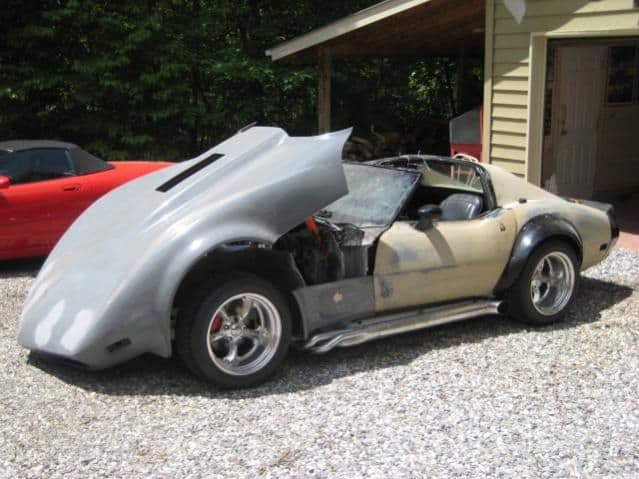
Yes I did paint it in the garage. Well.. the car port actually. My wife would have divorced me if I had painted in the real garage and filled the house with fumes!
Yes I did paint it in the garage. Well.. the car port actually. My wife would have divorced me if I had painted in the real garage and filled the house with fumes!


 12-30-2011, 12:44 AM
#23
Melting Slicks

[QUOTE=77custom;1579590403]Ross. Thanks for the compliments. The rear of the clip rests (and locks into place) on 2 bear claw catches.
You can see them better in the build photos.....
http://s1234.photobucket.com/albums/ff412/FullTilt1977/
So you have a cable that runs under the firewall that attaches to the Bearclaws that releases the hood?
You can see them better in the build photos.....
http://s1234.photobucket.com/albums/ff412/FullTilt1977/
So you have a cable that runs under the firewall that attaches to the Bearclaws that releases the hood?
12-30-2011, 12:50 AM
#24
Instructor
Thread Starter
yes. it is set up to release like a stock hood release under the dash. Both clamps/releases act as one. Was a real PITA to make... but works like a charm.
12-30-2011, 12:55 AM
#25
Melting Slicks
Thats what i thought, very ingenious, very Kool. so how much fun was it aligning your hood, bet that was fun. i've had lots of fun w/mine lol.
12-30-2011, 01:06 AM
#26
Instructor
Thread Starter
Ross... yes. that is the simple explanation. the reality is that both releases work in tandom via a hard wire connecting them... BUT.. it works left to right... and I needed something that worked up and down! So I had to fabricate a small piece that is mounted up beside the upper bolts in the brake housing that transfers that motion. Not real hard... but a very tight fit. Hard to explain in words.... but rather simple in design.
and for the entire front clip... aligning it was not that big of a deal... once I figured out how to fabricate the hinge mechanism. Everything else was simple (if not delicate) bodywork.
Did you design/fabricate your hinge assembly? Or is it a factory/aftermarket job?
Love your car BTW !!!
and for the entire front clip... aligning it was not that big of a deal... once I figured out how to fabricate the hinge mechanism. Everything else was simple (if not delicate) bodywork.
Did you design/fabricate your hinge assembly? Or is it a factory/aftermarket job?
Love your car BTW !!!
12-30-2011, 01:27 AM
#27
Melting Slicks
Your hinge fabrication is just brilliant, love all the lil tricks you did. my hood is the 1pc ecklers hood which the installation is varied on who installs it. i bought mine in 1990 w/all the body mods already done but the rest of the vette was junk so i replaced everything. the 2nd day i drove it i hit a bump and the hood released and i'm driving blind grinding the center grill on the road, happened twice in a 1/2 mile so i parked it till i put hoodpins in. It's just awesome working in the engine bay w/a Flip, so much room. Your hood is so awesome, as is your whole vette.

12-30-2011, 09:36 AM
#28


The car looks awsome, you have alot of time in just the firewall. I also have a 77 with a tilt front end that has been an on going 10 year project. On your tilt, does your front end go up and out or just out ( I hope that makes since). Mine just tilts forward and the nose hits the ground making very little working room. I'd like to figure out how to get more of an opening before the nose hits..

12-30-2011, 11:53 AM
#30
Instructor
Thread Starter
THANKS MRAnt!
Shamby... Love what you are doing to yours! I don't recognize your front clip though.... is it a modified "Mako" clip? If so... that is probably the reason why it won't tilt forward any more than it does.
I solved that problem by making my own hinges from scratch. I built off the existing frame and moved the hinge points (which are two 3/4 inch rods... one on each side) as far forward into the front clip as humanly possible.... making it tilt up rather than out.
The entire clip is supported by 4 gas struts that balance so well one finger will raise or lower the entire clip. BUT... it did take me over a week of playing around with various strut pressure combinations to get it right!
I also had to build a square steel tubing frame to carry all that weight from front to back considering the hinge points are now well forward of the actual balance point on the clip.
I hope that makes some kind of sense!
Keep up the great work! Maybe some day soon we can put them together!
Best.... Robert
12-30-2011, 12:06 PM
#31
Instructor
Thread Starter
Oh... and ROSS.... is you look closely at some of the build pics, you will see the bear claw catches. Once they garb a hold of the "male" pins I welded onto the rear of the steel support frame... the entire front clip locks into place. I haven't tested it over 150 mph yet... but so far, it stays right where it should.
Love to see more pics of yours!
Love to see more pics of yours!
 12-30-2011, 12:51 PM
#33
77Custom, I really don't know much about the front clip except that I believe it was sold by Ecklers for a short time, but made by American Sports Cars/Stinger Fiberglass. The clip is a one piece with 4" flares. The pivot point on mine is at the lower part of the radiator. The way mine opens is very impractical. The car needs to be on ramps to open the hood.
I've been through all your pictures several times. Love it, I even like the doors.
I've been through all your pictures several times. Love it, I even like the doors.
 12-30-2011, 01:25 PM
#35
Instructor
Thread Starter
Thanks Chevyman!
Shamby...I had a feeling that was what it was. Very rare if I am not mistaken. Ecklers sold very few of them. And yes... that is why I scrapped every aftermarket part out there... they just don't open correctly.
MandT... Thanks! The front spoiler/splitter are kind of like the rest of the car... I looked around at every aftermarket product out there.. hated all of them... so I got out the cardboard, fiberglass, and a TON of resin and created my own. I would love to say that I had molds for any of the parts (front clip, rear wing, front splitter, etc etc) but I don't. Usually just made things as I went... and probably threw away more fiberglass from things that didn't quite come out the way I wanted than is still on the car!
12-30-2011, 02:21 PM
#36
Melting Slicks
Oh... and ROSS.... is you look closely at some of the build pics, you will see the bear claw catches. Once they garb a hold of the "male" pins I welded onto the rear of the steel support frame... the entire front clip locks into place. I haven't tested it over 150 mph yet... but so far, it stays right where it should.
Love to see more pics of yours!
Love to see more pics of yours!
http://smg.photobucket.com/albums/v323/rosslato/
12-30-2011, 03:42 PM
#37
Instructor
Thread Starter
Ross... I love your ride ! Your powdercoating and chrome bills are more than mine! Didn't think that was possible! Fantastic undercarriage!
Do the hinge mechanisms on your clip come off the car WITH the front clip? And where do they attach to the frame? Hard to tell in the pics.
Do the hinge mechanisms on your clip come off the car WITH the front clip? And where do they attach to the frame? Hard to tell in the pics.
12-30-2011, 03:52 PM
#38
Instructor
Thread Starter
Ross. Here is a pic of the hinge mechanism, and the headlight system I fabbed. Probably reduced the total weight of the front end of the car over 400 lbs without the "bumper steel", and all the headlight crap.
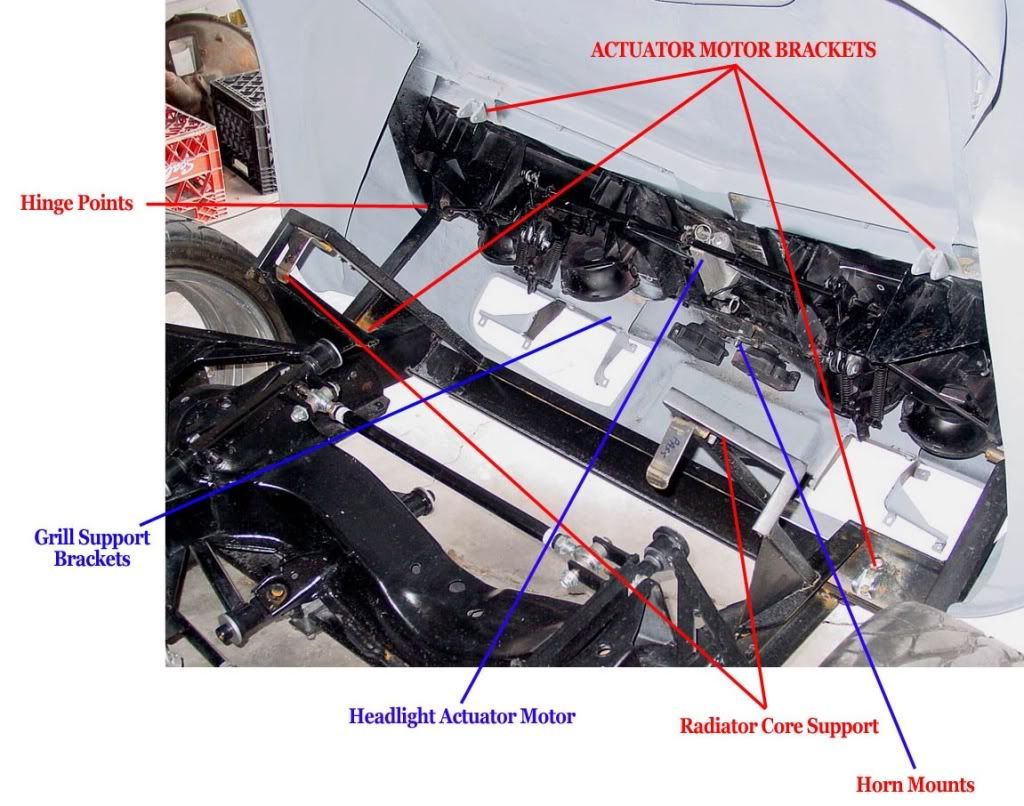

All the electrics on the front clip (headlights, turn signals, horns & power to the headlight actuator are connected through one quick release 12 pin connector.
All the electrics on the front clip (headlights, turn signals, horns & power to the headlight actuator are connected through one quick release 12 pin connector.
12-30-2011, 04:21 PM
#39
Melting Slicks

See that 5� L bracket that�s bolted to the top of the crossmember on the end? That�s the mount for the hood, theres one on each side so 2 bolts and it�s off w/the hood or on, pretty convenient. I gotta go out to the garage later and I�ll take a good pic. none of my parts are powdercoated, I used por-15 engine enamel ford thunderbird red, see here http://www.por15.com/ENGINE-ENAMEL/productinfo/EEPA/ I just brushed it on, leaves no brush strokes and I swear it looks powdercoated. even my VB Aarms came PC�d Black so I brushed on the por-15 engine enamel , came out awesome. the tank is also por-15�d. the stuff looks so wet. BTW I noticed on your front spring endbolts you had the Hex side up in 1 pic and down in another, which way did you finally go?
12-30-2011, 04:49 PM
#40
Melting Slicks
Great Fabrication on the hood, would love to see your vette up close and personal. you an engineer?