When you click on links to various merchants on this site and make a purchase, this can result in this site earning a commission. Affiliate programs and affiliations include, but are not limited to, the eBay Partner Network.
I've installed new rubber spring cushions in the trailing arms.
The spring isn't in yet so there is no load on the cushion at all.
When I went to install the sway-bar mount the bolts hit the large washer before they even get close to in.
I know the cushion will compress quite a bit and the bolts will fit but I'm now thinking the sway-bar bolts are way too long as well.
Does anyone have a length for those bolts? or a picture I can extrapolate a length from?
Thanks
Mooser
Last edited by Mooser; 11-21-2017 at 09:32 PM.
Reason: photobucket
If you are trying to install the factory sway bar bracket and bolts, you'll need to collapse the cushion, install the flat plate and then the upper bracket and bolts.
We use a home made tool to pull the cushion down. You'll see it in the picture below and it works like a charm.
Number 4 below is just a section of water pipe with two washers welded on the top and bottom. You insert it over the bolt, install the nut and compress the cushion. If you look at picture 3, you'll see it installed on the bolt. I think this is what you are trying to do, not positive. Hope this helps you.
[IMG][/IMG]
Last edited by Willcox Corvette; 04-16-2012 at 10:33 PM.
Looks like my bolts are too long, in you picture (#3) they barely stick through the bottom plate, the ones I've got are hanging down far enough they hit the large washer before the spring-bolt head hits the plate.
I'll have to cut probably 3/8 off them and re-coat them
My mistake for not checking, just matched the old length that came off
Many thanks
Mooser
(I've added your pics to my archive)
BUT
In this case I'm looking at the bolts that hold the swaybar bracket to the top of the Trailing Arm
I replaced the bolts that came off with new versions of the same size/length. Now, during re-assembly, I see that they are too long. When the spring is loaded, they will be OK but they still hang down about 3/8" below the nut-plate.
Since I've already powder coated them I was half-hoping they were right, or even close.
Oh well, time to get the hacksaw in motion
Thanks though
Brett
I do not remember the length but they do not extend more than a couple of threads beyond the nut plate. I would not think they are more than 1". Stack the nut plate and the bracket on top of the ta and take a measurement of the ta and the stack. Don't forget to add for a lock washer.
I do not remember the length but they do not extend more than a couple of threads beyond the nut plate. I would not think they are more than 1". Stack the nut plate and the bracket on top of the ta and take a measurement of the ta and the stack. Don't forget to add for a lock washer.
the bolts come through the plate but not by much..
And Mooser.. you might make yourself that tool for installing the plates.. it makes installing the plates a breeze without the spring attached....
Already shortened and re-parc'ed and powder coated. Should have caught that one earlier,
Made a "sort-a-tool" out of a some tubing and assorted shop bits that should work. Great idea . Might have to make space for it on the shelf beside #FUBAR-4 tool
I don't want to put the spring in quite yet since I still need to got through all of the torquing (half shafts, etc) and it's just in the way.
Mooser
Agree..
I have four drawers full of these handy shop made tools.... Not sure what I'd do without them over the years. The bushing puller tool is actually one you should make and keep too.. it pulls the bushings in to the bar in seconds... (with an impact)
Just to close off this thread for anyone searching
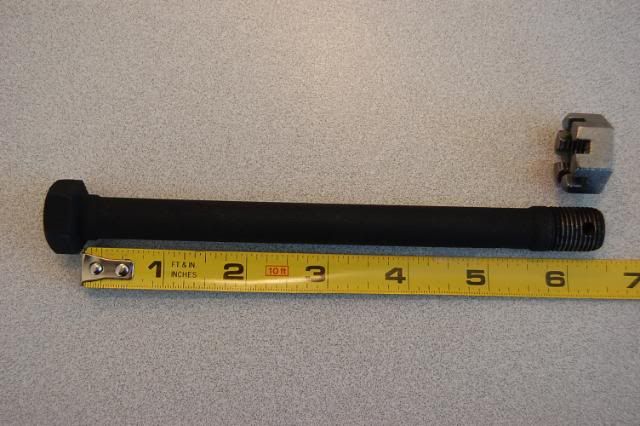
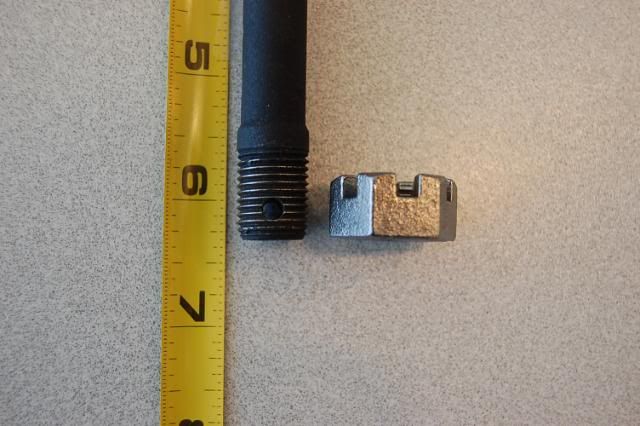
The bolts work out to 3/4" long (under the head)
Wilcox's sleeve to compress the cushion works well, I just had a length of tubing and a washer on the top, a larger nut on the bottom and a non-self locking nut to run it in about 5 turns after touching was enough to slide the threaded bar in for the sway bar bolts
When the tool is removed the head of the spring bolt is touching the bottom of the nut-bar so I slid in a plastic shim for now to protect the powder coat.
Mooser
Last edited by Mooser; 11-21-2017 at 09:31 PM.
Reason: photobucket mess
All I remember is years ago a vette shop sold me a stock rear bar without any of that complicated factory crap linkage....I too one glance at the ends, and so bought it for next to nothing, along with a couple of clamps for the frame support....went home to heat/bend the ends some 90* and so to install the typical urethane bushing front sway bar setup...bolt with 4 bushings/washers/spacer.....been on the car for maybe 15 years now....
OH, so simple to install also....take the whole thing out in about 15 minits if that.....
Continued thanks to all. Guess I need to un-nut the spring bolts, again, to both further compress the bushing and have the bolt head parallel with the TA box.
I am curious - there's one vote against poly for this bushing. Have any others had a bad experience? Now would be the time to change it.
I wouldn't vote against poly for this application. I used poly when I ran into this exact issue. The poly bushing let me install the sway bar bracket without a huge hassle. These bushings are easy to inspect, easy to replace, and are not "captured" the way the trailing arm and strut rod bushings are (for example), so poly all the way! I used the bushings that came with my NOS (shortened) VB&P spring, though Energy Suspension also makes them (I would have put on the red ones had I been paying attention).
Just my take on it, not getting into a poly/rubber argument. Everyone will have a different take on the subject of rubber / poly.
For me, in a street driven car 99.9999% of the time, Poly for things that turn (like swaybar mount bushings on the front) Rubber for things that twist/bend (like the rear spring cushions in this case)
As that spring moves up and down, the bolt angle will change (even though it's slight) and the rubber will conform to the different angles easier than the poly will.
If anyone wants to start up the poly/rubber debate yet again leave the thread alone and start a new one
M
Mooser that is some mighty fine detail work on that rear suspension. All I can say is WOW if the rest of the car looks like that. An LS5 and Yellow to boot! Great combination. I had a yellow car for 28 years. The color kind of grows on you doesn't it?
Thanks
Yeah, when I bought the car I knew it would need paint eventually and I fully planned to go red, by the time it actually went to paint jail the yellow had grown on me (and I knew way too many other red vettes around) so it stayed yellow. Still glad I did.
M
Just my take on it, not getting into a poly/rubber argument. Everyone will have a different take on the subject of rubber / poly.
For me, in a street driven car 99.9999% of the time, Poly for things that turn (like swaybar mount bushings on the front) Rubber for things that twist/bend (like the rear spring cushions in this case)
As that spring moves up and down, the bolt angle will change (even though it's slight) and the rubber will conform to the different angles easier than the poly will.
If anyone wants to start up the poly/rubber debate yet again leave the thread alone and start a new one
M
I didn't want to start up the poly/rubber debate. I think your middle of the road approach makes sense. The two materials have different properties which may be of benefit in one situation and detrimental in another.

 04-16-2012, 10:09 PM


 [/IMG]


 the bolts come through the plate but not by much..


