
L82 Valve cover restoration guide with pics
 11-29-2012, 11:37 AM
#1


Ok,
I was sick of looking at my L82 engine with factory valve covers that someone had stripped and failed to refinish. So I decided I would tackle them and restore them to their factory original beauty. I took some pics along the way and Ill post them with some simple instructions on what I did just in case anyone in the future may not know how to do this. It is a very very easy job and requires little mechanical knowledge if any. If you can unbolt 8 bolts, you're halfway there!
Obviously remove the valve covers from the engine. There are 4 bolts on each side.
Clean them. I used brake clean and a hard plastic bristle brush.Remove the pcv grommets on each side. Mine were so hard, old and brittle they literally broke in pieces when I took them off.

Passenger side before cleaning
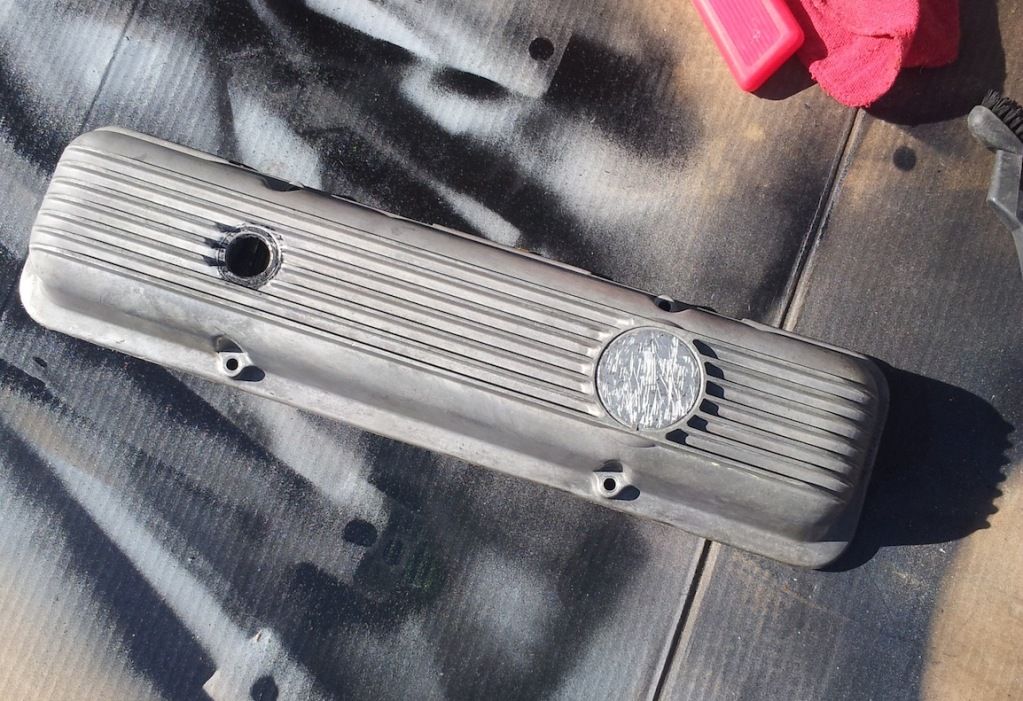
After a cleaning. I removed the old ratty corvette emblem.

Drivers side before cleaning.
Drivers side after cleaning.
Next you lay on the black paint. Word around these parts is you can use any black paint out of a spray can it doesn't have to be high temp paint. I had some caliper paint laying around, its high temp, so I decided to use it. It turned out well. Others have had just as good results with regular, plain jane black spray paint. Your call.

After a few coats of black paint.
Pay close attention to the inside of the fins as its easy to miss some small spots in there.
Paint an even layer then let it sit for 10 or 15 minutes, I offset the work on mine to make the time go by faster. I took the passenger side off first, cleaned it , and while I was waiting for it to dry I took the drivers side off. Painted the first layer on the passenger side and while it dried I cleaned the drivers side. You get the point...
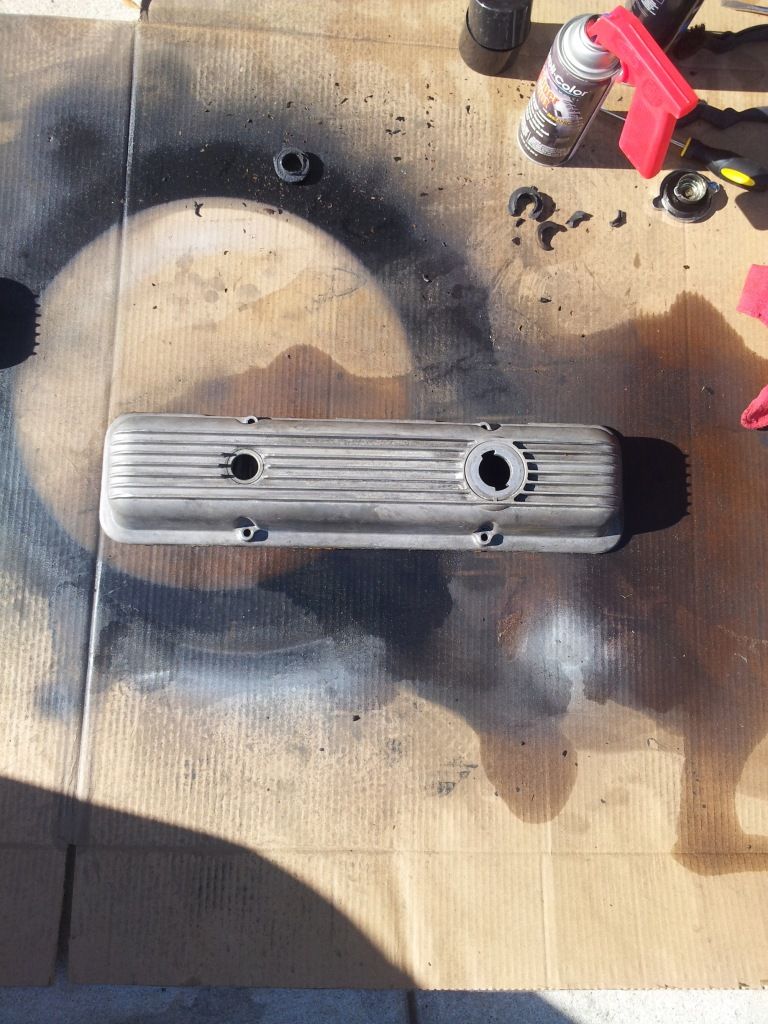
Anywho after a few layers of paint have dried and cured. I waited about an hour. Its time to wet sand the fins. I use a spray bottle with some dish soap and some water. I used a medium grit sanding block. keep the sandpaper/block and valve covers wet the entire time. Sand the fins until all the paint has been depleted. Hose them off, let them dry and put on your new corvette emblem. Dont forget to grab some new PCV grommets.

Bang! Valve covers that look like new!
I was sick of looking at my L82 engine with factory valve covers that someone had stripped and failed to refinish. So I decided I would tackle them and restore them to their factory original beauty. I took some pics along the way and Ill post them with some simple instructions on what I did just in case anyone in the future may not know how to do this. It is a very very easy job and requires little mechanical knowledge if any. If you can unbolt 8 bolts, you're halfway there!
Obviously remove the valve covers from the engine. There are 4 bolts on each side.
Clean them. I used brake clean and a hard plastic bristle brush.Remove the pcv grommets on each side. Mine were so hard, old and brittle they literally broke in pieces when I took them off.
Passenger side before cleaning
After a cleaning. I removed the old ratty corvette emblem.
Drivers side before cleaning.
Drivers side after cleaning.
Next you lay on the black paint. Word around these parts is you can use any black paint out of a spray can it doesn't have to be high temp paint. I had some caliper paint laying around, its high temp, so I decided to use it. It turned out well. Others have had just as good results with regular, plain jane black spray paint. Your call.
After a few coats of black paint.
Pay close attention to the inside of the fins as its easy to miss some small spots in there.
Paint an even layer then let it sit for 10 or 15 minutes, I offset the work on mine to make the time go by faster. I took the passenger side off first, cleaned it , and while I was waiting for it to dry I took the drivers side off. Painted the first layer on the passenger side and while it dried I cleaned the drivers side. You get the point...
Anywho after a few layers of paint have dried and cured. I waited about an hour. Its time to wet sand the fins. I use a spray bottle with some dish soap and some water. I used a medium grit sanding block. keep the sandpaper/block and valve covers wet the entire time. Sand the fins until all the paint has been depleted. Hose them off, let them dry and put on your new corvette emblem. Dont forget to grab some new PCV grommets.
Bang! Valve covers that look like new!
Last edited by Bagpype; 11-29-2012 at 02:05 PM.
 11-29-2012, 11:44 AM
#2
Drifting

What is the "correct" finish for these valve covers?
I blasted mine with walnut shells and they came out with a VERY clean, finished raw aluminum look. I then wet sanded with 600 grit and let them ride. They look pretty sharp.
I am curious, though. Are they black like this? Or just black in the fins? Wrinkle finish black? Or natural aluminum? How did they come from the factory?
Mr. Alan71? You seem to always have the undisputible answer...
11-29-2012, 11:51 AM
#3
What is the "correct" finish for these valve covers?
I blasted mine with walnut shells and they came out with a VERY clean, finished raw aluminum look. I then wet sanded with 600 grit and let them ride. They look pretty sharp.
I am curious, though. Are they black like this? Or just black in the fins? Wrinkle finish black? Or natural aluminum? How did they come from the factory?
Mr. Alan71? You seem to always have the undisputible answer...
I blasted mine with walnut shells and they came out with a VERY clean, finished raw aluminum look. I then wet sanded with 600 grit and let them ride. They look pretty sharp.
I am curious, though. Are they black like this? Or just black in the fins? Wrinkle finish black? Or natural aluminum? How did they come from the factory?
Mr. Alan71? You seem to always have the undisputible answer...
11-29-2012, 12:10 PM
#4
Drifting
11-29-2012, 12:43 PM
#5
Drifting
L-46 (69 - 70), LT-1 (70 - 72) and L-82 (73 +) aluminum valve covers were silver / natural for 1969 - 1977, black painted starting in 1978.
Last edited by Brcmpbl; 11-30-2012 at 11:30 AM.
11-29-2012, 12:50 PM
#6
Melting Slicks

I **think** that the earlier L82's came with natural covers and the later with black and aluminum fins. From what I have seen, this seemed to switch over in '77 so maybe it happened when they changed over to corporate blue engine paint? Possible that the very early '77's that came with orange engines still had the natural covers as well?
Hopefully someone that knows for sure will chime in.
Adam
EDIT: Brcmpbl posted as I was - sorry for any confusion.
Hopefully someone that knows for sure will chime in.
Adam
EDIT: Brcmpbl posted as I was - sorry for any confusion.
11-30-2012, 05:10 AM
#7
Safety Car


Nice work bagpype! I've got a set of 78 L82's I need to tackle so its nice to see a forum contributor do the work and post. As stated by BR...painted alumnium valve covers started in 1978 and the paint was gloss black.
Probably the greater challenge is to clean when paint remains. When using a bead blaster, I understand that lower pressure should be used along with, as suggested walnut shells.

Probably the greater challenge is to clean when paint remains. When using a bead blaster, I understand that lower pressure should be used along with, as suggested walnut shells.


 11-30-2012, 04:33 PM
#12
Thanks for the compliments everyone, i try and do things the right way every time.
The emblem is held on by adhesive. I used super glue on mine. Hope it stays but the emblem is easy to come by and cheap.
The emblem is held on by adhesive. I used super glue on mine. Hope it stays but the emblem is easy to come by and cheap.

