C3 General General C3 Corvette Discussion not covered in Tech
Sponsored by:
Sponsored by:

Step by Step Heater Core Replacement on a 73

Old 01-13-2013, 04:44 PM
  #1  
Scott's 73
Instructor
Thread Starter
 
Scott's 73's Avatar
 
Member Since: Aug 2012
Location: Riverside CA
Posts: 164
Likes: 0
Received 4 Likes on 3 Posts
Default Step by Step Heater Core Replacement on a 73

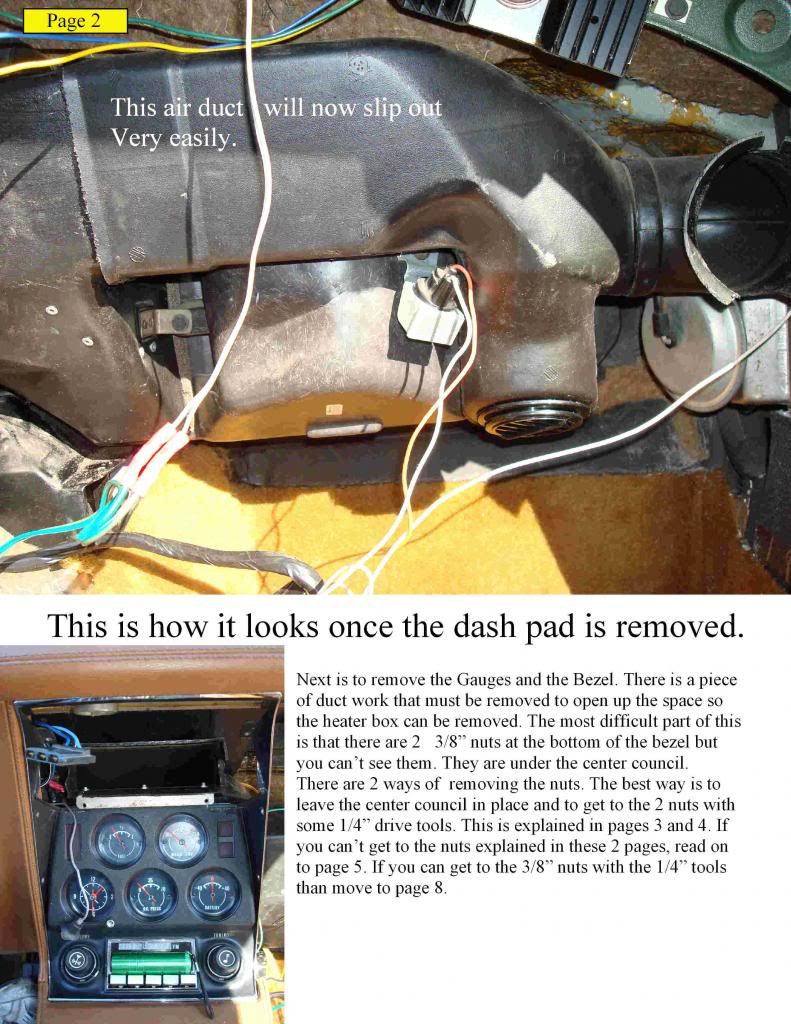
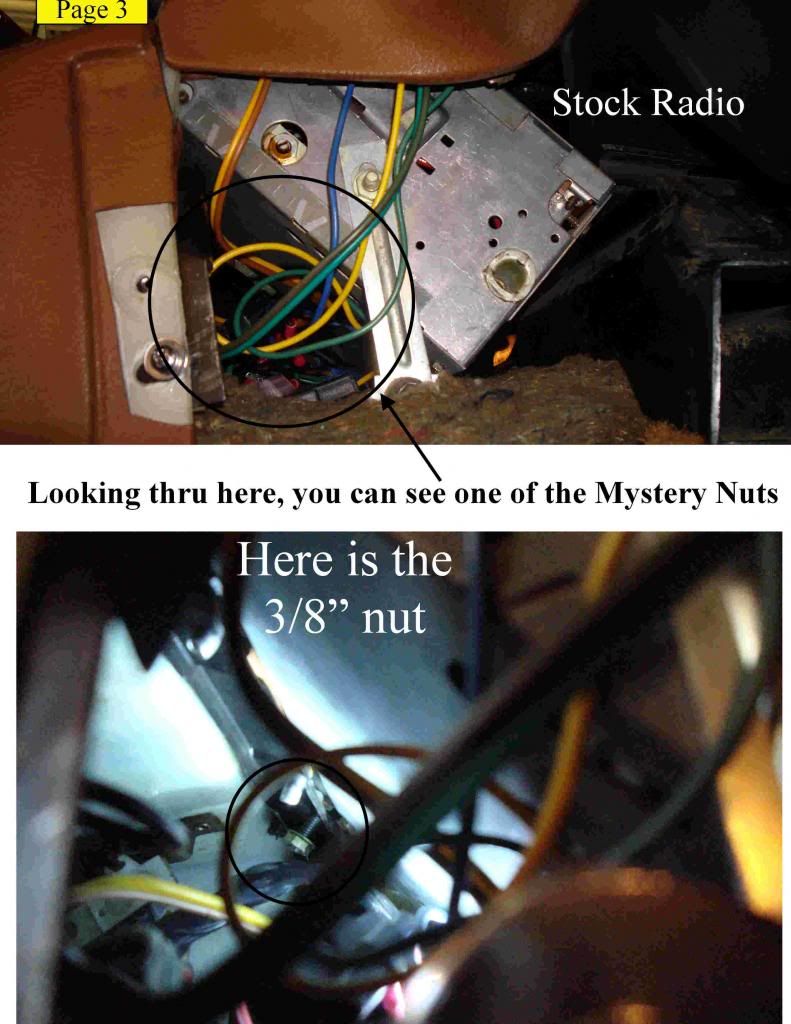
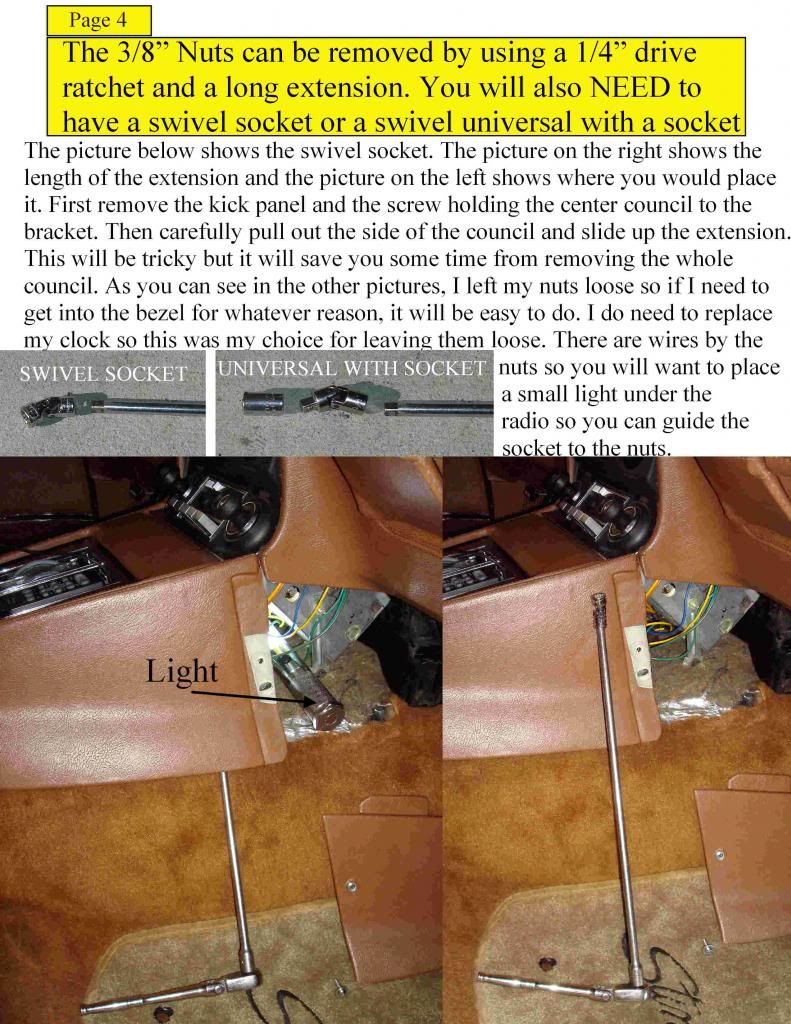
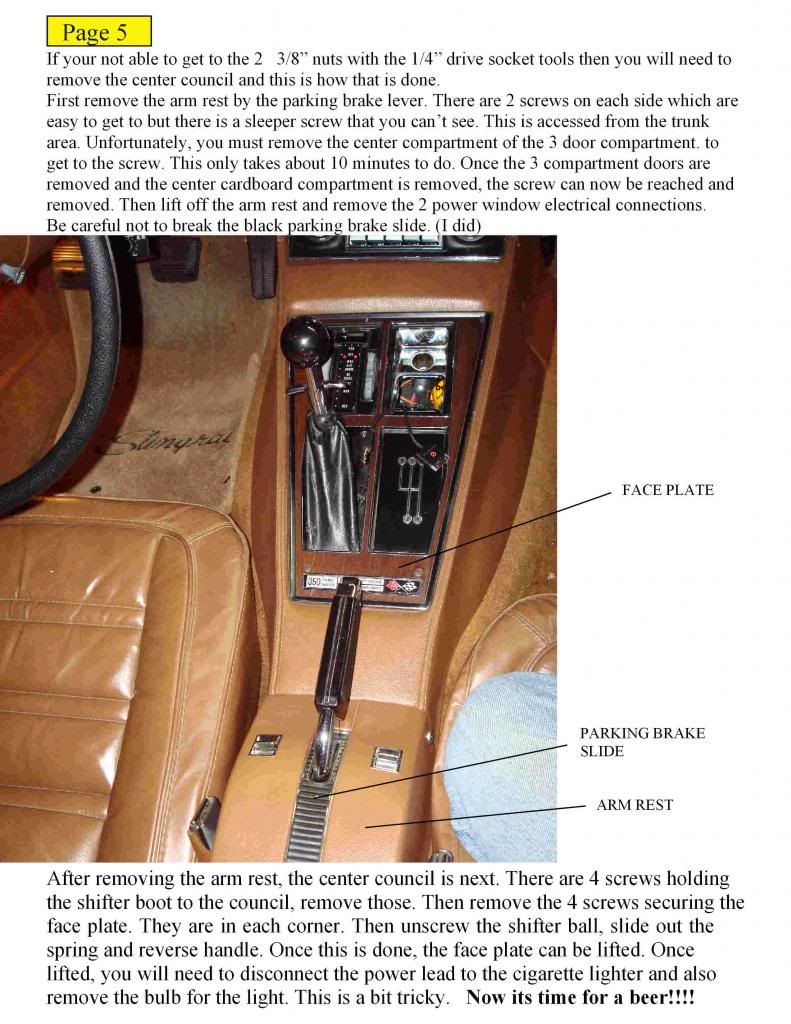
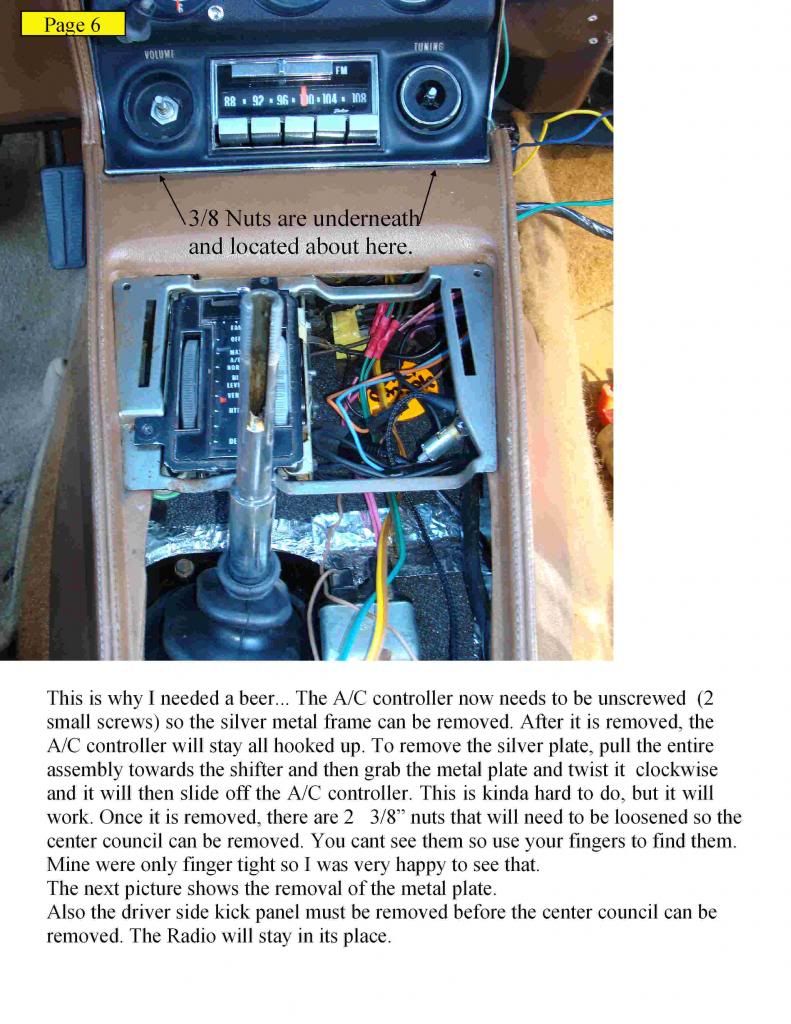
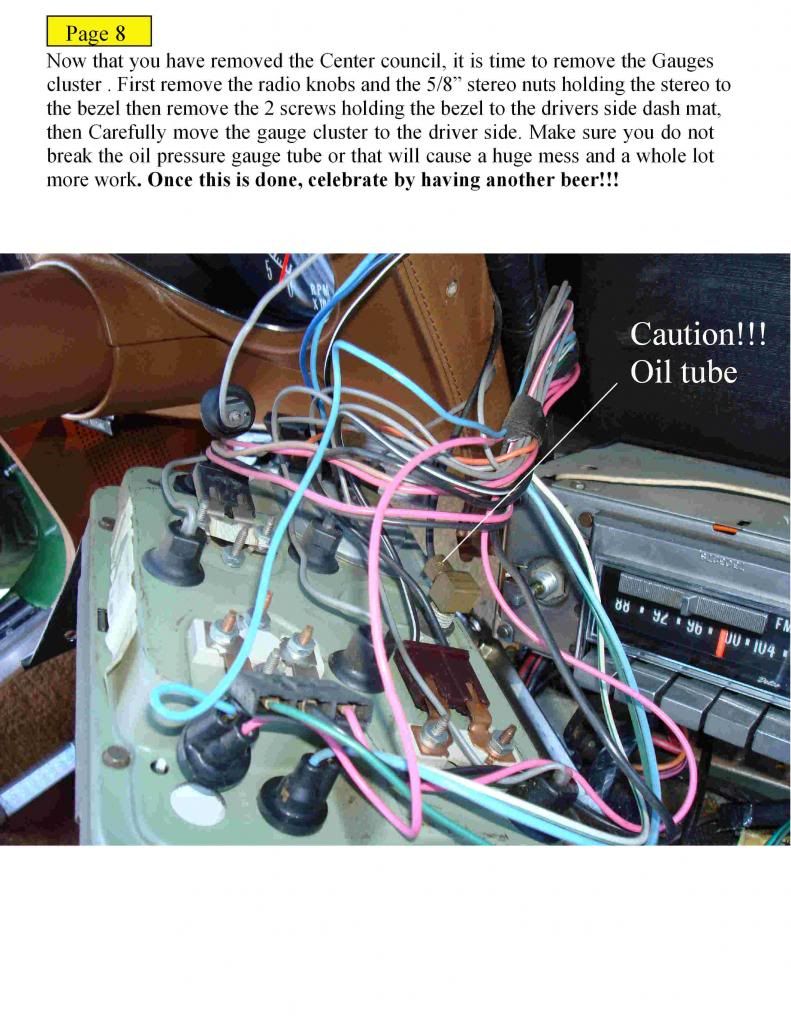
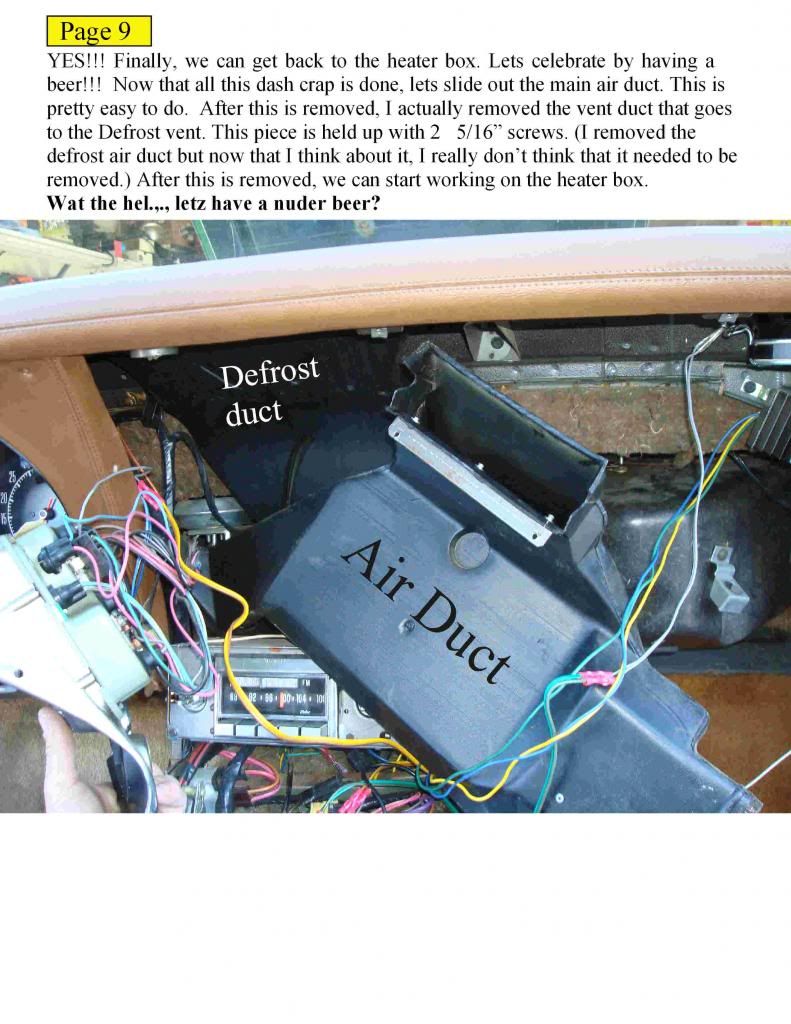
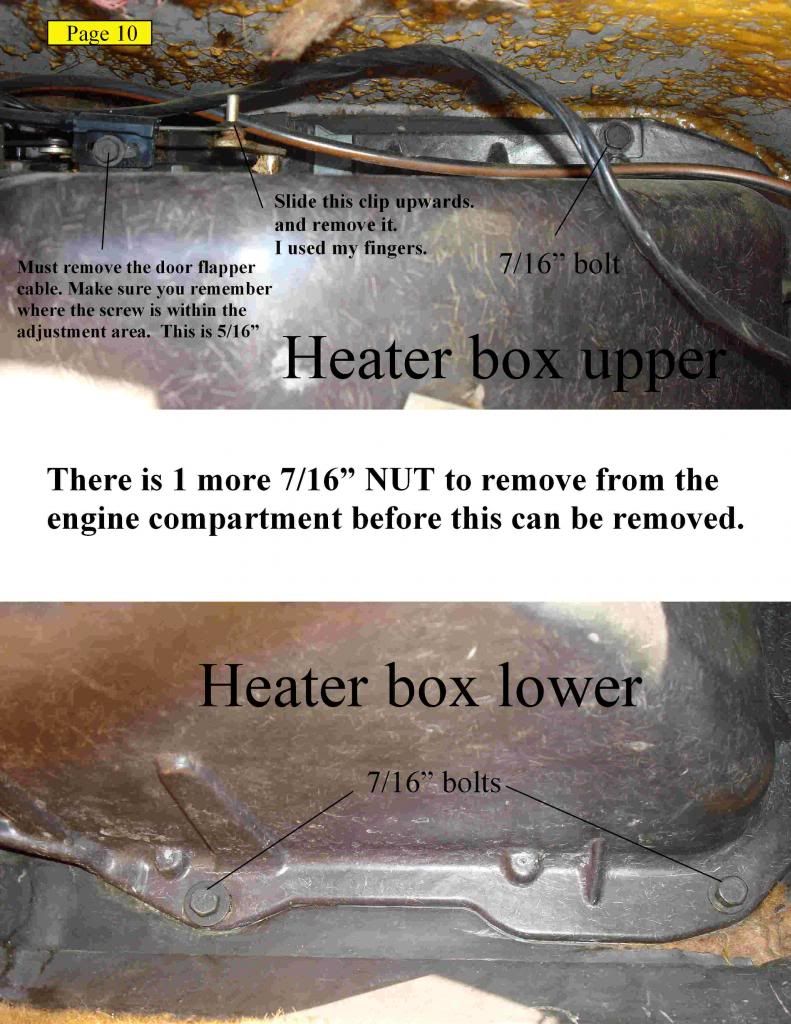
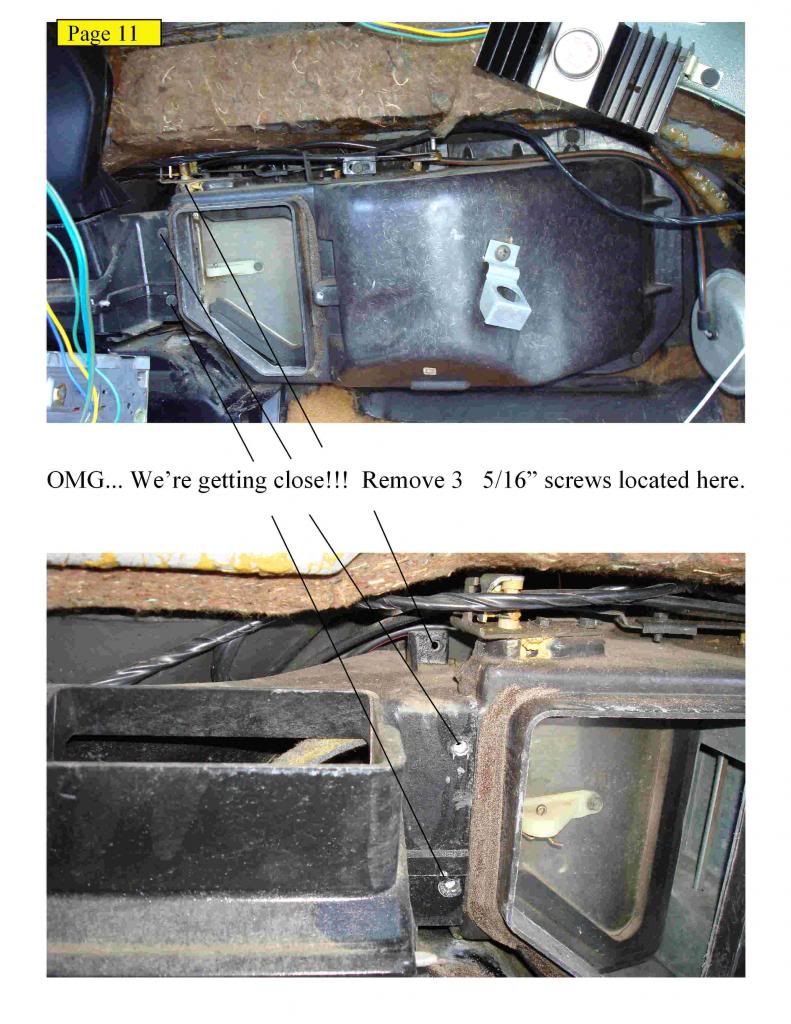
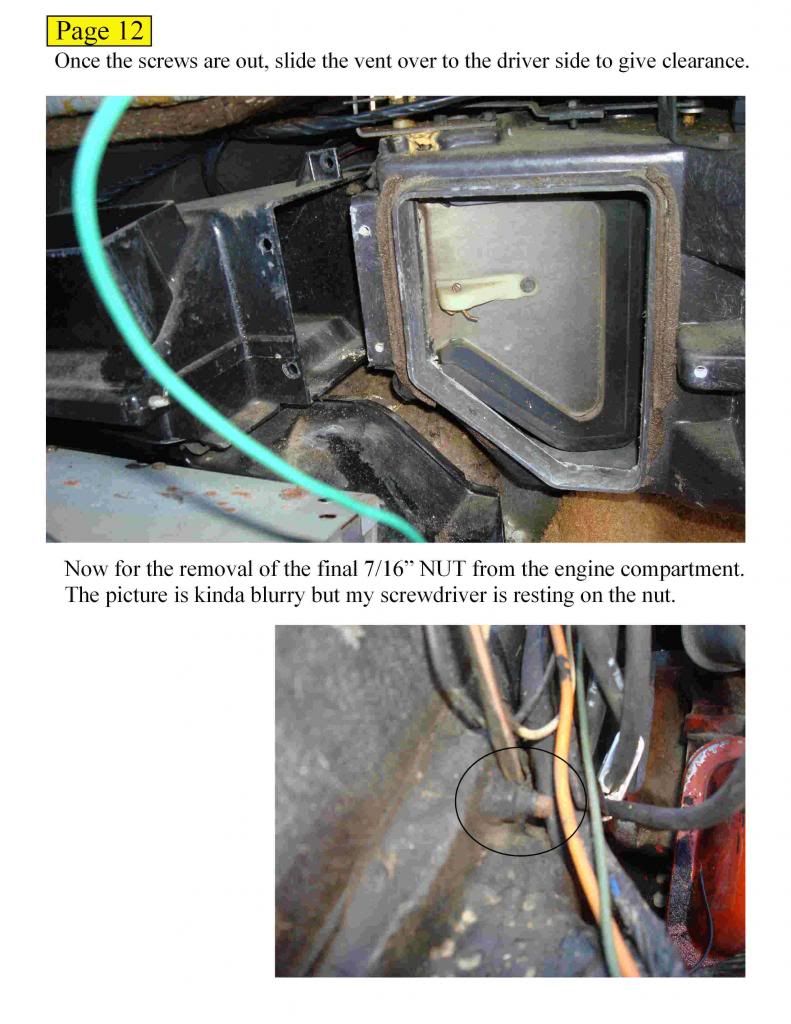
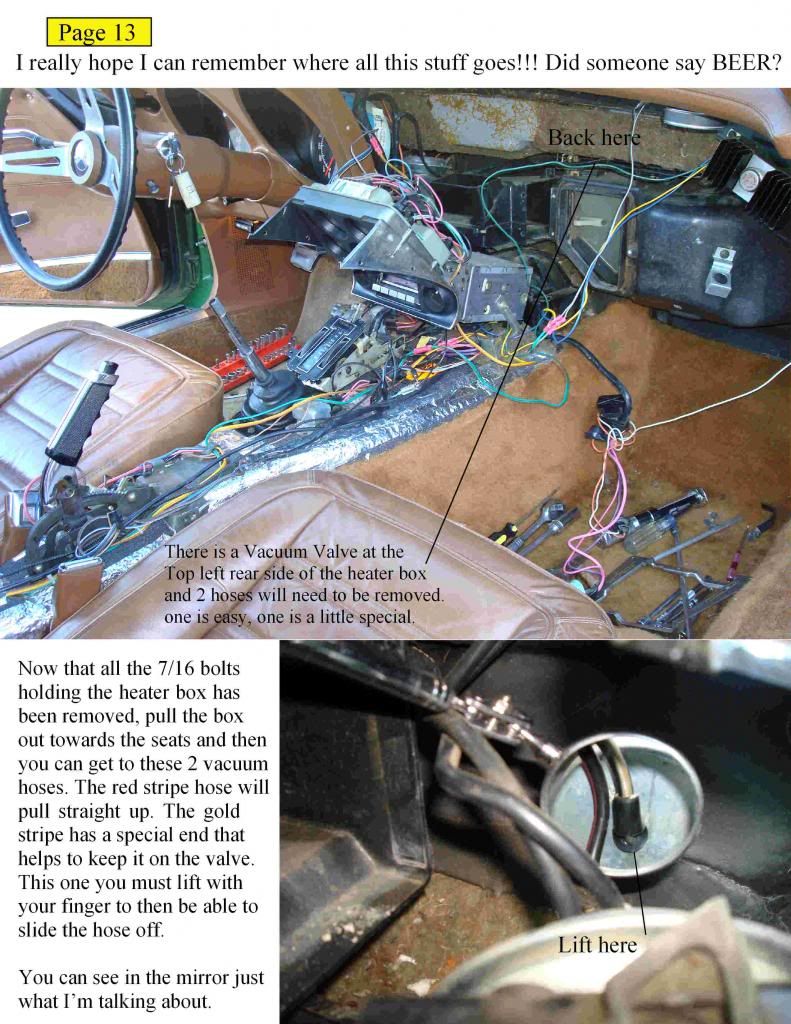
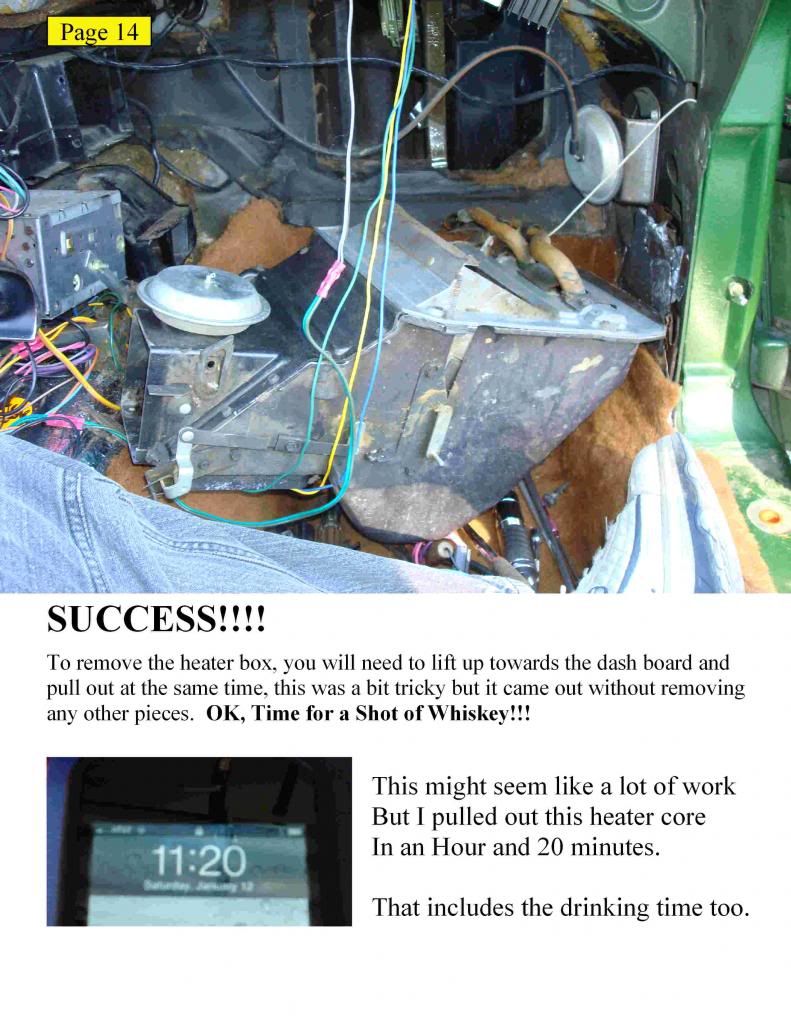
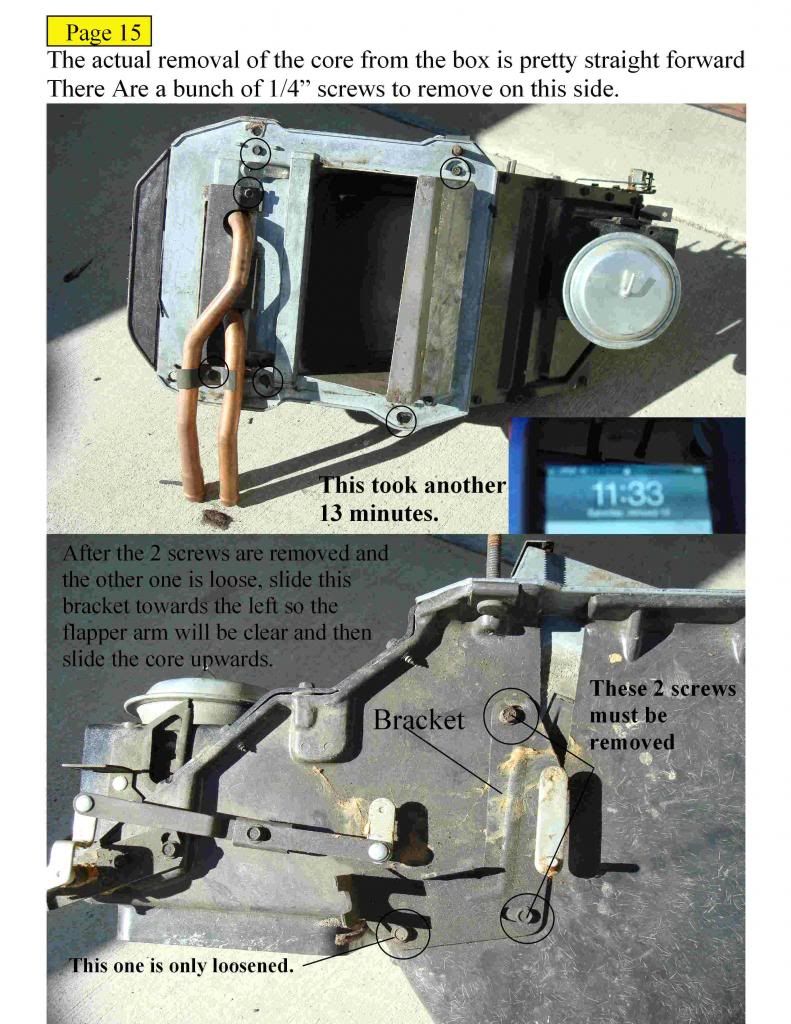
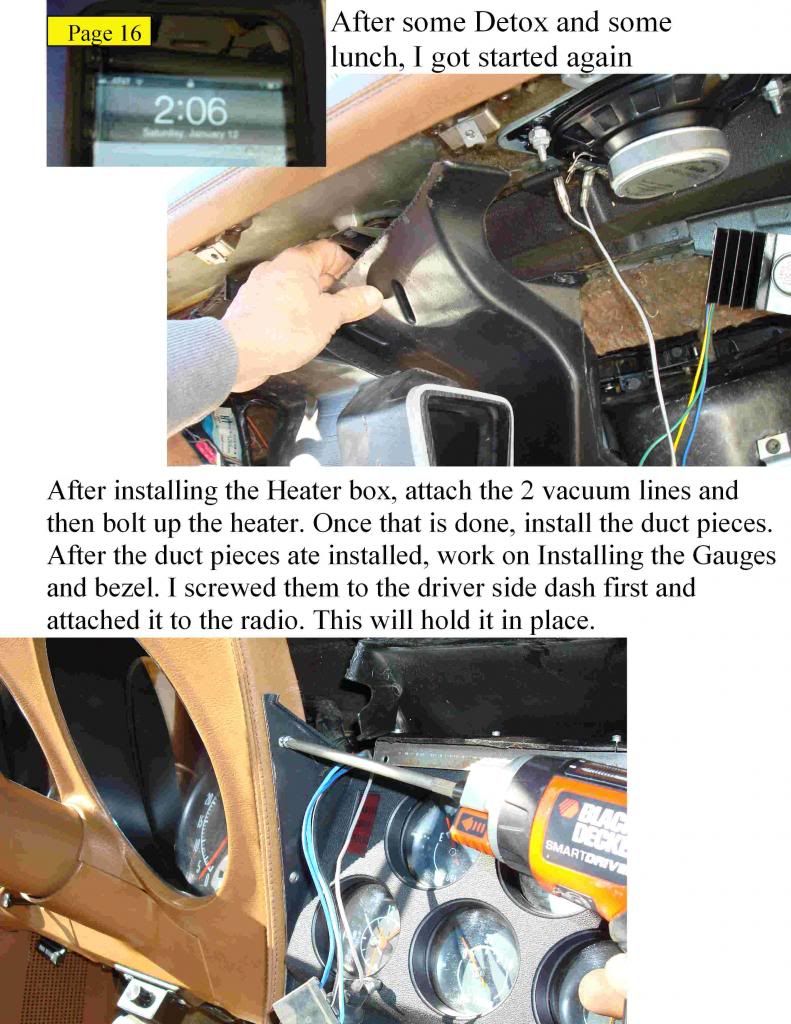
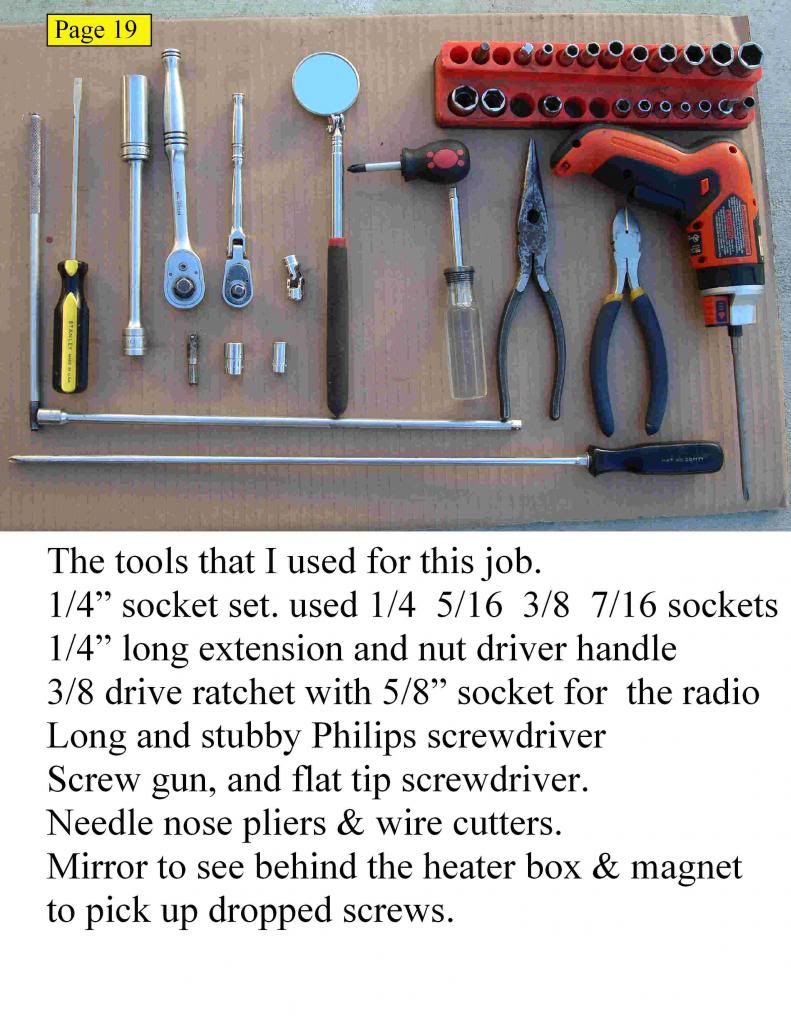
Hello gang, It's been getting cold out there and even in So Cal, it's gettin a bit chilly!! To the point that my wife doesn't want to ride in my 73 without the heater working. So here we go. I just replaced my leaking heater with a new one and I took a lot of pictures and wrote up a step by step showing just what I did. Now I used to be a mechanic in several auto shops in the younger years but now I only like to tinker with my own cars so I am pretty good around the shop. The total time it took me to R&R the heater core was almost 3.5 hours. Here is what was done.


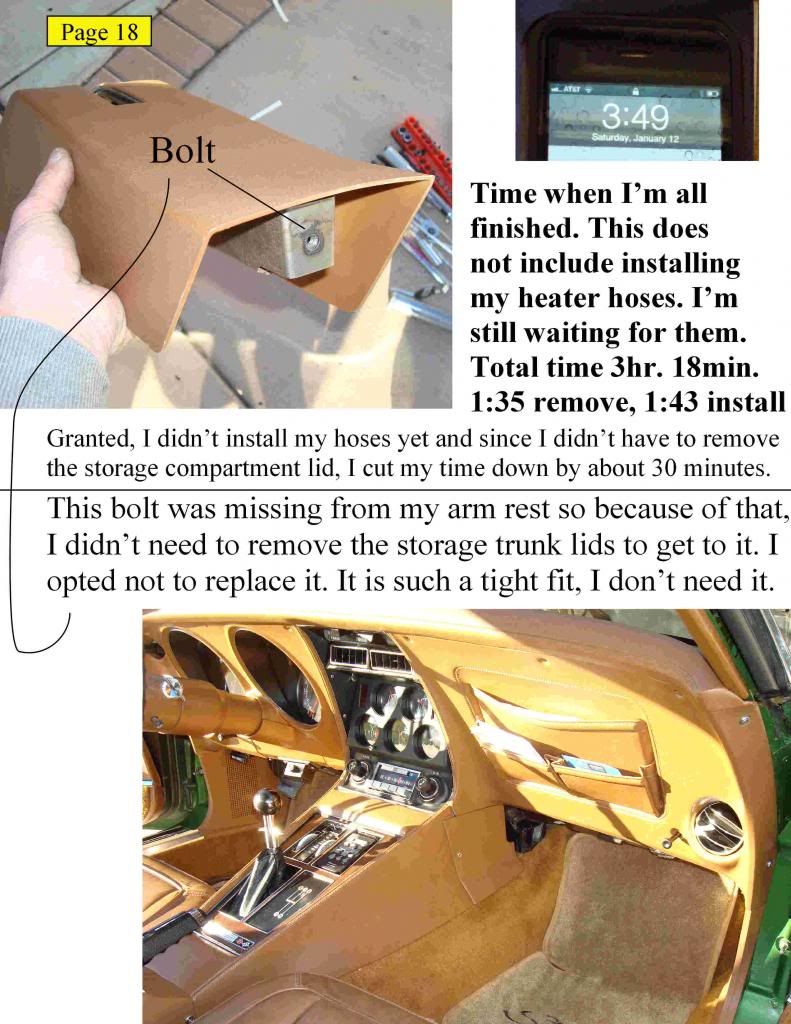
It's all done now except for the 2 heater hoses that should be here on Thursday. I do hope this will give some insight for other readers that want to tackle this job.

Last edited by Scott's 73; 01-18-2013 at 12:26 AM. Reason: I moved my pics in photobucket and they lost there path.
Old 01-13-2013, 04:56 PM
  #2  
calif phil
Racer
 
calif phil's Avatar
 
Member Since: Sep 2007
Location: Concordia KS
Posts: 295
Likes: 0
Received 1 Like on 1 Post

Default

Excellent write up. I will print this off in case I need to replace my '73 heater core. What heater core did you buy?
Old 01-13-2013, 05:01 PM
  #3  
Scott's 73
Instructor
Thread Starter
 
Scott's 73's Avatar
 
Member Since: Aug 2012
Location: Riverside CA
Posts: 164
Likes: 0
Received 4 Likes on 3 Posts
Default

Originally Posted by calif phil
Excellent write up. I will print this off in case I need to replace my '73 heater core. What heater core did you buy?
I ordered one from Corvette Central. My ride has A/C so it made the R&R a little bit harder.
Old 01-13-2013, 05:41 PM
  #4  
Mooser
Race Director
 
Mooser's Avatar
 
Member Since: Apr 2011
Location: North of Toronto - Ontario
Posts: 10,853
Received 3,135 Likes on 2,069 Posts

Default

Excellent write up
Thanks for taking the time to post.

Mooser
Old 01-13-2013, 05:55 PM
  #5  
esierra
Racer
 
esierra's Avatar
 
Member Since: Oct 2009
Location: Burbank, Ca
Posts: 256
Likes: 0
Received 1 Like on 1 Post

Default

Originally Posted by Mooser
Excellent write up
Thanks for taking the time to post.

Mooser
Old 01-13-2013, 05:59 PM
  #6  
Billysvette
Melting Slicks
 
Billysvette's Avatar
 
Member Since: Jul 2006
Location: Baltimore MD
Posts: 2,373
Likes: 0
Received 6 Likes on 6 Posts
Default

Yes, thank you for the pics and instructions,im sure it will come in handy for us.
Old 01-13-2013, 06:09 PM
  #7  
Blue73Shark
Burning Brakes
 
Blue73Shark's Avatar
 
Member Since: Sep 2005
Location: Lewes Delaware
Posts: 1,033
Received 186 Likes on 133 Posts

Default

Great write up and pics!
Hopefully, this can be made a Sticky for future reference.
Old 01-13-2013, 06:24 PM
  #8  
Frank.luvstingrays
Racer
 
Frank.luvstingrays's Avatar
 
Member Since: Oct 2010
Posts: 371
Received 1 Like on 1 Post

Default

Nice thread
Thanks
Frank
Old 01-13-2013, 06:51 PM
  #9  
Redwing01
Burning Brakes
 
Redwing01's Avatar
 
Member Since: Mar 2012
Location: Belle River Ontario
Posts: 1,200
Likes: 0
Received 1 Like on 1 Post
2015 C3 of Year Finalist
Default

Fantastic, detailed thread!
I will definitely be printing this one off as well.
Thanks man.
Old 01-13-2013, 09:26 PM
  #10  
Scott's 73
Instructor
Thread Starter
 
Scott's 73's Avatar
 
Member Since: Aug 2012
Location: Riverside CA
Posts: 164
Likes: 0
Received 4 Likes on 3 Posts
Default

Hey, Thanks guys for the nice words. I hate changing a radiator cap on a Toyota Prius but I love to do this kind of work on my 73.
Old 01-13-2013, 10:00 PM
  #11  
johnnyw
Instructor
 
johnnyw's Avatar
 
Member Since: Sep 2012
Posts: 249
Likes: 0
Received 5 Likes on 4 Posts

Default

I also thank you for all the extra time it took to do the writeup and post the pictures. I will be doing this same job hopefully in the near future.
Johnny
Old 01-14-2013, 12:53 AM
  #12  
Scott's 73
Instructor
Thread Starter
 
Scott's 73's Avatar
 
Member Since: Aug 2012
Location: Riverside CA
Posts: 164
Likes: 0
Received 4 Likes on 3 Posts
Default

Originally Posted by johnnyw
I also thank you for all the extra time it took to do the writeup and post the pictures. I will be doing this same job hopefully in the near future.
Johnny
I think it took me more time to write the post then to change the heater core.
Old 01-14-2013, 01:43 AM
  #13  
jordan89
Safety Car
 
jordan89's Avatar
 
Member Since: Mar 2009
Location: Oakland California
Posts: 3,558
Received 3 Likes on 3 Posts

Default

Fantastic! Will be lots of help. Now I'm debating tackling the job.
Old 01-14-2013, 01:55 AM
  #14  
20mercury
Melting Slicks
 
20mercury's Avatar
 
Member Since: May 2008
Location: Lafayette Louisiana
Posts: 3,418
Received 568 Likes on 445 Posts

Default Much thanks!

Much Thanks for documenting this!

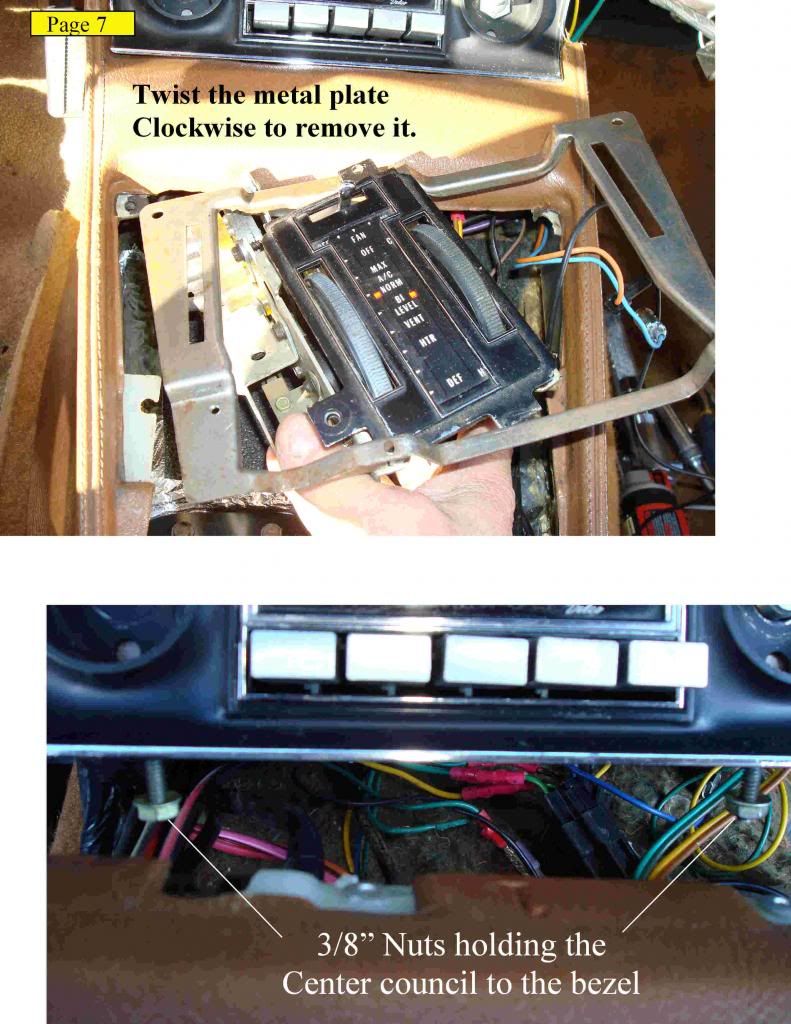
(I recognize all of the parts from having done this job. Much thanks too for the tip on getting the a/c control out by rotating the bracket clockwise. I had a lot of trouble getting that a/c control out.)
Old 01-14-2013, 08:29 AM
  #15  
Chinaski
Team Owner
 
Chinaski's Avatar
 
Member Since: Apr 2002
Location: Northridge California
Posts: 26,555
Received 27 Likes on 19 Posts
St. Jude Donor '14

Default

I'll be printing this out, as I need to do this on my '73. Awesome work!


Oddly, my name is Scott and I also own a '73 and live in California. Small World!
Old 01-14-2013, 01:46 PM
  #16  
ashfrj
Intermediate
 
ashfrj's Avatar
 
Member Since: Apr 2012
Posts: 29
Likes: 0
Received 0 Likes on 0 Posts
Default

Thanks for the write up, very informative. I had a shop replace mine a few months ago - would have had ago myself if I'd had this guide...
Old 01-14-2013, 02:37 PM
  #17  
AirborneSilva
Melting Slicks
 
AirborneSilva's Avatar
 
Member Since: Aug 2012
Location: Titusville Florida
Posts: 3,487
Received 81 Likes on 68 Posts

Default

thanks for posting, kinda makes the job less intimidating

Get notified of new replies

To Step by Step Heater Core Replacement on a 73

Old 01-14-2013, 02:41 PM
  #18  
Scott's 73
Instructor
Thread Starter
 
Scott's 73's Avatar
 
Member Since: Aug 2012
Location: Riverside CA
Posts: 164
Likes: 0
Received 4 Likes on 3 Posts
Default

Originally Posted by Chinaski
I'll be printing this out, as I need to do this on my '73. Awesome work!


Oddly, my name is Scott and I also own a '73 and live in California. Small World!
Sweet!!! What part of CA are ya from?
Old 01-14-2013, 02:50 PM
  #19  
Scott's 73
Instructor
Thread Starter
 
Scott's 73's Avatar
 
Member Since: Aug 2012
Location: Riverside CA
Posts: 164
Likes: 0
Received 4 Likes on 3 Posts
Default

Originally Posted by jordan89
Fantastic! Will be lots of help. Now I'm debating tackling the job.
You should do it. It looks like a lot of work but it does go pretty smoothly.
Old 01-14-2013, 02:58 PM
  #20  
AirborneSilva
Melting Slicks
 
AirborneSilva's Avatar
 
Member Since: Aug 2012
Location: Titusville Florida
Posts: 3,487
Received 81 Likes on 68 Posts

Default

You don't happen to have that write up in a word doc or PDF that you can e-mail do you?

Thread Tools
Search this Thread
Quick Reply: Step by Step Heater Core Replacement on a 73


All times are GMT -4. The time now is 04:42 AM.