
1974 Coupe Frame-Off Restoration
 04-08-2013, 10:35 AM
#41
Melting Slicks


I am not a safety nut and I am sure the straps are fine, but why not weld up a steel box....just to sit under the body...just in case..like a big jackstand....it is going to be up there for awhile, better safe than sorry....imho
car is looking great!
car is looking great!
 04-08-2013, 04:27 PM
#42
Intermediate

Thread Starter
Member Since: Jul 2012
Location: Airdrie Alberta
Posts: 35
Likes: 0
Received 0 Likes
on
0 Posts
 Not to mention the steel!
 Thanks a lot though!
 04-08-2013, 09:47 PM
#43
Well that would have been a good idea, but the straps and stuff were well over rated for the load, and with the lack of space i needed the area underneath to be easily adaptable to anything necessary. That would have been a day project in itself and being in school, my time was pretty limited already. Not to mention the steel!
Thanks a lot though!
Not to mention the steel! Thanks a lot though!
Love the ambition you have

Peace
Frank
04-08-2013, 11:33 PM
#44
Intermediate
Thread Starter
Member Since: Jul 2012
Location: Airdrie Alberta
Posts: 35
Likes: 0
Received 0 Likes
on
0 Posts
Hi SR-74 you don't have to use steel! Use wood 2x4's, and or 2x6's & 4x4's you can make a nice one for less then 100 bucks
Love the ambition you have
Peace
Frank
Love the ambition you have
Peace
Frank
Thanks to everyone for their concern, but the body is back on the ground now, no issues.
Now for a few random things:
I forgot to put this picture in the last post, just the other headers individual paint shot.

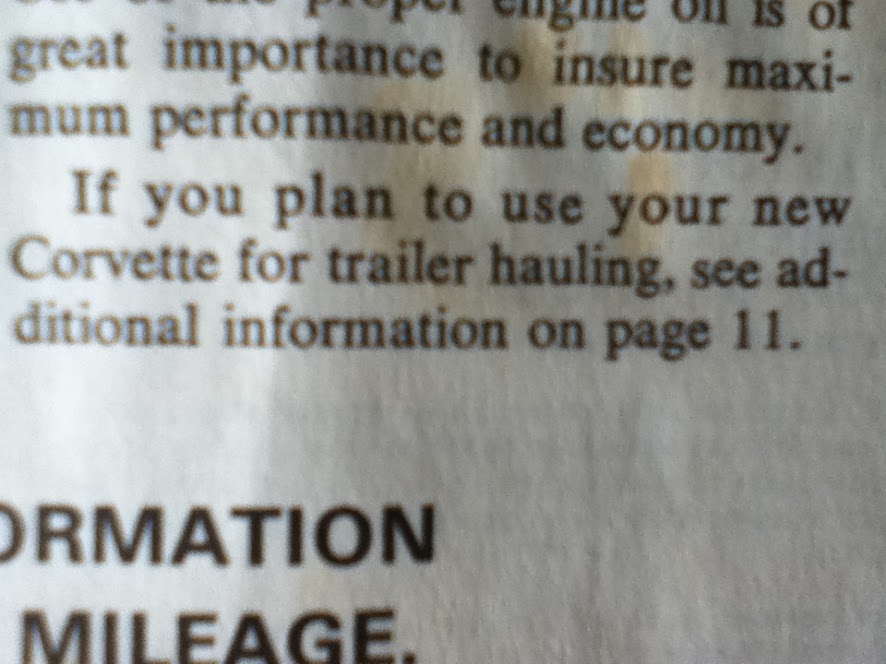
Found this in the little book that comes with it, found it very funny but also very interesting. Think about it, what cars could tow nowadays?
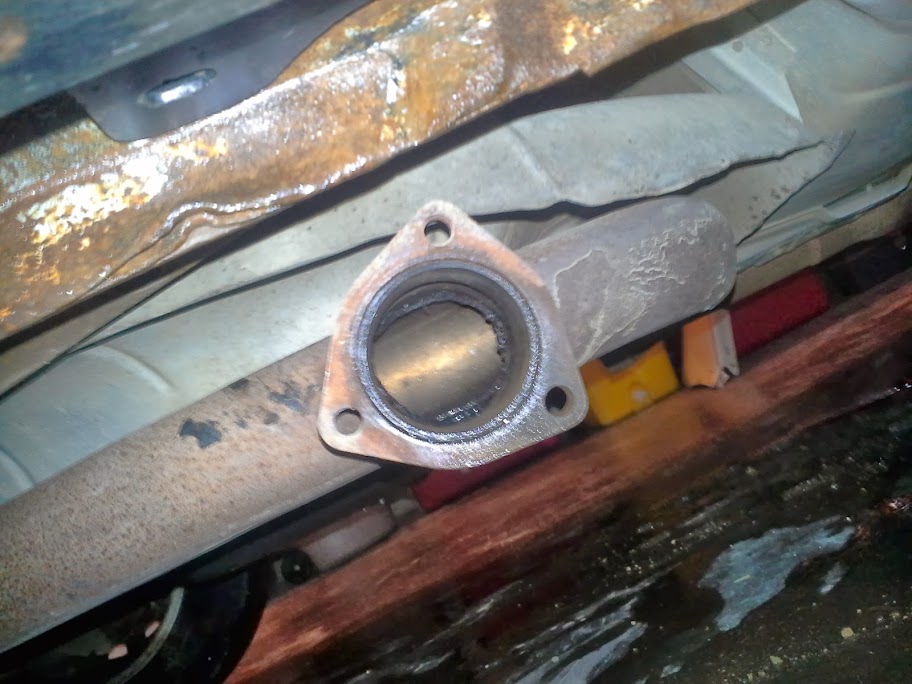
Also, I found this number on the block, back near the bell housing. It reads "861959". What is this number?

Lastly, I was able to scalp these little baggies from work,
 they are the bags that sports medals come in, I have a lot of them and they are perfect for holding parts! However, the cat
  got into them and peed all over, now I have to clean them in the sink.

Made a lot of progess today, more to come!

 04-11-2013, 01:01 PM
#47
Intermediate
Thread Starter
Member Since: Jul 2012
Location: Airdrie Alberta
Posts: 35
Likes: 0
Received 0 Likes
on
0 Posts
Hello Everyone, did some work on the brakes and some new stuff came in!
How the Brakes came off:

Removed the pads.

Sandblasted them, and used a dupli-color brake caliper paint kit on them, it gives a really deep color, but it takes an exhaustive amount of coating to get it there, it also has an odd consistency. But it looks good so oh well.


Also, a large order of stuff came in!


Not getting tired of seeing this...
Stainless mesh brake lines.

Thats all for now, more to come!
How the Brakes came off:
Removed the pads.
Sandblasted them, and used a dupli-color brake caliper paint kit on them, it gives a really deep color, but it takes an exhaustive amount of coating to get it there, it also has an odd consistency. But it looks good so oh well.
Also, a large order of stuff came in!
Not getting tired of seeing this...
Stainless mesh brake lines.
Thats all for now, more to come!
04-11-2013, 02:23 PM
#48
Melting Slicks
Take the time, even if less time is spent on the Corvette for a week or two, better safe than sorry
Trust me I know a thing or two about Corvettes hanging from ceilings and falling....this car was hanging the 'right' way, however when we started to get it ready to lower, one of the straps that was fatigued and let go...the car fell! luckily we had the come along on it, but it was still a harrowing experience, I a certain my dad and others had to change their underwear!
Here is my dad undoing the last of the straps after we lowered the car, it had been hanging in a garage...

Last edited by BOSTONCAMARO; 04-11-2013 at 02:37 PM.
04-23-2013, 11:54 PM
#49
Drifting


Member Since: Aug 2010
Location: Kanuckistan
Posts: 1,617
Received 127 Likes
on
68 Posts
2022 C3 of the Year Finalist - Modified

Your frame look very clean, you got a excellent restoration base.
I'm less convinced by the storage of the body. You got confidence in your straps, and the piece of metal you're hooked to is not designed to withstand this kind of force permanently.
I did much more sturdy :

But in your case maybe make some kind of frame : two wood beams alongside the car to go in rocker channels and under them two beams sideway. screw/bolt/nail together. Then run straps from the frame.
Usually people go for a body dolly, but maybe space is a concern for you.
Keep it up
EDIT: didn't see all the other post, ignore mine.
I'm less convinced by the storage of the body. You got confidence in your straps, and the piece of metal you're hooked to is not designed to withstand this kind of force permanently.
I did much more sturdy :
But in your case maybe make some kind of frame : two wood beams alongside the car to go in rocker channels and under them two beams sideway. screw/bolt/nail together. Then run straps from the frame.
Usually people go for a body dolly, but maybe space is a concern for you.
Keep it up
EDIT: didn't see all the other post, ignore mine.
12-19-2013, 12:53 AM
#51
Intermediate
Thread Starter
Member Since: Jul 2012
Location: Airdrie Alberta
Posts: 35
Likes: 0
Received 0 Likes
on
0 Posts
So!! Finally finished first semester of engineering school at the University of Calgary. Quite exhausting, but also pretty fun. Pretty darn sure I'm in the right place. Anyways, I have a lot to get up on this page, so im gonna try and make posts regularly throughout the break!
First things first. I thought I would introduce a large part of my corvette project by showing you some pilot projects I have been messing around with on my daily driver, a 1994 Cadillac STS. At 333 000 km, the old engine died and refused to run well, if at all. $400 parts car and three weeks later, a Northstar with 145k km was swapped in, and the car was rolling again.
The swap was incredibly difficult, the space in which you have to work and the amount of computers, sensors, wires, and ducts is staggering. However, it was good experience. This swap was done August 2012, and I could post picture if people are interested.
Soon after completing the swap, I found about exhaust cutouts, and decided they might be an option for the corvette. So found some on Kijiji (Canadian Craigslist) and tried them out on the STS. I really wanted to be able to control the exhaust note from inside the vehicle.
Street racing is a lot more fun when your opponent doesn't know what you have until you are racing, especially in high school
These are the pair of cutouts:

These Caddys don't have true dual exhaust, so only one was necessary. The exhaust was taken off, sized up, cut, and a port was welded on the side of part of the standard exhaust pipe to act as spot to let the roar of the v8 out.
The cutout was then bolted on, and the power cord was ran up through a drain plug in the back seat, below the carpet, to the console in the front.
The power for the cutout comes from the cigarette lighter in the middle.

After the power was soldered up, the switch was put in a very easy to access, but hidden place, as I like to confuse people that don't know the system is on the car.

I thought a good place in near the drivers right knee, hidden below the dash.

The console was reassembled, and put back. The final look:

This system was absolutely spectacular, it was very discreet, but could easily turn the silent caddy into a mean sounding machine in five seconds.
The second reason this is important, is that I plan to do a lot of custom aluminum fabrication for various parts of the corvette, such as the grill, dash, and console. Now unfortunately, I was involved in a car accident with the caddy a week ago.
On Highway 2 near Calgary, a Jeep was parked perpendicular to the road, occupying the fast lane. Having to swerve to avoid the jeep, I was approaching the car ahead of me in the middle lane much too quick, so I aimed for the gap between the jeep and the car, and hit the back quarter panel of the car. However, this was the best outcome of the situation, and I ended up in the median in very deep snow.
The damage:

https://lh6.googleusercontent.com/-N...218_115642.jpg

This was extremely frustrating. I removed the bumper and damaged quarter panel:

The car is not as badly damaged as I thought, it is mostly cosmetic. However, I had been planning to do some fascia changes with fabricated aluminum, such as the center grill and air dam below. This will give me an opportunity to build this from the ground up, honing my fabrication skills for the corvette parts.
Also, the exhaust valve/cutout suffered damage from the collision and stopped working. Upon inspection the ENTIRE MOTOR had been stripped somehow.

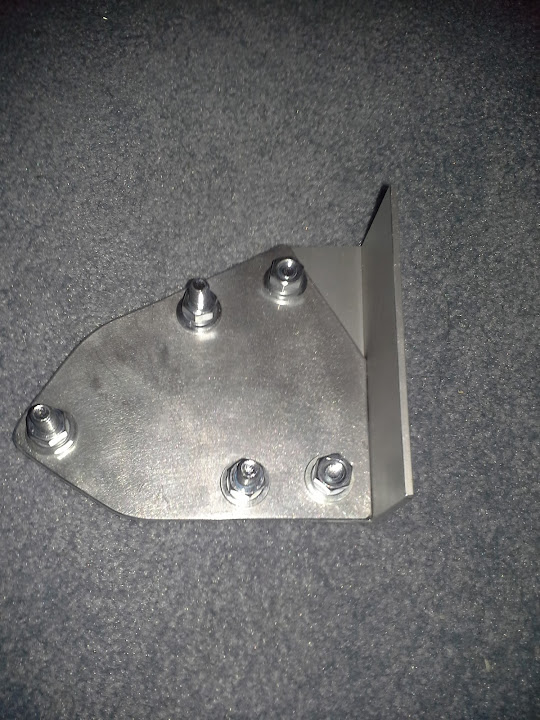
With the valve stuck open, the sound gets very tiring. I needed to plug it off until I find out what I want to do with the cutout. Using a peice of plate aluminum, I drew up and cut out this plug:

After filing, drilling, cleaning, and countersinking holes:

After Polishing:
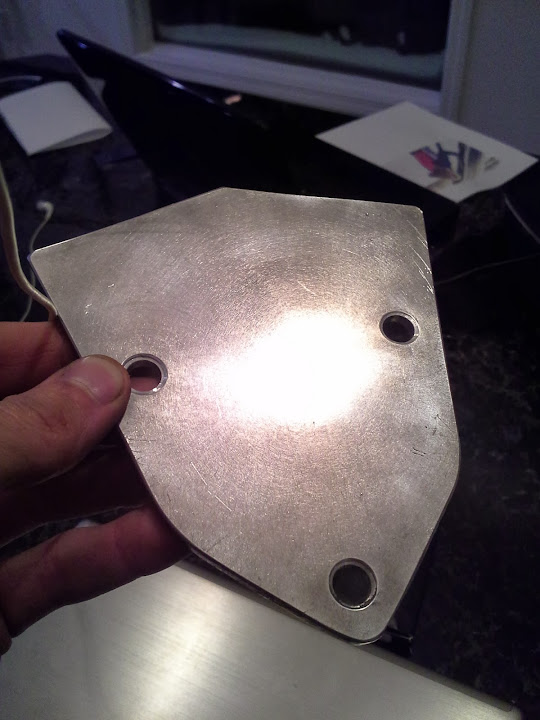
Final size up, and it was installed. The large part at the front is to give place to mount a guard, so gravel that gets thrown up doesn't erode the bolts. More on that later.

First semester of engineering allowed me to develop some skills on AutoCAD. Before the crash, I made this model of a "winter grill" that would block the wind from entering the radiator more. Here are some pictures of the model:
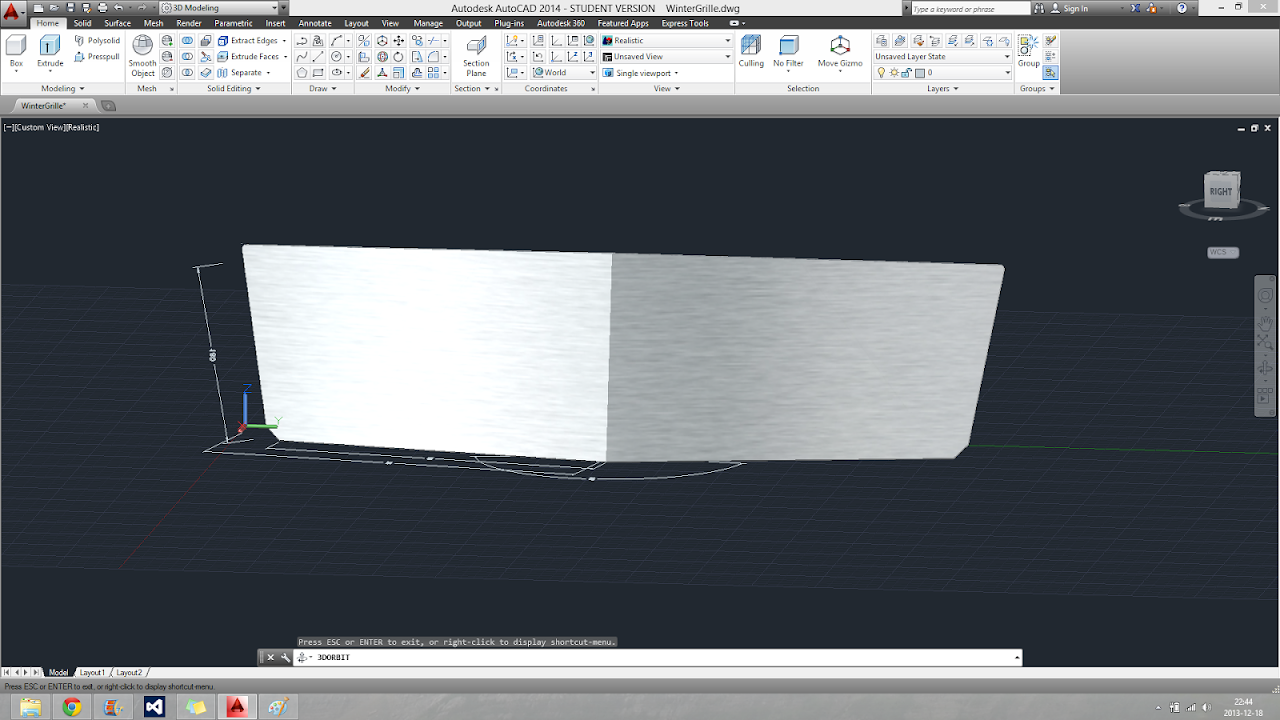

This model is based off hours of physical modelling, trig calculations, and measuring. The tolerances are small so it needs to be done right.
Also, just note, I got those exhaust cutouts used, and they lasted a year and a half, and twenty thousand kilometers through some pretty disgusting mud and rain. Kind of impressive I thought!
More to come on this as well. Just thought it would be beneficial to the post to explain rational and some of the upcoming posts for the corvette. If this grill project goes well using aluminum, then I will proceed with the fabrication for the corvette. I am more than busy with other stuff on the vette as of right now. Hopefully I will get the post for the vette up tomorrow! Thanks for tuning in, and Merry Christmas everyone!!
Ben
Anyways, I have a lot to get up on this page, so im gonna try and make posts regularly throughout the break!First things first. I thought I would introduce a large part of my corvette project by showing you some pilot projects I have been messing around with on my daily driver, a 1994 Cadillac STS. At 333 000 km, the old engine died and refused to run well, if at all. $400 parts car and three weeks later
, a Northstar with 145k km was swapped in, and the car was rolling again.The swap was incredibly difficult, the space in which you have to work and the amount of computers, sensors, wires, and ducts is staggering. However, it was good experience. This swap was done August 2012, and I could post picture if people are interested.
Soon after completing the swap, I found about exhaust cutouts, and decided they might be an option for the corvette. So found some on Kijiji (Canadian Craigslist) and tried them out on the STS. I really wanted to be able to control the exhaust note from inside the vehicle.
Street racing is a lot more fun when your opponent doesn't know what you have until you are racing, especially in high school
These are the pair of cutouts:
These Caddys don't have true dual exhaust, so only one was necessary. The exhaust was taken off, sized up, cut, and a port was welded on the side of part of the standard exhaust pipe to act as spot to let the roar of the v8 out.
The cutout was then bolted on, and the power cord was ran up through a drain plug in the back seat, below the carpet, to the console in the front.
The power for the cutout comes from the cigarette lighter in the middle.
After the power was soldered up, the switch was put in a very easy to access, but hidden place, as I like to confuse people that don't know the system is on the car.
I thought a good place in near the drivers right knee, hidden below the dash.
The console was reassembled, and put back. The final look:
This system was absolutely spectacular, it was very discreet, but could easily turn the silent caddy into a mean sounding machine in five seconds.
The second reason this is important, is that I plan to do a lot of custom aluminum fabrication for various parts of the corvette, such as the grill, dash, and console. Now unfortunately, I was involved in a car accident with the caddy a week ago.
On Highway 2 near Calgary, a Jeep was parked perpendicular to the road, occupying the fast lane. Having to swerve to avoid the jeep, I was approaching the car ahead of me in the middle lane much too quick, so I aimed for the gap between the jeep and the car, and hit the back quarter panel of the car. However, this was the best outcome of the situation, and I ended up in the median in very deep snow.
The damage:
https://lh6.googleusercontent.com/-N...218_115642.jpg
This was extremely frustrating. I removed the bumper and damaged quarter panel:
The car is not as badly damaged as I thought, it is mostly cosmetic. However, I had been planning to do some fascia changes with fabricated aluminum, such as the center grill and air dam below. This will give me an opportunity to build this from the ground up, honing my fabrication skills for the corvette parts.
Also, the exhaust valve/cutout suffered damage from the collision and stopped working. Upon inspection the ENTIRE MOTOR had been stripped somehow.
With the valve stuck open, the sound gets very tiring. I needed to plug it off until I find out what I want to do with the cutout. Using a peice of plate aluminum, I drew up and cut out this plug:
After filing, drilling, cleaning, and countersinking holes:
After Polishing:
Final size up, and it was installed. The large part at the front is to give place to mount a guard, so gravel that gets thrown up doesn't erode the bolts. More on that later.
First semester of engineering allowed me to develop some skills on AutoCAD. Before the crash, I made this model of a "winter grill" that would block the wind from entering the radiator more. Here are some pictures of the model:
This model is based off hours of physical modelling, trig calculations, and measuring. The tolerances are small so it needs to be done right.
Also, just note, I got those exhaust cutouts used, and they lasted a year and a half, and twenty thousand kilometers through some pretty disgusting mud and rain. Kind of impressive I thought!
More to come on this as well. Just thought it would be beneficial to the post to explain rational and some of the upcoming posts for the corvette. If this grill project goes well using aluminum, then I will proceed with the fabrication for the corvette. I am more than busy with other stuff on the vette as of right now. Hopefully I will get the post for the vette up tomorrow! Thanks for tuning in, and Merry Christmas everyone!!
Ben
12-19-2013, 11:08 PM
#52
Intermediate
Thread Starter
Member Since: Jul 2012
Location: Airdrie Alberta
Posts: 35
Likes: 0
Received 0 Likes
on
0 Posts
So, got some more work done today. Hopefully this is the last piece required to move the caddy outside to wait for parts.
Continuing with the plug to stop the straight pipe after my electric valve failed:
After the plug was sized up, a guard to shield from airborne rocks and debris was sized up and cut out:


Holes drilled and countersunk:

How it will mount up to the plug:

Bolts

Mounted up on the car:

This should close the hole up well for the winter.
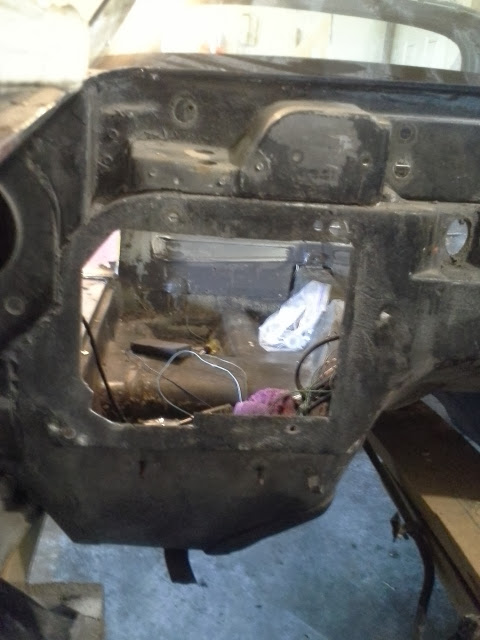
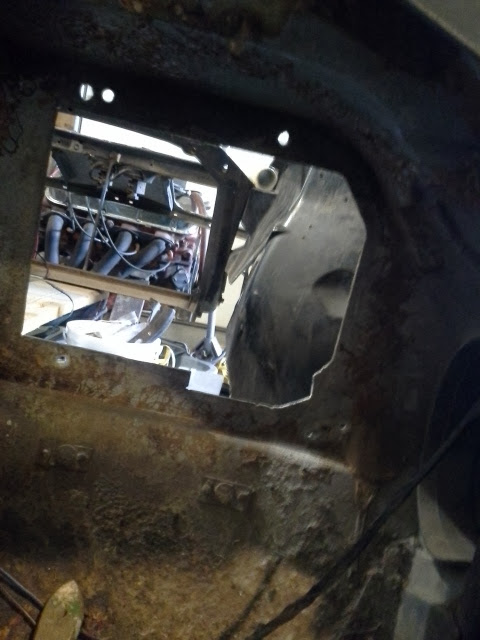
Moving on to the corvette, when I had taken it apart much earlier, it was evident that the heater core was not only damaged, but it wasn't worth the effort to restore, as this car was only to be a summer car. Perhaps a heater and A/C may be added later, but neither are necessary in the Calgary climate. Until then, I wanted to fill the large hole in the firewall with something that would look nice from the engine compartment and also be strong enough in case I never wanted to change it.
Hole in the firewall:
Using a piece of cardboard, I drew up a template of the panel.

This was done over several days, so I labelled it so no one trying to "clean up" would throw it out as always happens.

Bought a piece of sheet aluminum, 3mm thick, for 4$ at a salvage place.

Cut out the template from the sheet.

After countersinking and polishing:

How the plate should fit up against the firewall:

Havent gotten the bolts yet, because much more needs to be done to the body and firewall before this can go on. I know its somewhat premature, but I have limited space currently and it was something easy that I could plug away on while I had time. More to come tomorrow!
Ben
Continuing with the plug to stop the straight pipe after my electric valve failed:
After the plug was sized up, a guard to shield from airborne rocks and debris was sized up and cut out:
Holes drilled and countersunk:
How it will mount up to the plug:
Bolts
Mounted up on the car:
This should close the hole up well for the winter.
Moving on to the corvette, when I had taken it apart much earlier, it was evident that the heater core was not only damaged, but it wasn't worth the effort to restore, as this car was only to be a summer car. Perhaps a heater and A/C may be added later, but neither are necessary in the Calgary climate. Until then, I wanted to fill the large hole in the firewall with something that would look nice from the engine compartment and also be strong enough in case I never wanted to change it.
Hole in the firewall:
Using a piece of cardboard, I drew up a template of the panel.
This was done over several days, so I labelled it so no one trying to "clean up" would throw it out
as always happens.Bought a piece of sheet aluminum, 3mm thick, for 4$ at a salvage place.
Cut out the template from the sheet.
After countersinking and polishing:
How the plate should fit up against the firewall:
Havent gotten the bolts yet, because much more needs to be done to the body and firewall before this can go on. I know its somewhat premature, but I have limited space currently and it was something easy that I could plug away on while I had time. More to come tomorrow!
Ben
12-20-2013, 07:35 PM
#53
Intermediate
Thread Starter
Member Since: Jul 2012
Location: Airdrie Alberta
Posts: 35
Likes: 0
Received 0 Likes
on
0 Posts
Alrighty, so here are the updates for today!
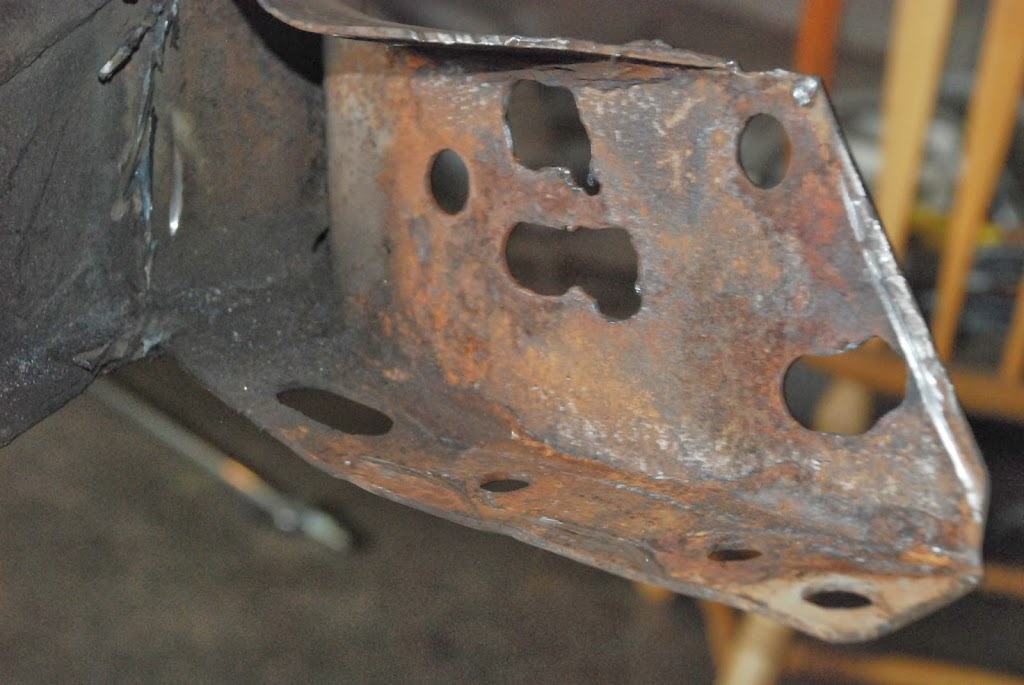
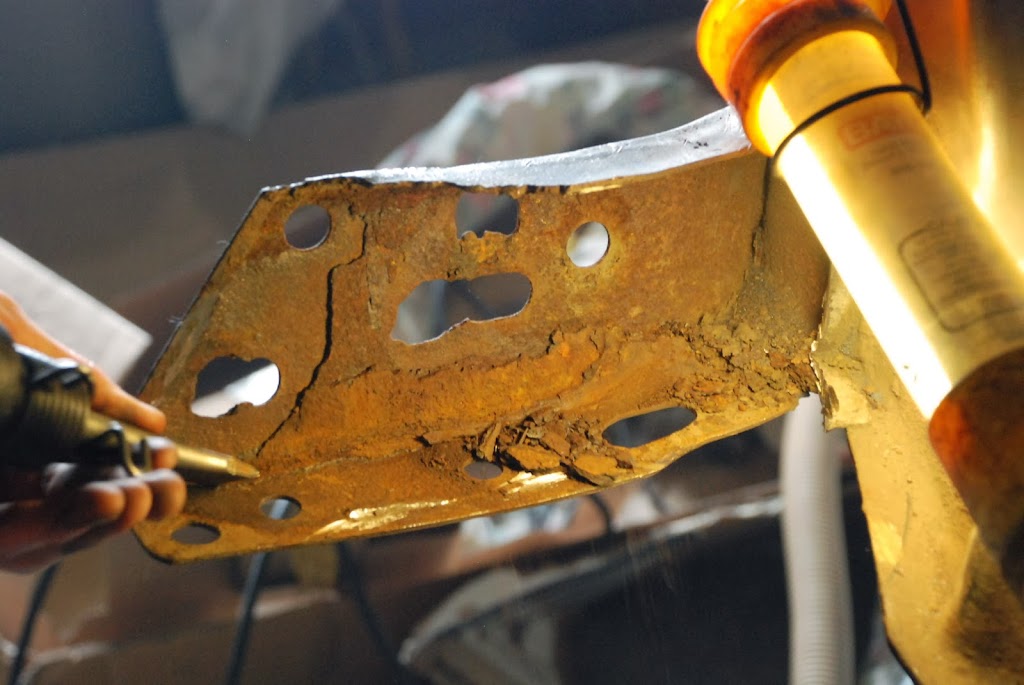
If you look back a couple pages, on one of my first posts where I am removing the body, you will see a very rusty body mount near the rear passenger side quarter panel. Well not only was the bolt trash and rusted through, but the mount on the frame was rusted quite thin as well...

The thin rusty part was cut out:


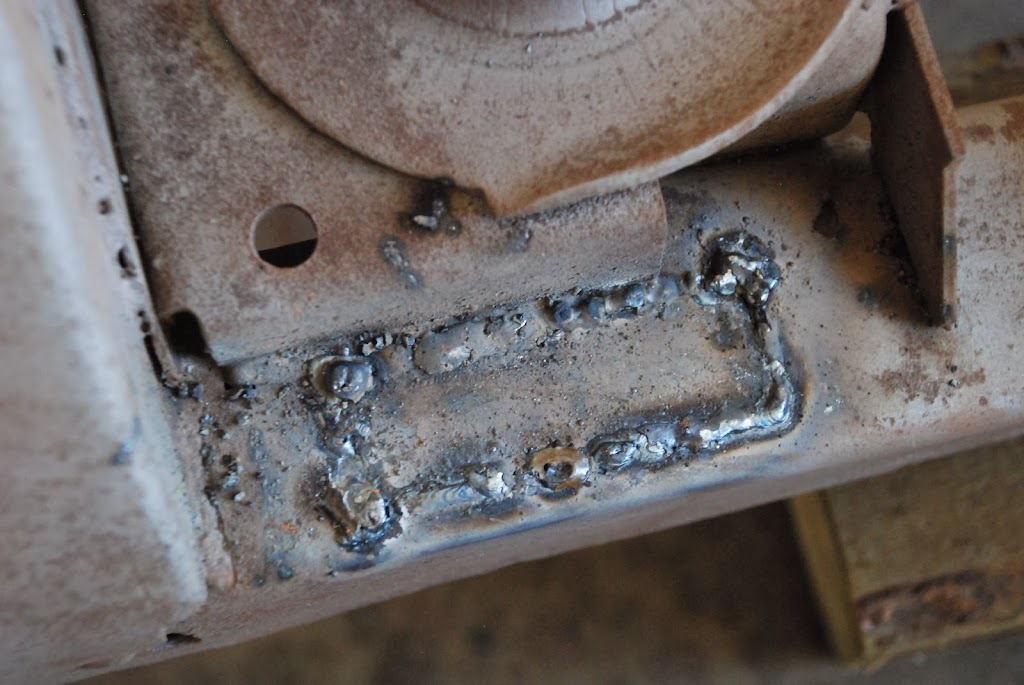
A large washer was found with the exact same thickness and size of hole as the original should have been.

The washer was then cut and welded in place.


Moving on, it was evident that someone has done a number on the frame horns, for reasons unknown. Not only were they chopped up pretty bad, but water that had gotten inside the gap between the inner and outer frame horns had caused some pretty serious rusting and bubbling. The chalk was where I was going to cut both off and refabricate, but fortunately did more research beforehand.


By the way, the frame was brought back out of the sandblasting unit to get this done first. That way the repairs could be blasted with the frame and become more integrated into the final paint.


After cutting out the inner frame horns:
New inner frame horns were ordered for my year, but something was wrong- the frame horns that came did not match the ones that were cut off, nor the outer frame horns still on the car.
As you can see, the new one is shorter and does not have a "lobe" on the end like the old ones.


We called the place that sold them, and they verified they were the correct ones... But it turns out that they didn't fit, because my frame doesn't belong to a '74! Well, at least not the front of it. Besides the frame horns, the rest is the exact same. The front of the frame is from a '65, as it still has the proper gusseting and enlarged cavity for a larger crank pulley. The reason we didn't notice it before, is whoever switched the frames had welded the new front on in the exact place where the frame was welded from the factory. I'll try and get some pics. So new frame horns are ordered.
Merry Christmas!
Ben
If you look back a couple pages, on one of my first posts where I am removing the body, you will see a very rusty body mount near the rear passenger side quarter panel. Well not only was the bolt trash and rusted through, but the mount on the frame was rusted quite thin as well...
The thin rusty part was cut out:
A large washer was found with the exact same thickness and size of hole as the original should have been.
The washer was then cut and welded in place.
Moving on, it was evident that someone has done a number on the frame horns, for reasons unknown. Not only were they chopped up pretty bad, but water that had gotten inside the gap between the inner and outer frame horns had caused some pretty serious rusting and bubbling. The chalk was where I was going to cut both off and refabricate, but fortunately did more research beforehand.
By the way, the frame was brought back out of the sandblasting unit to get this done first. That way the repairs could be blasted with the frame and become more integrated into the final paint.
After cutting out the inner frame horns:
New inner frame horns were ordered for my year, but something was wrong- the frame horns that came did not match the ones that were cut off, nor the outer frame horns still on the car.
As you can see, the new one is shorter and does not have a "lobe" on the end like the old ones.
We called the place that sold them, and they verified they were the correct ones... But it turns out that they didn't fit, because my frame doesn't belong to a '74!
Well, at least not the front of it. Besides the frame horns, the rest is the exact same. The front of the frame is from a '65, as it still has the proper gusseting and enlarged cavity for a larger crank pulley. The reason we didn't notice it before, is whoever switched the frames had welded the new front on in the exact place where the frame was welded from the factory. I'll try and get some pics. So new frame horns are ordered.Merry Christmas!
Ben
12-21-2013, 09:44 AM
#54
Its realy good to see a young guy keeping the hoby going!! Your rockin good for you. Do not give up! You can get it done.
I just finished a 74 frame off it took me 3 years.
Good job man.
I just finished a 74 frame off it took me 3 years.
Good job man.
12-21-2013, 07:10 PM
#55
Wow.....you never know what lurks under a body of an old vette. So many were wrecked and rebuilt with whatever bubba could figure out for the cheap.
Your overcoming the worst most likely .
Keep at it .......
BB corvettes forever
Your overcoming the worst most likely .
Keep at it .......
BB corvettes forever
12-22-2013, 12:23 PM
#56
Intermediate
Thread Starter
Member Since: Jul 2012
Location: Airdrie Alberta
Posts: 35
Likes: 0
Received 0 Likes
on
0 Posts
Its realy good to see a young guy keeping the hoby going!! Your rockin good for you. Do not give up! You can get it done.
I just finished a 74 frame off it took me 3 years.
Good job man.
I just finished a 74 frame off it took me 3 years.
Good job man.
Wow.....you never know what lurks under a body of an old vette. So many were wrecked and rebuilt with whatever bubba could figure out for the cheap.


 12-22-2013, 09:08 PM
#59
Intermediate
Thread Starter
Member Since: Jul 2012
Location: Airdrie Alberta
Posts: 35
Likes: 0
Received 0 Likes
on
0 Posts
So! moving ahead with the frame horns, new ones fit much better!

These were welded in place, along the back and front.
Next, a small hole was located along the frame rails, near the spot where the differential carrier mounts. The rust has caused the metal to become thin, so much so that you could just push your finger, and end up through the metal. The metal was cut out, then cut back to where it became thick again. A patch was made out of flat bar metal.

The weld, and after it was cleaned up.

Next, I wanted to get the engine up off the ground, and then also something mobile so it could be moved places and started up.

So I bought some casters, 500 lbs each for the front, and a 200 lb for the back, and built up this frame to roll the engine around on.


The video of the engine running on the stand can be seen here:
Thats all for now! Thanks for checking in, more tomorrow!
These were welded in place, along the back and front.
Next, a small hole was located along the frame rails, near the spot where the differential carrier mounts. The rust has caused the metal to become thin, so much so that you could just push your finger, and end up through the metal. The metal was cut out, then cut back to where it became thick again. A patch was made out of flat bar metal.
The weld, and after it was cleaned up.
Next, I wanted to get the engine up off the ground, and then also something mobile so it could be moved places and started up.
So I bought some casters, 500 lbs each for the front, and a 200 lb for the back, and built up this frame to roll the engine around on.
The video of the engine running on the stand can be seen here:
Thats all for now! Thanks for checking in, more tomorrow!
12-23-2013, 11:37 PM
#60
Intermediate
Thread Starter
Member Since: Jul 2012
Location: Airdrie Alberta
Posts: 35
Likes: 0
Received 0 Likes
on
0 Posts
Moving along, I got a bunch of parts sandblasted and painted with POR 15.
Halfshafts:

Other misc parts

Here is a close up of the offset trailing arms that I purchased.

Managed to push the new bushings into the control arms, a 20 ton shop press made short work of that!

I am really loving this christmas break. Great time to get stuff done and I am super motivated! More tomorrow
Halfshafts:
Other misc parts
Here is a close up of the offset trailing arms that I purchased.
Managed to push the new bushings into the control arms, a 20 ton shop press made short work of that!
I am really loving this christmas break. Great time to get stuff done and I am super motivated! More tomorrow