
***DIY:Headlight and tail light LED halos***
 04-07-2013, 10:43 AM
#21
The ORIGINAL and bestest

Thread Starter
Member Since: Oct 2000
Location: Toronto Ontario
Posts: 10,009
Received 234 Likes
on
143 Posts
Toronto Events Coordinator

I will be updating this this thread later today, more likely this evening. I have taken almost all of the pics that I wanted to take, just have to find the time to sit down and sort it all out and post it all. 
 04-07-2013, 09:43 PM
#22
The ORIGINAL and bestest
Thread Starter
Member Since: Oct 2000
Location: Toronto Ontario
Posts: 10,009
Received 234 Likes
on
143 Posts
Toronto Events Coordinator
Ok, so here it is, the "how to" portion of this thread.
Although this has nothing to do with the halos, before anything else, I am going to suggest that you rewire your headlights to run directly off the alternator though relays. Having full voltage at the headlights makes them much brighter; light output is severely compromised with decreased voltage, and the stock wiring does not provide full voltage to the headlights. The drop in light output with decreased voltage is not linear, it is exponential. Here is a very good read about it, and how to do the mod:
http://www.madelectrical.com/electri...adlights.shtml
In addition to the wiring mod, I also had previously converted to headlights using a H4 low beam lamp, and a H1 high beam lamp instead of sealed beams. These 2 mods together made a really noticeable difference in headlight brightness. It sounds complicated, but it is actually a very easy mod to do.
Now, the halos. This all started almost 2 years ago, with the headlights. I really liked the look of the headlight halos on BMW's, and wondered if there was something available in a 5.75" headlight. First I investigated how this was done on a BMW. They use a reflector ring that is illuminated from below, kinda like fiber optics. The earlier BMWs use an incandescent lamp for illumination, while the later ones use an LED lamp for illumination. When you see one, is is easy to tell incandescent from LED because the LED is very white compared to the incandescent yellow.
I started to search the web for a 5.75" headlight with a halo, and I soon found some on Ebay and elsewhere. Sometimes they are also called "angel eyes", but I will refer to them as halos.
So I bought a LED halo set from an Ebay seller, and when they arrived I was very disappointed!
First, the housing was made of plastic and was large enough in the back that either the headlight housing holes would have to be enlarged, or the plastic would have to be cut down to fit. I cut down the plastic headlight to fit instead of enlarging the holes in my headlight housings. I also had to make the hole in the headlight mounting cup larger to get them to fit.
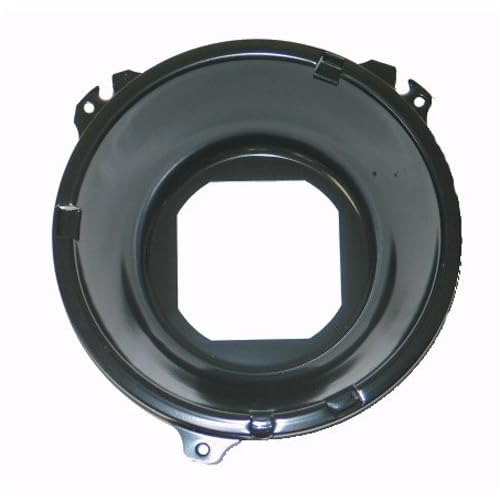
To remove the headlight cup from your car without disturbing the aiming, use a pair of pliers to grab the spring and remove it from where it hooks into the cup, and then you can wiggle the cup out of the 2 alignment screws and off the car. This is a stock headlight mounting cup, I cut the square hole with tin snips into a larger round hole for clearance:
Second, 5.75" automotive headlights have 3 tabs on the back that fit into 3 holes in the headlight cups that locate the lights properly. Low beam and high beam tabs are different so they can't be mixed up. The tabs on the halo headlights did not line up properly with the holes in the headlight cups, and they had to be modded to fit.
Third, and the most disappointing, the LED halo was lit with only 2 LEDs at the bottom! The halos were not very bright at all. In spite of these shortcomings, I made the mods to the headlights, and installed them.
Soon after this, I found what I thought were much better 5.75" halo headlights, they appeared much brighter than what I had. I bought a set of them with high expectations.
I was very diasappointed again. They housings were also made of plastic with the same clearance issues. These halos were lit with 4 LEDs; 2 at the top and 2 at the bottom. They were brighter, but still not what was I was looking for. I gave away the first set, and installed the second set.
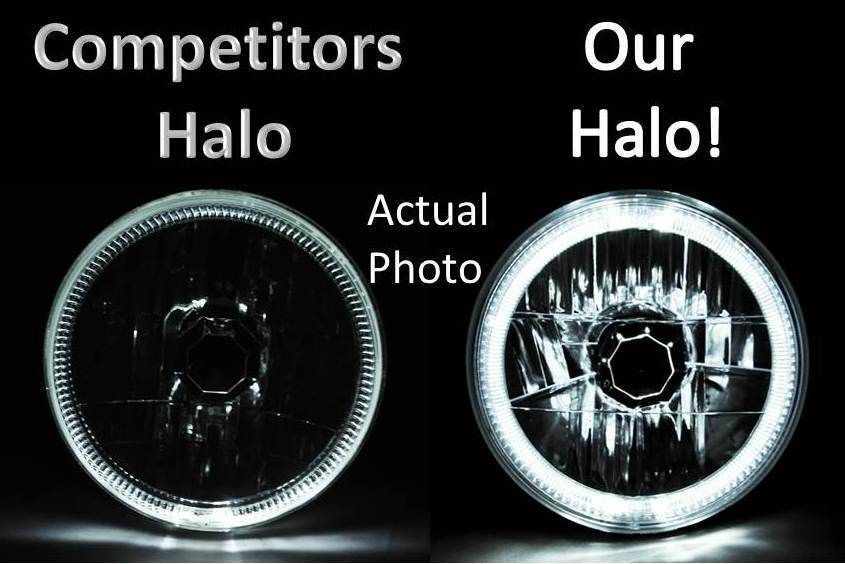
This is an actual picture off Ebay of both the sets I bought. You can see how the left halo has 2 LEDs and the right halo has 4 LEDs:
The quest continued. I took a look at the H4 and H1 headlights I previously had, and wondered if I could take them apart. They were a much better quality light, with a metal reflector housing instead of plastic. They also fit with no mods to the headlight cups or the headlight housings.
Broken headlight #1: I put it in the oven to heat the adhesive. I didn't heat it enough, and the glass broke as I tried to pry it apart. ****!!
Broken headlight #2: Heated it in the oven for a longer time, the heat broke the glass. ****!!
Broken headlight #3: Switched from the oven to using a heat gun instead.....success! Then I dropped the glass and broke it. ****!!
Ruined headlight #4: Successfully separated glass from housing. While trying to remove the remaining adhesive from the housing, the screwdriver I was using slipped and put a huge gouge in the reflector. ****!!!
Now I had to buy another full set of the same headlights!
These are the exact headlights I am using, you need 2 sets of these. I also used Sylvania Silverstar H4 and H1 lamps instead of the cheap ones that come with these headlights:
http://www.ebay.ca/itm/5-3-4-H5001-H...item3a6c16cdf9

This time, I got them all apart no problem. I also was able to remove the remaining adhesive with a plastic trim removal tool. Learn from my mistakes!!!
After breaking the first headlight, I was able to take a precise measurement of the inside of the glass. I then searched and found both LED and CCFL halo rings that seemed like they would work. I decided to order a set of both, and then decide which I likd better. CCFL = cold cathode fluorescent lamps. They are basically glass lamps that also use a ballast to light them.
These are the exact 126mm LED halos I bought, they have almost 100 LEDs/halo!!!:
http://www.ebay.ca/itm/170829042925?...84.m1423.l2649
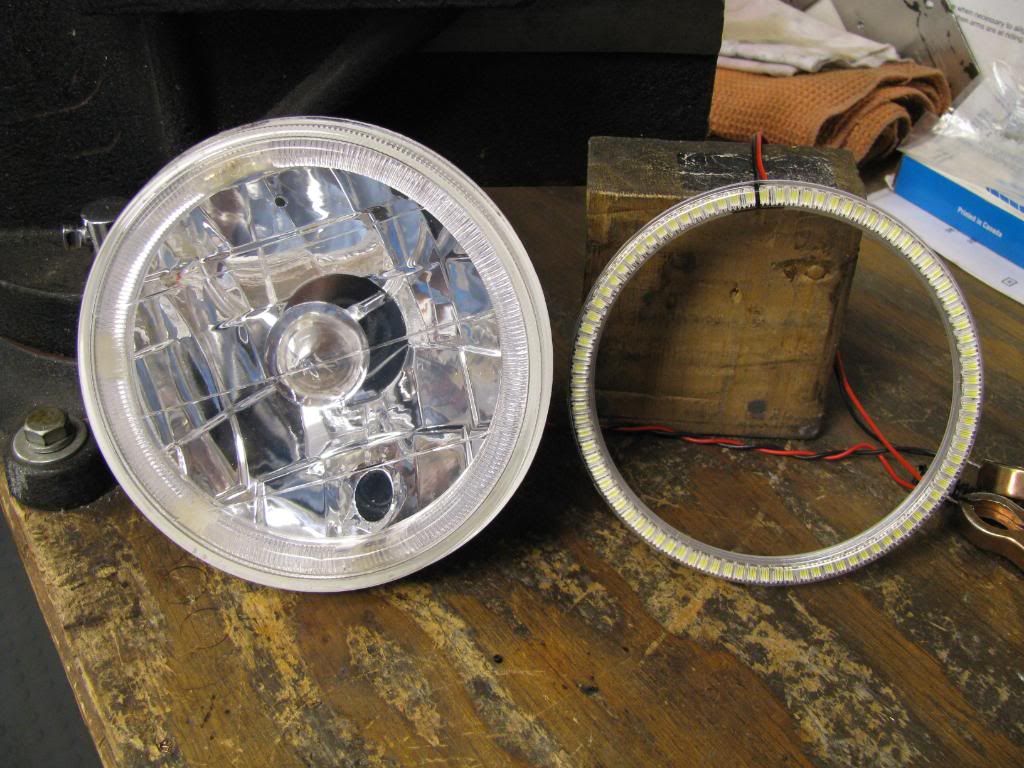
Here is a pic of the 126mm LED halo next to the second halo headlights I bought:
Here are the exact 126mm CCFL halos I bought:
http://www.ebay.ca/itm/Land-Rover-Ra...e02763&vxp=mtr
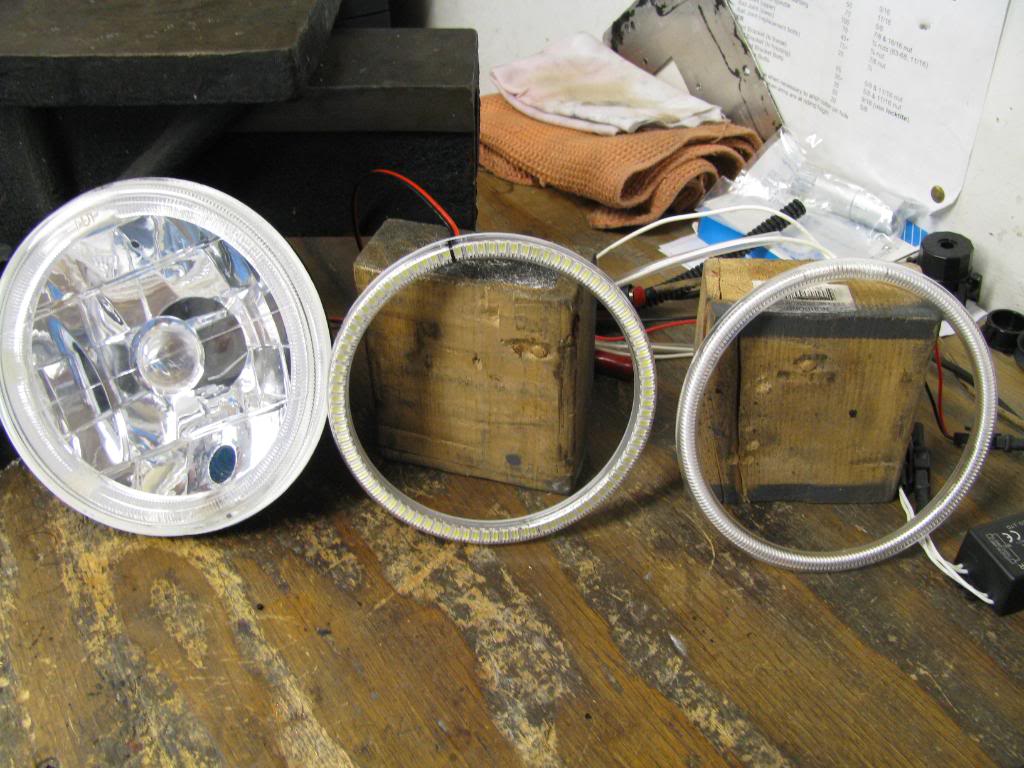
Here is a pic of the 126mm LED and CCFL halos next to the second halo headlights I bought. You can see the ballast for the CCFL halo in the lower right:
Here is the second Ebay headlight lit up; you can easily see how it only has 4 LEDs in the halo:
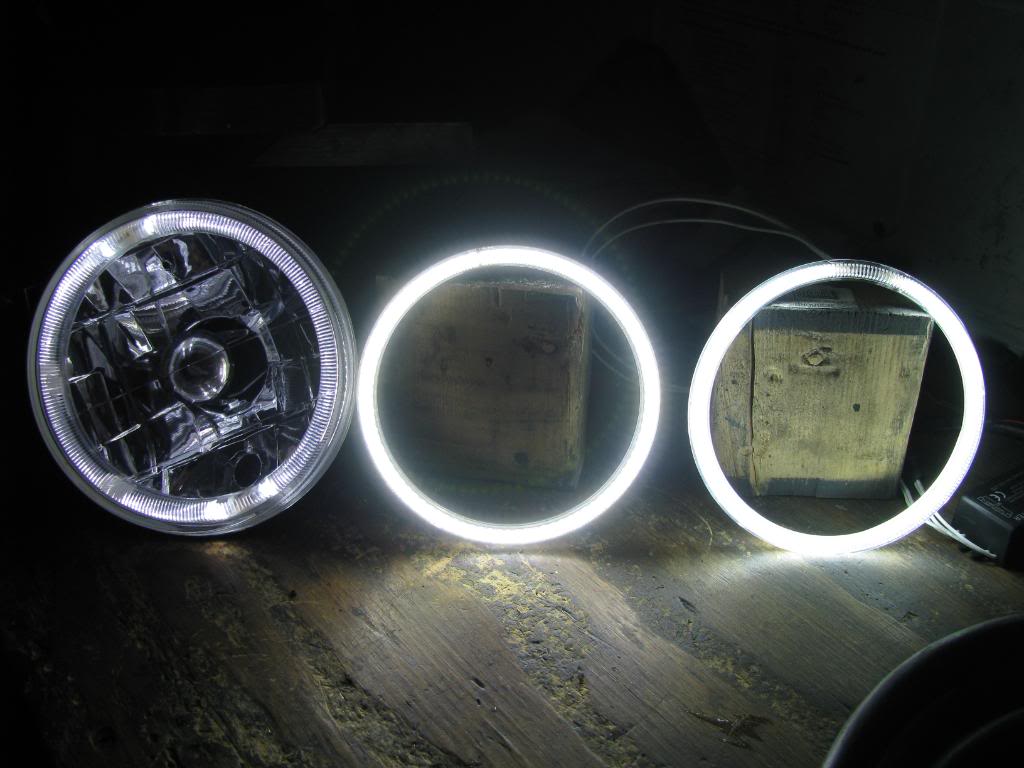
Here is the Ebay headlight and the LED and CCFl halos all lit up, quite a difference!
I decided to go with LED over CCFL because:
-the LED was brighter
-the LED was not made of fragile glass
-the LED has a longer life expectancy
-the LED is a full circle, the CCFL is not
-the LED uses no ballast, and is less complicated to install
These LED halos are so bright, they almost hurt to look directly at them!
The first thing I did was put a drop of 5 minute epoxy over where the 2 wires attach the the back of the circuit board to make it stronger. It seemed like the wires could break off if they were moved around too much.
I placed the halo ring inside the glass lens, and "spot welded" it with 4 drops of Permatex clear silicone adhesive sealant. This is what I used:
http://www.permatex.com/products/pro...sealant-detail
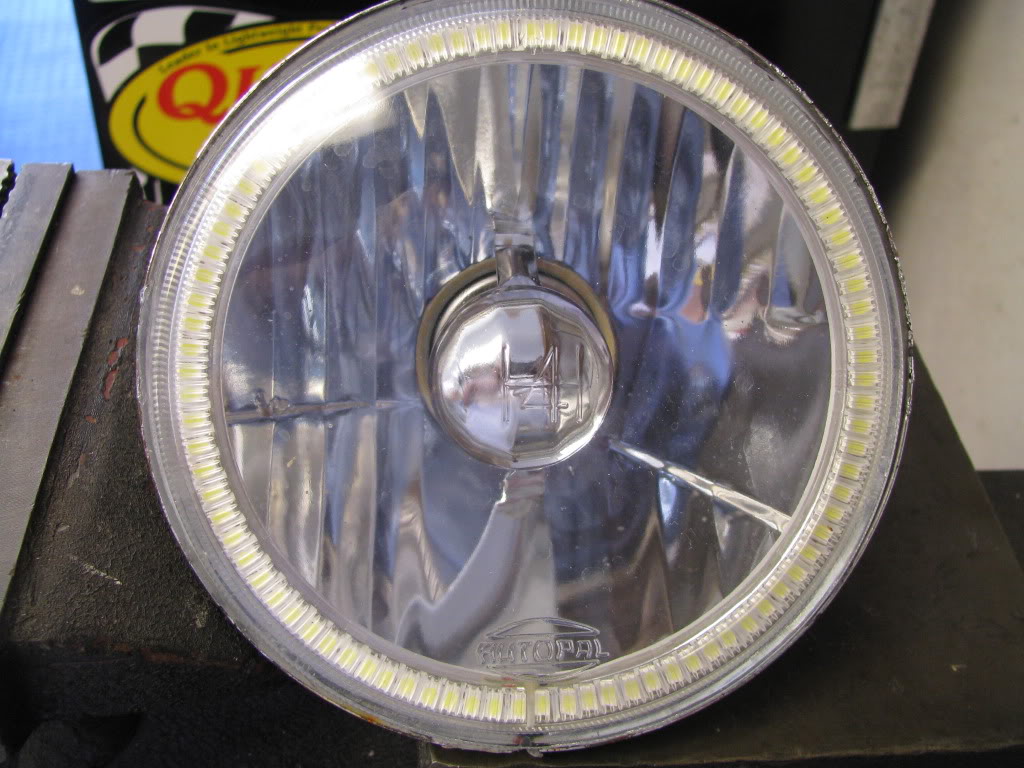
The next day, I ran a continuous bead of the same silicone around the halo. Then I drilled a small hole in the metal reflector for the wire to pass through. I used a very small grommet to protect the wire. I used the same silicone to glue the glass back onto the reflector housing.
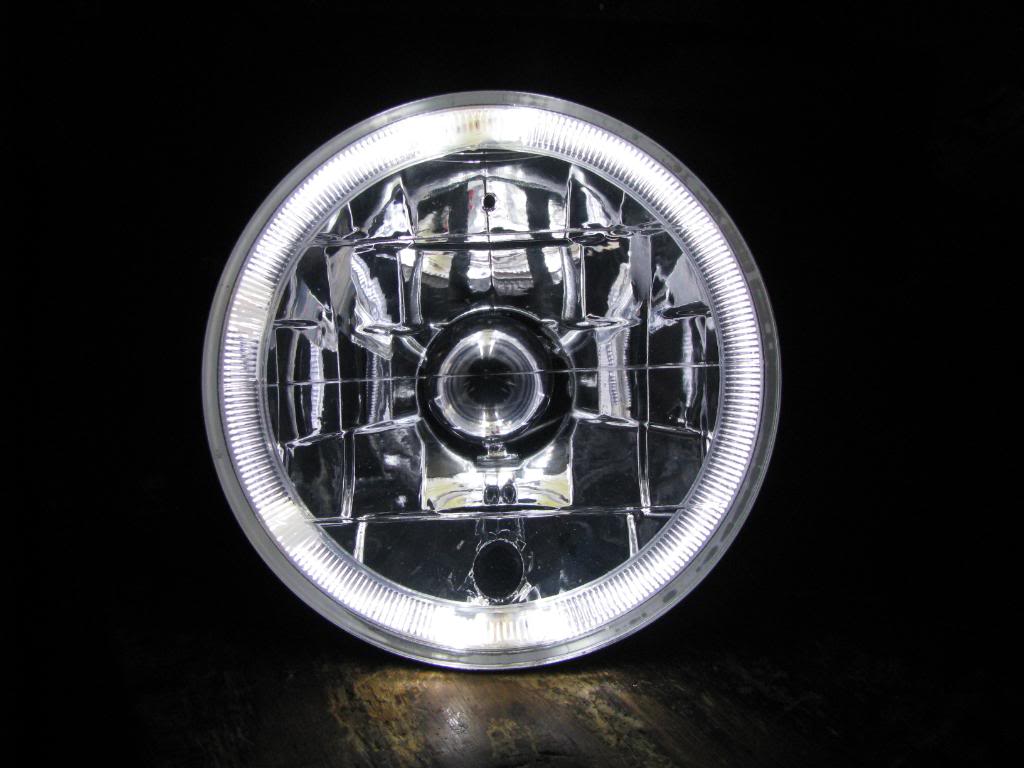
Here is the finished product:
You can see the grommet in this pic:
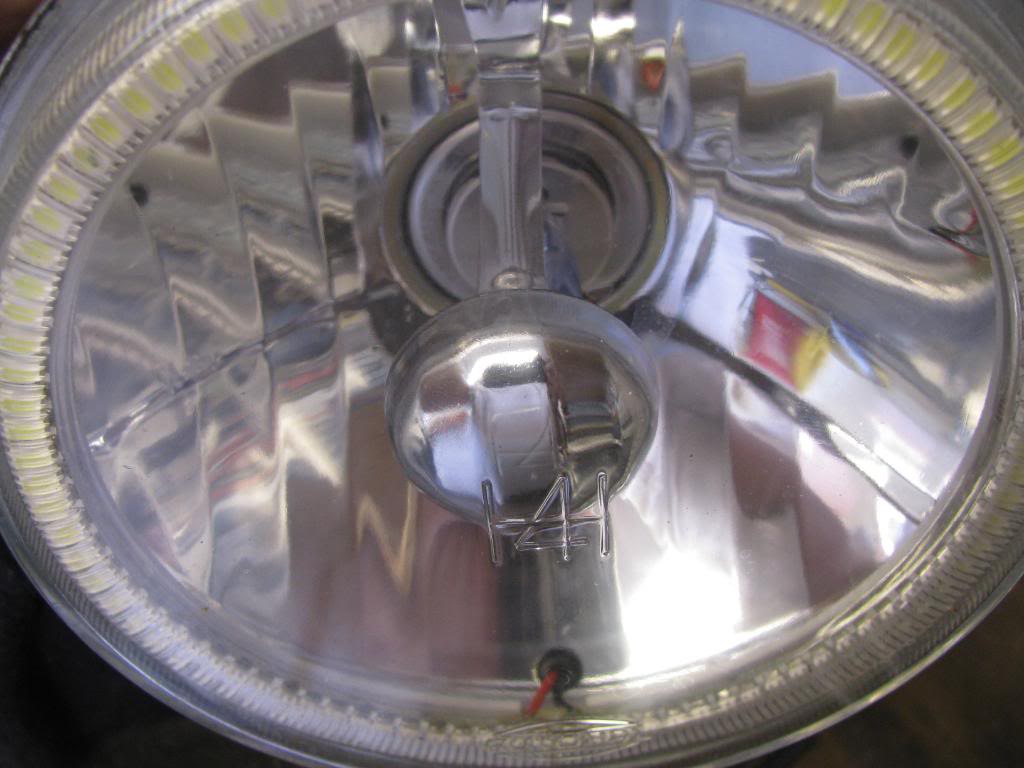

I had previously cut the back of the headlight cups into a circle from a square, and now I also drilled a hole and used a grommet for the wires to pass though. This grommet is bigger because I used quick disconnects on the wire so the headlights can be removed without cutting any wires:
I wired the halos into the wiring for the front parking lights, so they are on whenever the parking lights are on.
I used these all last year, so far so good, no problems.
I hope this helps explain what I did. Any questions, just ask.
I will write the tail light "how to" tomorrow.
Although this has nothing to do with the halos, before anything else, I am going to suggest that you rewire your headlights to run directly off the alternator though relays. Having full voltage at the headlights makes them much brighter; light output is severely compromised with decreased voltage, and the stock wiring does not provide full voltage to the headlights. The drop in light output with decreased voltage is not linear, it is exponential. Here is a very good read about it, and how to do the mod:
http://www.madelectrical.com/electri...adlights.shtml
In addition to the wiring mod, I also had previously converted to headlights using a H4 low beam lamp, and a H1 high beam lamp instead of sealed beams. These 2 mods together made a really noticeable difference in headlight brightness. It sounds complicated, but it is actually a very easy mod to do.
Now, the halos. This all started almost 2 years ago, with the headlights. I really liked the look of the headlight halos on BMW's, and wondered if there was something available in a 5.75" headlight. First I investigated how this was done on a BMW. They use a reflector ring that is illuminated from below, kinda like fiber optics. The earlier BMWs use an incandescent lamp for illumination, while the later ones use an LED lamp for illumination. When you see one, is is easy to tell incandescent from LED because the LED is very white compared to the incandescent yellow.
I started to search the web for a 5.75" headlight with a halo, and I soon found some on Ebay and elsewhere. Sometimes they are also called "angel eyes", but I will refer to them as halos.
So I bought a LED halo set from an Ebay seller, and when they arrived I was very disappointed!
First, the housing was made of plastic and was large enough in the back that either the headlight housing holes would have to be enlarged, or the plastic would have to be cut down to fit. I cut down the plastic headlight to fit instead of enlarging the holes in my headlight housings. I also had to make the hole in the headlight mounting cup larger to get them to fit.
To remove the headlight cup from your car without disturbing the aiming, use a pair of pliers to grab the spring and remove it from where it hooks into the cup, and then you can wiggle the cup out of the 2 alignment screws and off the car. This is a stock headlight mounting cup, I cut the square hole with tin snips into a larger round hole for clearance:
Second, 5.75" automotive headlights have 3 tabs on the back that fit into 3 holes in the headlight cups that locate the lights properly. Low beam and high beam tabs are different so they can't be mixed up. The tabs on the halo headlights did not line up properly with the holes in the headlight cups, and they had to be modded to fit.
Third, and the most disappointing, the LED halo was lit with only 2 LEDs at the bottom! The halos were not very bright at all. In spite of these shortcomings, I made the mods to the headlights, and installed them.
Soon after this, I found what I thought were much better 5.75" halo headlights, they appeared much brighter than what I had. I bought a set of them with high expectations.
I was very diasappointed again. They housings were also made of plastic with the same clearance issues. These halos were lit with 4 LEDs; 2 at the top and 2 at the bottom. They were brighter, but still not what was I was looking for. I gave away the first set, and installed the second set.
This is an actual picture off Ebay of both the sets I bought. You can see how the left halo has 2 LEDs and the right halo has 4 LEDs:
The quest continued. I took a look at the H4 and H1 headlights I previously had, and wondered if I could take them apart. They were a much better quality light, with a metal reflector housing instead of plastic. They also fit with no mods to the headlight cups or the headlight housings.
Broken headlight #1: I put it in the oven to heat the adhesive. I didn't heat it enough, and the glass broke as I tried to pry it apart. ****!!
Broken headlight #2: Heated it in the oven for a longer time, the heat broke the glass. ****!!
Broken headlight #3: Switched from the oven to using a heat gun instead.....success! Then I dropped the glass and broke it. ****!!
Ruined headlight #4: Successfully separated glass from housing. While trying to remove the remaining adhesive from the housing, the screwdriver I was using slipped and put a huge gouge in the reflector. ****!!!
Now I had to buy another full set of the same headlights!
These are the exact headlights I am using, you need 2 sets of these. I also used Sylvania Silverstar H4 and H1 lamps instead of the cheap ones that come with these headlights:
http://www.ebay.ca/itm/5-3-4-H5001-H...item3a6c16cdf9
This time, I got them all apart no problem. I also was able to remove the remaining adhesive with a plastic trim removal tool. Learn from my mistakes!!!
After breaking the first headlight, I was able to take a precise measurement of the inside of the glass. I then searched and found both LED and CCFL halo rings that seemed like they would work. I decided to order a set of both, and then decide which I likd better. CCFL = cold cathode fluorescent lamps. They are basically glass lamps that also use a ballast to light them.
These are the exact 126mm LED halos I bought, they have almost 100 LEDs/halo!!!:
http://www.ebay.ca/itm/170829042925?...84.m1423.l2649
Here is a pic of the 126mm LED halo next to the second halo headlights I bought:
Here are the exact 126mm CCFL halos I bought:
http://www.ebay.ca/itm/Land-Rover-Ra...e02763&vxp=mtr
Here is a pic of the 126mm LED and CCFL halos next to the second halo headlights I bought. You can see the ballast for the CCFL halo in the lower right:
Here is the second Ebay headlight lit up; you can easily see how it only has 4 LEDs in the halo:
Here is the Ebay headlight and the LED and CCFl halos all lit up, quite a difference!
I decided to go with LED over CCFL because:
-the LED was brighter
-the LED was not made of fragile glass
-the LED has a longer life expectancy
-the LED is a full circle, the CCFL is not
-the LED uses no ballast, and is less complicated to install
These LED halos are so bright, they almost hurt to look directly at them!
The first thing I did was put a drop of 5 minute epoxy over where the 2 wires attach the the back of the circuit board to make it stronger. It seemed like the wires could break off if they were moved around too much.
I placed the halo ring inside the glass lens, and "spot welded" it with 4 drops of Permatex clear silicone adhesive sealant. This is what I used:
http://www.permatex.com/products/pro...sealant-detail
The next day, I ran a continuous bead of the same silicone around the halo. Then I drilled a small hole in the metal reflector for the wire to pass through. I used a very small grommet to protect the wire. I used the same silicone to glue the glass back onto the reflector housing.
Here is the finished product:
You can see the grommet in this pic:
I had previously cut the back of the headlight cups into a circle from a square, and now I also drilled a hole and used a grommet for the wires to pass though. This grommet is bigger because I used quick disconnects on the wire so the headlights can be removed without cutting any wires:
I wired the halos into the wiring for the front parking lights, so they are on whenever the parking lights are on.
I used these all last year, so far so good, no problems.
I hope this helps explain what I did. Any questions, just ask.
I will write the tail light "how to" tomorrow.
Last edited by 7t2vette; 10-07-2017 at 03:36 PM.
The following 2 users liked this post by 7t2vette:
Classic Muscle (03-30-2018),
fjc1982 (05-25-2016)
04-07-2013, 10:12 PM
#23
Drifting


7t2--
Great writeup... Appreciate you taking the time to document the "how-to" for us... Really looking forward to the rear tail lights write-up....
Very well done!!!
Rogman
Great writeup... Appreciate you taking the time to document the "how-to" for us... Really looking forward to the rear tail lights write-up....
Very well done!!!
Rogman
04-07-2013, 10:20 PM
#24
The ORIGINAL and bestest
Thread Starter
Member Since: Oct 2000
Location: Toronto Ontario
Posts: 10,009
Received 234 Likes
on
143 Posts
Toronto Events Coordinator
I forgot to mention that all of the 5.75" halo headlight that I can find on Ebay and elsewhere are all the same crappy plastic 2 or 4 LED junk. Don't buy them! Oracle has since come out with their own 5.75" halos, but they are still a plastic housing that won't fit without mods to the housings, and their LED halo ring use way less LEDs so the light doesn't look as continuous as my home made ones.
These are the Oracle halos:
These are the Oracle halos:
04-07-2013, 10:54 PM
#25
Drifting
Wow, you wasn't kidding about them Being home made, you have a lot of time and work In this lighting system. Your work, ideals, and persistence really payed off, truly custom and a job well done.
Thanks for taking the time to share you skills and great attention to detail. I look forward to the write up on the rear LEDs
Thanks again,
Riggs
Thanks for taking the time to share you skills and great attention to detail. I look forward to the write up on the rear LEDs
Thanks again,
Riggs
04-08-2013, 09:48 AM
#26
The ORIGINAL and bestest
Thread Starter
Member Since: Oct 2000
Location: Toronto Ontario
Posts: 10,009
Received 234 Likes
on
143 Posts
Toronto Events Coordinator
One more thing I would like to add about the headlights.......just because the 126mm halos worked in the headlights I used does not mean they will fit properly in other brand headlights.
There are differences in measurements in other brand headlights. If you have headlights you would like to use, take them apart first to measure them.
There are differences in measurements in other brand headlights. If you have headlights you would like to use, take them apart first to measure them.
 04-08-2013, 08:50 PM
#28
The ORIGINAL and bestest
Thread Starter
Member Since: Oct 2000
Location: Toronto Ontario
Posts: 10,009
Received 234 Likes
on
143 Posts
Toronto Events Coordinator
Here is the how to for the tail light halos. This mod was done on stock 70-73 style tail lights; the halos I used might not work for earlier or later year tail lights. Measure yours to be sure.
This mod is much less involved than the headlights. I measured the inside of my tail lights, and started looking for some LED halos that would work. I found some again on Ebay that might work.
These are the exact 85mm halos I bought:
http://www.ebay.ca/itm/130556349924?...84.m1423.l2649
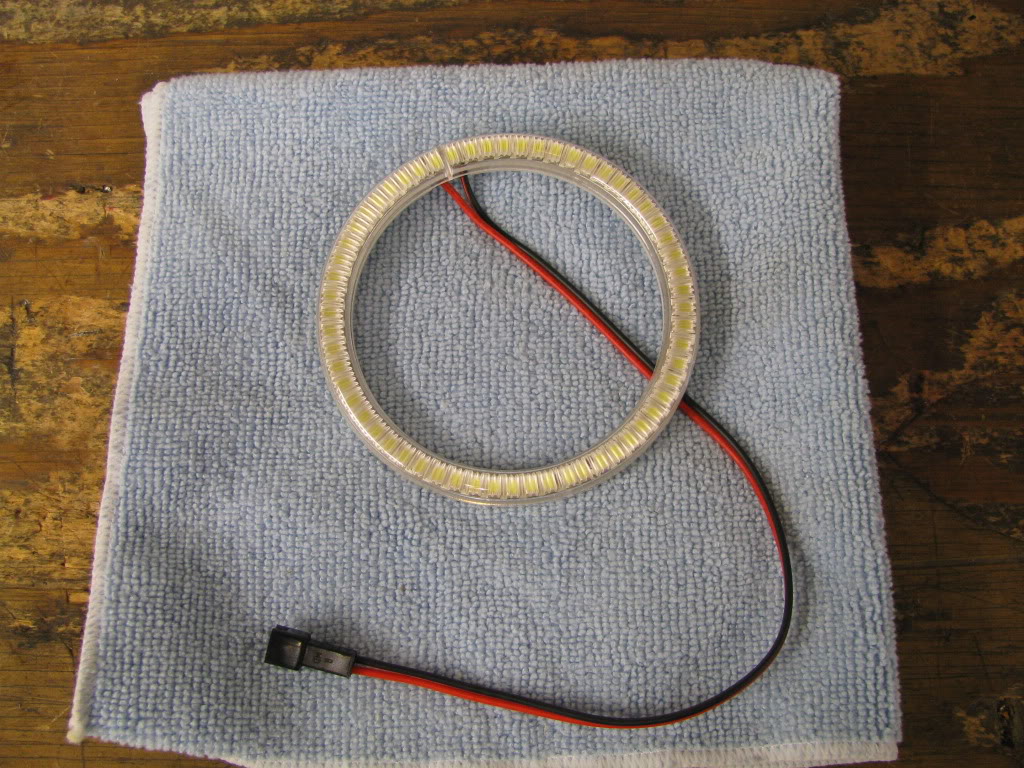
As with the headlight halos, the first thing I did was put a drop of 5 minute epoxy over where the 2 wires attach the the back of the circuit board to make it stronger. It seemed like the wires could break off if they were moved around too much.
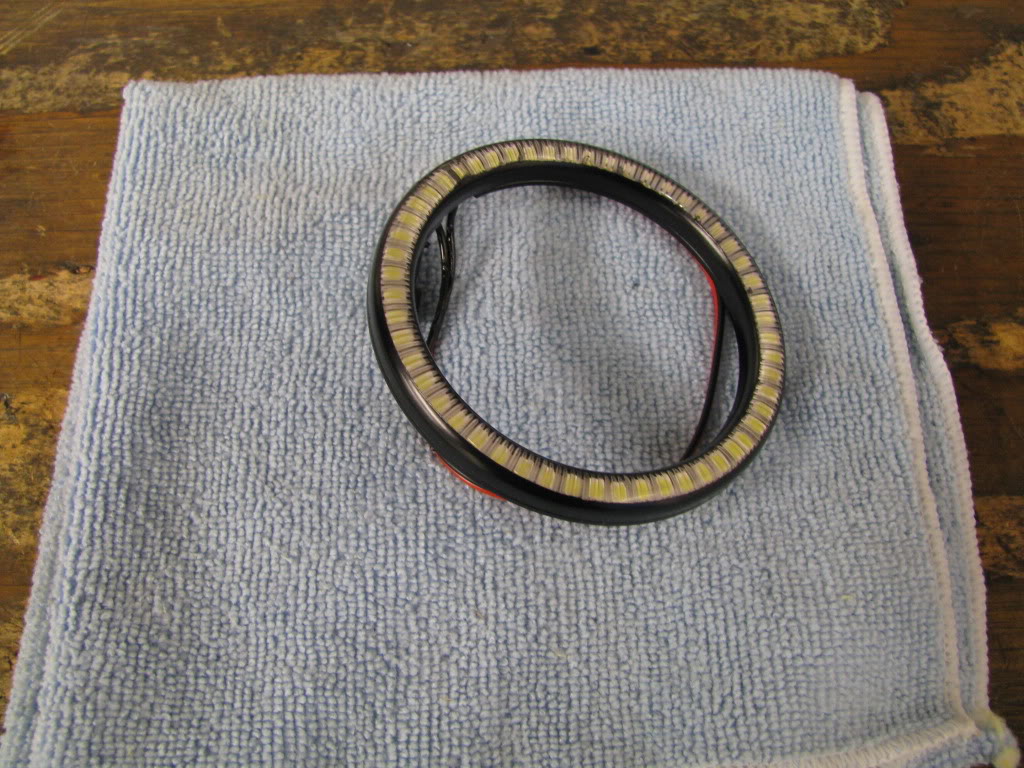
They fit perfectly into the tail light. When I energized it, I wasn't happy with the amount of light bleeding into the tail light from the halo, I wanted as much of the light directed straight out the tail light as possible. I also wanted to get a very distinct ring of light. What I ended up doing was using 1/4" masking tape to mask the top of the ring where the LEDs are, and then painting the rest of the halo black. This worked to stop the light from bleeding into the tail light, and gave me a very defined ring of light.
Here it is painted:
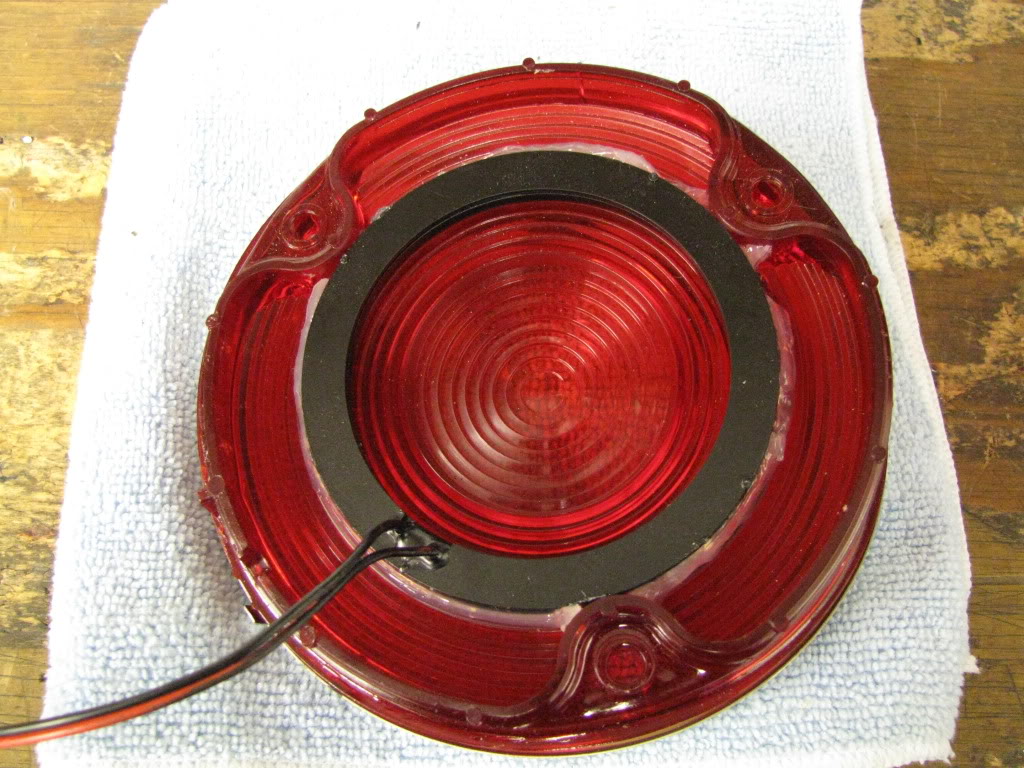
As with the headlights, I placed the halo ring inside the tail light lens, and "spot welded" it with 4 drops of Permatex clear silicone adhesive sealant. This is what I used:
http://www.permatex.com/products/pro...sealant-detail
The next day, I ran a continuous bead of the same silicone around the halo. Here is a pic of the finished product; in this pic of the back, you can also see the drop of epoxy on the wires:
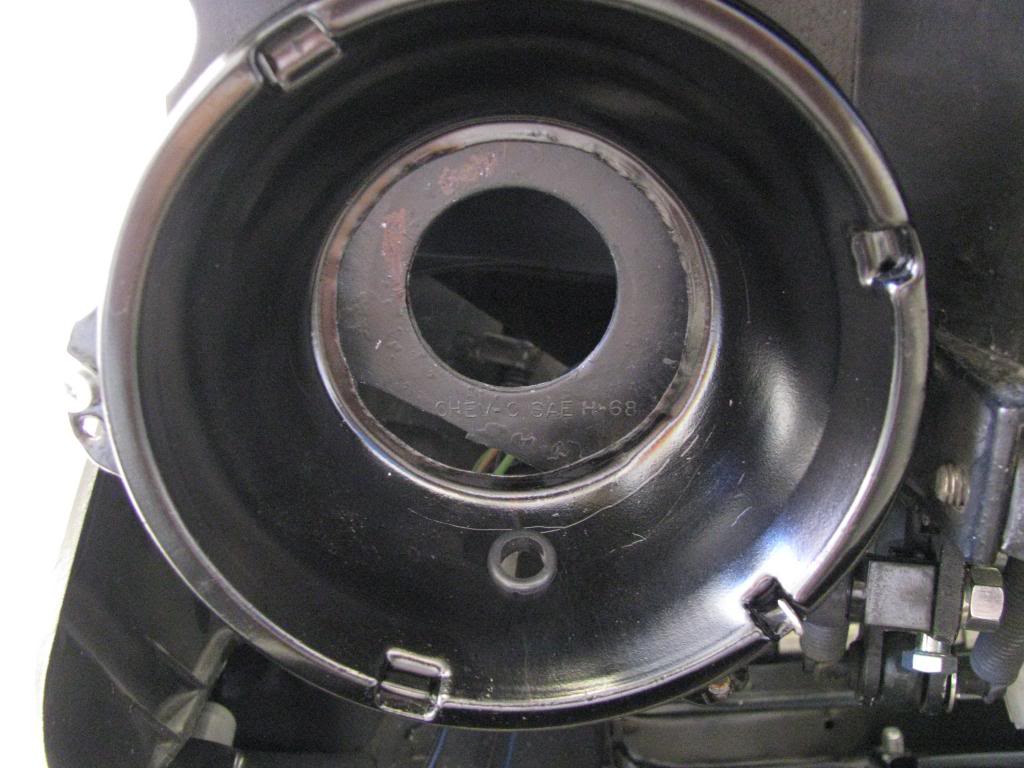
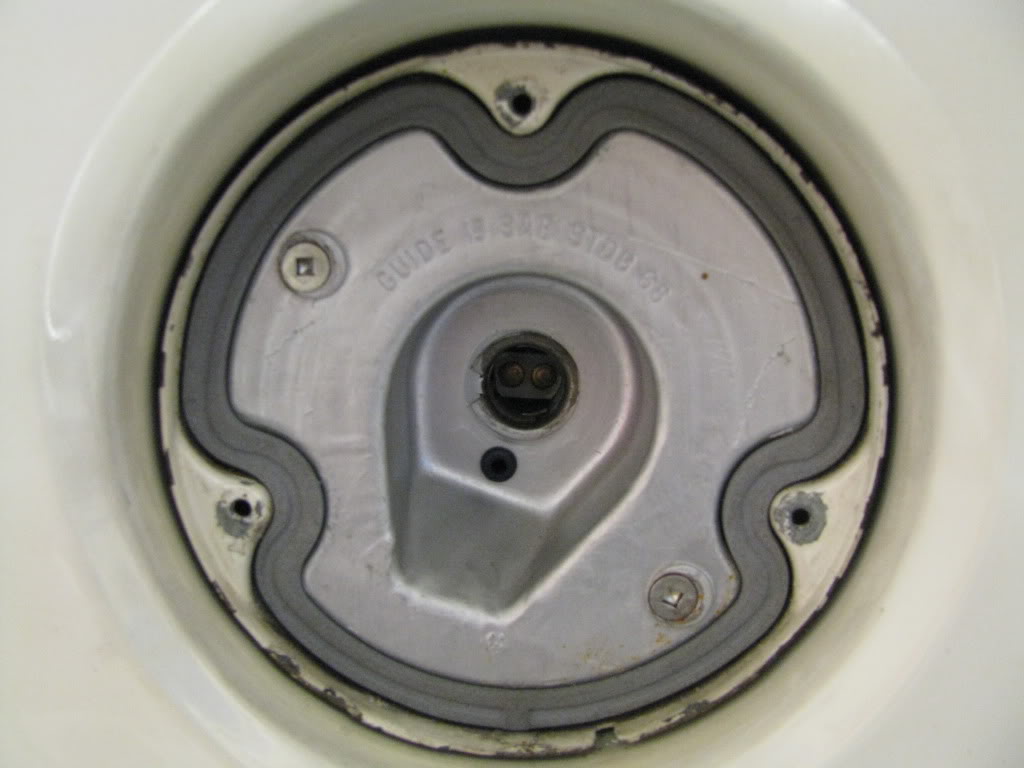
Next, I drilled a hole in the tail light housing, and used the same very small grommets I used inside the headlight housings to protect the wire as it passed through the hole.
Here is the hole and grommet in the tail light housing:
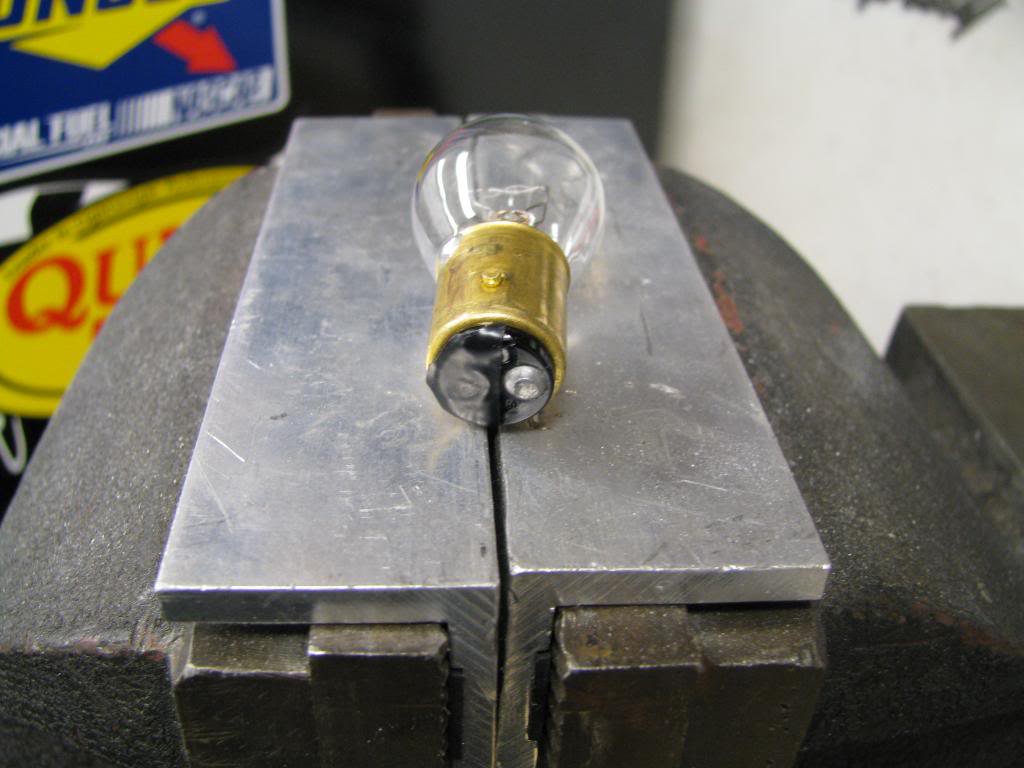
I then extended the wires on each halo to make them all long enough the reach the license plate light in the middle. I wanted the halos to act as the running lights only, and not as turn or brake lights. I didn't want to hack into the tail light wiring to achieve this, so I came up with something else. I took the 1157 lamp and filed off the solder bump that is for the running lights, leaving the bump for the stop/turn lights. I then placed a piece if black electrical tape over the bump I filed down so it wouldn't make contact in the socket.
Here is the modded 1157 lamp:
It worked perfect, and I didn't have to cut any tail light wires. I then installed the tail light lenses, and ran all the wires to the middle. I wired them into the wiring for the license plate light so the halos only come on with the running lights. Doing this meant I only had to cut into the license plate wiring.
After I had determined that the modded incandescent 1157 lamp would work properly, I swapped them out for similarly modded LED 1157 lamps. I used these really bright LEDs:
http://www.superbrightleds.com/morei...power-led/808/

And that's it!
Any questions, ask away! Hope this helps.
This mod is much less involved than the headlights. I measured the inside of my tail lights, and started looking for some LED halos that would work. I found some again on Ebay that might work.
These are the exact 85mm halos I bought:
http://www.ebay.ca/itm/130556349924?...84.m1423.l2649
As with the headlight halos, the first thing I did was put a drop of 5 minute epoxy over where the 2 wires attach the the back of the circuit board to make it stronger. It seemed like the wires could break off if they were moved around too much.
They fit perfectly into the tail light. When I energized it, I wasn't happy with the amount of light bleeding into the tail light from the halo, I wanted as much of the light directed straight out the tail light as possible. I also wanted to get a very distinct ring of light. What I ended up doing was using 1/4" masking tape to mask the top of the ring where the LEDs are, and then painting the rest of the halo black. This worked to stop the light from bleeding into the tail light, and gave me a very defined ring of light.
Here it is painted:
As with the headlights, I placed the halo ring inside the tail light lens, and "spot welded" it with 4 drops of Permatex clear silicone adhesive sealant. This is what I used:
http://www.permatex.com/products/pro...sealant-detail
The next day, I ran a continuous bead of the same silicone around the halo. Here is a pic of the finished product; in this pic of the back, you can also see the drop of epoxy on the wires:
Next, I drilled a hole in the tail light housing, and used the same very small grommets I used inside the headlight housings to protect the wire as it passed through the hole.
Here is the hole and grommet in the tail light housing:
I then extended the wires on each halo to make them all long enough the reach the license plate light in the middle. I wanted the halos to act as the running lights only, and not as turn or brake lights. I didn't want to hack into the tail light wiring to achieve this, so I came up with something else. I took the 1157 lamp and filed off the solder bump that is for the running lights, leaving the bump for the stop/turn lights. I then placed a piece if black electrical tape over the bump I filed down so it wouldn't make contact in the socket.
Here is the modded 1157 lamp:
It worked perfect, and I didn't have to cut any tail light wires. I then installed the tail light lenses, and ran all the wires to the middle. I wired them into the wiring for the license plate light so the halos only come on with the running lights. Doing this meant I only had to cut into the license plate wiring.
After I had determined that the modded incandescent 1157 lamp would work properly, I swapped them out for similarly modded LED 1157 lamps. I used these really bright LEDs:
http://www.superbrightleds.com/morei...power-led/808/
And that's it!
Any questions, ask away! Hope this helps.
Last edited by 7t2vette; 10-13-2013 at 09:38 AM.
The following 7 users liked this post by 7t2vette:
86C4Z51 (06-01-2016),
fjc1982 (05-25-2016),
NAVY08 (02-17-2018),
SpeedRacerMach (12-03-2017),
taylor34 (03-21-2018),
and 2 others liked this post.
 04-09-2013, 02:12 PM
#32
Burning Brakes

I am confused.
You modified the regular incandesent 1157 to remove the running light connection...but you installed the 1157 LED bulbs?
Where did you install the 1157 LED bulbs?
You modified the regular incandesent 1157 to remove the running light connection...but you installed the 1157 LED bulbs?
Where did you install the 1157 LED bulbs?
04-09-2013, 07:58 PM
#33
The ORIGINAL and bestest
Thread Starter
Member Since: Oct 2000
Location: Toronto Ontario
Posts: 10,009
Received 234 Likes
on
143 Posts
Toronto Events Coordinator
I edited my text in the thread to clear this up.
Last edited by 7t2vette; 04-09-2013 at 08:05 PM.

 04-10-2013, 11:59 AM
#37
Burning Brakes
Member Since: Sep 2012
Location: St Louis
Posts: 822
Received 100 Likes
on
66 Posts
St. Jude Donor '13

I've been looking for a tail light set up like this for quite some time. Great job and excellent documentation!!
A question I do have, what about your reverse lights? I see you have the halos around your inner most lenses and an 1157 bulb wired for your brake. Did you just bypass the reverse hot lead and substitute a brake lead?
I'm contemplating adding the halo to my reverse lens and using the 1156 LED for a back up lamp and keeping the outer 2 lamps as brake / turn.
Last edited by STL Zombie Hunter; 04-10-2013 at 08:00 PM.
04-10-2013, 07:24 PM
#38
The ORIGINAL and bestest
Thread Starter
Member Since: Oct 2000
Location: Toronto Ontario
Posts: 10,009
Received 234 Likes
on
143 Posts
Toronto Events Coordinator
I've been looking for a tail light set up like this for quite some time. Great job and excellent documentation!!
A question I do have, what about your reverse lights? I see you have the halos around your inner most lenses and an 1157 bulb wired for your brake. Did you just bypass the reverse hot lead and substitute a brake lead?
I'm contemplating adding the halo to my reverse lens and using the 1157 LED for a back up lamp and keeping the outer 2 lamps as brake / turn.
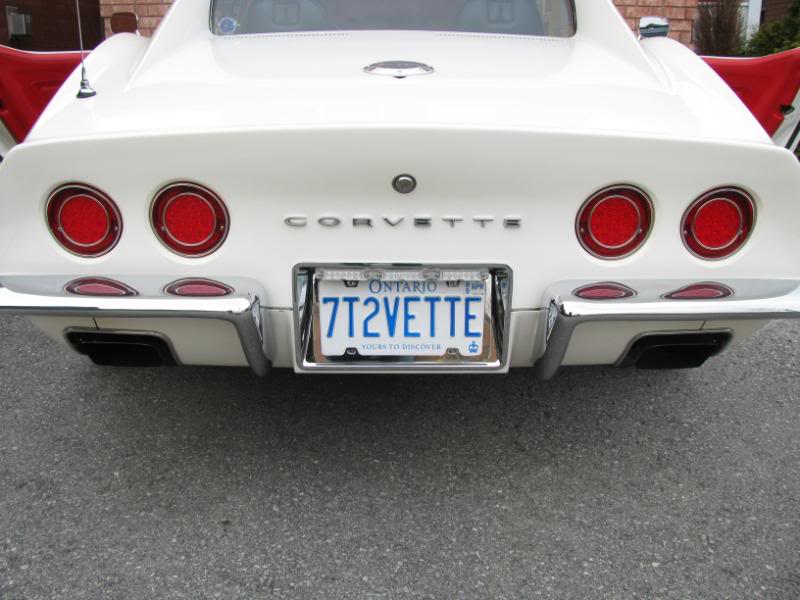
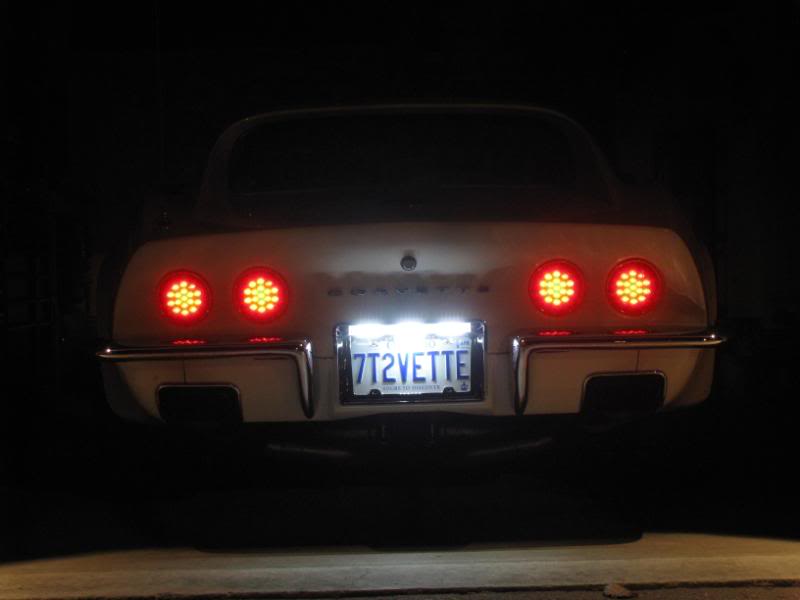
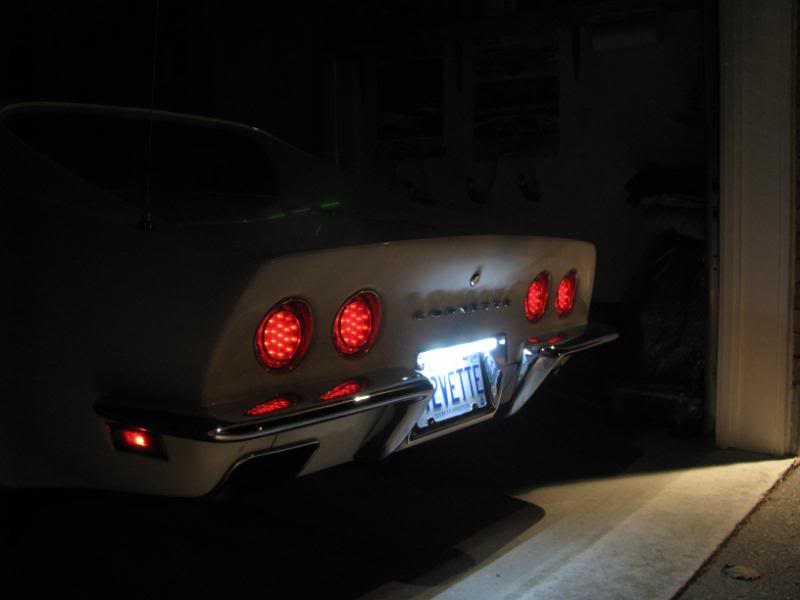
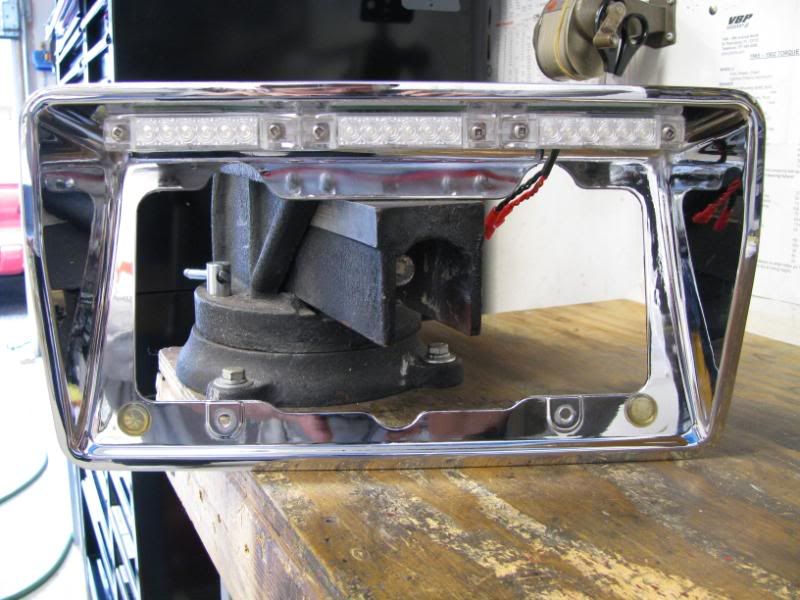
I had to come up with something for the reverse lights, so I made a custom LED reverse light mounted over the license plate. I found the LED lights on Ebay.
Here are some pics:
 04-10-2013, 07:59 PM
#39
Burning Brakes
Member Since: Sep 2012
Location: St Louis
Posts: 822
Received 100 Likes
on
66 Posts
St. Jude Donor '13
Ah. I see. Good idea. Did you upgrade to a different flasher to help with the load difference? Was it like a Tridon flasher?
I swapped all the corner marker lights & dash lights to LED over the weekend, except for the speedo & tach. I can't seem to get those damn things out! Blue LED for hi beam indicator, greens for signal indicators, red for brake & seat belt, etc.
I swapped all the corner marker lights & dash lights to LED over the weekend, except for the speedo & tach. I can't seem to get those damn things out! Blue LED for hi beam indicator, greens for signal indicators, red for brake & seat belt, etc.
04-10-2013, 08:18 PM
#40
The ORIGINAL and bestest
Thread Starter
Member Since: Oct 2000
Location: Toronto Ontario
Posts: 10,009
Received 234 Likes
on
143 Posts
Toronto Events Coordinator
I am still using a normal flasher, although an electronic one.
My front and rear side marker and front turn signal lamps are all still incandescent lamps. I have found if I change the front signal lamps to LEDs, the flasher will not work. I will have to figure out a way to make it work because I have a cool plan to change them to some sort of LED.....but that project is still in the R&D stage!!!
My front and rear side marker and front turn signal lamps are all still incandescent lamps. I have found if I change the front signal lamps to LEDs, the flasher will not work. I will have to figure out a way to make it work because I have a cool plan to change them to some sort of LED.....but that project is still in the R&D stage!!!