
Doorgunner's '68 Convertible Project
 01-23-2015, 07:01 AM
#941
Melting Slicks

After being submerged, I'd say that was more of a reincarnation than a restoration. Plus you're guaranteed it's gonna fit. Really nice work buddy. Now make sure you put some miles on for me this weekend......remember you're driving for two. 
 01-23-2015, 08:59 AM
#942
Drifting

Here's the "new" center console with some history.........
the 1970 Vette that it came out of was submerged undet 10 feet of water during the Hurricane Katrina flood in New Orleans......
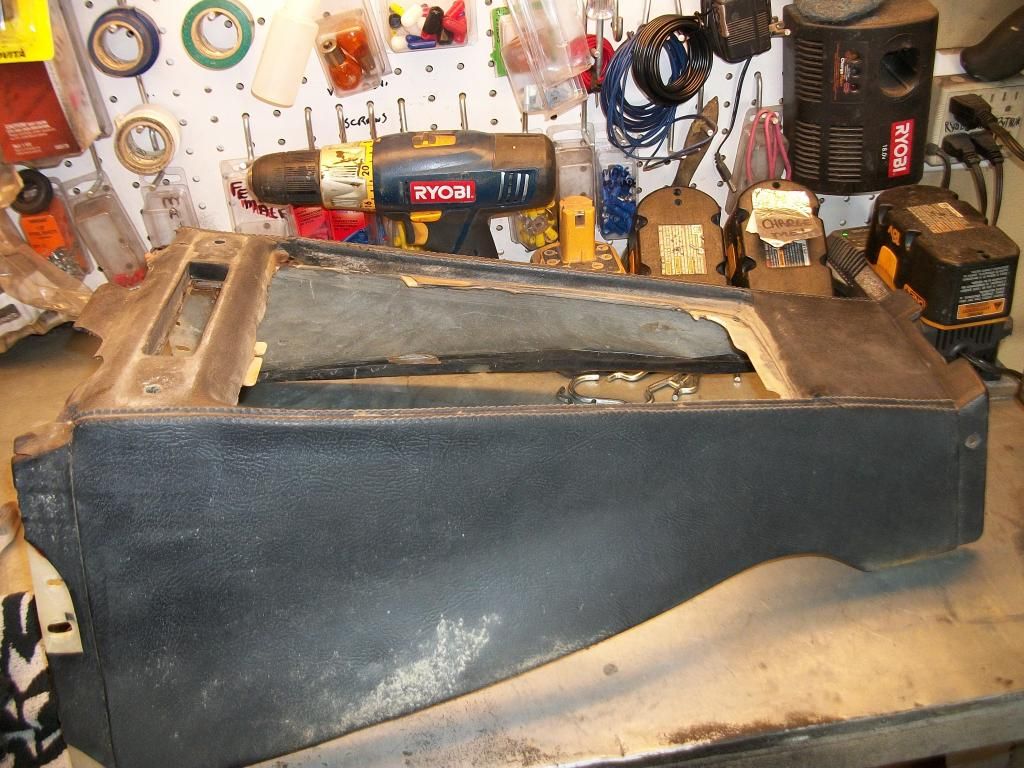
After a good scrubbing and wiping down with degreaser it got a couple coats of vinyl dye........
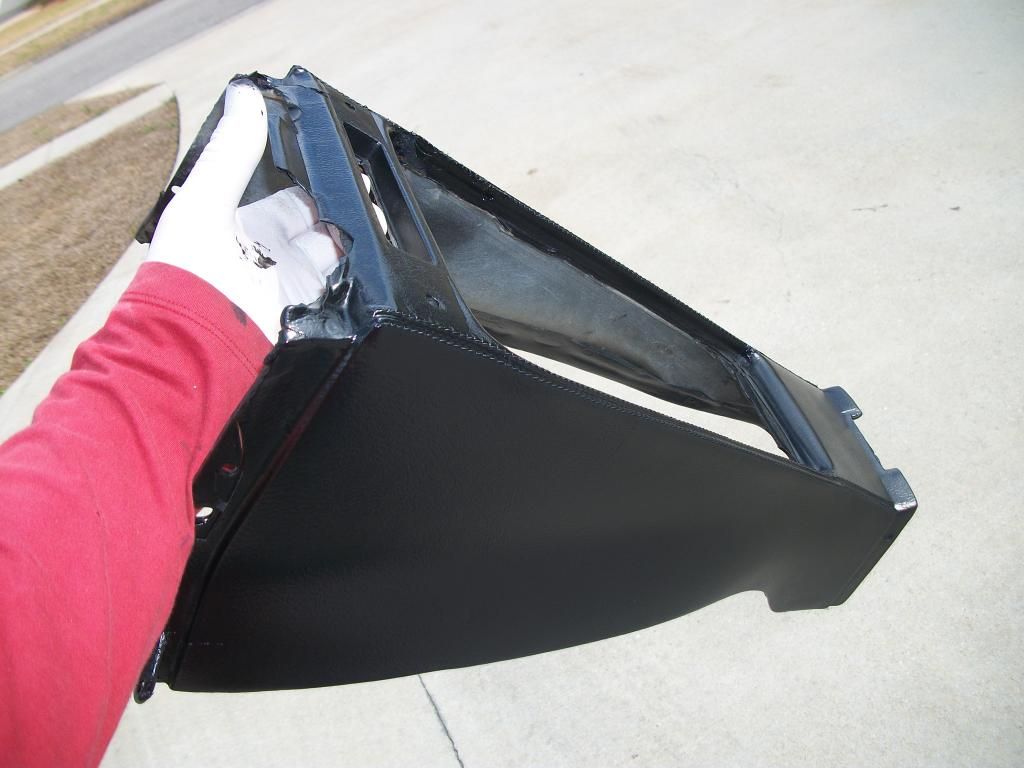
the 1970 Vette that it came out of was submerged undet 10 feet of water during the Hurricane Katrina flood in New Orleans......
After a good scrubbing and wiping down with degreaser it got a couple coats of vinyl dye........
01-23-2015, 09:38 AM
#943
Burning Brakes


Keep up the good work DG, your giving me hope that there is plenty to do after I retire. Not sure when that is going to be but that is okay in the mean time I will keep dancing with my Love and enjoying my Grandchild.
Jack.
Jack.
01-23-2015, 03:18 PM
#944
Nam Labrat


Thread Starter
Member Since: Sep 2013
Location: New Orleans Loo-z-anna
Posts: 33,898
Received 4,178 Likes
on
2,738 Posts


my wife says that she's embarressed when we go out to eat............
and I'm reading the menu with black fingernails and black paint overspray to the knuckles!
(Hmmmmmmmmm....I never really noticed it....myself!)
Last edited by doorgunner; 01-23-2015 at 03:20 PM.
01-23-2015, 03:44 PM
#945
Burning Brakes
01-23-2015, 11:31 PM
#946
Nam Labrat
Thread Starter
Member Since: Sep 2013
Location: New Orleans Loo-z-anna
Posts: 33,898
Received 4,178 Likes
on
2,738 Posts
 01-25-2015, 11:09 PM
#947
Nam Labrat
Thread Starter
Member Since: Sep 2013
Location: New Orleans Loo-z-anna
Posts: 33,898
Received 4,178 Likes
on
2,738 Posts
The new-to-me radio ***** arrived today courtesy of member dboz/radio is DONE!
I had to completely disassemble the previous owner's Hurst ratchet shifter and cut 3/4" off the base of it so the shifter plate would fit properly over the shifter....which took about 2 hours to cut/fit/weld everything in place---the insulation covers the ratchet mechanism......
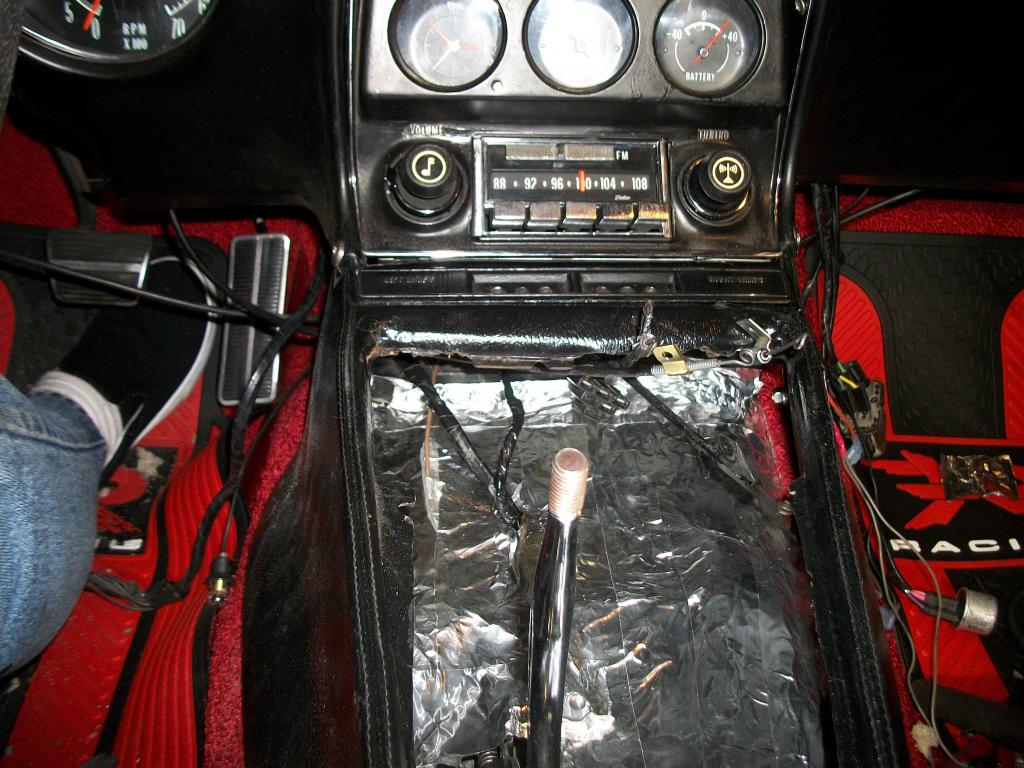
It took another 2 hours to fit the '70 console in place and level it to fit under the radio (there was a 1/2" gap under the right side of the radio at first)...............
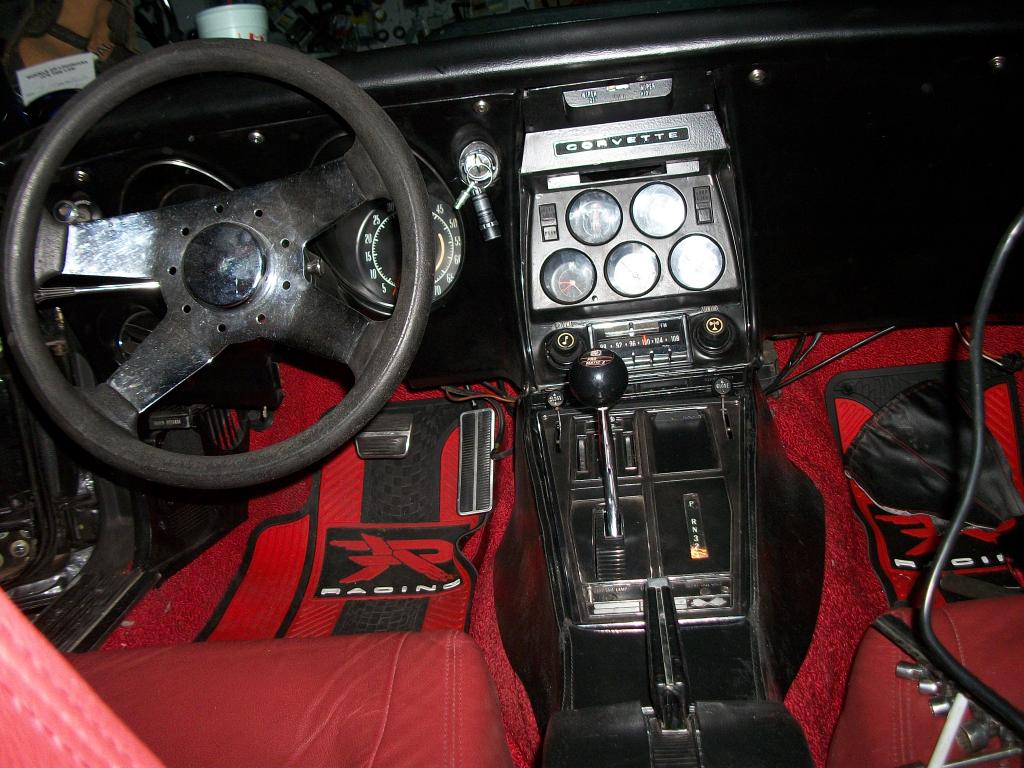
The E-brake console is in place/I even have the handle facing in the correct direction THIS TIME in the pic above...(PREVIOUS PIC BELOW has the "reverse handle" I blame the meds )..........
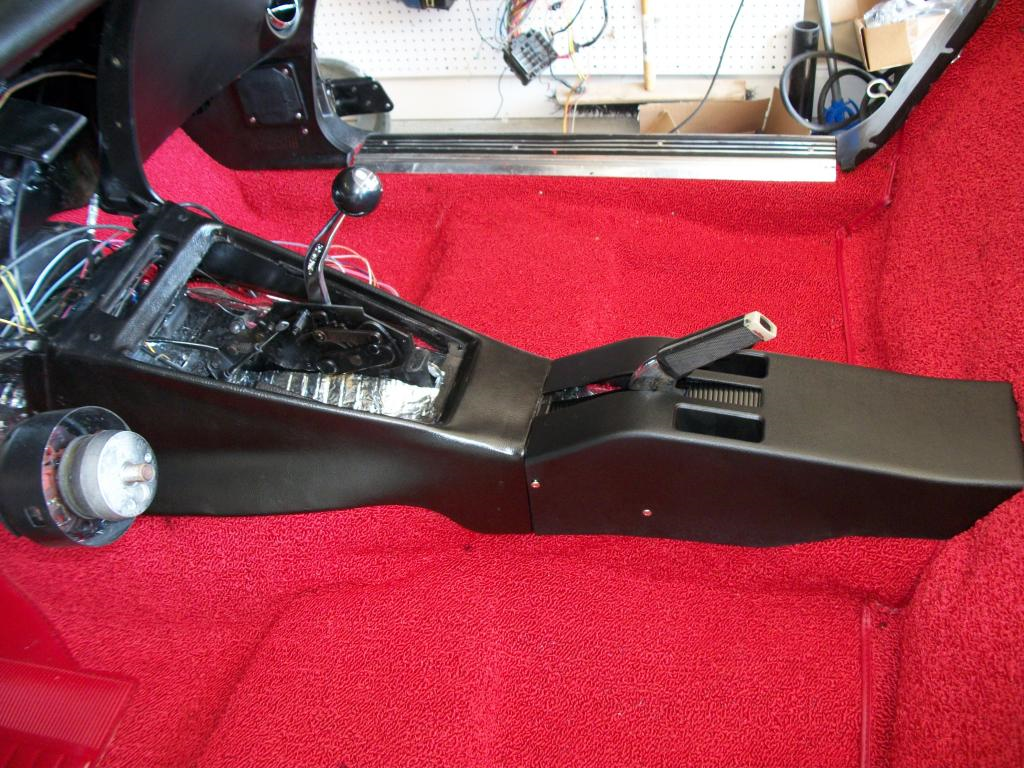
Tomorrow I'll tuck all the wires and cables out of site and tie-wrap them in place.
51150
I had to completely disassemble the previous owner's Hurst ratchet shifter and cut 3/4" off the base of it so the shifter plate would fit properly over the shifter....which took about 2 hours to cut/fit/weld everything in place---the insulation covers the ratchet mechanism......
It took another 2 hours to fit the '70 console in place and level it to fit under the radio (there was a 1/2" gap under the right side of the radio at first)...............
The E-brake console is in place/I even have the handle facing in the correct direction THIS TIME in the pic above...(PREVIOUS PIC BELOW has the "reverse handle" I blame the meds
)..........Tomorrow I'll tuck all the wires and cables out of site and tie-wrap them in place.
51150
Last edited by doorgunner; 01-25-2015 at 11:18 PM.
01-26-2015, 12:43 AM
#948
Racer

I'm sure you're aware that your park brake handle's missing the thumb button too. 
Looking damn good Doorgunner! That Hurst shifter is a killer mod, and you even used the same slider seal that the park brake handle uses. Hooray consistency!
Looking damn good Doorgunner! That Hurst shifter is a killer mod, and you even used the same slider seal that the park brake handle uses. Hooray consistency!
01-26-2015, 02:28 AM
#949
Nam Labrat
Thread Starter
Member Since: Sep 2013
Location: New Orleans Loo-z-anna
Posts: 33,898
Received 4,178 Likes
on
2,738 Posts
I think the car needs to get some fresh air tomorrow....the electric hoist really spares my back and lifts the hardtop in seconds......
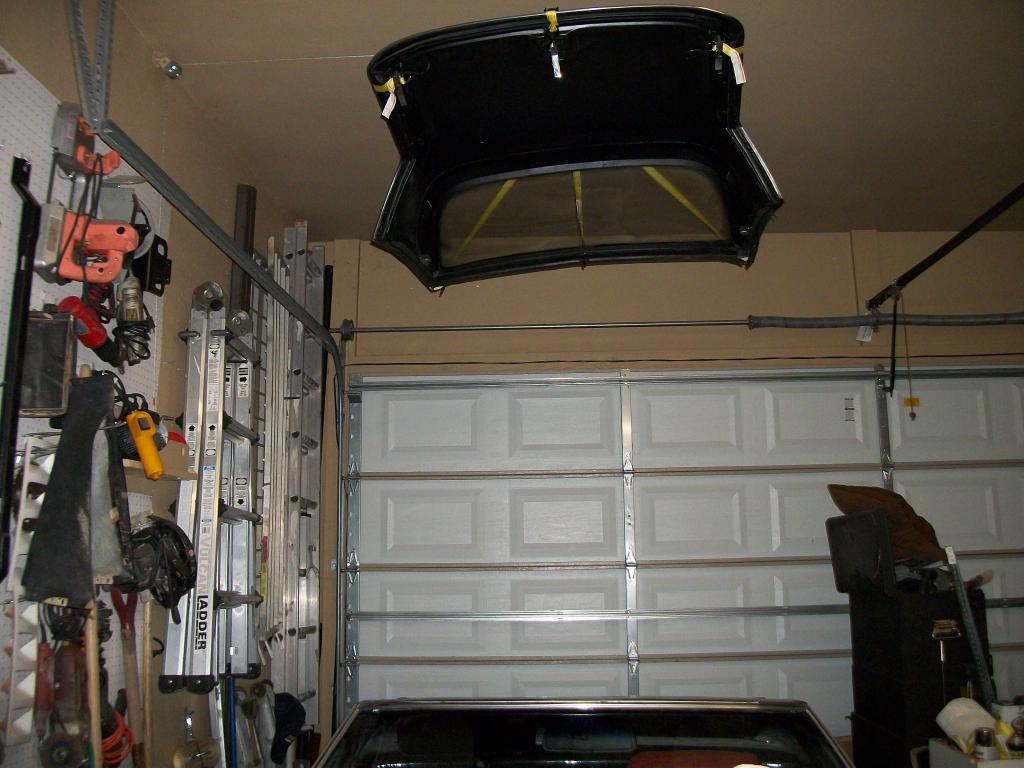
Before..........
Tonight................................. ..

Last edited by doorgunner; 01-26-2015 at 02:31 AM.
01-26-2015, 06:06 AM
#950


I need to check the AIM.....the button is in the bottom of the recess/it must be missing a return spring. I almost put that $230 ratchet shifter for sale in the PARTS Forum when the shifter plate wouldn't drop into place. I had a spare E-brake slider laying around so I installed it to cover the gap around the shift handle (It DOES match the E-brake though!).
I think the car needs to get some fresh air tomorrow....the electric hoist really spares my back and lifts the hardtop in seconds......

Before..........

Tonight................................. ..

I think the car needs to get some fresh air tomorrow....the electric hoist really spares my back and lifts the hardtop in seconds......
Before..........
Tonight................................. ..
R
 01-26-2015, 10:21 AM
#952
Racer
 If the return spring is all that's missing you'll have to source one from somewhere, because you can only buy a whole new park brake handle assembly, or a replacement lever. The new assembly is expensive: $454 at KeenParts (Part # 500053). The handle alone is around $100 (CorvetteAmerica part# 49073 or part# 29785. I don't see a difference). Really though, it shouldn't be hard to source a spring if that's all you need.
Last edited by Kris Tunetso; 01-26-2015 at 10:45 AM.
01-26-2015, 10:23 AM
#953
Nam Labrat
Thread Starter
Member Since: Sep 2013
Location: New Orleans Loo-z-anna
Posts: 33,898
Received 4,178 Likes
on
2,738 Posts
Thanks Men.
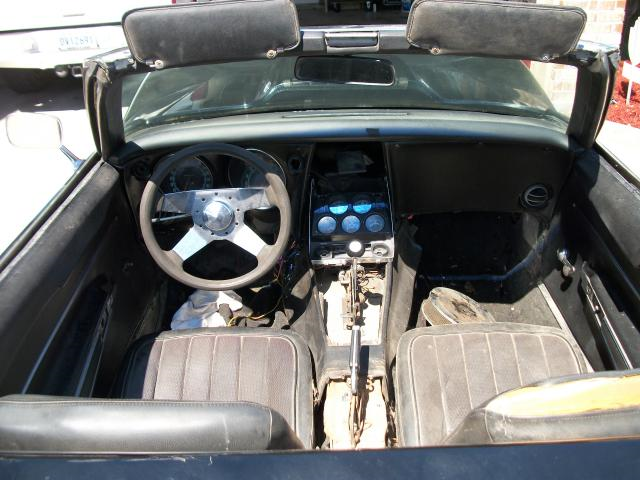
YIKES......I MUST remove that steering wheel...polish the spider-web-scratches out....and put a good cover on it.....
BUT no Honda Civic cover---I DON'T need to match the "pre-paint" floor mats....LOL!
Time to take the car out for some fresh air since the sun finally is shining after a rainy 7 days.
 01-26-2015, 03:29 PM
#955
Nam Labrat
Thread Starter
Member Since: Sep 2013
Location: New Orleans Loo-z-anna
Posts: 33,898
Received 4,178 Likes
on
2,738 Posts
Who would have thought! I overlooked that console for a year because of all the mold/crud covering it....once I wiped some crud off it.
I thought it might have a chance since my original console was bowed so badly that I could stick a screwdriver in the gaps between the sides and the shifter plate/bezel (I'll keep the original and try to it).
I thought it might have a chance since my original console was bowed so badly that I could stick a screwdriver in the gaps between the sides and the shifter plate/bezel (I'll keep the original and try to it).
01-26-2015, 05:54 PM
#956
Nam Labrat
Thread Starter
Member Since: Sep 2013
Location: New Orleans Loo-z-anna
Posts: 33,898
Received 4,178 Likes
on
2,738 Posts
Oldgto and Kris......thanks much.....I copied it......
So THAT'S where the spring goes that I found on the floorboard a year ago!!!!!!!
I had planned to refurbish mine.
It does come completely apart. You need to drive out the pins with a punch. You can use a drift pin, a screwdriver, a solid rod, whatever you have to drive the pins out. I shot mine with PB Blaster before I banged them out.
There are 3 to drive out, the big one in the lower center, one that holds the lever to the wheel, and a small pin in the handle.
Looking at the price of re-chroming, I ended up finding another handle, and put the better one in my assembly when I rebuilt it.
(My car is a 71, I don`t know how many years are the same as this)
First, drive the pin from the center of the lower end of the handle....

Then you can pull out the cable end bracket....

Next, drive the smaller pin that holds the lever to the wheel....

Now the handle will come out. Next, drive the pin out of the handle, and the push button, rod, spring, and plastic grip will come apart...

Some have said that the plastic grip won`t come off, it`s glued on. As you can see, with some wiggling and pulling, I`ve gotten it off (on two different assemblies now), so I`m telling you it WILL come off....

It does come completely apart. You need to drive out the pins with a punch. You can use a drift pin, a screwdriver, a solid rod, whatever you have to drive the pins out. I shot mine with PB Blaster before I banged them out.
There are 3 to drive out, the big one in the lower center, one that holds the lever to the wheel, and a small pin in the handle.
Looking at the price of re-chroming, I ended up finding another handle, and put the better one in my assembly when I rebuilt it.
(My car is a 71, I don`t know how many years are the same as this)
First, drive the pin from the center of the lower end of the handle....
Then you can pull out the cable end bracket....
Next, drive the smaller pin that holds the lever to the wheel....
Now the handle will come out. Next, drive the pin out of the handle, and the push button, rod, spring, and plastic grip will come apart...
Some have said that the plastic grip won`t come off, it`s glued on. As you can see, with some wiggling and pulling, I`ve gotten it off (on two different assemblies now), so I`m telling you it WILL come off....
So THAT'S where the spring goes that I found on the floorboard a year ago!!!!!!!
Last edited by doorgunner; 01-26-2015 at 05:56 PM.
01-26-2015, 06:04 PM
#957
 01-26-2015, 06:28 PM
#958
Nam Labrat
Thread Starter
Member Since: Sep 2013
Location: New Orleans Loo-z-anna
Posts: 33,898
Received 4,178 Likes
on
2,738 Posts
"Keep my tools on tethers so they don't float away when I'm not looking"
All the loose parts go in boxes marked MISC....for the same reason....
 <<<<<<<<< Me
01-26-2015, 07:41 PM
<<<<<<<<< Me
01-26-2015, 07:41 PM
#960
Racer
In the last pic, the long rod with the round end: the other end of it is barbed and is what goes into the button. The button is just press-fit in place, relying on the barb friction to keep it there; an "interference fit" I believe is the proper machinist's term. My button was cracked all the way up the bottom, so there was no friction and the return spring kept shooting it across the room when I reassembled it. I had to put a daub of modeler's cement in the hole on the button and put it back together that way.
What I'm trying to say is, the lever handle's not supposed to come apart. Whatever you do you need to figure you'll only get 1 chance to do it, because you might destroy it trying to take it apart again.
One more step forward Doorgunner.
What I'm trying to say is, the lever handle's not supposed to come apart. Whatever you do you need to figure you'll only get 1 chance to do it, because you might destroy it trying to take it apart again.
One more step forward Doorgunner.