
Headlight Reinforcement Rivets
 09-30-2013, 06:45 PM
#1
Race Director

Thread Starter
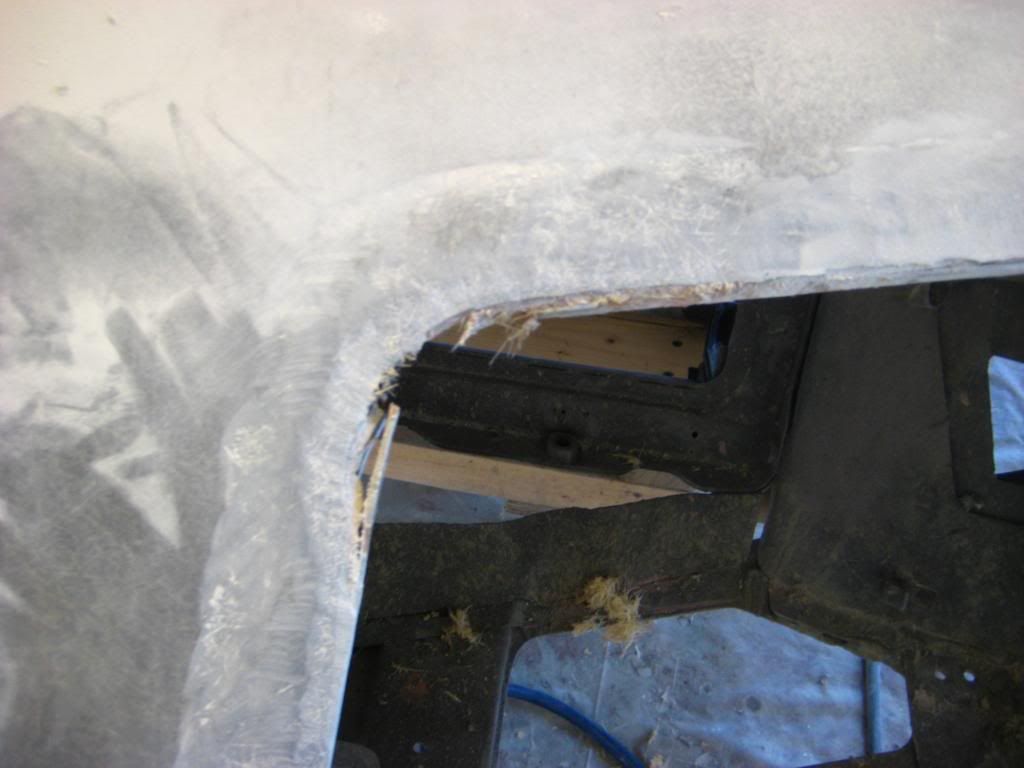
With my car down to bare fiberglass should I drill the rivets out then adhere the headlight reinforcement bracket back on or are the rivet popping the paint stories rare?
I've got some major fiberglass repair to do on the headlight openings but was hoping to not have to mess with the support area.
I saw the Wilcox article on how they did it using a special gun to apply the adhesive. Not sure how it's done without the gun.
What If I just drill the rivets out but leave the support in place? It kinda looks like it's glued in from the factory already...wasn't sure if it's strong enough to not need the rivets though.
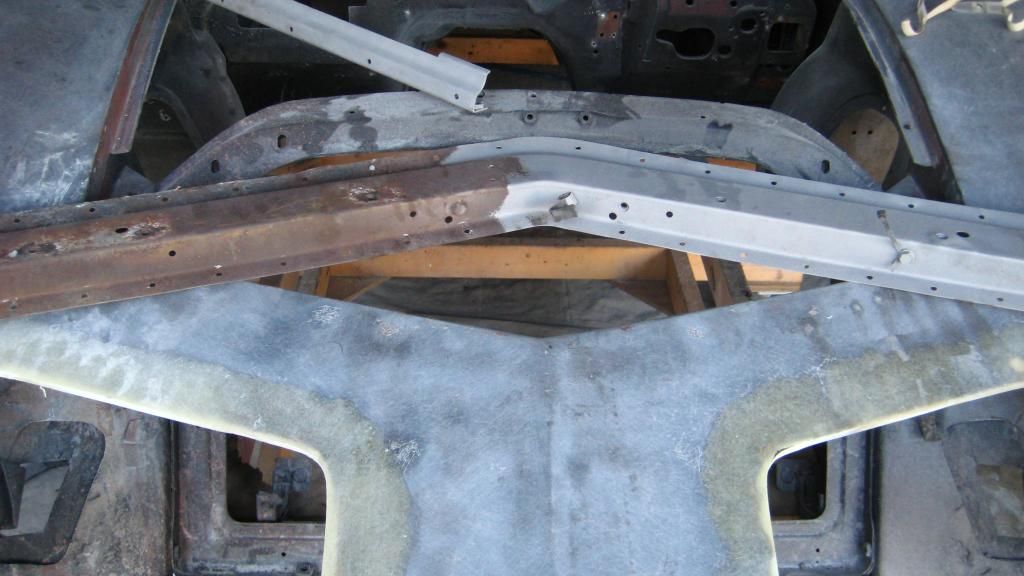
Here's a peak of the mess I have to figure out how to fix.
I've got some major fiberglass repair to do on the headlight openings but was hoping to not have to mess with the support area.
I saw the Wilcox article on how they did it using a special gun to apply the adhesive. Not sure how it's done without the gun.
What If I just drill the rivets out but leave the support in place? It kinda looks like it's glued in from the factory already...wasn't sure if it's strong enough to not need the rivets though.
Here's a peak of the mess I have to figure out how to fix.

 09-30-2013, 07:13 PM
#2
Former Vendor
Member Since: Aug 2006
Location: Jeffersonville Indiana 812-288-7103
Posts: 76,656
Received 1,813 Likes
on
1,458 Posts
St. Jude Donor '08-'09-'10-'11-'12-'13-'14-'15

I would not drill them from the top for sure..
You can remove header bar to get to them from the bottom (which I'm sure you knew). Then bond the header back in with a two part epoxy I'm sure instead of the glue that I use.
I use the glue and the gun because it mixes as you use it and the glue is phenomenal. But I'm sure you could find something else. Go to your local paint and body shop supply house and see if they have anything to offer.
Willcox
09-30-2013, 08:06 PM
#3
Safety Car


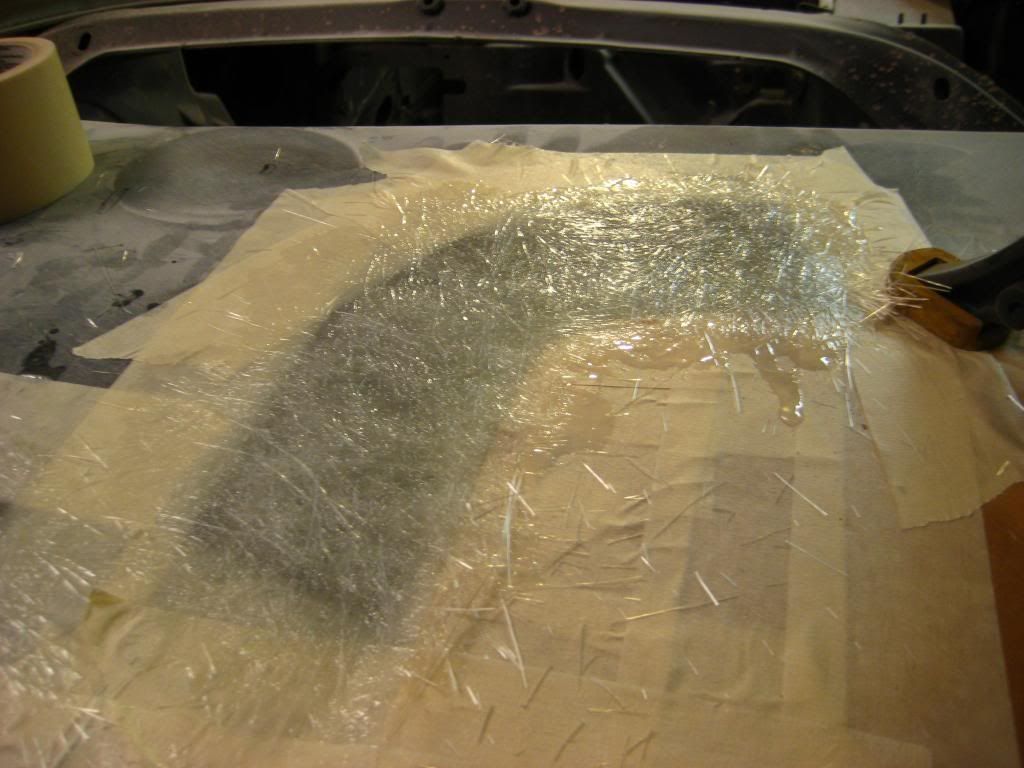
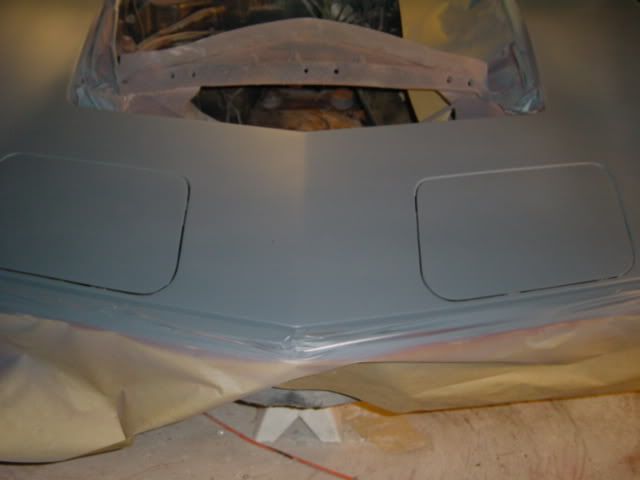
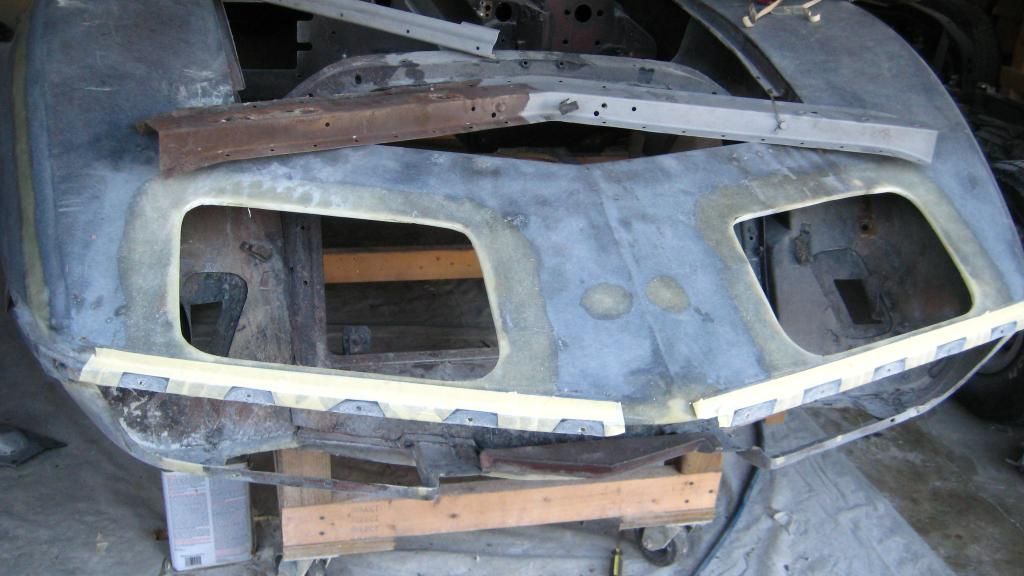
I did mine just like Willcox suggests.... from the back. First, I ground the rivets down enough for the support piece to come off. Then I dug out the rivet heads from below. Do NOT go through the top layer of fiberglass! Use extra epoxy to fill the holes when gluing the support back on.
I got a dozen clamps from Harbor Freight, and used sticks. This helped push the bumps down while clamping the support till the glue dried. As you can see from the pics, I did the nose support at the same time.
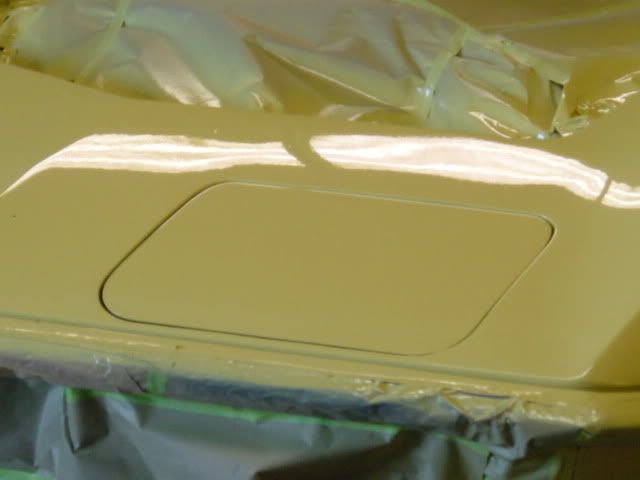
Was it worth the hassle? YES! Would I do it again if I bought another car? YES!


I got a dozen clamps from Harbor Freight, and used sticks. This helped push the bumps down while clamping the support till the glue dried. As you can see from the pics, I did the nose support at the same time.
Was it worth the hassle? YES! Would I do it again if I bought another car? YES!
09-30-2013, 09:38 PM
#4
Race Director
Thread Starter
I did mine just like Willcox suggests.... from the back. First, I ground the rivets down enough for the support piece to come off. Then I dug out the rivet heads from below. Do NOT go through the top layer of fiberglass! Use extra epoxy to fill the holes when gluing the support back on.
I got a dozen clamps from Harbor Freight, and used sticks. This helped push the bumps down while clamping the support till the glue dried. As you can see from the pics, I did the nose support at the same time.
Was it worth the hassle? YES! Would I do it again if I bought another car? YES!
I got a dozen clamps from Harbor Freight, and used sticks. This helped push the bumps down while clamping the support till the glue dried. As you can see from the pics, I did the nose support at the same time.
Was it worth the hassle? YES! Would I do it again if I bought another car? YES!
You use the same adhesive Wilcox used? with the special gun? Just curious what other product I can use that won't require a dedicated applicator I'll probably not use again for years and years.
What is involved with the nose support? Those rivets are already exposed so you wanted it glued instead?
09-30-2013, 10:08 PM
#5
Safety Car
I used a panel adhesive I got from the local auto body shop supply store. I don`t recall the number, but it was a two part 3-M product designed to bond metal to fiberglass (about $40). It was worth it to me to buy the applicator gun (about $60).
The metal headlight support was originally riveted to a strip of fiberglass, then that fiberglass strip was bonded to the front surround. The rivet heads between those two layers of fiberglass would swell up as a reaction of the aluminum to steel, causing the bumps.
When you grind them off from the bottom, the metal brace will pry off, then you can dig the heads out of the fiberglass bonding strip without going into the upper layer.
The nose support on mine was rusted in half right in the middle, that`s why I replaced that one at the same time.
Last edited by oldgto; 09-30-2013 at 10:15 PM.
10-16-2013, 12:25 PM
#6
Race Director
Thread Starter
Well I received a PM from DUB over in the paint/body section that gave me a ton of pointers on this project.
One tip he pointed out was that if I remove the rivets and the fiberglass bonding strip they were in and glue the header bar back up it'll make aligning my headlight doors a nightmare due to the angle the header bar is now at(less gap without that extra layer of fiberglass in there)
BUT
From the looks of oldgto's pictures can I just leave that old fiberglass strip in place acting as a spacer in a way and bond the bar back to it? That should put the bar in pretty much the same spot as it was before right?
I still haven't decided on what bonding material to use. Almost all threads use the 2 part ones that require the special guns. One mentioned an Ecklers product but nowhere in the description does it say metal-->fiberglass so it worries me to use that.
10-16-2013, 02:09 PM
#7
Drifting

I just did this I took out the headlight assemblies and also the radiator. I got under the car and used a carbide burr to grind off the rivets flush and then popped the header bar off with a putty knife and then finished grinding out the rivets. Leave the fiberglass strip in place and sand with coarse sand paper. Clean the header bar and paint ( I had mine powder coated) on the side that bonds to the fiberglass rough it up pretty good. Next test fit. I used Evercoat adhesive which is a 2 part but uses a standard caulking gun with special mixing tips. Make sure both surfaces are clean I used a blow gun to blow off any dust and then wiped down with lacquer thinner. I put adhesive on both pieces and then used clamps to hold it in place. I hope this helps
10-16-2013, 06:23 PM
#8
Safety Car

 10-16-2013, 07:12 PM
#9
Le Mans Master


Yes, leave the old strip on the car if its sound and also go in from the bottom, not through the outside to remove the old fastners. I used an adhesive from Lord-Fusor in the double tube gun to reattach the support. Good stuff for metal to fiberglass.
Me and a buddy of mine made this shortened keyhole saw bit and it worked out great removing the old rivets. Flat, no point on the recessed pilot.

Mine were pretty bad and the bumps were large. Use some spacers between the support and the surface of the bonding strip so you dont squeeze out all the glue you just applied when snugging up the clamps. Obviously mark everything so it goes back in the same exact position. Good luck.
Me and a buddy of mine made this shortened keyhole saw bit and it worked out great removing the old rivets. Flat, no point on the recessed pilot.
Mine were pretty bad and the bumps were large. Use some spacers between the support and the surface of the bonding strip so you dont squeeze out all the glue you just applied when snugging up the clamps. Obviously mark everything so it goes back in the same exact position. Good luck.
10-16-2013, 07:21 PM
#10
Former Vendor
Member Since: Aug 2006
Location: Jeffersonville Indiana 812-288-7103
Posts: 76,656
Received 1,813 Likes
on
1,458 Posts
St. Jude Donor '08-'09-'10-'11-'12-'13-'14-'15
Well I received a PM from DUB over in the paint/body section that gave me a ton of pointers on this project.
One tip he pointed out was that if I remove the rivets and the fiberglass bonding strip they were in and glue the header bar back up it'll make aligning my headlight doors a nightmare due to the angle the header bar is now at(less gap without that extra layer of fiberglass in there)
BUT
From the looks of oldgto's pictures can I just leave that old fiberglass strip in place acting as a spacer in a way and bond the bar back to it? That should put the bar in pretty much the same spot as it was before right?
I still haven't decided on what bonding material to use. Almost all threads use the 2 part ones that require the special guns. One mentioned an Ecklers product but nowhere in the description does it say metal-->fiberglass so it worries me to use that.
One tip he pointed out was that if I remove the rivets and the fiberglass bonding strip they were in and glue the header bar back up it'll make aligning my headlight doors a nightmare due to the angle the header bar is now at(less gap without that extra layer of fiberglass in there)
BUT
From the looks of oldgto's pictures can I just leave that old fiberglass strip in place acting as a spacer in a way and bond the bar back to it? That should put the bar in pretty much the same spot as it was before right?
I still haven't decided on what bonding material to use. Almost all threads use the 2 part ones that require the special guns. One mentioned an Ecklers product but nowhere in the description does it say metal-->fiberglass so it worries me to use that.
There are all kinds of bonding glues you can use and pick up from your local paint and supply shop, go there and ask them what they suggest.
Willcox
 10-16-2013, 09:45 PM
#11
Race Director
Thread Starter
Thanks for the info guys! My concern was that maybe the old fiberglass strip that they bonded wouldn't be very strong after 40years and when I bonded the bar back to the strip it would just fall out.
But if the strip will stay I don't think it should be that hard a job...
Unlike fixing the headlight fiberglass which I decided to tackle first!!!!!!!! I'll trade anyone this job for something they don't like.
Decided to just jump in and give it a shot. Tackling the worst section just to see if my idea on how to go about it would work...I'll find out better tomorrow!


Last edited by PUNISHER VETTE; 10-16-2013 at 09:48 PM.
10-17-2013, 05:39 AM
#12
Safety Car
10-17-2013, 06:28 AM
#13
Race Director
Thread Starter
Yes, leave the old strip on the car if its sound and also go in from the bottom, not through the outside to remove the old fastners. I used an adhesive from Lord-Fusor in the double tube gun to reattach the support. Good stuff for metal to fiberglass.
Me and a buddy of mine made this shortened keyhole saw bit and it worked out great removing the old rivets. Flat, no point on the recessed pilot.
Mine were pretty bad and the bumps were large. Use some spacers between the support and the surface of the bonding strip so you dont squeeze out all the glue you just applied when snugging up the clamps. Obviously mark everything so it goes back in the same exact position. Good luck.
10-17-2013, 09:17 AM
#14
Le Mans Master
Its 3/4 of an inch wide and 1 1/2 long. Put it in a small shallow drill. Keep up the good work. You're getting there.
Car looks great oldgto.
Car looks great oldgto.
10-17-2013, 08:02 PM
#15
Former Vendor
Member Since: Aug 2006
Location: Jeffersonville Indiana 812-288-7103
Posts: 76,656
Received 1,813 Likes
on
1,458 Posts
St. Jude Donor '08-'09-'10-'11-'12-'13-'14-'15
John... that is a great idea!
I'll have to make one of those tools for the next time..
To take this a step further, placing a plug in the hole saw for fixed penetration would eliminate the worry of going to far.
I'll have to make one of those tools for the next time..
To take this a step further, placing a plug in the hole saw for fixed penetration would eliminate the worry of going to far.
10-17-2013, 10:32 PM
#16
Race Director
This car sat in my warehouse for 35 years until we got around to repair it and that was the major issue that developed from the aluminum rivets and the metal header
ed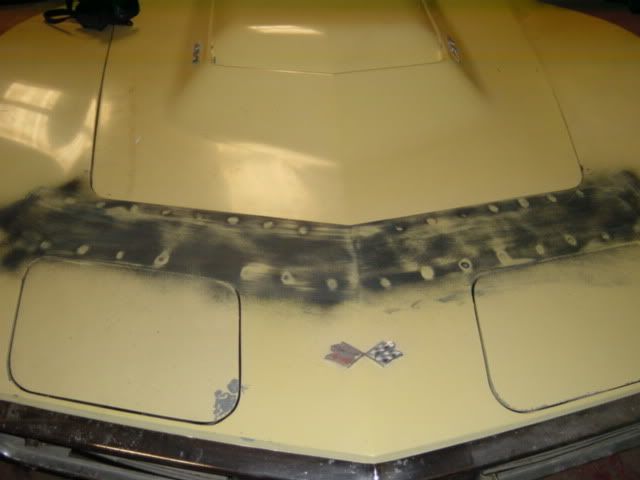
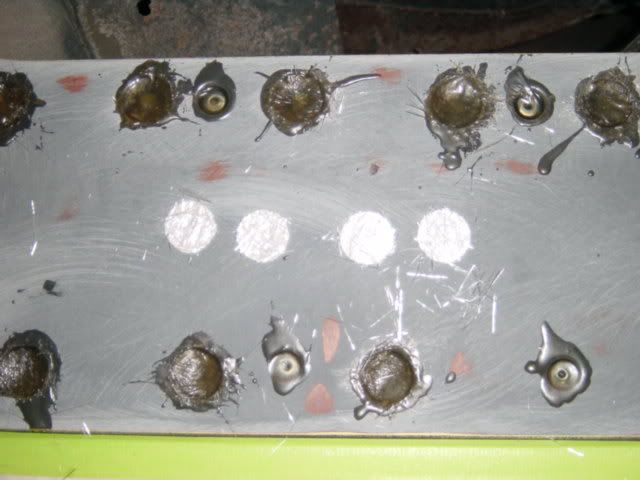
If you don't get the rivets completely out, the bumps will come back....they must be clearly removed...and we didn`t remove the header...cut them out with a holesaw and then reglassed the holes

ed


If you don't get the rivets completely out, the bumps will come back....they must be clearly removed...and we didn`t remove the header...cut them out with a holesaw and then reglassed the holes
Last edited by Ironcross; 10-17-2013 at 10:55 PM.
07-27-2014, 06:27 PM
#17
Race Director
Thread Starter
well it's been almost a year since I asked about this topic but I'm just now getting around to fixing it.
air hammer made short work of the rivets and popped the two reinforcements out fairly easy.
Sand blasted and power coated both... despite nobody ever seeing them again.
I'll be fiberglassing the old rivet holes back shut on the front..for no reason other than I felt like it.
The hole saw trick is working okay... I'm having a hard time keeping the hole saw centered over the rivet... without a bit in the middle it wants to walk all over the place.
And I ordered some West Systems 610 adhesive...which should be good stuff, cheapish($25) and will use a normal caulk gun. Plus about $50 worth of clamps at HF... which will probably work for this project and break by the time it's over.
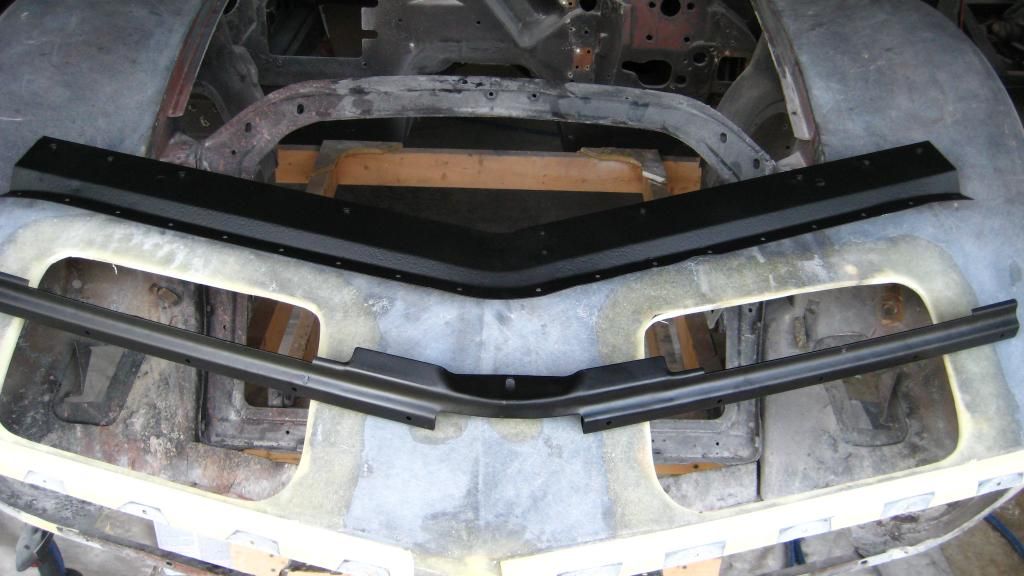
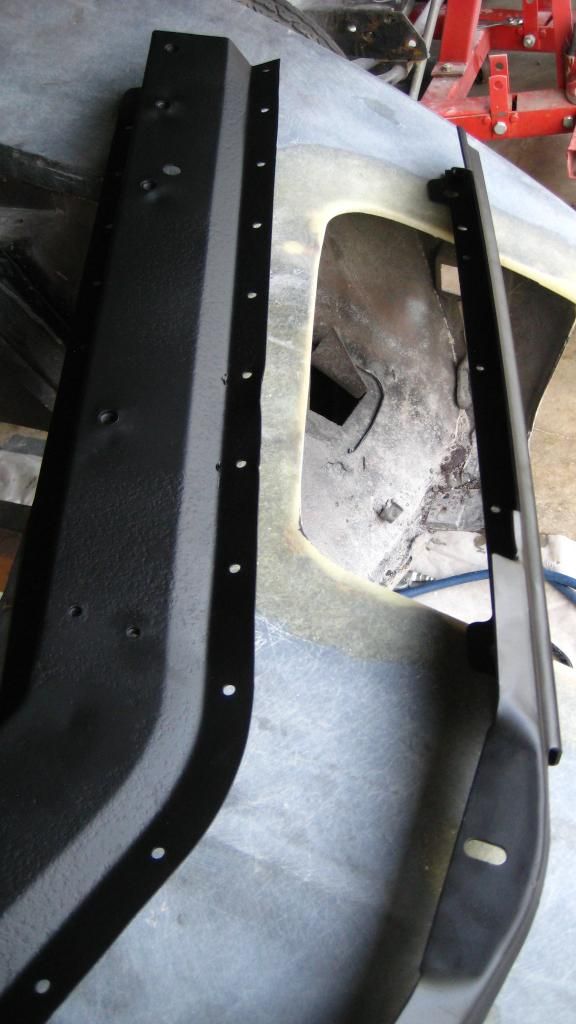
I'm amazed at how much this reinforcement adds structure to the front of the car... without it the whole nose is very weak.
08-26-2014, 09:15 AM
#18
Pro


Looks great. Where did you get the replacement rivets?
Thanks,
Nelson007
Thanks,
Nelson007
I did mine just like Willcox suggests.... from the back. First, I ground the rivets down enough for the support piece to come off. Then I dug out the rivet heads from below. Do NOT go through the top layer of fiberglass! Use extra epoxy to fill the holes when gluing the support back on.
I got a dozen clamps from Harbor Freight, and used sticks. This helped push the bumps down while clamping the support till the glue dried. As you can see from the pics, I did the nose support at the same time.
Was it worth the hassle? YES! Would I do it again if I bought another car? YES!
I got a dozen clamps from Harbor Freight, and used sticks. This helped push the bumps down while clamping the support till the glue dried. As you can see from the pics, I did the nose support at the same time.
Was it worth the hassle? YES! Would I do it again if I bought another car? YES!
08-30-2014, 03:57 AM
#19
Old Fart Pilot
There were NO replacement rivets. The metal header bar is glued back in after the old rivets are removed. If the rivets are replaced, the notorious bumps will come back...
08-30-2014, 06:44 AM
#20
Safety Car
Last edited by oldgto; 08-30-2014 at 06:47 AM.