
Fiberglass repair technique.
 02-23-2014, 08:09 PM
#1
Melting Slicks

Thread Starter

I've been thinking of doing something of a tutorial for those who have never worked with fiberglass before. My background, I've been involved 1 way or another for about 40 yrs working with glass. I've built glass laminated bows, repaired my own fiberglass boats, have done many glass laminated repairs on aircraft fairings, and all of my own corvette body repairs.
It's not hard to do but does require a few tools and repair materials. I have learned a few things over the yrs. My most memorable lesson was taught to me by a fellow aircraft mech some 30+ yrs ago.
I had then recently been hired as an A&P mech fresh out of school by Connie Kalitta who drag races and owns an air cargo outfit. I was asked by the director of maintenance who had recently crashed his midget racer if I could fix his race car body fairing. Sure, no problem. I found the repair materials and went at it. The next day, Louis a senior mech, a French Canadian, and a damn talented sheet metal mech called to me. Hey Kevin, did you do this? Pointing at the repair I had done. Yes. Well if any one ever asks if you know anything about fiberglass, you tell them f*ck no!
Louis then proceeded to teach me what he knew. I ended up doing many fiberglass repairs under his watchful eyes the few yrs I worked there.
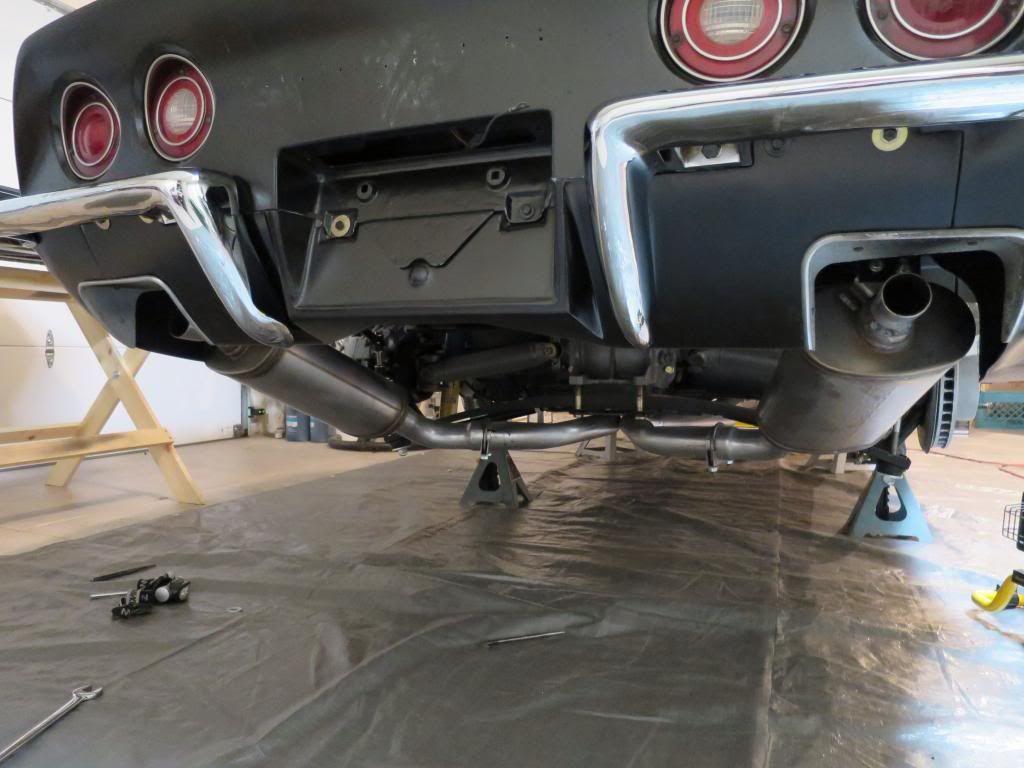
So here is a repair I performed recently on my rear exhaust panel.
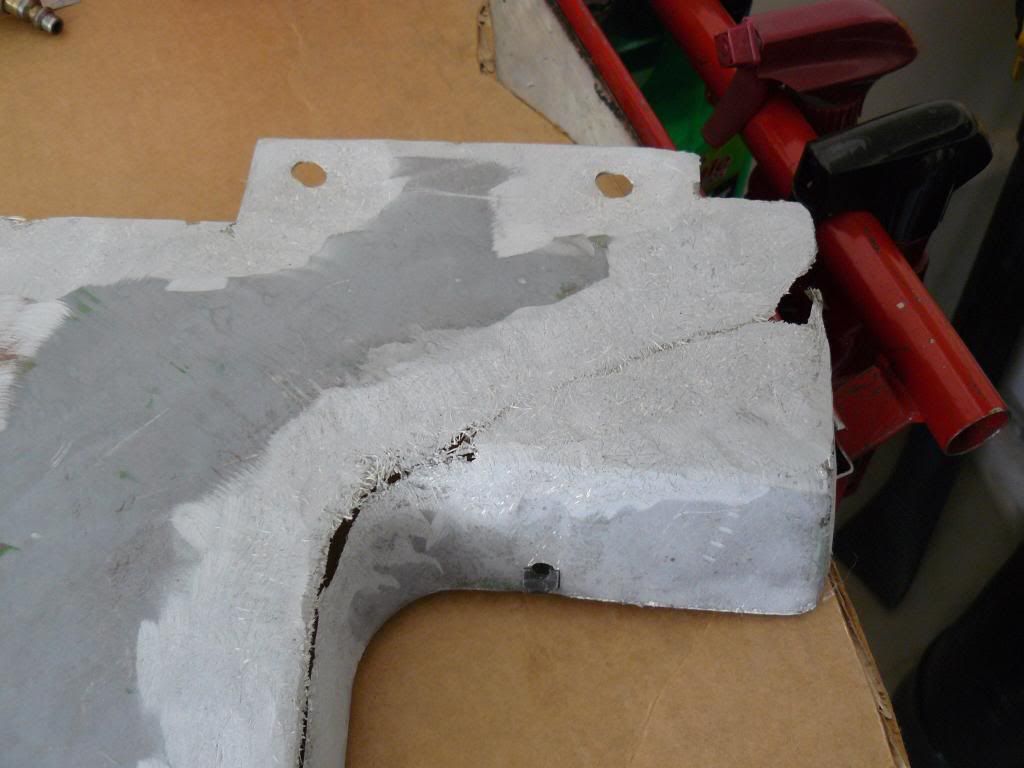
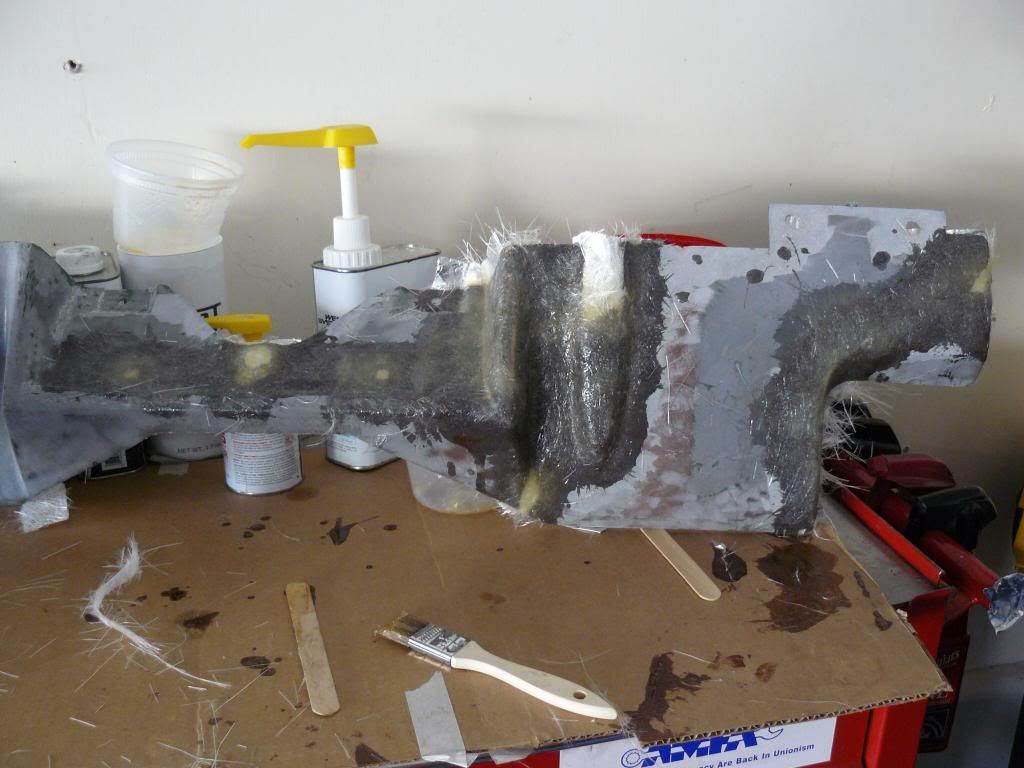
As you can see it was cracked badly. These are just a few of the areas, basically the whole panel should have just been scrapped. But I had the materials on hand, and a new panel is $250. I'm up for a challenge, and a cheap basturd by nature, so let's do it.
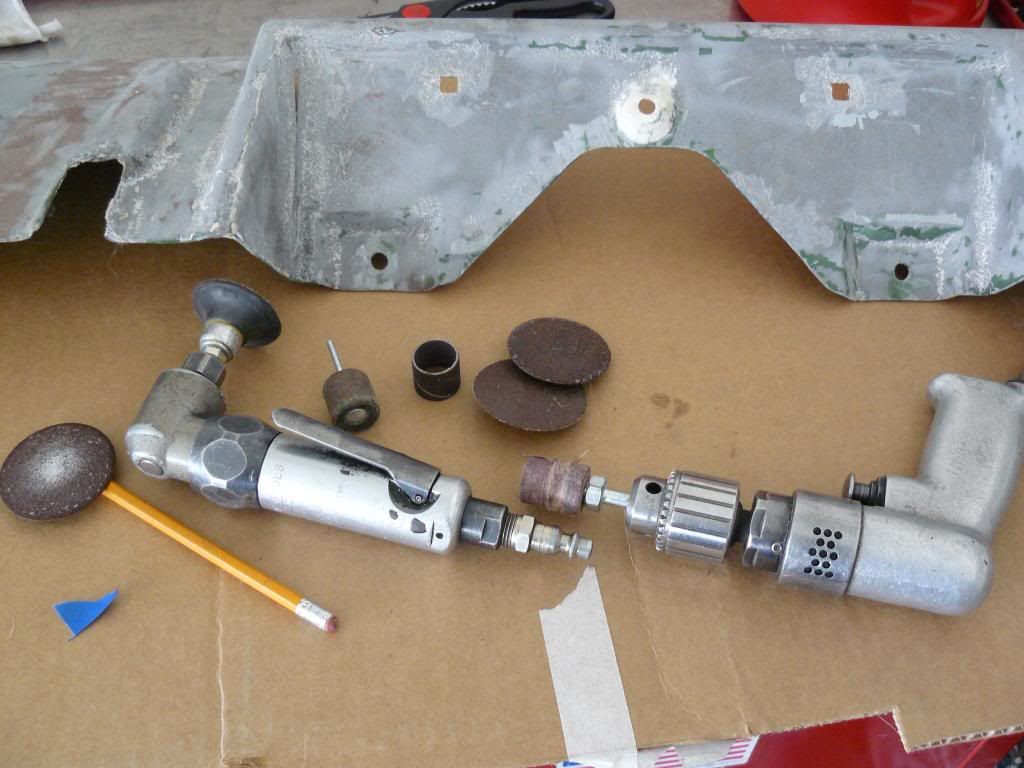
We need tools. These are a few of my heavy hitters, plus some carbide dies I have not shown.
Next we need materials. I like this stuff.
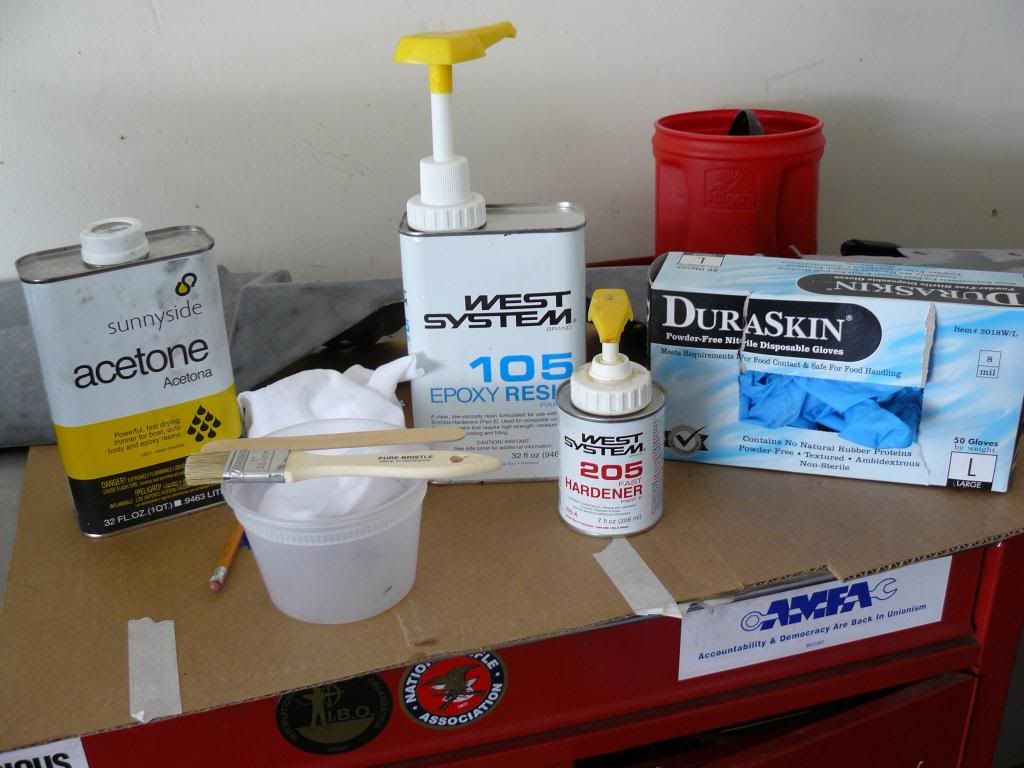
And my do all double secret speed tape.

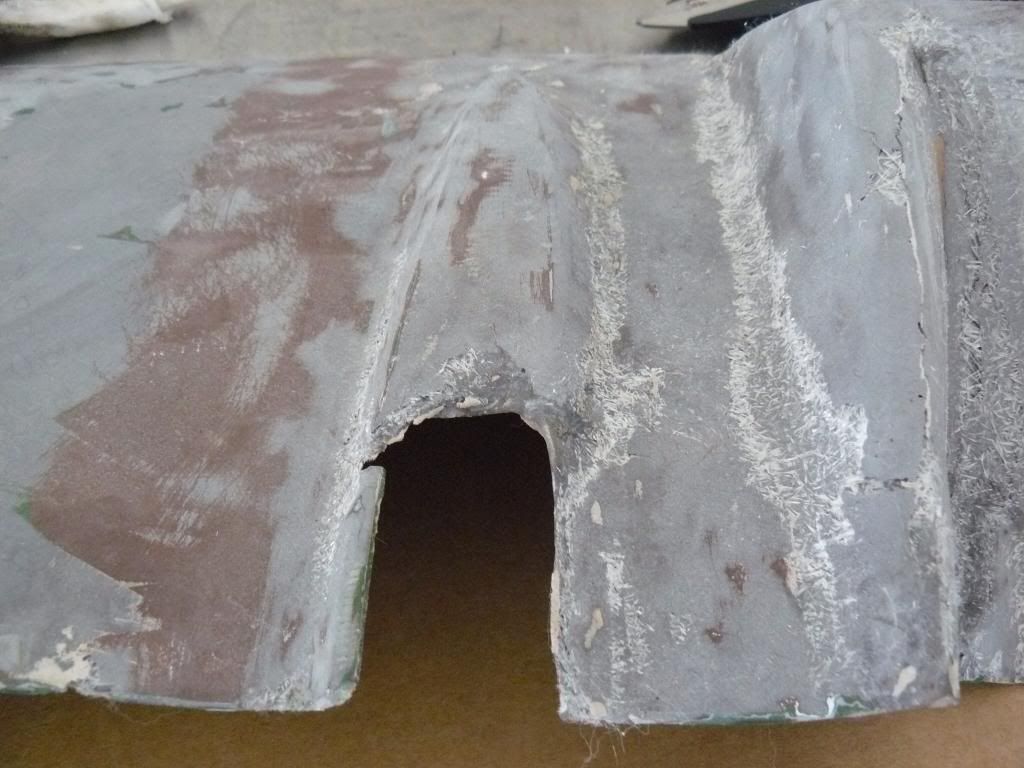
I try and access the back side and do my repair on it first. I clean the area with acetone thoroughly and get rid of broken damage. You need to taper or feather the edges back, I usually go an inch or more. Another lesson I learned over the yrs, a hole is a hole no matter what size. It just means your repair is bigger. In this case, I needed to replicate the contour of the panel so I started most of the repairs on the outside.
Here I have added my speed tape as a backer. Both front and back sides of the da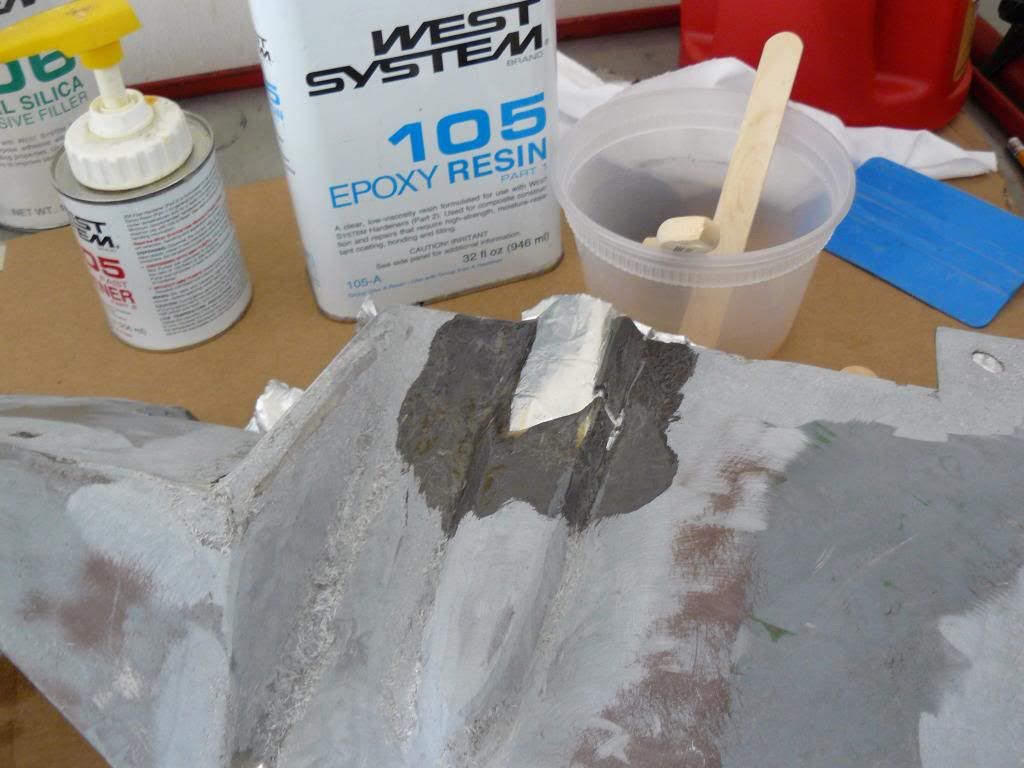 maged area have been tapered back.
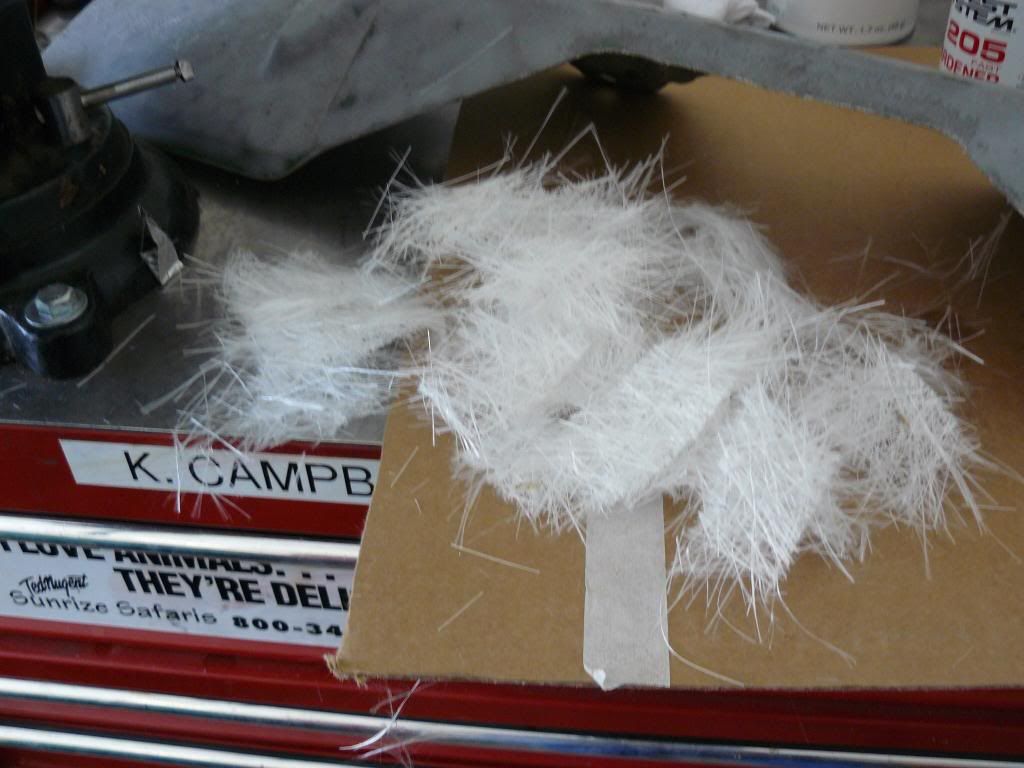
Here I have fiberglass mat cut into strips then torn and ready to use. I learned this tip on our forum by another member, torn pieces blend together nicely. See you can teach an old dog new tricks.
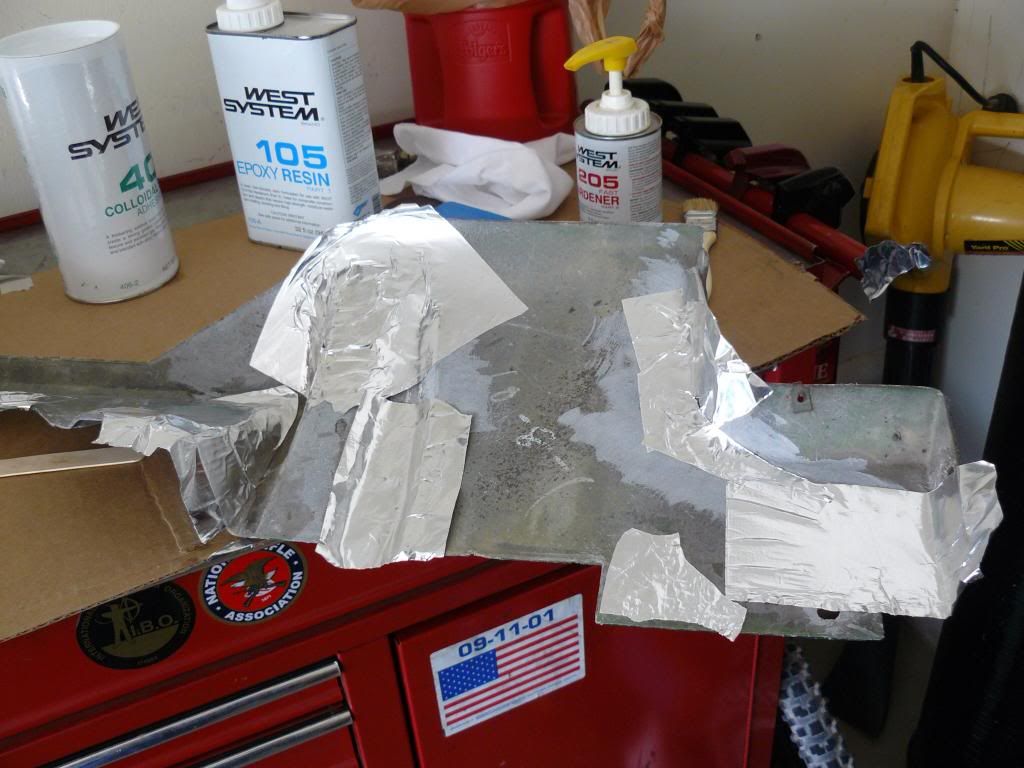
Here I have mixed my resin, only mix what you can use. Too much resin and hardener hits faster and you will waste a lot of resin. Most jobs 1 pump of each resin and hardener at a time works.
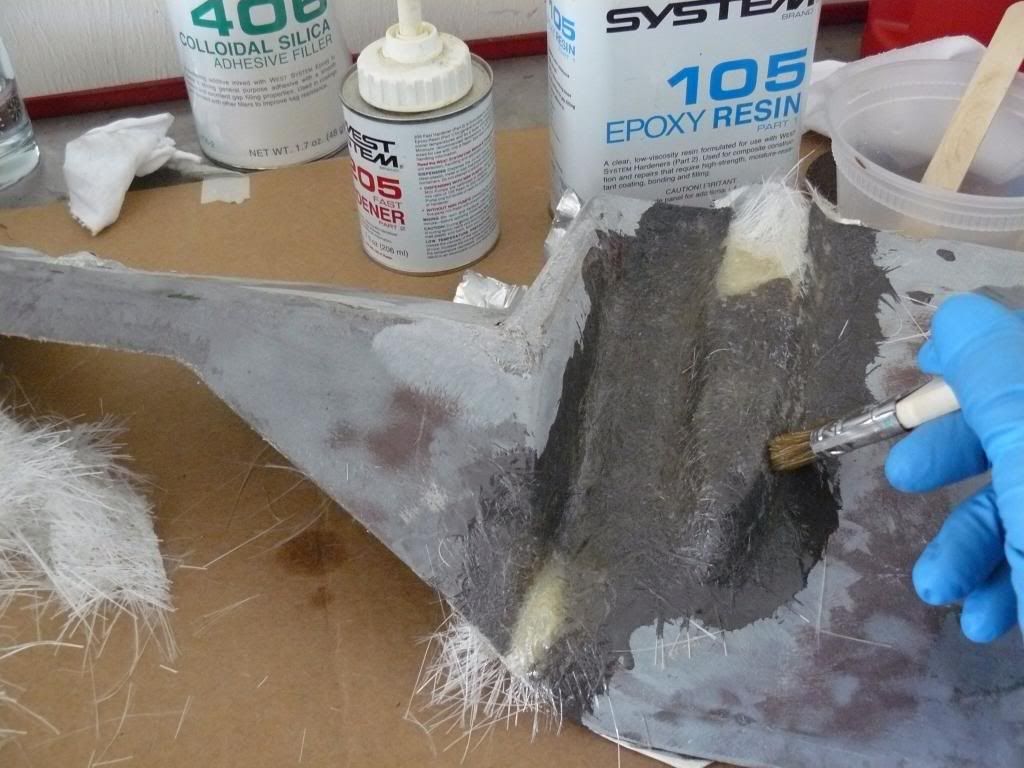
I paint or "wet" the surrounding repair area with the resin mixture. A trick I started doing, take a sheet of wax paper, pour a little resin on it. Lay a few pieces of mat into it and thoroughly saturate the pieces. Pick them up with your brush, and apply them in layers. I usually do 3 layers. Note the cut down paint brush. It works a lot better than with full length bristles. Also it helps at dabbing out air pockets, and removing excess resin. The resin is wicked into the brush and you can wipe it off back into your mixing cup.
Here is a pic of the backside of 1 of the areas. It has hardened up and ready for the front side repair.
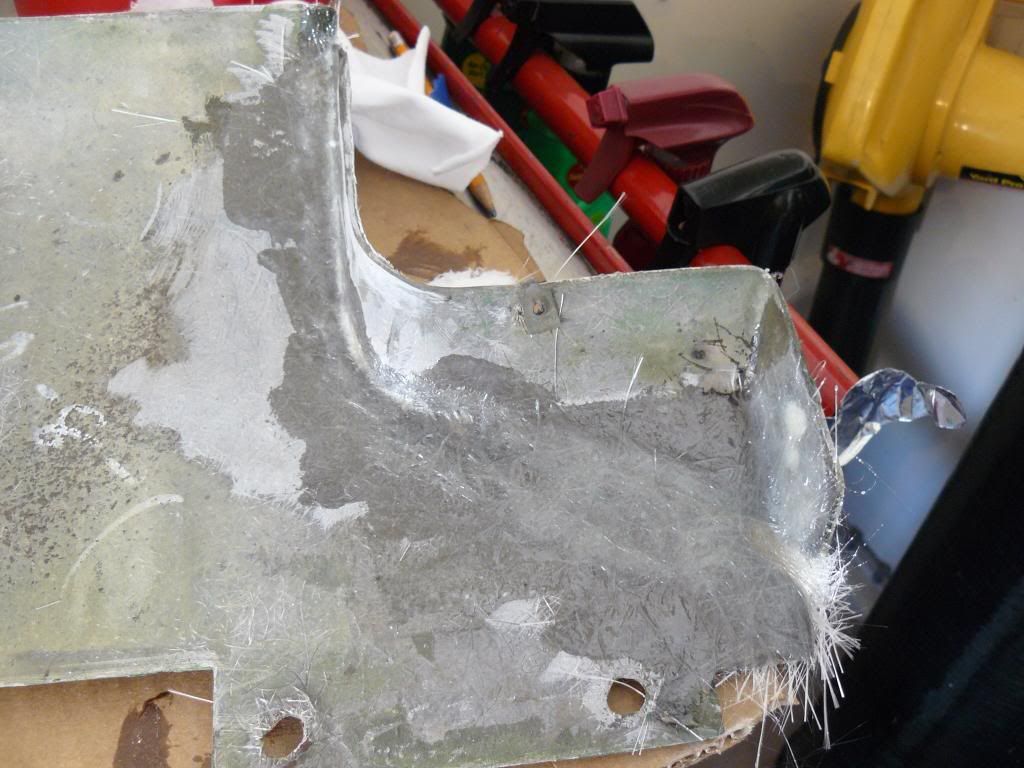
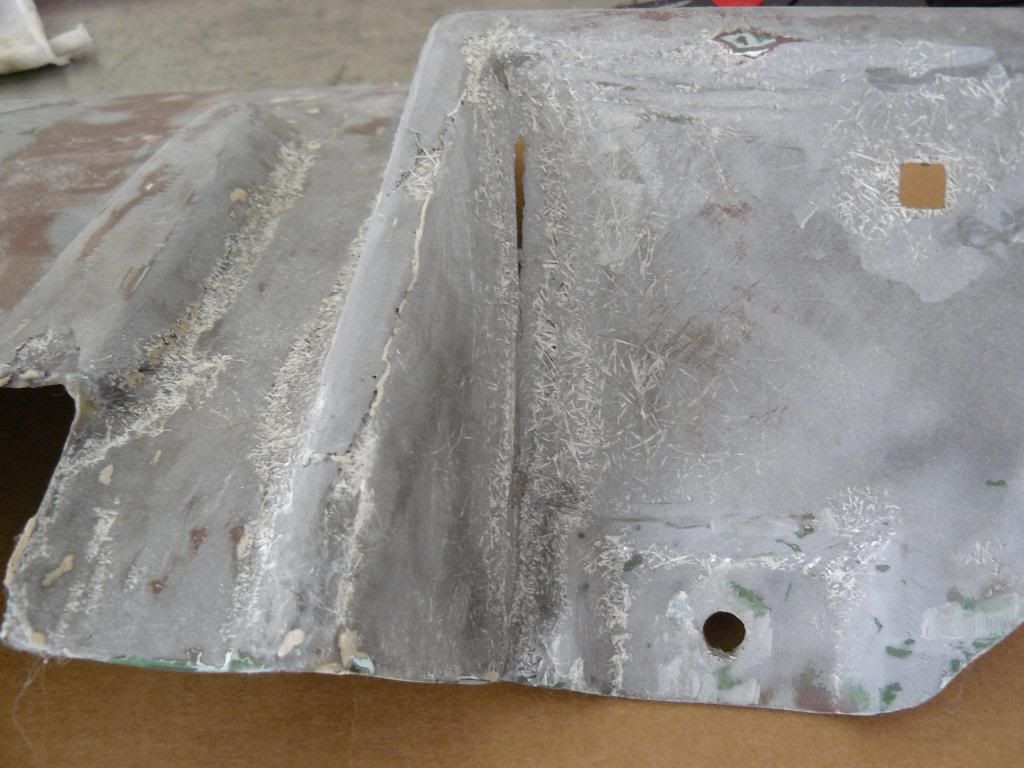
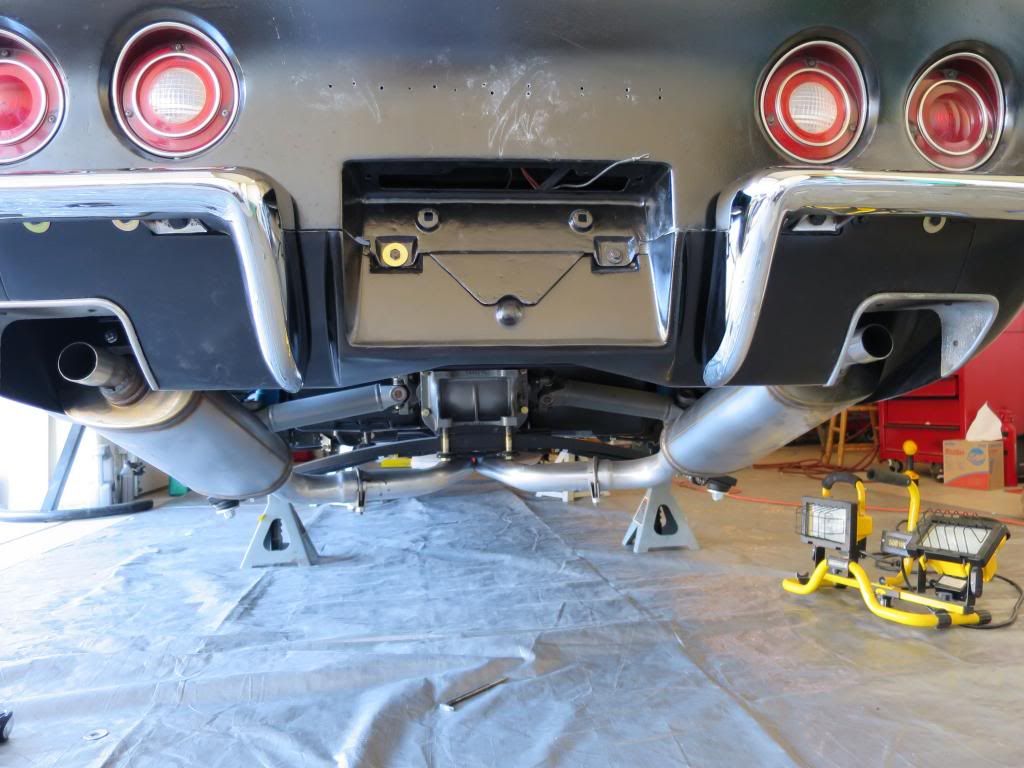
Here I am in the process of repairing the outside of the panel. With all the dips and curves of this panel it was a series of repairs. Sand and grind, add more repair as needed using the same techniques. Note: hardened resin creates a waxy film called amine blush. If hardened over 24 hrs you must sand this film off before applying more resin. Very important.
Once I completed all of my repairs, ground off excess, sanded to contour and smooth, I had a little filler work to do. For this I used evercoat vette panel and bonding adhesive. This was used much like bondo. A very thin skim coat to fill any imperfections. I do NOT use it in lieu of a solid glass repair.
More to come
It's not hard to do but does require a few tools and repair materials. I have learned a few things over the yrs. My most memorable lesson was taught to me by a fellow aircraft mech some 30+ yrs ago.
I had then recently been hired as an A&P mech fresh out of school by Connie Kalitta who drag races and owns an air cargo outfit. I was asked by the director of maintenance who had recently crashed his midget racer if I could fix his race car body fairing. Sure, no problem. I found the repair materials and went at it. The next day, Louis a senior mech, a French Canadian, and a damn talented sheet metal mech called to me. Hey Kevin, did you do this? Pointing at the repair I had done. Yes. Well if any one ever asks if you know anything about fiberglass, you tell them f*ck no!
Louis then proceeded to teach me what he knew. I ended up doing many fiberglass repairs under his watchful eyes the few yrs I worked there.
So here is a repair I performed recently on my rear exhaust panel.
As you can see it was cracked badly. These are just a few of the areas, basically the whole panel should have just been scrapped. But I had the materials on hand, and a new panel is $250. I'm up for a challenge, and a cheap basturd by nature, so let's do it.
We need tools. These are a few of my heavy hitters, plus some carbide dies I have not shown.
Next we need materials. I like this stuff.
And my do all double secret speed tape.
I try and access the back side and do my repair on it first. I clean the area with acetone thoroughly and get rid of broken damage. You need to taper or feather the edges back, I usually go an inch or more. Another lesson I learned over the yrs, a hole is a hole no matter what size. It just means your repair is bigger. In this case, I needed to replicate the contour of the panel so I started most of the repairs on the outside.
Here I have added my speed tape as a backer. Both front and back sides of the da
maged area have been tapered back. Here I have fiberglass mat cut into strips then torn and ready to use. I learned this tip on our forum by another member, torn pieces blend together nicely. See you can teach an old dog new tricks.
Here I have mixed my resin, only mix what you can use. Too much resin and hardener hits faster and you will waste a lot of resin. Most jobs 1 pump of each resin and hardener at a time works.
I paint or "wet" the surrounding repair area with the resin mixture. A trick I started doing, take a sheet of wax paper, pour a little resin on it. Lay a few pieces of mat into it and thoroughly saturate the pieces. Pick them up with your brush, and apply them in layers. I usually do 3 layers. Note the cut down paint brush. It works a lot better than with full length bristles. Also it helps at dabbing out air pockets, and removing excess resin. The resin is wicked into the brush and you can wipe it off back into your mixing cup.
Here is a pic of the backside of 1 of the areas. It has hardened up and ready for the front side repair.
Here I am in the process of repairing the outside of the panel. With all the dips and curves of this panel it was a series of repairs. Sand and grind, add more repair as needed using the same techniques. Note: hardened resin creates a waxy film called amine blush. If hardened over 24 hrs you must sand this film off before applying more resin. Very important.
Once I completed all of my repairs, ground off excess, sanded to contour and smooth, I had a little filler work to do. For this I used evercoat vette panel and bonding adhesive. This was used much like bondo. A very thin skim coat to fill any imperfections. I do NOT use it in lieu of a solid glass repair.
More to come
Last edited by Sunstroked; 02-23-2014 at 09:24 PM.
 02-23-2014, 08:35 PM
#2
Melting Slicks
Thread Starter
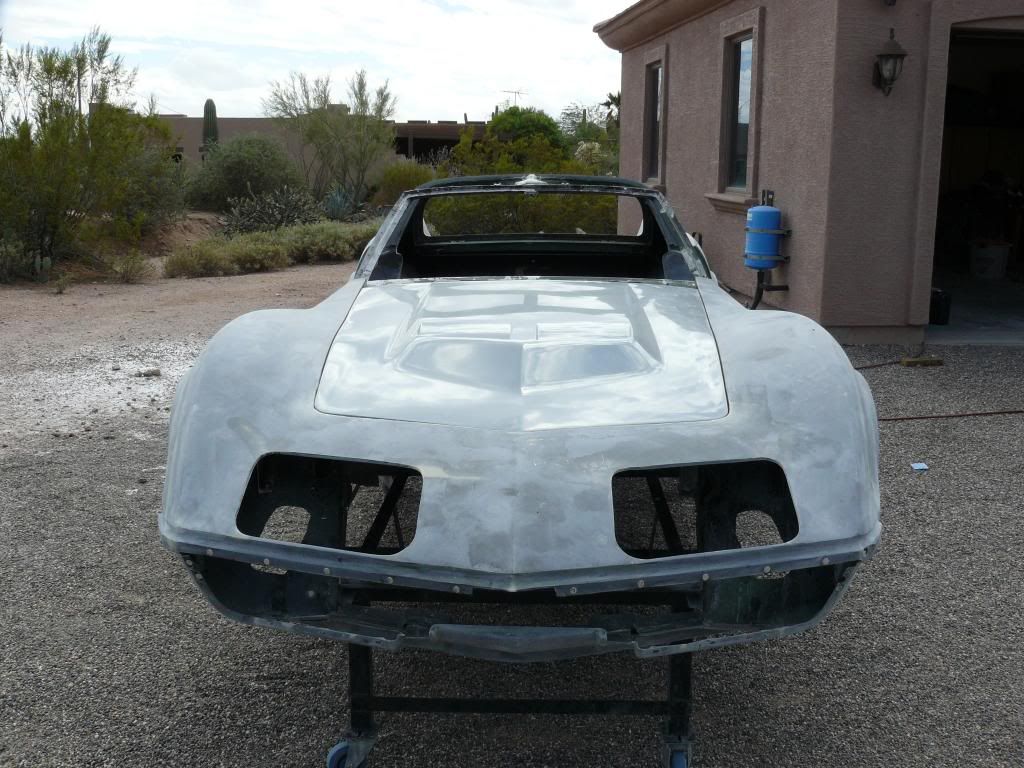
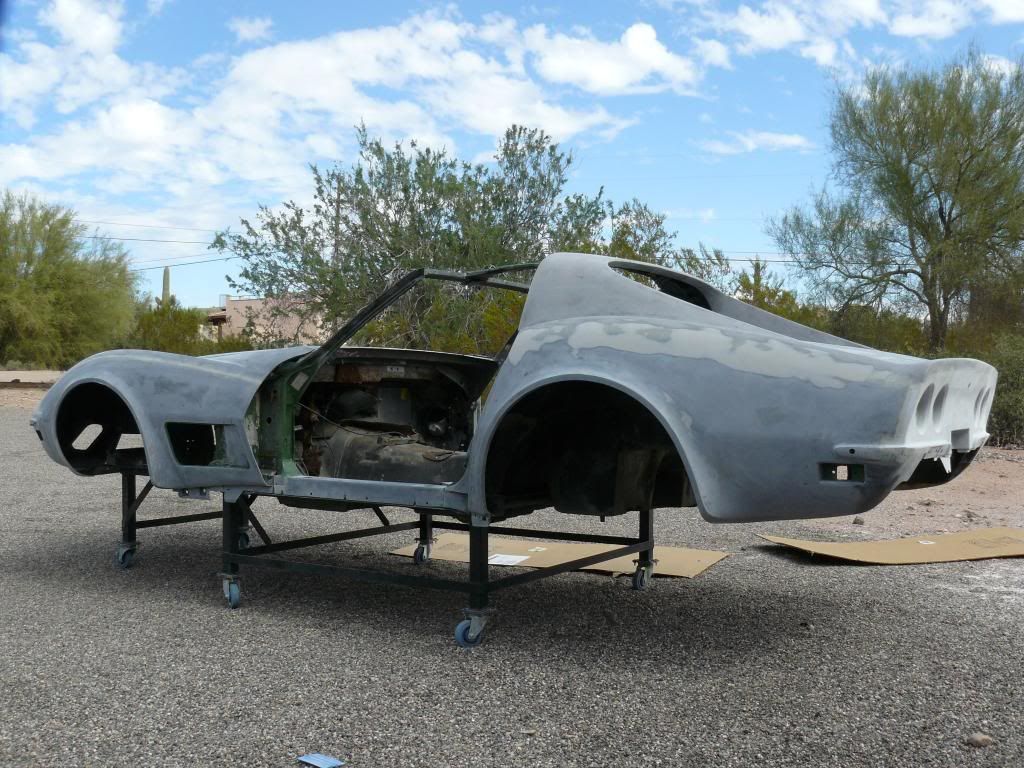
Here I want show how these same techniques can be applied to the whole car
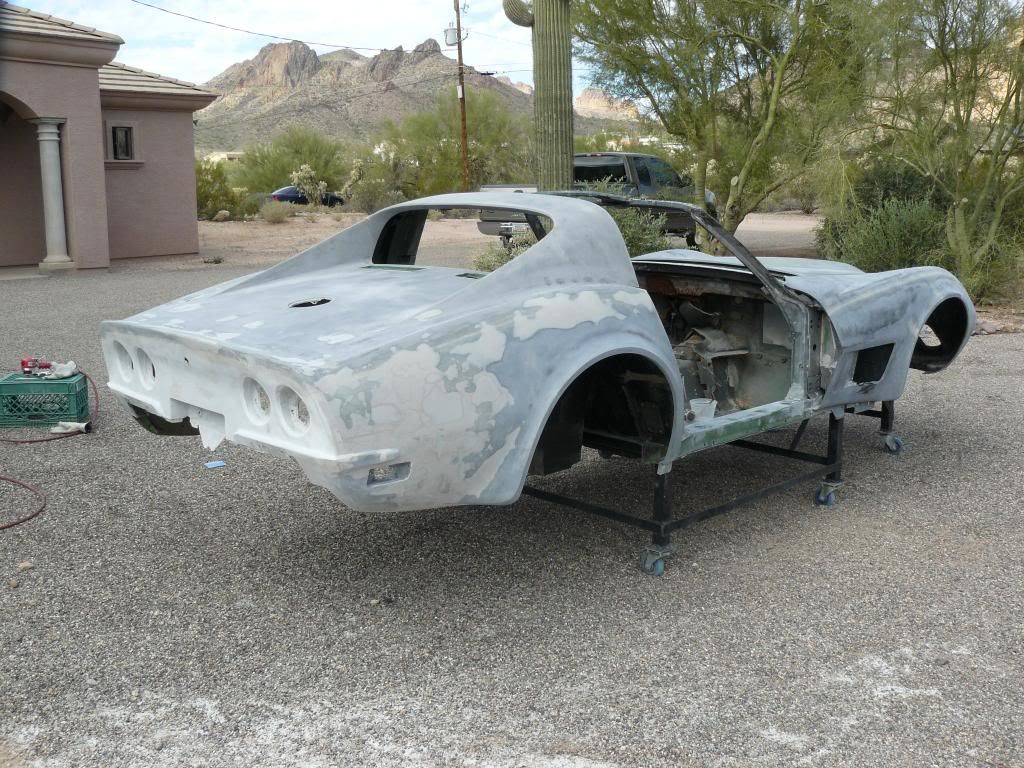
As you can see, there is a lot going on with this body. Much more than I ever dreamed was there. The car had been hit front and rear at some point. The right rear quarter was really screwed up. I removed all old repairs and redid every part of this car. The whole lower quarter was rebuilt using these same techniques.
The whole nose was rebuilt too. I removed all bonded metal supports, performed repairs underneath first then topside. I then bonded the structure back into place.
Same goes for the rear panel. What a mess it was. I salvaged it by removing someone's idea of body work. Repairing the glass correctly and bonding the tail light panel back into place.
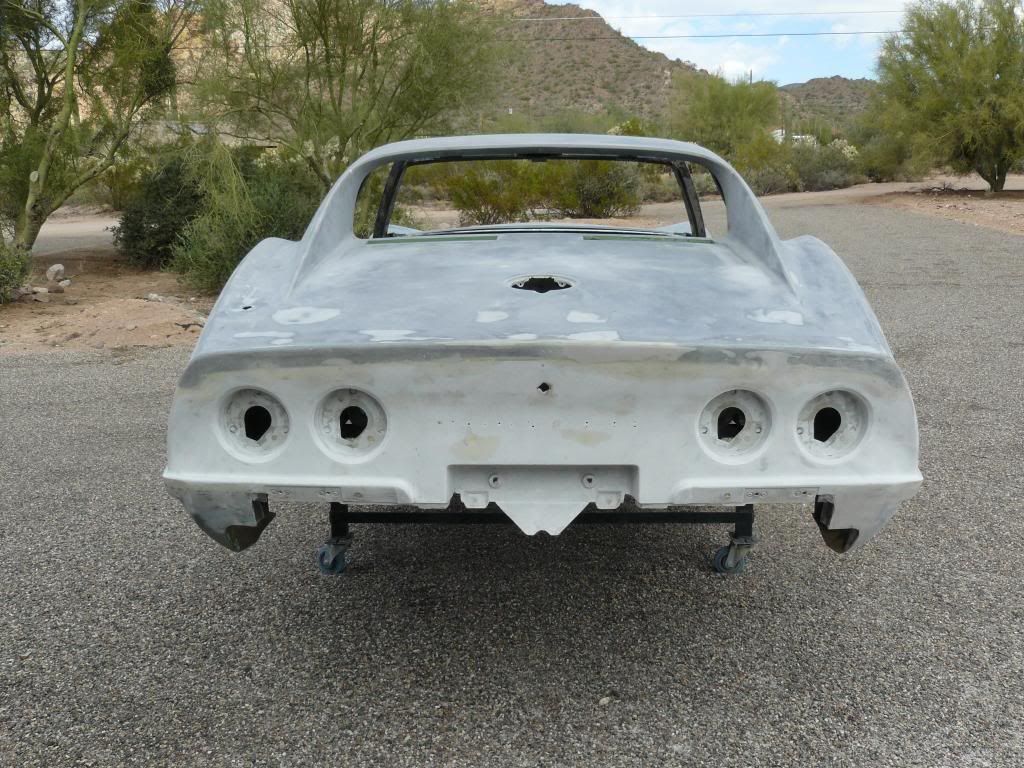
I also took the time to grind out all the factory seams and glass them in. It's a mod worth doing. It eliminates that stripe that eventually shows thru a corvette paint job. And no matter what some say, I have no use for a luggage rack so I removed it and repaired the holes both top side and underneath using glass mat and epoxy resin. Not shown in this picture is the lack of an alarm hole, which I did glass in. Yup I think it looks stupid. So I took it out.
As you can see, there is a lot going on with this body. Much more than I ever dreamed was there. The car had been hit front and rear at some point. The right rear quarter was really screwed up. I removed all old repairs and redid every part of this car. The whole lower quarter was rebuilt using these same techniques.
The whole nose was rebuilt too. I removed all bonded metal supports, performed repairs underneath first then topside. I then bonded the structure back into place.
Same goes for the rear panel. What a mess it was. I salvaged it by removing someone's idea of body work. Repairing the glass correctly and bonding the tail light panel back into place.
I also took the time to grind out all the factory seams and glass them in. It's a mod worth doing. It eliminates that stripe that eventually shows thru a corvette paint job. And no matter what some say, I have no use for a luggage rack so I removed it and repaired the holes both top side and underneath using glass mat and epoxy resin. Not shown in this picture is the lack of an alarm hole, which I did glass in. Yup I think it looks stupid. So I took it out.
Last edited by Sunstroked; 02-23-2014 at 08:49 PM.
02-23-2014, 08:42 PM
#3
Melting Slicks
Thread Starter
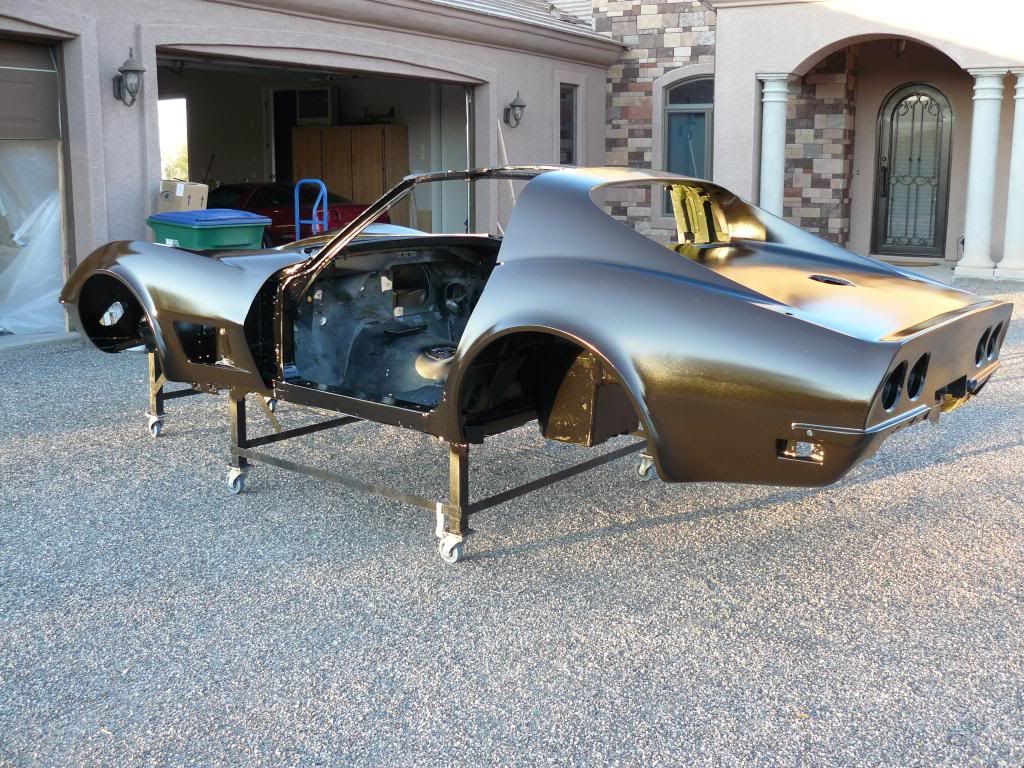
Here is the car in black epoxy primer. I painted it black so I could visualize the car in its final color coat. Yup, screw the green. Black it will be.
Before. Note: I'm still working on the front end so you see no filler in the front fender seams. Again it is used just as a skim coat to smooth and fill any minor imperfections.
After.
Before. Note: I'm still working on the front end so you see no filler in the front fender seams. Again it is used just as a skim coat to smooth and fill any minor imperfections.
After.
Last edited by Sunstroked; 02-23-2014 at 09:14 PM.
 02-23-2014, 08:57 PM
#5
Melting Slicks
Thread Starter
I'll post more pictures of how my exhaust filler panel turned out. I think the results will clearly show what a little, correction, make that a lot of time and effort can produce.Yeah, I had a bunch of hours into it but so what. It keeps me busy.
For the record I had 4 months of solid body work into the body itself. Probably 30 hrs into that filler panel.
I'm in the fitting stage of everything. Over the next few days I'll wrap it up, remove all bumpers and trim installed and begin block sanding the car for paint. Lots to do but you can see the results of the effort. And I saved $250!
Last edited by Sunstroked; 02-24-2014 at 03:01 AM.
02-23-2014, 11:37 PM
#7
Melting Slicks


I've been thinking of doing something of a tutorial for those who have never worked with fiberglass before. My background, I've been involved 1 way or another for about 40 yrs working with glass. I've built glass laminated bows, repaired my own fiberglass boats, have done many glass laminated repairs on aircraft fairings, and all of my own corvette body repairs.
It's not hard to do but does require a few tools and repair materials. I have learned a few things over the yrs. My most memorable lesson was taught to me by a fellow aircraft mech some 30+ yrs ago.
I had then recently been hired as an A&P mech fresh out of school by Connie Kalitta who drag races and owns an air cargo outfit. I was asked by the director of maintenance who had recently crashed his midget racer if I could fix his race car body fairing. Sure, no problem. I found the repair materials and went at it. The next day, Louis a senior mech, a French Canadian, and a damn talented sheet metal mech called to me. Hey Kevin, did you do this? Pointing at the repair I had done. Yes. Well if any one ever asks if you know anything about fiberglass, you tell them f*ck no!
Louis then proceeded to teach me what he knew. I ended up doing many fiberglass repairs under his watchful eyes the few yrs I worked there.
So here is a repair I performed recently on my rear exhaust panel.
As you can see it was cracked badly. These are just a few of the areas, basically the whole panel should have just been scrapped. But I had the materials on hand, and a new panel is $250. I'm up for a challenge, and a cheap basturd by nature, so let's do it.
We need tools. These are a few of my heavy hitters, plus some carbide dies I have not shown.
Next we need materials. I like this stuff.
And my do all double secret speed tape.
I try and access the back side and do my repair on it first. I clean the area with acetone thoroughly and get rid of broken damage. You need to taper or feather the edges back, I usually go an inch or more. Another lesson I learned over the yrs, a hole is a hole no matter what size. It just means your repair is bigger. In this case, I needed to replicate the contour of the panel so I started most of the repairs on the outside.
Here I have added my speed tape as a backer. Both front and back sides of the damaged area have been tapered back.
Here I have fiberglass mat cut into strips then torn and ready to use. I learned this tip on our forum by another member, torn pieces blend together nicely. See you can teach an old dog new tricks.
Here I have mixed my resin, only mix what you can use. Too much resin and hardener hits faster and you will waste a lot of resin. Most jobs 1 pump of each resin and hardener at a time works.
I paint or "wet" the surrounding repair area with the resin mixture. A trick I started doing, take a sheet of wax paper, pour a little resin on it. Lay a few pieces of mat into it and thoroughly saturate the pieces. Pick them up with your brush, and apply them in layers. I usually do 3 layers. Note the cut down paint brush. It works a lot better than with full length bristles. Also it helps at dabbing out air pockets, and removing excess resin. The resin is wicked into the brush and you can wipe it off back into your mixing cup.
Here is a pic of the backside of 1 of the areas. It has hardened up and ready for the front side repair.
Here I am in the process of repairing the outside of the panel. With all the dips and curves of this panel it was a series of repairs. Sand and grind, add more repair as needed using the same techniques. Note: hardened resin creates a waxy film called amine blush. If hardened over 24 hrs you must sand this film off before applying more resin. Very important.
Once I completed all of my repairs, ground off excess, sanded to contour and smooth, I had a little filler work to do. For this I used evercoat vette panel and bonding adhesive. This was used much like bondo. A very thin skim coat to fill any imperfections. I do NOT use it in lieu of a solid glass repair.
More to come
It's not hard to do but does require a few tools and repair materials. I have learned a few things over the yrs. My most memorable lesson was taught to me by a fellow aircraft mech some 30+ yrs ago.
I had then recently been hired as an A&P mech fresh out of school by Connie Kalitta who drag races and owns an air cargo outfit. I was asked by the director of maintenance who had recently crashed his midget racer if I could fix his race car body fairing. Sure, no problem. I found the repair materials and went at it. The next day, Louis a senior mech, a French Canadian, and a damn talented sheet metal mech called to me. Hey Kevin, did you do this? Pointing at the repair I had done. Yes. Well if any one ever asks if you know anything about fiberglass, you tell them f*ck no!
Louis then proceeded to teach me what he knew. I ended up doing many fiberglass repairs under his watchful eyes the few yrs I worked there.
So here is a repair I performed recently on my rear exhaust panel.
As you can see it was cracked badly. These are just a few of the areas, basically the whole panel should have just been scrapped. But I had the materials on hand, and a new panel is $250. I'm up for a challenge, and a cheap basturd by nature, so let's do it.
We need tools. These are a few of my heavy hitters, plus some carbide dies I have not shown.
Next we need materials. I like this stuff.
And my do all double secret speed tape.
I try and access the back side and do my repair on it first. I clean the area with acetone thoroughly and get rid of broken damage. You need to taper or feather the edges back, I usually go an inch or more. Another lesson I learned over the yrs, a hole is a hole no matter what size. It just means your repair is bigger. In this case, I needed to replicate the contour of the panel so I started most of the repairs on the outside.
Here I have added my speed tape as a backer. Both front and back sides of the da
maged area have been tapered back. Here I have fiberglass mat cut into strips then torn and ready to use. I learned this tip on our forum by another member, torn pieces blend together nicely. See you can teach an old dog new tricks.
Here I have mixed my resin, only mix what you can use. Too much resin and hardener hits faster and you will waste a lot of resin. Most jobs 1 pump of each resin and hardener at a time works.
I paint or "wet" the surrounding repair area with the resin mixture. A trick I started doing, take a sheet of wax paper, pour a little resin on it. Lay a few pieces of mat into it and thoroughly saturate the pieces. Pick them up with your brush, and apply them in layers. I usually do 3 layers. Note the cut down paint brush. It works a lot better than with full length bristles. Also it helps at dabbing out air pockets, and removing excess resin. The resin is wicked into the brush and you can wipe it off back into your mixing cup.
Here is a pic of the backside of 1 of the areas. It has hardened up and ready for the front side repair.
Here I am in the process of repairing the outside of the panel. With all the dips and curves of this panel it was a series of repairs. Sand and grind, add more repair as needed using the same techniques. Note: hardened resin creates a waxy film called amine blush. If hardened over 24 hrs you must sand this film off before applying more resin. Very important.
Once I completed all of my repairs, ground off excess, sanded to contour and smooth, I had a little filler work to do. For this I used evercoat vette panel and bonding adhesive. This was used much like bondo. A very thin skim coat to fill any imperfections. I do NOT use it in lieu of a solid glass repair.
More to come
Bill

Last edited by 1974ta; 02-23-2014 at 11:38 PM. Reason: subscribe
02-24-2014, 12:19 AM
#8
Race Director

Concerning the amine blush:
The proper way to remove it is to use warm water, a harsh soap and a scotch brite pad.
Just sanding can force the blush further into the glass and not remove it.
Chemicals such as acetone also don't remove it.
It is always not visible, but more visible with higher moisture content (usually when cured at lower temps)
It can play hell with some single part primers and paints migrating thru the surface and possibly lifting from the surface. It can also prevent some coats from curing fully.
Another reason to use 2 part primers.
02-24-2014, 02:55 AM
#9
Melting Slicks
Thread Starter
Good primer and pics.
Concerning the amine blush:
The proper way to remove it is to use warm water, a harsh soap and a scotch brite pad.
Just sanding can force the blush further into the glass and not remove it.
Chemicals such as acetone also don't remove it.
It is always not visible, but more visible with higher moisture content (usually when cured at lower temps)
It can play hell with some single part primers and paints migrating thru the surface and possibly lifting from the surface. It can also prevent some coats from curing fully.
Another reason to use 2 part primers.
Heres a shot of what I use. I cut a large sheet of scotch brite into smaller pieces. I have a little dawn dish detergent mixed with water in the spray bottle, and this is the filler I like. I bought 1 gallon, I/2 of it is still in the can, the rest is mostly on the ground after sanding. Try and m
 ake the glass and resin the primary repair material.
Last edited by Sunstroked; 02-24-2014 at 11:42 AM.
02-24-2014, 11:06 AM
#11
Melting Slicks
Thread Starter


 02-25-2014, 12:30 AM
#13
Le Mans Master

02-25-2014, 12:40 AM
#14

So I gotta ask 2 questions, neither related to the fine work you are doing...
1. Is that gravel in your driveway or a special asphalt? I see those little casters and wonder how you move the car.
2. I see the state tree of AZ - the cactus. You down here?
again - nice work!
1. Is that gravel in your driveway or a special asphalt? I see those little casters and wonder how you move the car.
2. I see the state tree of AZ - the cactus. You down here?
again - nice work!
02-25-2014, 06:45 AM
#15
Race Director
eg. the powder from a laser printers toner cartridge.

Some lumber yards or concrete suppliers will have a powder called "lampblack". Messy stuff, but best.
Or you can also go with an oil based tinter from a paint store.
Or you can get dyes marketed specifically for epoxy from granite supply places like Gran Quartz. A local granite fabricator would also probably sell you a tube.
02-25-2014, 04:52 PM
#16
Melting Slicks
Got mine at West Marine.
Yes you mix with the resin. You need very very little. It will not affect the resin in such tiny quantities.
Bill
Last edited by 1974ta; 02-25-2014 at 04:54 PM. Reason: add
02-25-2014, 11:23 PM
#17
Melting Slicks
Thread Starter
So I gotta ask 2 questions, neither related to the fine work you are doing...
1. Is that gravel in your driveway or a special asphalt? I see those little casters and wonder how you move the car.
2. I see the state tree of AZ - the cactus. You down here?
again - nice work!
1. Is that gravel in your driveway or a special asphalt? I see those little casters and wonder how you move the car.
2. I see the state tree of AZ - the cactus. You down here?
again - nice work!
It's called a chip seal driveway, they spray a coat of asphalt and then apply the rocks. Many roads are built that way but the stones are brushed off. I liked them left on.
Last edited by Sunstroked; 02-25-2014 at 11:26 PM.
02-25-2014, 11:43 PM
#18
Melting Slicks
Thread Starter
02-26-2014, 02:42 AM
#19
Le Mans Master
Next trip to LV I'll give you a shout. There are a couple of guys out there that I've met on other Corvette forums. I saw a sticker on your toolbox that said bowling shoe airlines too. I played that one for 5 years.