
1971 Corvette Maintenance Schedule (long read)
 04-06-2014, 09:48 PM
#1
Race Director

Thread Starter
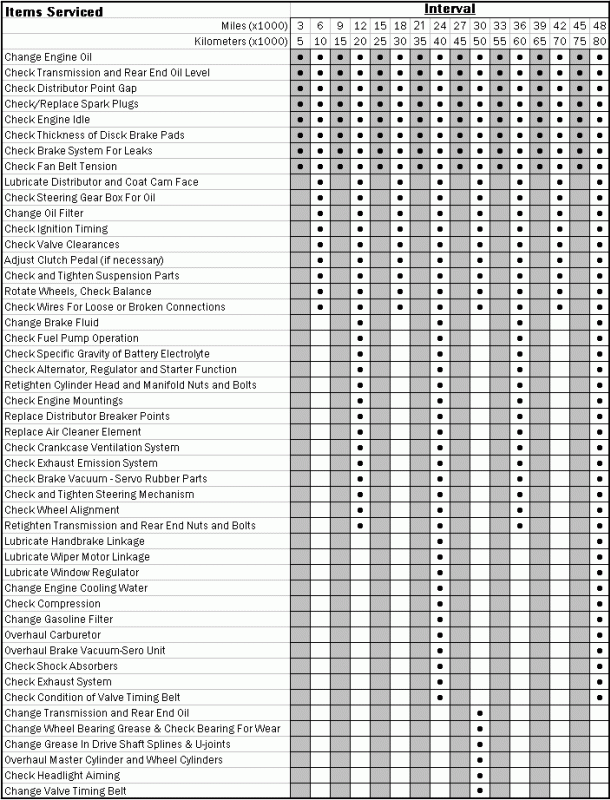
Additional Maintenance and Lubrication
In addition to the items listed above, it is also recommended that the following items are inspected every 300 miles or 2 weeks, whichever comes first:
Check Tire Pressure
Check Battery Water Level
Check Oil Level In Engine
Compression Test
Remove air cleaner and block throttle and choke in wide open position. Hook up starter remote control cable and insert compression gauge firmly in spark plug port. Whenever the engine is cranked remotely at the starter, with a jumper cable or other means, the distributor primary lead must be disconnected from the negative post on the coil and the ignition switch must be in the "ON" position. Failure to do this will result in a damaged grounding circuit in the ignition switch.
Crank engine through at least four compression strokes to obtain highest possible reading. Check and record compression of each cylinder. If one or more cylinders reads low or uneven, inject about a tablespoon of engine oil on top of pistons in low reading cylinders (through spark plug port.) Crank engine several times and recheck compression. If compression comes up but does not necessarily reach normal, rings are worn. If compression does not improve, valves are burnt, sticking or not sealing properly. If two adjacent cylinders indicate low compression, the cause may be a head gasket leak between the cylinders. Engine coolant and/or oil in cylinders could result from this defect.
Carburetor Adjustments:
The adjustments described apply to all carburetors used, except as noted. All adjustments are made with the engine at normal operating temperature.
Idle Speed (1971)
The 1971 models use a Combined Emission Control Valve (C.E.C.) to adjust idle speed and adjust ignition according to demand.
Disconnect the vacuum hose at the distributor and plug, remove gas tank cap, and be sure A/C is off. Manually extend C.E.C. valve plunger to contact the throttle level at the limit of its travel. Adjust plunger length to obtain specified rpm. Adjust idle mixture screw as previously described, if necessary.
Idle Speed and Mixture - Holley 2300
All adjustments are same as previously described except as follows: On models equipped with idle stop solenoid, adjust idle stop solenoid screw to give 1000 rpm, then adjust idle mixture adjusting screw to specified rpm. Turn idle mixture screw in (leaner mixture) until engine speed drops 20 rpm, then turn out 1/4 turn. Disconnect lead at idle stop solenoid (throttle level will rest against regular stopscrew.) Adjust this stopscrew for idle speed of 500 rpm. Do not change setting of idle stop solenoid stopscrew or idle mixture screw.
Fast Idle (1966-1976)
With the transmission in neutral, position the cam follower on the high step (2nd step, 1971-1972) of the fast idle cam. Adjust fast idle screw of Rochester carburetors to obtain recommended fast idle speed. Bend fast idle lever on Holleys. On 1970-72 models, disconnect transmission controlled spark solenoid.
Dashpot Adjustment
With slow idle speed correctly adjusted, fully open choke and make sure fast idle cam follower is off steps of cam. With dashpot fully compressed, adjust for 1/16" clearance between dashpot plunger and throttle lever.
Automatic Choke
Remove the air cleaner and check to see that choke valve and rod more freely. Disconnect choke rod at choke lever. Check choke adjustment by holding choke valve closed and position rod so that it contacts stop. If necessary, adjust rod length by bending rod at offset. Bend must be such that rod enters choke lever hole freely and squarely. Connect rod at choke lever and install air cleaner.
Air Injection Reactor (A.I.R.)
Description and Operation
The A.I.R. system is used to burn the unburned portion of the exhaust gases to reduce its hydrocarbon and carbon monoxide content. The system forces compressed air into the exhaust manifold where it mixes with the hot exhaust gases. The hot exhaust gases contain unburned particles that complete their combustion when the addition air is supplied.
The system consists of: An air pump, diverter valve, check valve(s), AIR pipe assemblies and connecting hoses and fittings. Carburetors and distributors for AIR engines are made to be used with the system and should not be replaced with components intended for use with engines that do not have the system.
The air pump is a two-vane pump which compresses fresh filtered air and injects it into the exhaust manifold. The pump consists of: a housing, centrifugal filter, set of vanes that rotate about the centerline of pump housing bore, the rotor, and the seals for the vanes. The centrifugal filter is replaced by first removing the drive belt and pump pulley; then pulling filter off with pliers. Care should be taken to prevent fragments from entering the air intake hole. NOTE: A new filter may squeal when first put into operation. Additionally, GREAT CARE should be taken in working on the compressor as the aluminum used is quite soft and thin. The air pump is operating satisfactorily when the air flow from it increases as engine speed increases.
The air hoses should be replaced only with hoses which are designed for AIR system use, as no other type hoses can withstand the high temperature.
Check and Adjust Dwell
Start engine then check ignition dwell. With engine running at idle, raise the adjustment screw window and insert an Allen wrench in the socket of the adjusting screw. Turn the adjusting screw as required until a dwell reading of thirty degrees is obtained. A two degree variation is allowable for wear. Close access cover fully to prevent the entry of dirt into the distributor. If a dwell meter is not available, turn adjusting screw clockwise until engine starts to misfire, then turn screw one-half turn in the opposite direction to complete adjustment.
Slowly accelerate engine to 1500 rpm and note dwell reading. Return engine to idle and note dwell reading. If dwell variation exceeds specifications, check for worn distributor shaft, worn distributor shaft bushing or loose breaker plate.
Ignition System
Remove distributor cap, clean cap and inspect for cracks, carbon tracks and burned or corroded terminals. Replace cap where necessary. Clean rotor and inspect for damage or deterioration. Replace rotor where necessary. Replace brittle, oil soaked or damaged spark plug wires. Install all wires to proper spark plug. Proper positioning of spark plug wires in supports is important to prevent cross-firing. Tighten all ignition system connections. Replace or repair any wires that are frayed, loose or damaged.
Ignition Timing
Disconnect the distributor spark advance hose and plug the vacuum source opening. Start engine and run at idle speed. Aim timing light at timing tab. The markings on the tabs are in two degree increments (the greatest number of markings on the "A" side of the "Q"). The "O" marking is TDC (Top Dead Center) and the BTDC settings fall on the "A" (advance) side of the "O". Adjust the timing by loosening the distributor clamp and rotating the distributor body as required, then tighten the clamp, and recheck timing. Stop engine and remove timing light and reconnect the spark advance hose.
Spark Plugs
Inspect each plug individually for badly worn electrodes, glazed, broken or blistered porcelains and replace plugs where necessary. Clean serviceable spark plugs thoroughly, using an abrasive-type cleaner such as sand blast. File the center electrode flat. Inspect each spark plug for make and heat range. All plugs must be of the same make and number. Adjust spark plug gaps to .035 in. using a round feeler gauge. If available, test plugs with a spark plug tester. Inspect spark plug hole threads and clean before installing plugs. Install spark plugs with new gaskets and torque to specifications. Connect spark plug wiring.
Transistorized Distributor (H.E.I. System)
There are no moving parts in the ignition pulse amplifier, and the distributor shaft and bushings have permanent type lubrication, therefore no periodic maintenance is required for the magnetic pulse ignition system.
Distributor (Breaker Point System)
Check the distributor centrifugal advance mechanisms by turning the distributor rotor in a clockwise direction as far as possible, then releasing the rotor to see if the springs return it to its retarded position. If the rotor does not return readily, the distributor must be disassembled and the cause of the trouble corrected.
Check to see that the vacuum spark control operates freely by turning the movable breaker plate counter-clockwise to see if the spring returns to its retarded position. Any stiffness in the operation of the spark control will affect the ignition timing. Correct any interference or binding condition noted.
Examine distributor points and clean or replace if necessary. Contact points with an overall gray color and only slight roughness or pitting need not be replaced. Dirty points should be cleaned with a clean point file. Use only a few strokes of a clean, fine-cut contact file. The file should not be used on other metals and should not be allowed to become greasy or dirty. Never use emery cloth or sandpaper to clean contact points since particles will embed and cause arcing and rapid burning of points. Do not attempt to remove all roughness nor dress the point surfaces down smooth. Merely remove scale or dirt. Clean cam lobe with cleaning solvent, and rotate cam lubricator wick end (or one-hundred-eighty degrees as applicable). Replace points that are burned or badly pitted.
Where prematurely burned or badly pitted points are encountered, the ignition system and engine should be checked to determine the cause of trouble so that it can be eliminated. Unless the condition causing point burning or pitting is corrected, new points will provide no better service than the old points.
Check point alignment then adjust distributor contact point gap to .019" (new points) or .016" (used points). Breaker arm rubbing block must be on high point of lobe during adjustment. If contact points have been in service, they should be cleaned with a point file before adjusting with a feeler gauge.
Check distributor point spring tension (contact point pressure) with a spring gauge hooked to breaker lever at the contact and pull exerted at 90 degrees to the breaker lever. The points should be closed (cam follower between lobes) and the reading taken just as the points separate. Spring tension should be 19-23 ounces. If not within limits, replace. Excessive point pressure will cause excessive wear on the points, cam and rubber block. Weak point pressure permits bouncing or chattering, resulting in arcing and burning of the points and an ignition miss at high speed.
Install rotor and distributor cap. Press all wires firmly into cap towers.
Battery and Battery Cables
The top of the battery should be clean and the battery hold-down properly tightened. Particular care should be taken to see that the top of the battery is kept clean of acid film and dirt. When cleaning batteries, wash first with a dilute ammonia based or soda solution to neutralize any acid present and then flush off with clean water. Keep vent plugs tight so that the neutralizing solution does not enter the cell. The hold-down bolts should be kept tight enough to prevent the batter from shaking around in its holder, but they should onto be tightened to the point where the battery case will be placed under a severe strain.
To ensure good contact, the battery cables should be tight on the battery posts. Oil battery terminal felt washer. If the battery posts or cable terminals are corroded, the cables should be cleaned separately with a soda solution and wire brush. After cleaning and before installing clamps, apply a thin coating of a petrolatum to the posts and cable clamps to help slow corrosion.
If the battery has remain undercharged, check for loose or defective fan belt, defective alternator, high resistance in the charging circuit, oxidized regulator contact points, or a low voltage setting. If the battery has been using too much water, the voltage output is too high.
Crankcase Ventilation
Inspect for deteriorated or plugged hoses. Inspect all hose connections. On engines with closed element air cleaners, inspect crankcase ventilation filter and replace if necessary. On engines with open element air cleaners, remove flame arrestor and wash in solvent then dry with compressed air.
Brakes
Check the brake fluid regularly, for as the brake pads wear the level will drop rapidly. It should be replenished only with the recommended fluid. Check disc brake assemblies to see if they are wet; it would indicate a leaking cylinder.
Disc brakes do not need periodic adjustments; they are self adjusting. The pads should be replaced when the friction material gets down to 1/16". This is when the groove in the center of the pad is gone. Check by removing wheel and looking directly into caliper.
Clutch Pedal Play
Check clutch action by holding pedal 1/2" from floor and move shift lever between first and reverse several times, with engine running. If shift is not smooth adjust clutch. Free play with pedal released is approx. 1-1/4" to 2" and 2" to 2-1/2" for heavy duty.
Clutch Adjustment
At clutch lever near firewall remove clutch return spring. To decrease clutch pedal free play remove clutch pedal return spring and loosen lower nut on clutch pedal rod; take up play with upper nut. Continue until proper play is obtained, then securely tighten top nut and replace spring. To increase pedal play work nuts in opposite sequence.
Accelerator Linkage
Disconnect control linkage at carburetor throttle lever. Hold carburetor throttle lever in wide position. Pull control linkage to wide open position. (On vehicles equipped with automatic transmission, pull through detent.) Adjust control linkage to freely enter hole in carburetor throttle lever. Connect control linkage at throttle lever.
Throttle Linkage Adjustment (Powerglide)
Remove air cleaner, disconnect accelerator linkage at carburetor. Disconnect accelerator return and trans. road return springs. Pull upper rod forward until transmission is through detent. Open carburetor wide open, at which point ball stud must contact end of slot in upper rod. Adjust swivel on end of rod if necessary.
Throttle Linkage Adjustment (Turbo Hydra-matic 350)
Disengage the snap lock and position the carburetor to wide open throttle. Push the snap lock downward until the top is flush with the rest of the cable.
Throttle Linkage Adjustment (Turbo Hydra-matic 400)
Pull detent switch driver to rear until hole in switch body lines up with hole in driver. Insert a 3/16" pin through hole to depth of 1/8", and loosen mounting bolts. Open throttle fully and move switch forward until lever touches accelerator lever. Tighten mounting bolt and remove pin.
EGR Valve Check
A rough idling engine may be caused by a malfunction of the valve. Check by pinching vacuum hose to carburetor with engine idling. If idling smooths out, the valve should be removed for cleaning or replacement if something appears to be broken.
Lubrication
Engine Oil
The car should be standing on level ground and the oil level checked with the dipstick. Withdraw the dipstick, wipe it with a clean rag, replace and withdraw again. The mark made by the oil on the lower end of the dipstick will indicate the oil level. If necessary, oil should be added through the filler cap. Never let the oil level fall so low that it does not show at all on the dipstick. If in doubt, it is better to have a bit too much oil than too little. Never mix oils of different brands, the additives may not be compatible.
Engine Oil Drain and Replacement
Place a pan under the oil pan drain plug and remove plug. Be sure pan is of a large enough capacity to hold the oil. Move pan under filter and remove filter by turning if counterclockwise. Clean gasket surface of cylinder block. Coat gasket of new filter with engine oil. Thread filter into adapter. Tighten securely by hand. Do not overtighten filter. Remove drop pan.
Remove drain pan. Inspect oil pan drain plug gasket and replace if broken, cracked, or distorted. Install drain plug and tighten. Fill crankcase to required level with recommended oil. Operate engine at fast idle and check for oil leakage.
Crankcase Capacities: 327 & 350 Engines - 4 quarts, 427 & 454 Engines - 5 quarts.
When changing oil filter, add one additional quart.
Transmission, Automatic
Check fluid level with engine idling, transmission in neutral and engine at normal operating temperature. Add fluid as needed to bring level to mark. Do not overfill.
Every 12,000 miles or sooner, depending on service, remove fluid from sump and add new fluid. Operate transmission and check fluid level. Every 24,000 miles the transmission sump strainer of the Turbo Hydra-Matic transmission should be replaced.
Refill Capacity: Powerglide - 2 quarts, Turbo Hydra-Matic - 7-1/2 quarts.
Transmission, Manual
Raise car on lift, clean dirt and grease from area around the filler plug. Plug is located on side of transmission case. Remove plug and place finger tip inside hole. The oil should be just about level with the bottom edge of the hole. Add oil as needed, using a plastic syringe.
Distributor
Change cam lubricator end for end at 12,000 mile intervals. Replace at 24,000 mile intervals.
Differential
With the car standing level, clean dirt and grease from area around filler plug. Remove plug and place finger tip inside hole. The oil should be just about level with the bottom edge of the hole. Add oil, with a plastic syringe, as needed.
Steering Gear
Check fluid level by removing lowest, outboard side cover retaining screw. If lubricant does not run out add enough through same hole until it does.
Power Steering
Check fluid level with engine at normal operating temperature. Bring to full mark on stick, as required.
 04-07-2014, 05:06 PM
#2
Team Owner

Member Since: Sep 2006
Location: Westminster Maryland
Posts: 30,173
Likes: 0
Received 2,878 Likes
on
2,515 Posts

Hi WB,
Does this mean that when the milage on my car reaches 48,000 sometime in the next 20 to 30 years, I should bring it to my local Chevy Store and they'll know about this list, check all those items, and do the required maintenance?
Also, how likely is it that the cost for this service will be close to what I paid for the car?
Regards,
Alan
04-07-2014, 09:08 PM
#3
Race Director
Thread Starter
Hi WB,
Does this mean that when the milage on my car reaches 48,000 sometime in the next 20 to 30 years, I should bring it to my local Chevy Store and they'll know about this list, check all those items, and do the required maintenance?
Also, how likely is it that the cost for this service will be close to what I paid for the car?
Regards,
Alan
Does this mean that when the milage on my car reaches 48,000 sometime in the next 20 to 30 years, I should bring it to my local Chevy Store and they'll know about this list, check all those items, and do the required maintenance?
Also, how likely is it that the cost for this service will be close to what I paid for the car?
Regards,
Alan

This one stuck out to me:
Distributor
Change cam lubricator end for end at 12,000 mile intervals. Replace at 24,000 mile intervals.
Really? This was done?
04-07-2014, 10:04 PM
#4
Safety Car

Member Since: Sep 1999
Location: AnyTown NJ
Posts: 4,930
Likes: 0
Received 9 Likes
on
7 Posts
St. Jude Donor '08-'09-'10-'11-'12-'13-'14-'15

Hmmm, looks like I have a lot more work to do....all I did this year was change the oil, check the timing, trans fluid & air pressure. 
04-08-2014, 09:22 AM
#5
Race Director
Thread Starter


