
Headlight adjustment


 04-21-2014, 02:11 PM
#2
Team Owner


Member Since: Jun 2000
Location: Southbound
Posts: 38,928
Likes: 0
Received 1,468 Likes
on
1,247 Posts
Cruise-In II Veteran

Adjust how? What are you wanting to do?

04-21-2014, 02:34 PM
#3
Team Owner
Member Since: Sep 2006
Location: Westminster Maryland
Posts: 30,173
Likes: 0
Received 2,878 Likes
on
2,515 Posts

Hi JT,
There is an individual stop for stop the up position and the down position.
Regards,
Alan
The adjustable bumper for the up position.
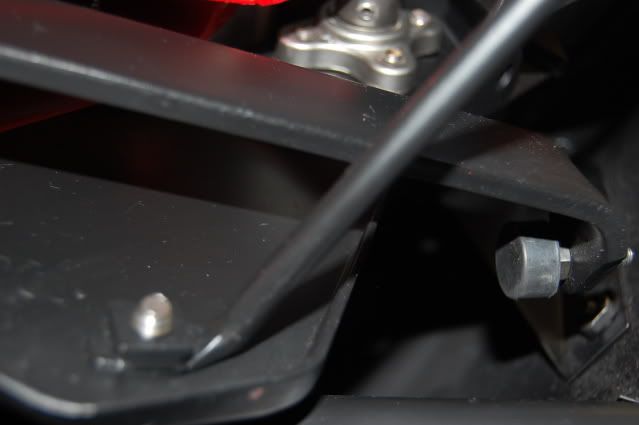
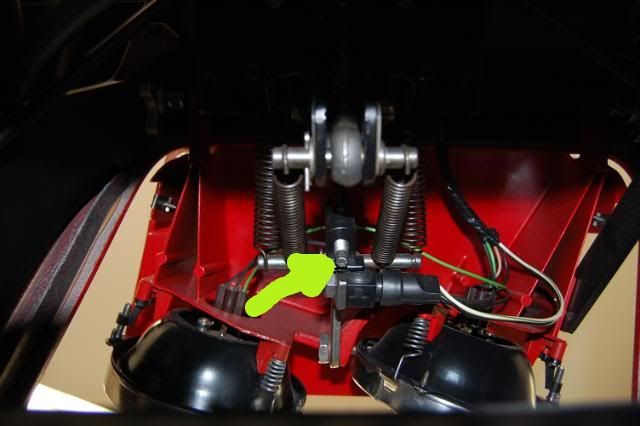
This is the adjustment for the down position.
There is an individual stop for stop the up position and the down position.
Regards,
Alan
The adjustable bumper for the up position.

This is the adjustment for the down position.
 04-21-2014, 07:33 PM
#5
Le Mans Master

Member Since: May 2003
Location: Fernandina Beach FL
Posts: 8,474
Received 3,216 Likes
on
1,729 Posts
2023 Restomod of the Year finalist
2020 C3 of the Year Winner - Modified
Here you go-
http://forums.corvetteforum.com/c3-t...alignment.html
From forum member 'Scotts76corvette'
"Sharing the fruits of my hard labor. I've seen a number of incomplete and/or erroneous posts on this subject, so I reasoned out the process and tested it on my 76. Here are the steps in the correct order. Do this with the engine not running and no vacuum in the reservoir, or you could get pinched fingers (or worse). Remove the grill (5 screws) so you can reach the mechanism from the front as well as from underneath.
1. If a new installation, center the headlight door in the opening by adjusting the pivot points and the collars (on the hinge posts) at the upper rear corners of the assembly. Hold the door in the closed position and adjust the pivot points until the corners of the door are aligned with the corners of the opening. Don't worry about the final open/closeed height at this point - just be sure the door is centered and on the same plane as the surrounding bodywork when held in the closed position. Tighten the pivot point mounting bolts and verify the alignment is still correct in the closed position.
2. Loosen the 3 bolts on the bracket in front of the vacuum actuator (NOT the ones on the vacuum actuator itself) - the ones that locate the bracket holding the linkage with the springs and the clevis (remove the clevis to get at the center bolt). To remove the clevis, first remove the 2 springs that attach to the clevis pin, then the cotter pin and the clevis pin itself. The other 2 springs can stay attached.
3. Adjust the full open height with the adjusting bolt - the one on the arm that contacts the headlight frame when full open. Out is lower, in is higher. Use a long socket extension and a universal joint to reach the adjusting bolt through the grill opening. Make the bottom of the bezel flush with the front edge of the opening.
4. Actuate the mechanism by hand so you can feel the "over center" condition when the door is fully open and the linkage fully extended forward. Move the bracket until you get a slight interference fit - the linkage gently, but firmly, "snaps" forward into the over center position when you actuate it manually. Tighten the 3 bolts loosened in step 2.
5. Adjust the clevis by turning it on its shaft until the clevis pin (the rod that goes through the clevis, and where the springs mount) is all the way to the front of the curved slot it rides in. Remove the clevis pin and turn the clevis 1 to 1 1/2 turns counterclockwise to give a slight interference fit at the end of its travel in the open position. The clevis must extend enough to push the linkage into the over center position, which is what locks the door in the open position. The interference fit ensures this locking, and prevents rattles too.
6. Last step - adjust the closed position with the small hex bolt - this is in the center of the linkage, and points down at the ground when the door is closed. The hex is small - the same size as the diameter of the bolt itself. Adjust so the front edge of the door is about 1/32" inch lower than the front edge of the opening. This will minimize wind noise and water entry.
7. Test. The door should snap into full open firmly, with a click, but not a thud. If it makes a loud thud or a bang, re-do step 4. The thud means the over center position is too tight, and this will put too much strain on the linkage, damaging it over time.
Note: It goes without saying, but just in case, you should use a good lubricant on all pivot points and moving parts in the linkage."

