
Old Fart w/ No Experience '71 Resto
 09-04-2014, 01:36 PM
#41
Old Fart Pilot

Thread Starter
 09-04-2014, 01:37 PM
#42
Team Owner


You are doing great! Keep up the good progress.
I will suggest to you that you might not want to replace all the accessory systems in your car (starter, alt, P/S components, etc.) but, rather, REBUILD the original units to like-new condition. You can buy rebuild components from auto parts supply stores or from existing repair businesses in your area (ie, starter/alt shops). Most of those accessory items are easily disassembled and repaired, if you find the few internal parts you need (brushes, diodes, bearings, bushings).
The other part of that process is cleaning and refinishing those components. Once you have them apart, cleaning and painting is relatively easy. If you MUST redo in original factory condition, so be it. But, for longevity, it would be better to use powdercoat or bake-on paint (VHT brand) that will LOOK like original condition, but will last much longer. This is particularly true with BARE metal sufaces like the alternator housing. If you paint it with VHT aluminum colored paint and bake it in a toaster-oven per directions, it will still look like bare metal BUT NEVER OXIDIZE AND CORRODE EVER AGAIN. Very easy appearance maintenance, thereafter.
Think about this issue and how you wish to do it on your car. Doing it "properly" now will take a bit more time and effort; but it will make maintaining your car much, much easier for future years.
09-04-2014, 01:40 PM
#43
Old Fart Pilot
Thread Starter
09-04-2014, 01:43 PM
#44
Old Fart Pilot
Thread Starter
Paul
09-04-2014, 02:06 PM
#45
Nam Labrat


Member Since: Sep 2013
Location: New Orleans Loo-z-anna
Posts: 33,893
Received 4,173 Likes
on
2,735 Posts

Be sure to take a pic of each component with attaching brackets before removing it (my camera remembers things well 8 months later....LOL)
Same deal with brake assemblies (fronts are different than rears)......front suspension linkage........etc......place each pic in a log book or in the box/bag with the component.
Have a section of cabinets/shelving JUST for removed parts boxes or bags (so you won't have to search the attic/garage/closet/shed/for that box of bolts that you put in that special place where they would be easy to find....... !
!
"Learning my first time on my first Vette rebuild by trying not to re-do the same thing the 3rd time (any more....LOL)"
Same deal with brake assemblies (fronts are different than rears)......front suspension linkage........etc......place each pic in a log book or in the box/bag with the component.
Have a section of cabinets/shelving JUST for removed parts boxes or bags (so you won't have to search the attic/garage/closet/shed/for that box of bolts that you put in that special place where they would be easy to find.......
!"Learning my first time on my first Vette rebuild by trying not to re-do the same thing the 3rd time (any more....LOL)"
Last edited by doorgunner; 09-04-2014 at 02:12 PM.
09-05-2014, 01:15 AM
#46
Old Fart Pilot
Thread Starter
You are doing great! Keep up the good progress.
I will suggest to you that you might not want to replace all the accessory systems in your car (starter, alt, P/S components, etc.) but, rather, REBUILD the original units to like-new condition. You can buy rebuild components from auto parts supply stores or from existing repair businesses in your area (ie, starter/alt shops). Most of those accessory items are easily disassembled and repaired, if you find the few internal parts you need (brushes, diodes, bearings, bushings).
The other part of that process is cleaning and refinishing those components. Once you have them apart, cleaning and painting is relatively easy. If you MUST redo in original factory condition, so be it. But, for longevity, it would be better to use powdercoat or bake-on paint (VHT brand) that will LOOK like original condition, but will last much longer. This is particularly true with BARE metal sufaces like the alternator housing. If you paint it with VHT aluminum colored paint and bake it in a toaster-oven per directions, it will still look like bare metal BUT NEVER OXIDIZE AND CORRODE EVER AGAIN. Very easy appearance maintenance, thereafter.
Think about this issue and how you wish to do it on your car. Doing it "properly" now will take a bit more time and effort; but it will make maintaining your car much, much easier for future years.
Not going for an NCRS car so the "correct" finish of parts doesn't matter to me other than looking sharp and being durable enough for a NON-daily driver. Might go the powder coat route but will have to look into that bake-on VHT paint first...
Paul
09-05-2014, 01:25 AM
#47
Old Fart Pilot
Thread Starter
Be sure to take a pic of each component with attaching brackets before removing it (my camera remembers things well 8 months later....LOL)
Same deal with brake assemblies (fronts are different than rears)......front suspension linkage........etc......place each pic in a log book or in the box/bag with the component.
Have a section of cabinets/shelving JUST for removed parts boxes or bags (so you won't have to search the attic/garage/closet/shed/for that box of bolts that you put in that special place where they would be easy to find....... !
"Learning my first time on my first Vette rebuild by trying not to re-do the same thing the 3rd time (any more....LOL)"
Same deal with brake assemblies (fronts are different than rears)......front suspension linkage........etc......place each pic in a log book or in the box/bag with the component.
Have a section of cabinets/shelving JUST for removed parts boxes or bags (so you won't have to search the attic/garage/closet/shed/for that box of bolts that you put in that special place where they would be easy to find.......
!"Learning my first time on my first Vette rebuild by trying not to re-do the same thing the 3rd time (any more....LOL)"
Parts Storage - CHECK I'm tagging and / or bagging all the removed parts and grouping them by location on the car or function. These parts "groups" will be stored in the garage (engine & transmission) and the basement (all other "carriable" parts).
Paul
 09-05-2014, 01:51 AM
#49
Old Fart Pilot
Thread Starter
Took care of some "garage keeping" business today by fixing the ON/OFF switch of the shop vac so I could keep up with all the dirt and rust flakes/dust my disassembly efforts have produced. Also made a Harbor Freight run and got some items I felt might come in handy such as an air impact hammer, chisels, small sledge, metal sawzall blades, propane hand torch, wire brushes, and a hoist load leveler.
I also got both #4 body mount bolts cut using the sawzall. On the right side the spacer was easily nibbled out with a screwdriver giving me plenty of room for the sawzall cut to the bolt itself. However, the left side spacer was much tougher and wouldn't come apart even after attacking it with the air and hand chisels. I eventually just used the sawzall to cut through the spacer and the bolt at the same time. I will worry about the non-captive #4 nuts after the body is off the frame.
Tomorrow, I hope to free up the last body mount; that stubborn #1R one that already has the nut removed but is still stuck in the mount. Between the torch, the air chisel and the sledge I hope it won't take long. Then maybe I can get my son to come over and help with the body lift.
Once, that's done, it'll really be a milestone marking the first phase of the project.
Paul
Paul
09-05-2014, 03:19 AM
#50
Burning Brakes


Sounds like you're doing this the right way Paul. Remember to take lots of pictures. I took about 2000 during the disassembly and now feel that I should have taken more
Congrats on the #4 bolts. The 17 blades I used were just for the two trailing arm bolts.
Hey you're a WA guy too. Go Hawks!
Congrats on the #4 bolts. The 17 blades I used were just for the two trailing arm bolts.
Hey you're a WA guy too. Go Hawks!
09-05-2014, 01:29 PM
#51

You are doing great! Keep up the good progress.
I will suggest to you that you might not want to replace all the accessory systems in your car (starter, alt, P/S components, etc.) but, rather, REBUILD the original units to like-new condition. You can buy rebuild components from auto parts supply stores or from existing repair businesses in your area (ie, starter/alt shops). Most of those accessory items are easily disassembled and repaired, if you find the few internal parts you need (brushes, diodes, bearings, bushings).
The other part of that process is cleaning and refinishing those components. Once you have them apart, cleaning and painting is relatively easy. If you MUST redo in original factory condition, so be it. But, for longevity, it would be better to use powdercoat or bake-on paint (VHT brand) that will LOOK like original condition, but will last much longer. This is particularly true with BARE metal sufaces like the alternator housing. If you paint it with VHT aluminum colored paint and bake it in a toaster-oven per directions, it will still look like bare metal BUT NEVER OXIDIZE AND CORRODE EVER AGAIN. Very easy appearance maintenance, thereafter.
Think about this issue and how you wish to do it on your car. Doing it "properly" now will take a bit more time and effort; but it will make maintaining your car much, much easier for future years.
I will suggest to you that you might not want to replace all the accessory systems in your car (starter, alt, P/S components, etc.) but, rather, REBUILD the original units to like-new condition. You can buy rebuild components from auto parts supply stores or from existing repair businesses in your area (ie, starter/alt shops). Most of those accessory items are easily disassembled and repaired, if you find the few internal parts you need (brushes, diodes, bearings, bushings).
The other part of that process is cleaning and refinishing those components. Once you have them apart, cleaning and painting is relatively easy. If you MUST redo in original factory condition, so be it. But, for longevity, it would be better to use powdercoat or bake-on paint (VHT brand) that will LOOK like original condition, but will last much longer. This is particularly true with BARE metal sufaces like the alternator housing. If you paint it with VHT aluminum colored paint and bake it in a toaster-oven per directions, it will still look like bare metal BUT NEVER OXIDIZE AND CORRODE EVER AGAIN. Very easy appearance maintenance, thereafter.
Think about this issue and how you wish to do it on your car. Doing it "properly" now will take a bit more time and effort; but it will make maintaining your car much, much easier for future years.
Good advice in this post...... Rebuild the original GM Delco parts ....send them to quality restorer if you are unable or not inclined to do,the yourself .
Most every external item on my car was rebuilt about over 20 years ago. By independent vendors .
The Mexican rebuilt and re pro mechanical stuff is not worth the effort to put on the car .
09-05-2014, 02:29 PM
#52
Team Owner
If you are personally doing a 'body-off' restoration, rebuilding the accessory components is "child's play". Starter requires cleaning, new brushes and some grease (most likely), with an assessment of bearings/bushings. If you don't want to do it, take YOUR components to a starter/alternator repair place. You will still have your original components...in good condition, and won't have to suffer the pains of 'rebuilt JUNK' from the auto supply stores.
09-06-2014, 02:45 AM
#53
Old Fart Pilot
Thread Starter
If you are personally doing a 'body-off' restoration, rebuilding the accessory components is "child's play". Starter requires cleaning, new brushes and some grease (most likely), with an assessment of bearings/bushings. If you don't want to do it, take YOUR components to a starter/alternator repair place. You will still have your original components...in good condition, and won't have to suffer the pains of 'rebuilt JUNK' from the auto supply stores.
Paul
09-06-2014, 02:54 AM
#54
Old Fart Pilot
Thread Starter
Finally got the last body mount bolt free after nibbling away the spacer. Also got the center console removed (not an easy feat and I'm NOT looking forward to that reinstall!) along with the shifter boots. My son is coning over tomorrow to help with the body lift and hopefully I'll have the seats and seat belts removed by then, but if not, I don't think they'll interfere with the lift (inner belts retaining cable has already been disconnected).
Wish me luck for a trouble-free body removal!
Paul
Wish me luck for a trouble-free body removal!
Paul
Last edited by nwav8tor; 09-06-2014 at 02:56 AM.
09-17-2014, 01:19 AM
#55
Old Fart Pilot
Thread Starter
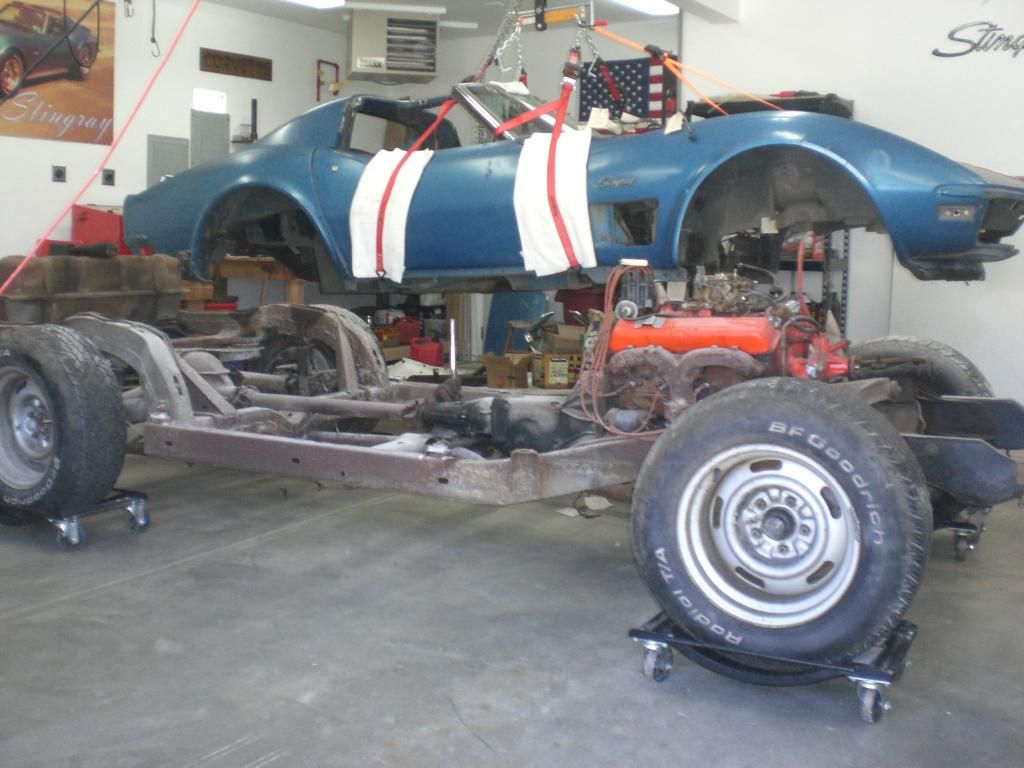
Well, I finally got the body off the frame! The lift itself went very smoothly. I guess I was expecting it to be more difficult. I used a single HF chain hoist suspended from a large laminated beam in the garage attic. Snap-On tie down straps from Costco attached easily to the lip under each door. Another smaller strap was used to support the nose, but I'm not sure this provided much support other than to ease my fear of the front clip snapping off.
I performed the lift solo with a bit of help from my wife checking for any hangups:
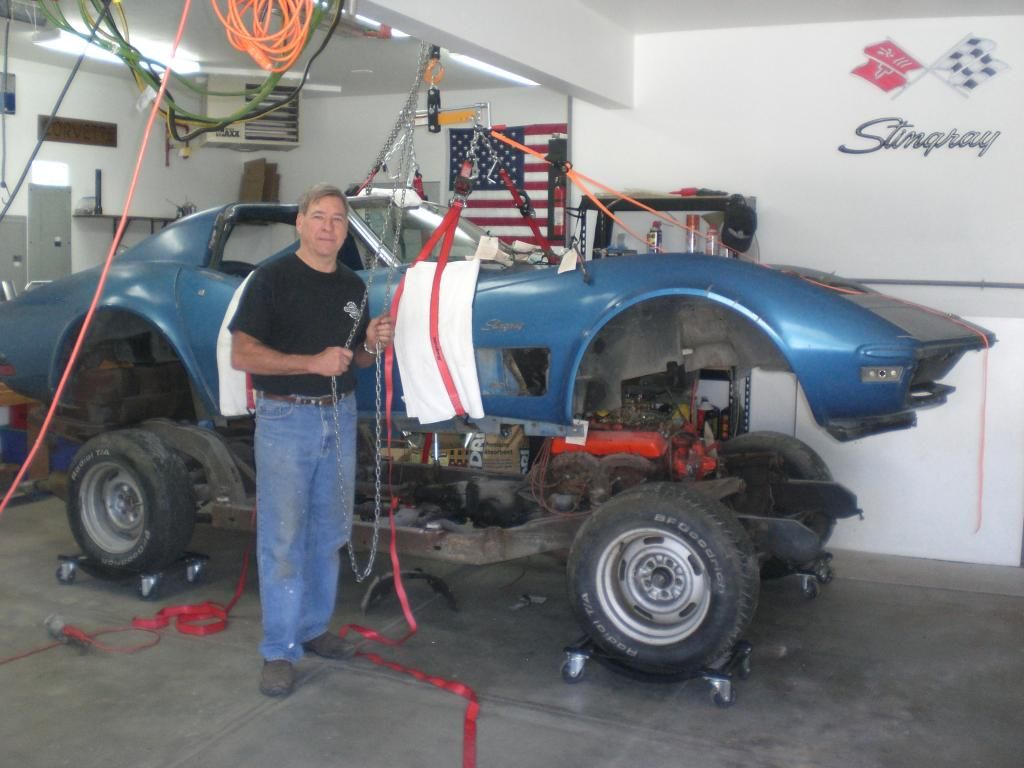
It's been 43 years since these two pieces have been apart:
What's missing from this picture?
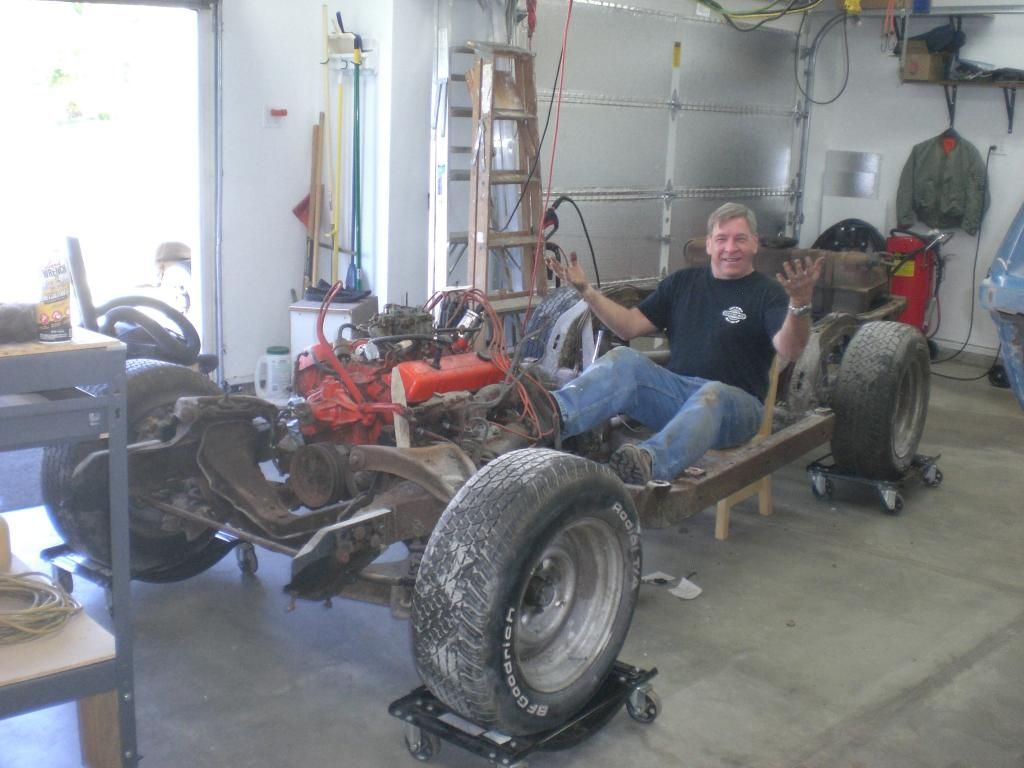
All Right! Here's that brew that I was missing:
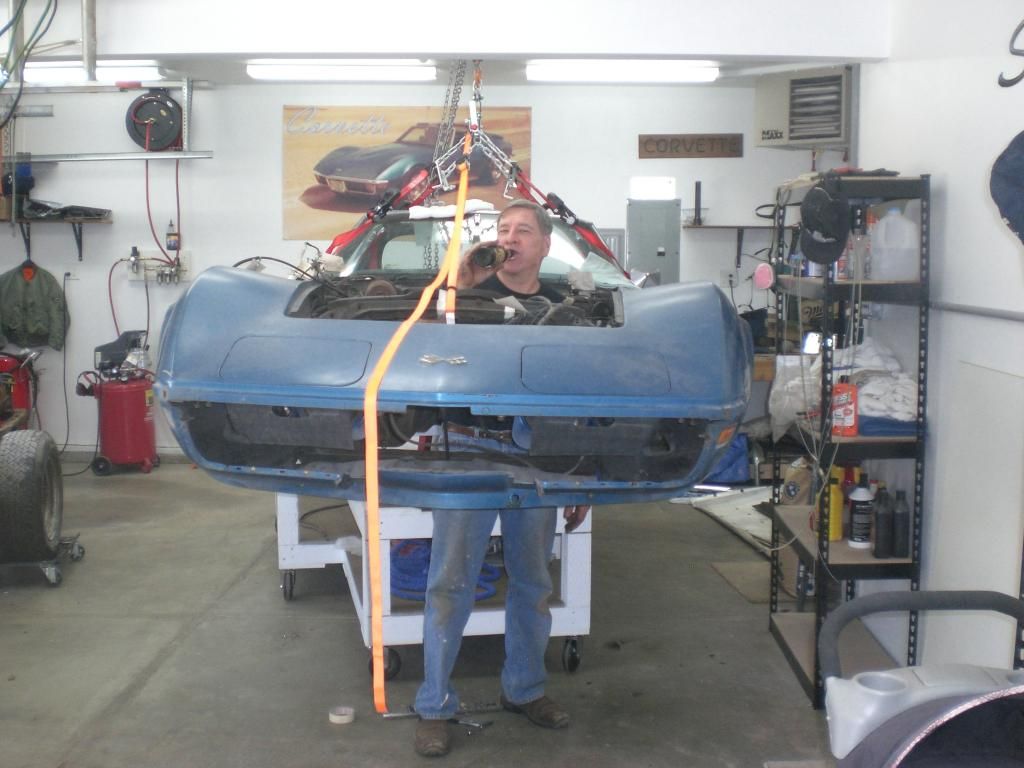
Now that that major hurdle is out of the way, I can finally get on with the disassembly and see just how bad the rust is. So far it doesn't look too bad! I'll just keep plugging away at it when I'm not off flying around.
More photos to come...
I performed the lift solo with a bit of help from my wife checking for any hangups:

It's been 43 years since these two pieces have been apart:

What's missing from this picture?

All Right! Here's that brew that I was missing:

Now that that major hurdle is out of the way, I can finally get on with the disassembly and see just how bad the rust is. So far it doesn't look too bad! I'll just keep plugging away at it when I'm not off flying around.
More photos to come...
The following 2 users liked this post by nwav8tor:
Bighog (08-06-2023),
cocodrillo (11-24-2021)
09-17-2014, 10:16 AM
#56
Burning Brakes
Paul, love the photos and it looks like you're doing a great job. I'm always impressed when someone takes on a project like this as opposed to farming it all out. In the end it will be worth the journey. I just retired July 1st after more than 35 years with AA. I knew quite a few Northwest/Republic guys. We're you every MSP based? Good luck with the project!


The following users liked this post:
ustabevetteguy (02-26-2022)
09-17-2014, 12:32 PM
#58
Old Fart Pilot
Thread Starter
Paul
09-17-2014, 12:41 PM
#59
Old Fart Pilot
Thread Starter
Paul, love the photos and it looks like you're doing a great job. I'm always impressed when someone takes on a project like this as opposed to farming it all out. In the end it will be worth the journey. I just retired July 1st after more than 35 years with AA. I knew quite a few Northwest/Republic guys. We're you every MSP based? Good luck with the project!
09-17-2014, 02:24 PM
#60
Team Owner
Just a little 'tip'...learned from experience:
Powdercoating is great stuff...very durable and long lasting. BUT, it is also much thicker than paint. So, on any parts that you are having powdercoated, make sure you mask any [attachment] surfaces where additional thickness will be problematic/result in assembly problems or areas that should not be painted.
I powdercoated some wheel rims. They looked great! After installing on the car, I would find (over time) that I would lose a lug nut every now and then. Finally figured out that the powdercoating between the lug nut and the wheel was eroding with use and losing torque on the nuts. Had to go back and grind the powdercoating off the nut seats on the wheel rims.