
Old Fart w/ No Experience '71 Resto
 09-18-2014, 01:04 AM
#61
Old Fart Pilot

Thread Starter

Just a little 'tip'...learned from experience:
Powdercoating is great stuff...very durable and long lasting. BUT, it is also much thicker than paint. So, on any parts that you are having powdercoated, make sure you mask any [attachment] surfaces where additional thickness will be problematic/result in assembly problems or areas that should not be painted.
I powdercoated some wheel rims. They looked great! After installing on the car, I would find (over time) that I would lose a lug nut every now and then. Finally figured out that the powdercoating between the lug nut and the wheel was eroding with use and losing torque on the nuts. Had to go back and grind the powdercoating off the nut seats on the wheel rims.
 09-18-2014, 01:31 AM
#62
Old Fart Pilot
Thread Starter
Well, after removing the body, there was no build sheet on the tank and I didn't find anything of the sort in the frame either. However, I did find this in the glove compartment :
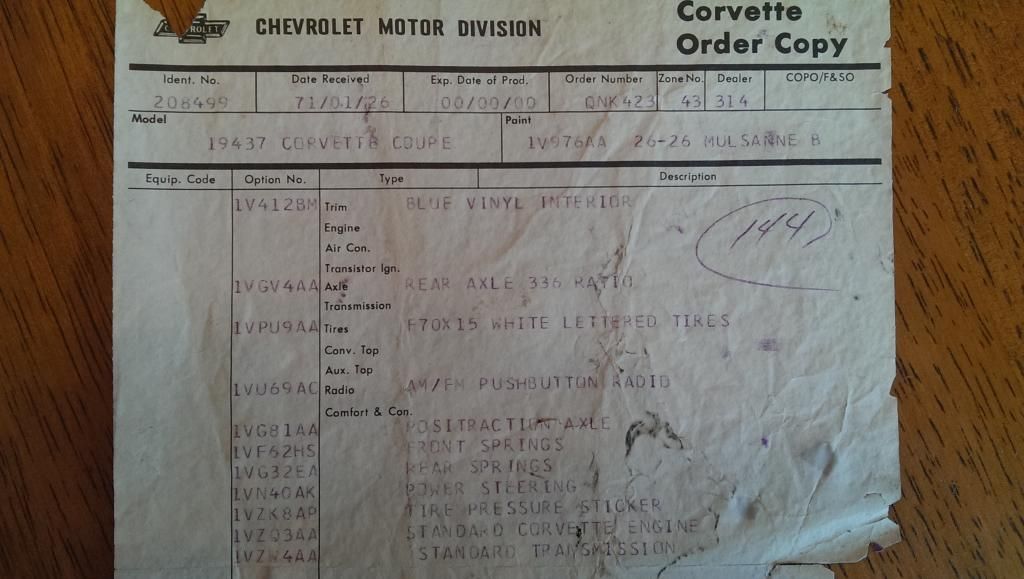
Is this the same as (or similar to) the build sheet?
I also found the original owner's manual and warranty pamphlet with the Ident-o-Plate still attached!

Is this the same as (or similar to) the build sheet?
I also found the original owner's manual and warranty pamphlet with the Ident-o-Plate still attached!
09-18-2014, 12:45 PM
#63
Team Owner

Cool!!! Stick that sheet in an acid-free protector sleeve so that it will remain intact. Nice to have the other original items. 
01-06-2015, 03:04 AM
#64
Old Fart Pilot
Thread Starter
Well, contrary to some thoughts, I am still alive and have finally resumed work on the vette. Haven't gotten much done in the past 3 months due to typical excuses such as work travel, some vacations, the holidays and prepping some space in the basement for removed parts storage. All previously removed parts are now safely (I hope) stored in the basement freeing up more room to work in the garage.
I got the seats removed after grinding down a socket to shorten it to fit under the seat rail edge and squarely grip the bolt heads on the inner rear bolts on both sides. Air impact wrench made short work of all the seat belt and shoulder belt attach bolts. No way those were coming out with a hand wrench or rachet.
At first, I couldn't figure out how to get the shoulder belt through the slot on the seat back since the plastic retraction "stop" was doing it's job and wouldn't fit back through the opening. Then the light bulb clicked on and I used a heat gun to soften the plastic ears of the stops and bend them enough to fit through the slots. Is there another better/easier way to do this?
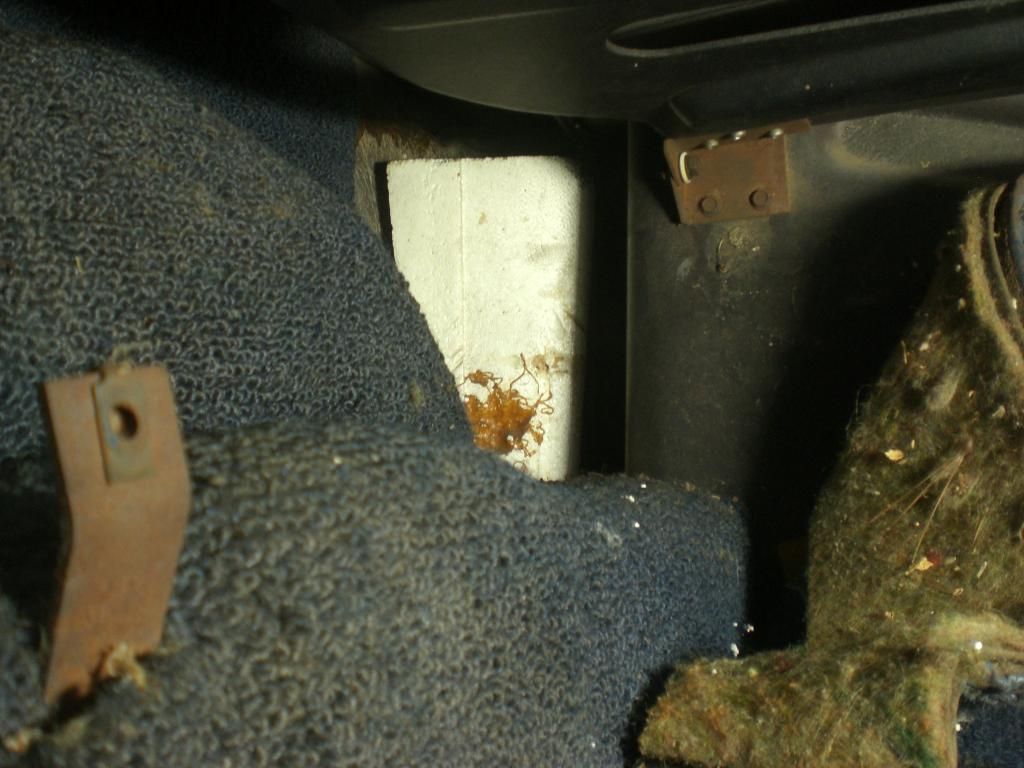
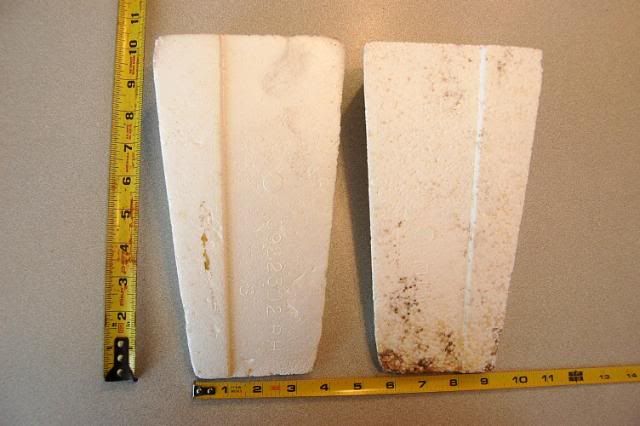
I've also started removing interior trim pieces. I do have some questions for forum members regarding a few pieces I discovered in the rear compartment area. Way in each back corner is a loose styrafoam wedge. I believe they are technically called Spacers (item #5 on the '71 AIM, UPC 1, Sheet F31), but I don't know what their purpose is. Anyone know what they do or are for?
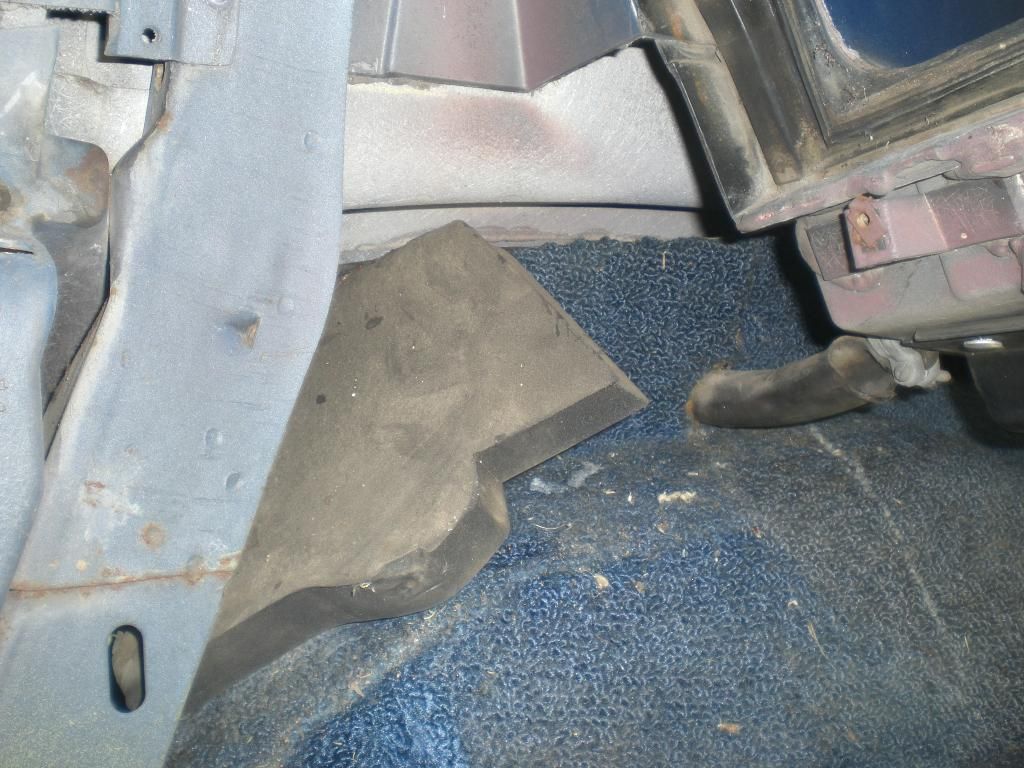
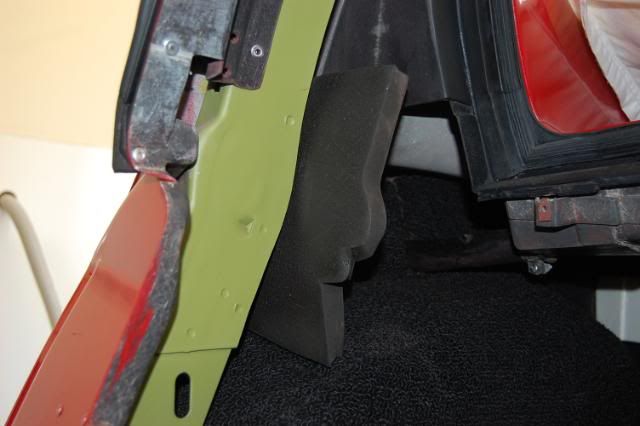
I also found a foam rubber piece on top of each rear wheel well behind the the shoulder belt housing on each side. I believe these are the Pad-Whl House (Item #12, '71 AIM UPC 1, Sheet B9) but again, I'm not sure of their purpose and proper positioning behind the trim panels. Anybody with words of wisdom for me?
Here's the pad itself from the passenger side:

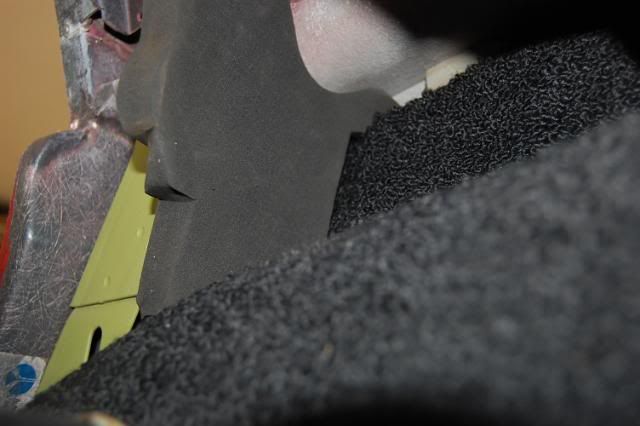
And this is the position I found it in:
Thanks for your help,
Paul
I got the seats removed after grinding down a socket to shorten it to fit under the seat rail edge and squarely grip the bolt heads on the inner rear bolts on both sides. Air impact wrench made short work of all the seat belt and shoulder belt attach bolts. No way those were coming out with a hand wrench or rachet.
At first, I couldn't figure out how to get the shoulder belt through the slot on the seat back since the plastic retraction "stop" was doing it's job and wouldn't fit back through the opening. Then the light bulb clicked on and I used a heat gun to soften the plastic ears of the stops and bend them enough to fit through the slots. Is there another better/easier way to do this?
I've also started removing interior trim pieces. I do have some questions for forum members regarding a few pieces I discovered in the rear compartment area. Way in each back corner is a loose styrafoam wedge. I believe they are technically called Spacers (item #5 on the '71 AIM, UPC 1, Sheet F31), but I don't know what their purpose is. Anyone know what they do or are for?
I also found a foam rubber piece on top of each rear wheel well behind the the shoulder belt housing on each side. I believe these are the Pad-Whl House (Item #12, '71 AIM UPC 1, Sheet B9) but again, I'm not sure of their purpose and proper positioning behind the trim panels. Anybody with words of wisdom for me?
Here's the pad itself from the passenger side:

And this is the position I found it in:

Thanks for your help,
Paul
01-06-2015, 10:47 AM
#65
Team Owner
Member Since: Sep 2006
Location: Westminster Maryland
Posts: 30,173
Likes: 0
Received 2,878 Likes
on
2,515 Posts

Hi,
The white styrofoam 'fillers' are used on coupes to support the rear bullhead carpet 'flaps' at the rear compartment corners above the #4 body mounts.
The gray dense foam wheelhouse pads are used as sound deadeners above the forward end of the wheelhouse on both coupes and convertibles.
Regards,
Alan
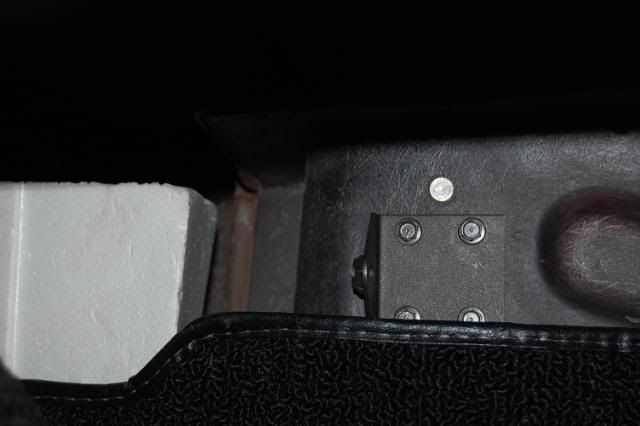
The rear quarter interior trim panel holds the pad in place.
The white styrofoam 'fillers' are used on coupes to support the rear bullhead carpet 'flaps' at the rear compartment corners above the #4 body mounts.
The gray dense foam wheelhouse pads are used as sound deadeners above the forward end of the wheelhouse on both coupes and convertibles.
Regards,
Alan
The rear quarter interior trim panel holds the pad in place.
Last edited by Alan 71; 01-06-2015 at 10:55 AM.
01-06-2015, 04:07 PM
#66
Old Fart Pilot
Thread Starter
Thanks for the photos Alan. Your documentation is a tremendous asset!
I had a suspicion that's what the spacers were for. Are they supposed to be attached to the body or do they just sit loosely behind the carpet?
As for the wheel housing pads, mine were laying down on the wheel well itself, but your photos show them standing up in a more upright vertical position. I'll reposition mine as such and take more pics so I'll remember how they should go when it comes time for reassembly.
Paul
01-06-2015, 04:55 PM
#67
Team Owner
Member Since: Sep 2006
Location: Westminster Maryland
Posts: 30,173
Likes: 0
Received 2,878 Likes
on
2,515 Posts
Hi Paul,
As I indicated in my post the rear quarter interior trim panel holds the pad in place. It wasn't fastened in any way.
Regards,
Alan
As I indicated in my post the rear quarter interior trim panel holds the pad in place. It wasn't fastened in any way.
Regards,
Alan
01-06-2015, 08:06 PM
#68


Paul;
Great work, you have more guts than I do...
I have a 1971 Convertible that has been restored as a resto-mod. I bought the car as complete. It has three very cool mods that I recommend; 1) Tremec 5-Speed trans, 2) Hydroboost Power Brake booster and 3) Electric motors on the headlight doors.
It has a ZZ4 with Edelbrock aluminum heads, intake and carb. I like the engine setup but if it was my build I would try to install an LS1 or another C5/6 engine.
I did not do the work myself so cannot offer install tips - only that these three are highly recommended...
Dave
01-07-2015, 11:40 PM
#69
Old Fart Pilot
Thread Starter
Paul;
Great work, you have more guts than I do...
I have a 1971 Convertible that has been restored as a resto-mod. I bought the car as complete. It has three very cool mods that I recommend; 1) Tremec 5-Speed trans, 2) Hydroboost Power Brake booster and 3) Electric motors on the headlight doors.
It has a ZZ4 with Edelbrock aluminum heads, intake and carb. I like the engine setup but if it was my build I would try to install an LS1 or another C5/6 engine.
I did not do the work myself so cannot offer install tips - only that these three are highly recommended...
Dave
Great work, you have more guts than I do...
I have a 1971 Convertible that has been restored as a resto-mod. I bought the car as complete. It has three very cool mods that I recommend; 1) Tremec 5-Speed trans, 2) Hydroboost Power Brake booster and 3) Electric motors on the headlight doors.
It has a ZZ4 with Edelbrock aluminum heads, intake and carb. I like the engine setup but if it was my build I would try to install an LS1 or another C5/6 engine.
I did not do the work myself so cannot offer install tips - only that these three are highly recommended...
Dave
Paul
01-08-2015, 03:27 AM
#70
Melting Slicks


I suggest you take a close look at the drain hoses from the plenum under the back window while you are in there. Mine looked okay but on close inspection were perished and would have let water into the car, lucky the PO kept the car garaged! I replaced the hoses with flexible electrical conduit that is IP rated for external use as I have little faith in much of the repo rubber stuff about these days.
01-10-2015, 11:58 PM
#71
Old Fart Pilot
Thread Starter
I suggest you take a close look at the drain hoses from the plenum under the back window while you are in there. Mine looked okay but on close inspection were perished and would have let water into the car, lucky the PO kept the car garaged! I replaced the hoses with flexible electrical conduit that is IP rated for external use as I have little faith in much of the repo rubber stuff about these days.
Paul
02-06-2015, 01:46 AM
#72
Old Fart Pilot
Thread Starter
Still disassembling the vette and I have run into a problem: 
Best I can tell, the Pin - RR Roof Locating Wedge (Item 3, 71 AIM UPC 1, Sheet F14) is threaded and just screws through the plate (Item 1, same sheet) into the tapping plate (Item 12, 71 AIM UPC 1, sheet B11). Is that correct?
When I removed the two screws and tried to back the locating wedge pin out, I could feel and see the inner tapping plate moving in the background! Is that normal, or is my tapping plate not being secured by the retainer (Item 11, UPC 1, Sheet B11)?
I don't want to remove the pin and screws and have the tapping plate drop down into the interior of the lower portion of the latch pillar.
Any suggestions on how to proceed?
Thanks for any help...
Paul
02-06-2015, 09:51 AM
#73
Team Owner
Member Since: Sep 2006
Location: Westminster Maryland
Posts: 30,173
Likes: 0
Received 2,878 Likes
on
2,515 Posts
Hi Paul,
It's possible that inner plate is free, but maybe not.
I'd put the 2 screws back in and take the wedge pin out.
Then take ONE of the screws out and try to get the inner plate to move around by turning the screw slightly and by fishing through the 2 empty holes. You may be able to sense if the inner plate is indeed still captured by the bracket.
I'd then reverse the screws and try the same thing.
If you remain unsure and don't want to take a chance, take the top screw and wedge screw out, loosen the lower screw enough to turn the chrome plate and put the top screw or wedge pin back in it's hole, but not through the plate.
Then take the bottom screw out to remove the chrome plate.
I'd then put both screws in place and restore around them.
Good Luck!
Regards,
Alan
Last edited by Alan 71; 02-06-2015 at 09:53 AM.
02-06-2015, 01:15 PM
#74
Old Fart Pilot
Thread Starter
Hi Paul,
It's possible that inner plate is free, but maybe not.
I'd put the 2 screws back in and take the wedge pin out.
Then take ONE of the screws out and try to get the inner plate to move around by turning the screw slightly and by fishing through the 2 empty holes. You may be able to sense if the inner plate is indeed still captured by the bracket.
I'd then reverse the screws and try the same thing.
If you remain unsure and don't want to take a chance, take the top screw and wedge screw out, loosen the lower screw enough to turn the chrome plate and put the top screw or wedge pin back in it's hole, but not through the plate.
Then take the bottom screw out to remove the chrome plate.
I'd then put both screws in place and restore around them.
Good Luck!
Regards,
Alan
It's possible that inner plate is free, but maybe not.
I'd put the 2 screws back in and take the wedge pin out.
Then take ONE of the screws out and try to get the inner plate to move around by turning the screw slightly and by fishing through the 2 empty holes. You may be able to sense if the inner plate is indeed still captured by the bracket.
I'd then reverse the screws and try the same thing.
If you remain unsure and don't want to take a chance, take the top screw and wedge screw out, loosen the lower screw enough to turn the chrome plate and put the top screw or wedge pin back in it's hole, but not through the plate.
Then take the bottom screw out to remove the chrome plate.
I'd then put both screws in place and restore around them.
Good Luck!
Regards,
Alan

At this rate, when (and IF) I ever complete the resto, I'll (gladly) have to give you credit for the assistance.
Paul
02-06-2015, 04:15 PM
#75
Team Owner
A heat gun will work to soften the vinyl seatbelt clip covers, but you have to be sure not to OVERheat them (melting, discoloring). My preferred way is to microwave a big mug of water to boiling, then stick the clip/cover in the water for about 30 seconds. Pull it out and then pull it off (with gloved hand, of course). Put it back on in the same manner.
P.S. If you figured the "heat" approach out by yourself...without cutting one up to begin with..., then you'll do fine working on your C3. When faced with a conundrum (I could have said 'problem', but I like the sound of "conundrum"), you think about it enough to come up with a decent solution. You can't imagine how many folks cut them off...then look at the vendor books to buy new ones, only to find out they don't exist.
P.S. If you figured the "heat" approach out by yourself...without cutting one up to begin with..., then you'll do fine working on your C3. When faced with a conundrum (I could have said 'problem', but I like the sound of "conundrum"), you think about it enough to come up with a decent solution. You can't imagine how many folks cut them off...then look at the vendor books to buy new ones, only to find out they don't exist.
02-06-2015, 05:47 PM
#76
Old Fart Pilot
Thread Starter
A heat gun will work to soften the vinyl seatbelt clip covers, but you have to be sure not to OVERheat them (melting, discoloring). My preferred way is to microwave a big mug of water to boiling, then stick the clip/cover in the water for about 30 seconds. Pull it out and then pull it off (with gloved hand, of course). Put it back on in the same manner.
P.S. If you figured the "heat" approach out by yourself...without cutting one up to begin with..., then you'll do fine working on your C3. When faced with a conundrum (I could have said 'problem', but I like the sound of "conundrum"), you think about it enough to come up with a decent solution. You can't imagine how many folks cut them off...then look at the vendor books to buy new ones, only to find out they don't exist.
P.S. If you figured the "heat" approach out by yourself...without cutting one up to begin with..., then you'll do fine working on your C3. When faced with a conundrum (I could have said 'problem', but I like the sound of "conundrum"), you think about it enough to come up with a decent solution. You can't imagine how many folks cut them off...then look at the vendor books to buy new ones, only to find out they don't exist.
out there I might have thought to use your approach. I guess it wouldn't do any good to dip the cover into a mug of cold beer would it
 ?
?I have to ask, is that pearl of wisdom about using a GLOVED hand a result os actual experience?
Well, on to the next conundrum...
Paul
03-17-2015, 07:46 AM
#77
Senior Member


Member Since: Jan 2008
Location: Easton, PA
Posts: 12,154
Received 2,031 Likes
on
1,103 Posts
St. Jude Donor '10
Paul, David here, sorry to be late to the show but I am here to help any way I can. Looking forward to your progress as you move forward.
Watch out for those rust bunnies, they can be brutal.
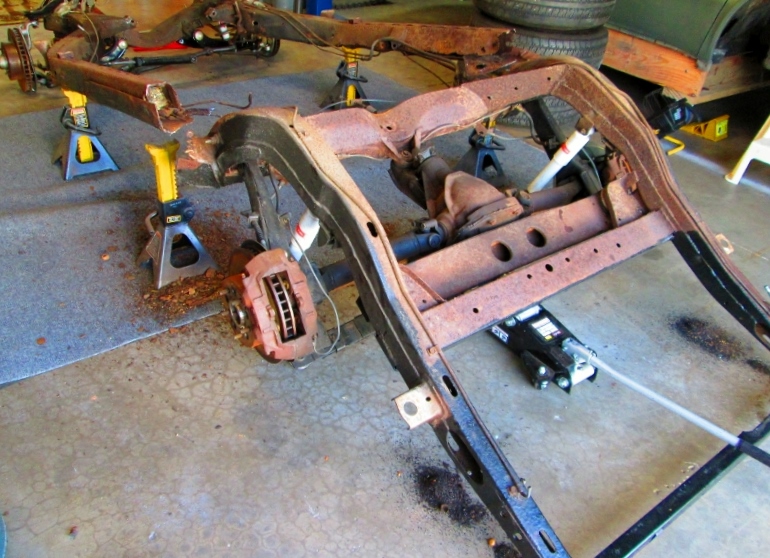
They attacked the 72 chassis I had sitting in my garage yesterday and left it dead on the ground. Brutal. Only thing left to do now is get the good parts off of it and sell them to you. LOL. I'll continue to watch your thread and best of success on your restoration.
Best regards,
David Howard
AllC34Me
Watch out for those rust bunnies, they can be brutal.
They attacked the 72 chassis I had sitting in my garage yesterday and left it dead on the ground. Brutal. Only thing left to do now is get the good parts off of it and sell them to you. LOL. I'll continue to watch your thread and best of success on your restoration.
Best regards,
David Howard
AllC34Me
03-17-2015, 03:03 PM
#78
Old Fart Pilot
Thread Starter
Thanks David. I plan to get back out in the garage later this week and re-start work on BigBlu. I also need to update this thread with more progress pictures that I finally got organized and cataloged on the 'puter. Can you tell me if those suspension parts on the now deceased '72 frame are new reproductions or rebuilt original parts (and if the later, who did the rebuilds). I'm still undecided about buying new parts or rebuilding (or having them rebuilt) my existing suspension.
Thanks,
Paul
Thanks,
Paul
03-17-2015, 05:09 PM
#79
Senior Member
Member Since: Jan 2008
Location: Easton, PA
Posts: 12,154
Received 2,031 Likes
on
1,103 Posts
St. Jude Donor '10
I'll be selling the dead chassis parts soon. Rear trailing arms are in great shape. I'll check the receipts and post that data when I list parts for sale. I'll include pictures too. Lots of good parts came off this one.
04-01-2015, 04:02 AM
#80
Old Fart Pilot
Thread Starter
I have had a bit of progress on the vette, but took a LONG while to organize all the photos I've been taking to document the disassembly.
As previously stated, once the body was off I found the chassis to be in fairly good shape. No damage or holes that I can see, only surface rust. What really worried me was finding out what the birdcage looked like so I'm stripping everything off the body.
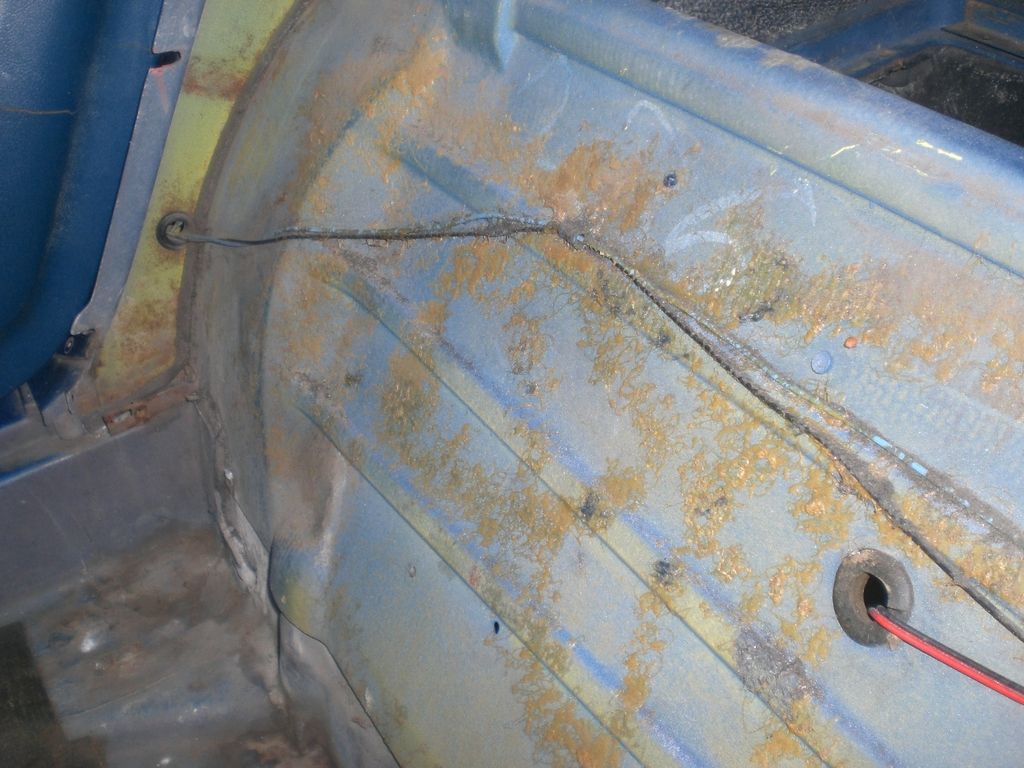
Luckily there wasn't a huge amount of glue on the rear riser or deck and wheel wells:
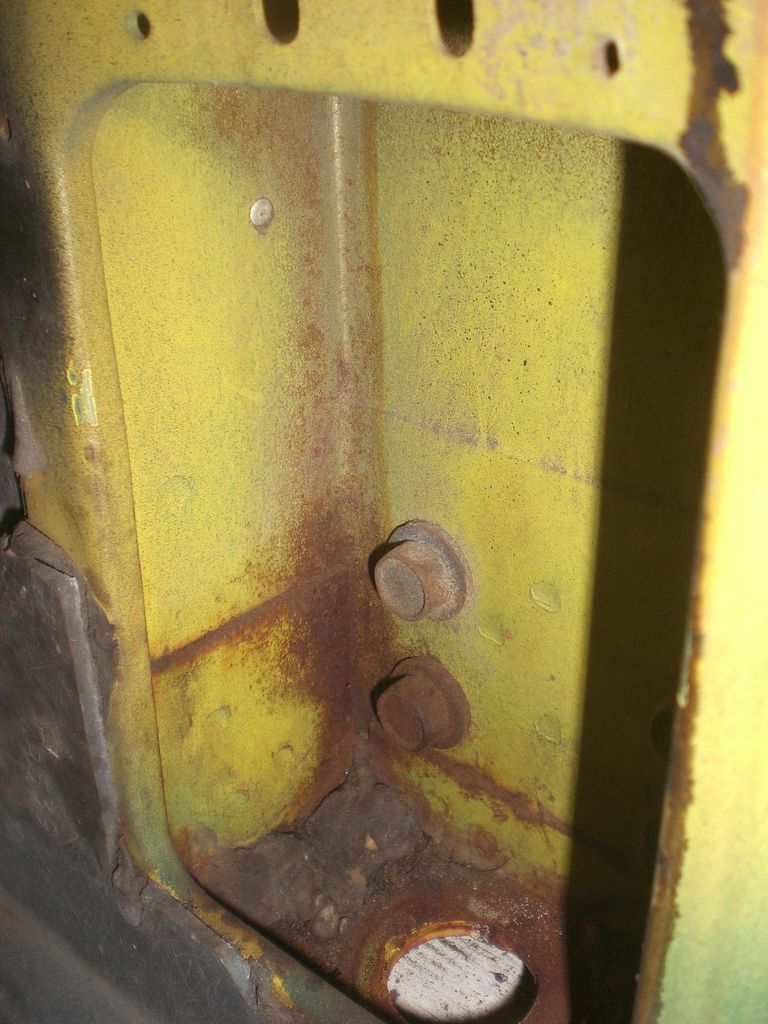
The body mount areas (Rt #2 shown) appear OK:
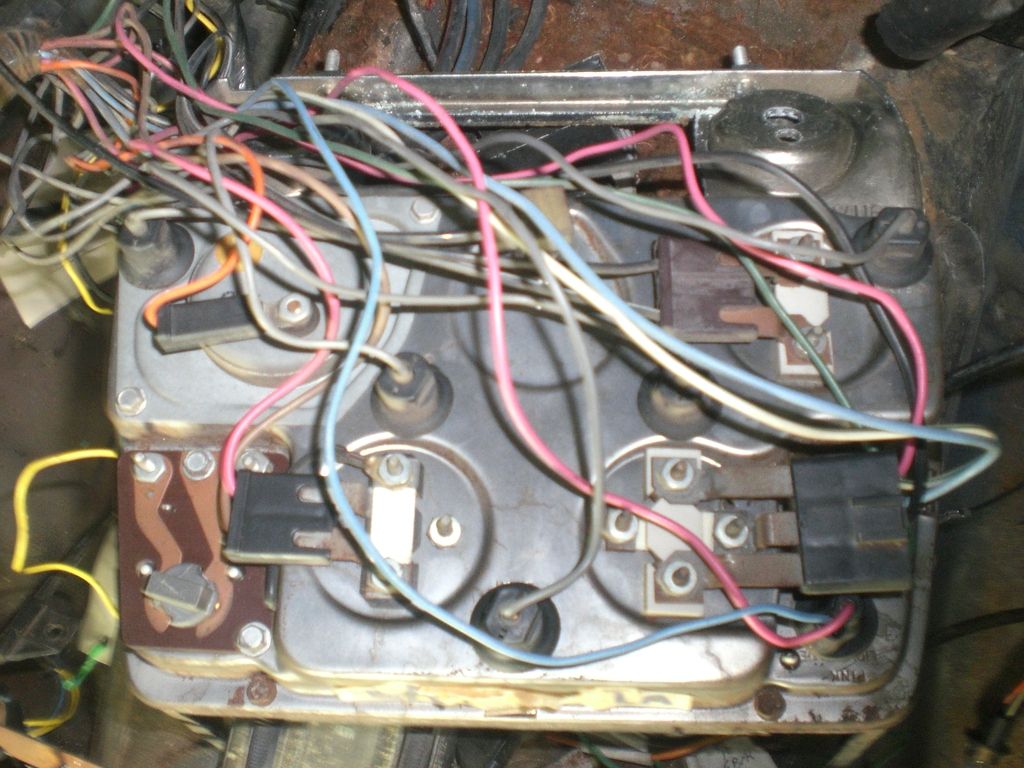
The back sides of the gauge clusters are good:
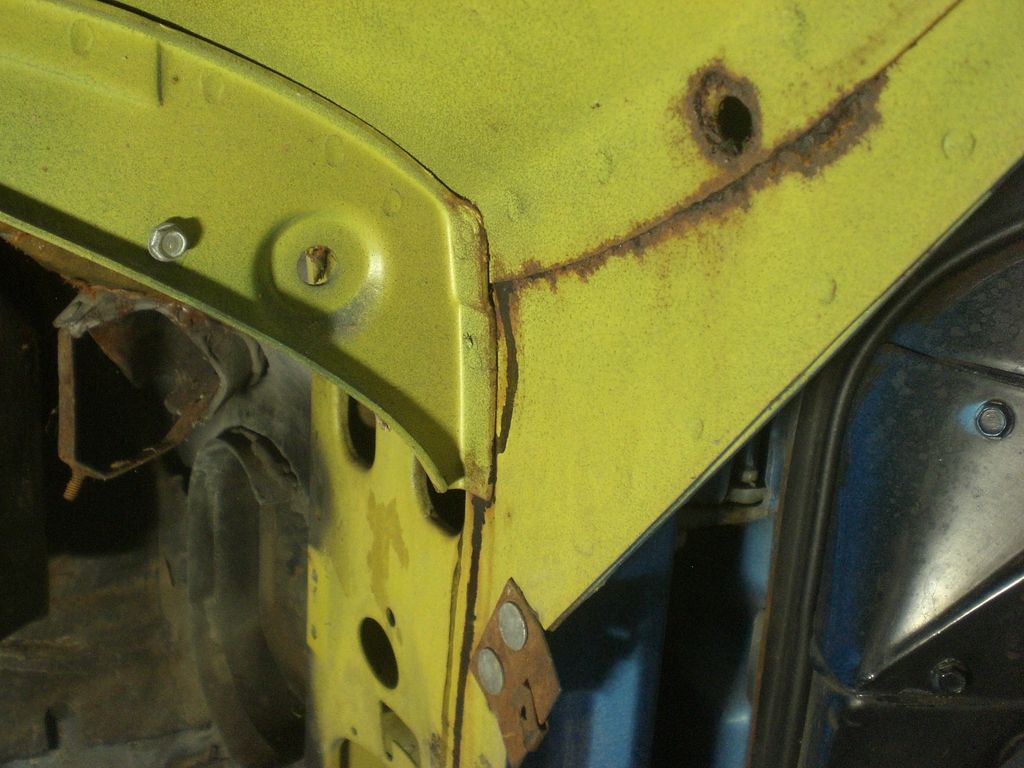
The lower windshield corner on the right is OK:
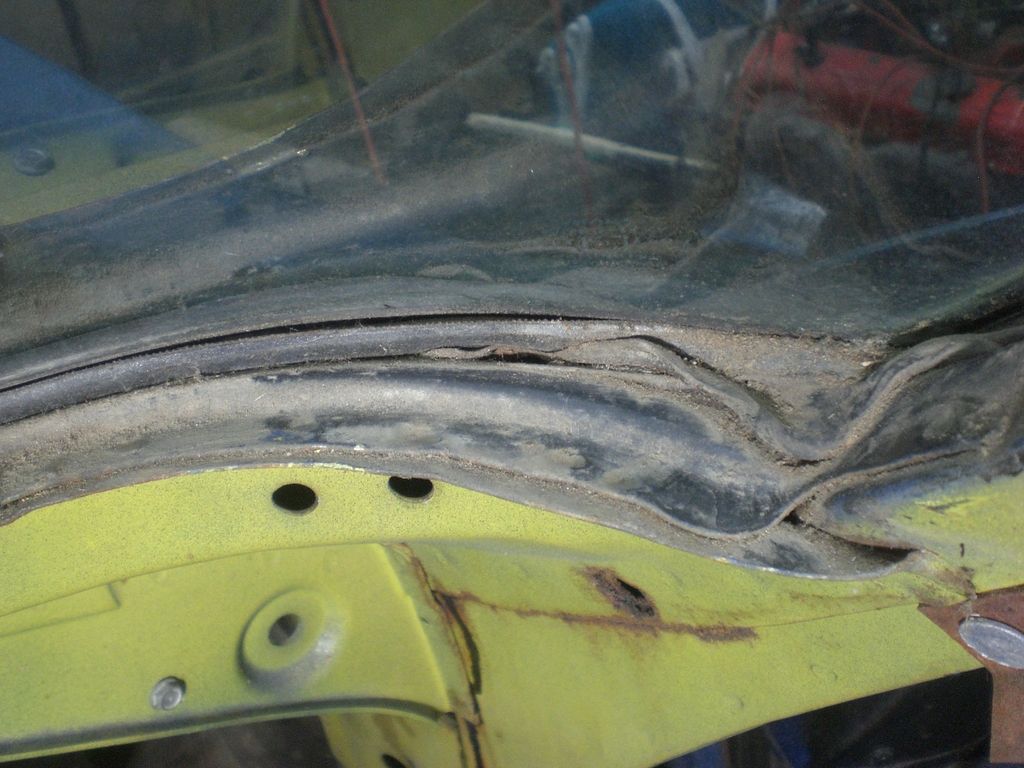
As is the underside of that corner:
The driver's side though is another story
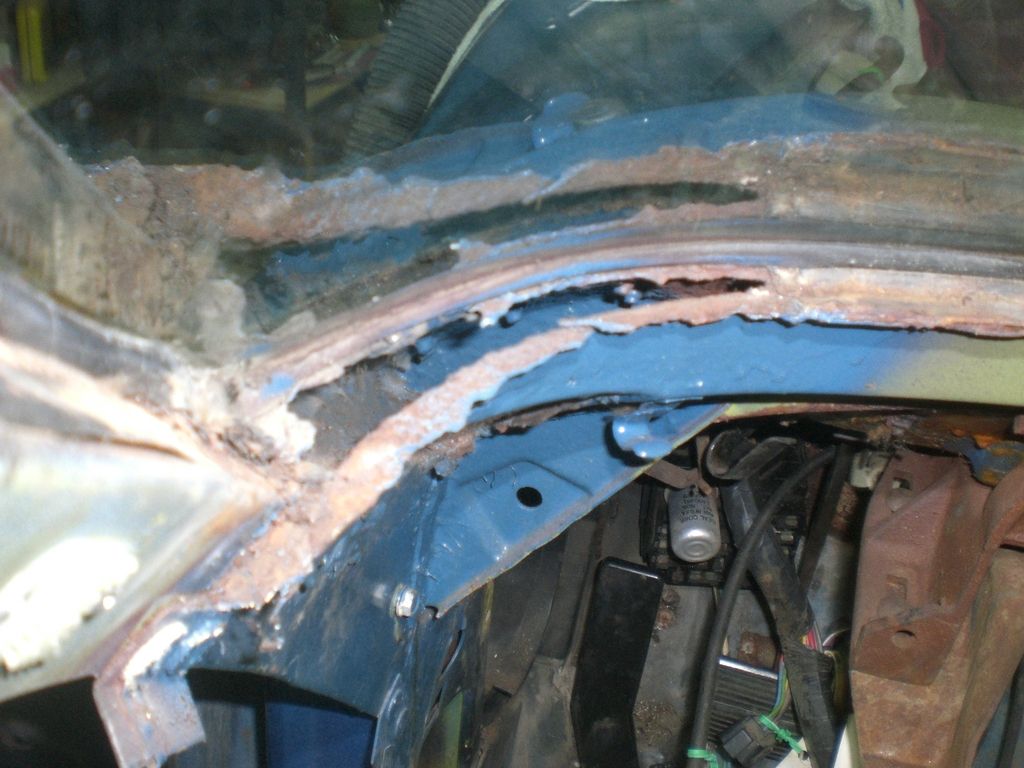
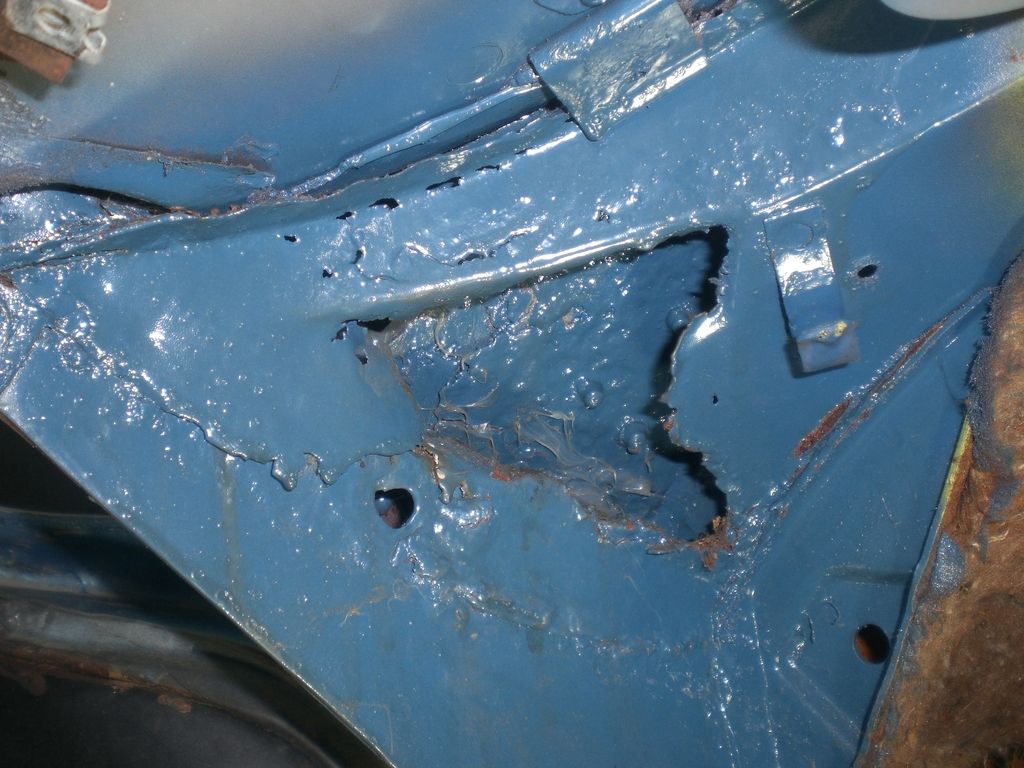
As you can see, there is rust in the area of the lower left windshield corner. It does NOT appear to have progressed down the birdcage to the left #2 body mount area and for that I am thankful!
I now remember finding that rust back in the 80's when the car was a daily driver and my only source of transportation. I had dropped the dash panel to install new speakers and found the damage. I'm so glad that I cleaned it up the best I could and sprayed it with Rustoleum before storing the car. It doesn't seem to have progressed any in the 26+ years since then.
I guess my next step is to remove the windshield trim and glass and check the entire window frame for more rust.
Just how difficult is it to find replacement parts for the window corner and supporting frame and how hard is it to remove the damaged sections and repair with new material?
Thanks for any thoughts,
Paul
As previously stated, once the body was off I found the chassis to be in fairly good shape. No damage or holes that I can see, only surface rust. What really worried me was finding out what the birdcage looked like so I'm stripping everything off the body.
Luckily there wasn't a huge amount of glue on the rear riser or deck and wheel wells:

The body mount areas (Rt #2 shown) appear OK:

The back sides of the gauge clusters are good:

The lower windshield corner on the right is OK:

As is the underside of that corner:

The driver's side though is another story


As you can see, there is rust in the area of the lower left windshield corner. It does NOT appear to have progressed down the birdcage to the left #2 body mount area and for that I am thankful!
I now remember finding that rust back in the 80's when the car was a daily driver and my only source of transportation. I had dropped the dash panel to install new speakers and found the damage. I'm so glad that I cleaned it up the best I could and sprayed it with Rustoleum before storing the car. It doesn't seem to have progressed any in the 26+ years since then.
I guess my next step is to remove the windshield trim and glass and check the entire window frame for more rust.
Just how difficult is it to find replacement parts for the window corner and supporting frame and how hard is it to remove the damaged sections and repair with new material?
Thanks for any thoughts,
Paul
Last edited by nwav8tor; 04-01-2015 at 03:23 PM.
The following users liked this post:
Bighog (08-06-2023)