
***DIY: 68-72 Wiper door vacuum to electric conversion***
 02-28-2015, 08:41 PM
#1
The ORIGINAL and bestest

Thread Starter
Member Since: Oct 2000
Location: Toronto Ontario
Posts: 10,009
Received 234 Likes
on
143 Posts
Toronto Events Coordinator

Before I get into the how-to part of this thread, I want to say that my vacuum system worked perfectly; I didn't do this because there was something wrong with it. In 2013, I did the electric headlight conversion, and I was so happy with it that I decided that I also wanted to do an electric wiper door conversion to get rid of the rest of the vacuum system. I also have never been a fan of how the wiper door vacuum actuator looked in the engine compartment.
I have seen a few different ways people have already done this, specifically either using a linear actuator or an electric seat motor, so I bought one of each to decide which I liked best. I started with the linear actuator; I got as far as fabricating a temporary mounting bracket and installing it. After some tests, I decided to pull the plug on the project because there were a few things I just wasn't happy about using it, and I realized some of the same things would also bother me using a power seat motor.
What I didn't like:
- both the linear actuator and seat motor had operation speeds that were too slow for my liking
- both required wiring that while fairly simple, was still too complicated than I wanted it to be
- if there was an electrical or mechanical failure of any of the parts, both would require some amount of disassembly to manually operate the wiper door, which was something I didn't want to do on the side of the road
What I wanted:
- faster operating speed
- simple wiring with as few components and devices as possible
- full automatic operation exactly the same as the factory vacuum using the factory wiper switch
And the desired function that was absolutely the most important to me:
- The ability to operate the door manually if there is an electrical or mechanical failure of any or all parts with little or no disassembly required to do so, especially if the failure occurs with the door in the closed position and I need to open it. Some people are more concerned about minimizing the size of whatever operates the door in the engine compartment, but I really wanted simple manual control to be a priority.
I tried to figure out a way to accomplish this manual function with either the actuator or seat motor to no real avail, so it was back to the drawing board.
Then it hit me - why not try to use the same Miata headlight motor that I used on the headlight conversion! These motors can be manually operated by turning the red manual ****, so it was a question of would it actually fit and function the way I wanted. Since I had bought a couple of spares, I got them out and quickly determined that it just might work. I fabricated a prototype mounting bracket, basically guessing how it should be located, and then tweaked it to be where I wanted it. Then I prototyped a linkage, and also tweaked it after some testing to operate exactly as I wanted. It worked! All that was left to do was sort out the electrical control circuit so it would operate exactly as the factory vacuum/electric control circuit. Once I had the electrical figured out, I made my permanent mounting bracket and linkage.
I put it to the test over the entire driving season of 2014, including many washes and getting caught in the rain a few times, and I am happy to report that it works perfectly! It is a fairly inexpensive and uncomplicated conversion.
So here is a list of the parts I used:
- 1 x driver's side Miata electric headlight motor*
- 1 x PWM DC motor speed controller*
- 1 x common 12v 5 pin automotive relay (I prefer to use quality relays made by Bosch, Tyco, or Hella)
- 1 x 5 pin automotive relay connector (While not neccessary, I prefer to use these connectors)
- 1 x limit switch with at least one set of NO (normally open) contacts
- 2 x 1/4-28 female rod ends; right hand thread
- 1 x piece of 1/4-28 threaded rod (less than 6" is needed)
- some 3/8" OD metal tubing (brake or fuel type will work; I used SS fuel line)
- various nuts, bolts, and washers; mostly 1/4-20 and 10-24
- wire and wiring terminals (I use GM style multi-pin weather pack terminals)
- metal to fabricate brackets for the limit switch and the electric motor (I used 1/16" x 1" angle and 1/8" plate aluminum respectively)
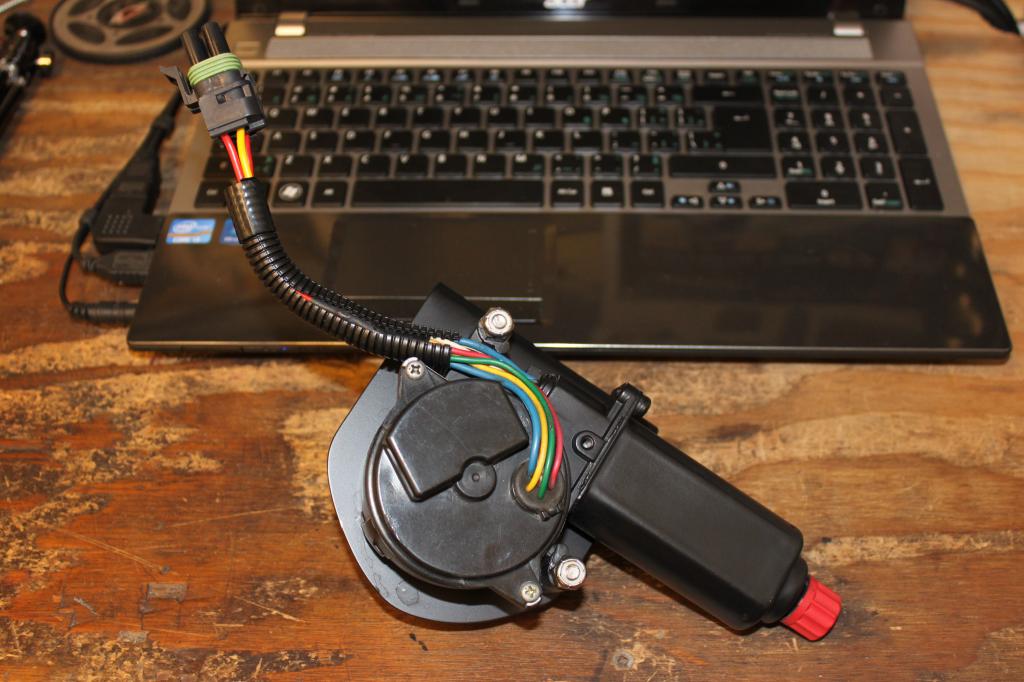
* - While a PWM speed controller is not absolutely necessary, I found that without it, the Miata headlight motor operated far too fast for my liking! If you do decide to use a speed controller, you have to make sure the electric motor you buy is the isolated ground type, and not the common ground type. The common ground type will not work with a PWM controller. There is a video at the end of this post that shows the speed of the motor operating the wiper door at full speed without the PWM controller.
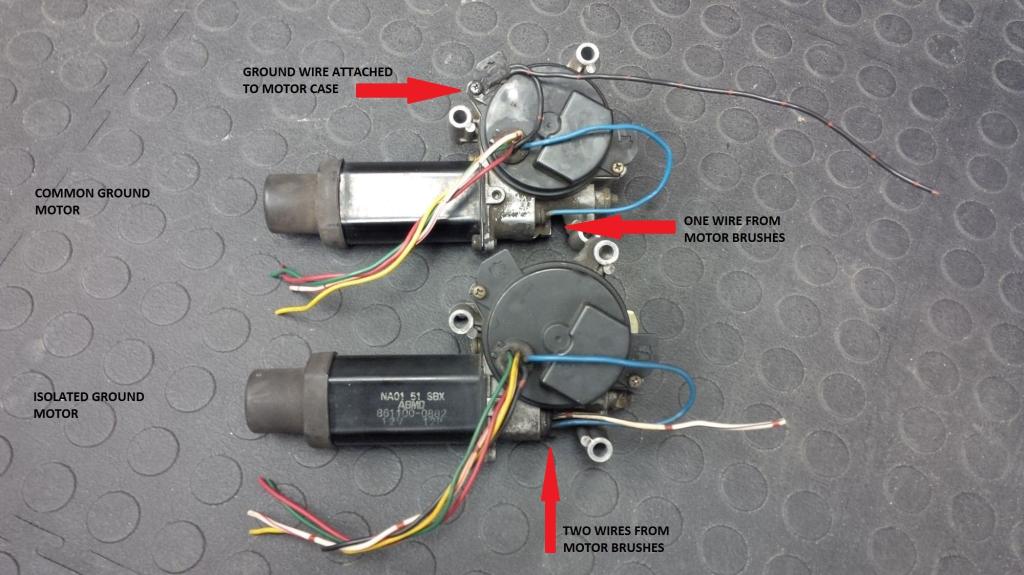
It seems that with some of these Probe and Miata electric motors, the motor shares a common ground with the metal housing. They are easy to identify because there is only one wire coming from the motor brushes, and the ground wire in the harness is attached to the housing with a screw; even removing the wire attached to the housing does not isolate the motor from the housing. I don't know exactly what years these common ground motors were used, but if you want to control them with a PWM controller, you will need the type with an isolated ground.
Here is pic of common ground motor on top, and an isolated ground motor on the bottom; you can easily see on the top motor the single blue wire coming from the brushes, as well as the ground wire attached to the housing with a screw:
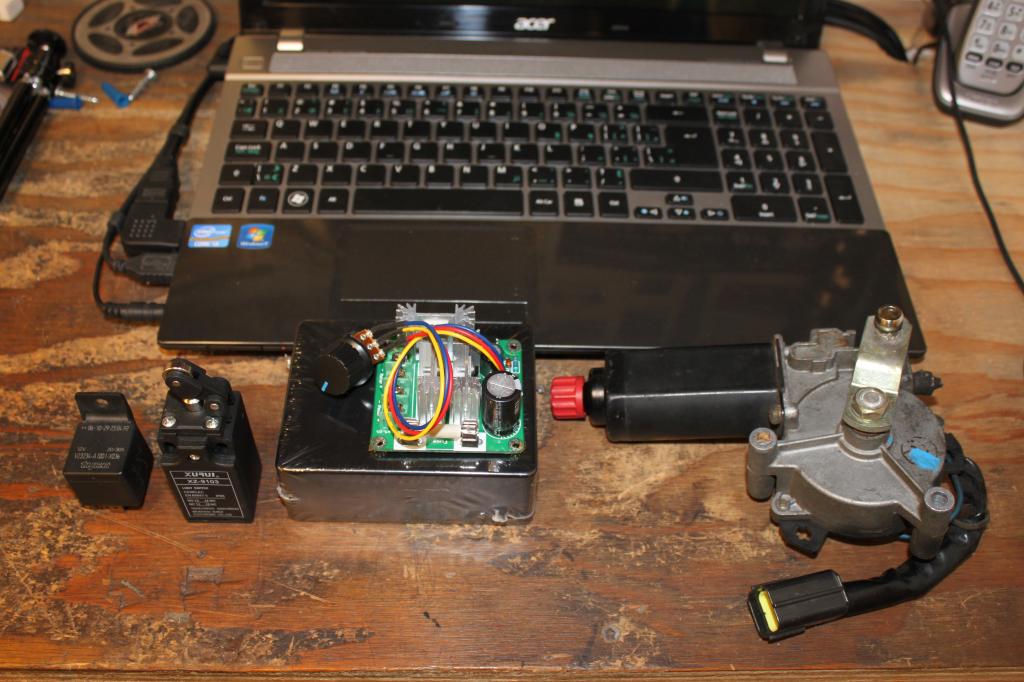
I used this exact PWM controller, I mounted it in a Hammond project enclosure box I already had:
http://www.ebay.ca/itm/New-6V-90V-15...3D271258506428
A PWM controller like this one should also work, and it is already mounted in an enclosure:
http://www.ebay.ca/itm/10-50V-40A-DC...kAAOSw7aBVB6bc
This is the exact limit switch I used:
http://www.ebay.ca/itm/1-XZ-9103-NO-...431&rmvSB=true
Here is a pic of all the electrical devices I used for this conversion:
Mods required to the wiper door linkage and firewall:
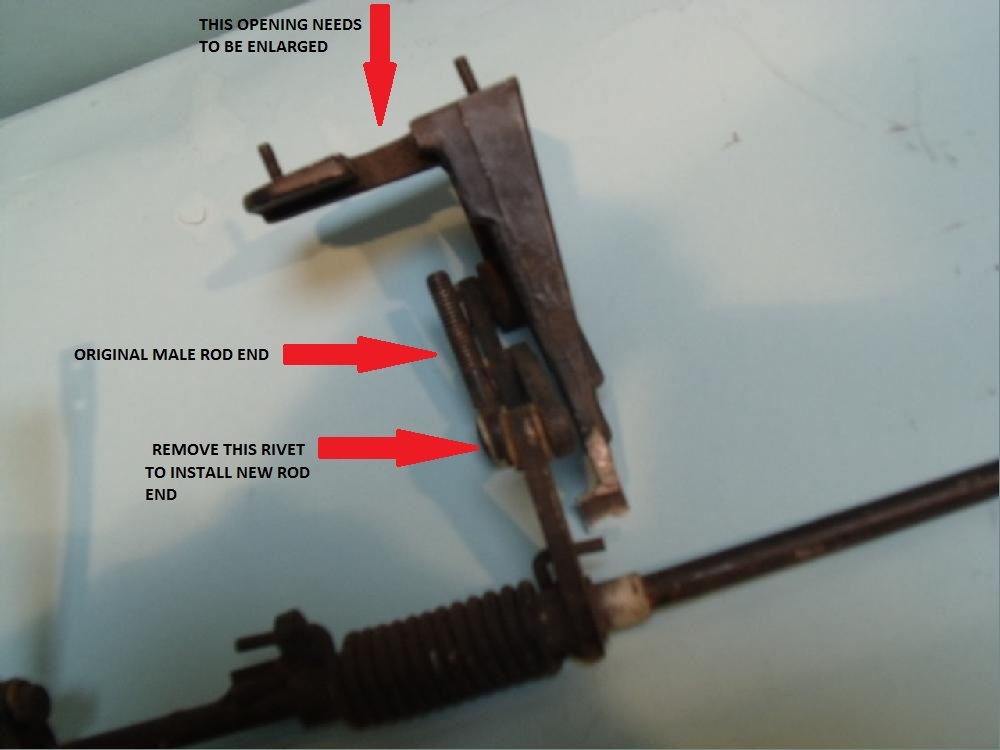
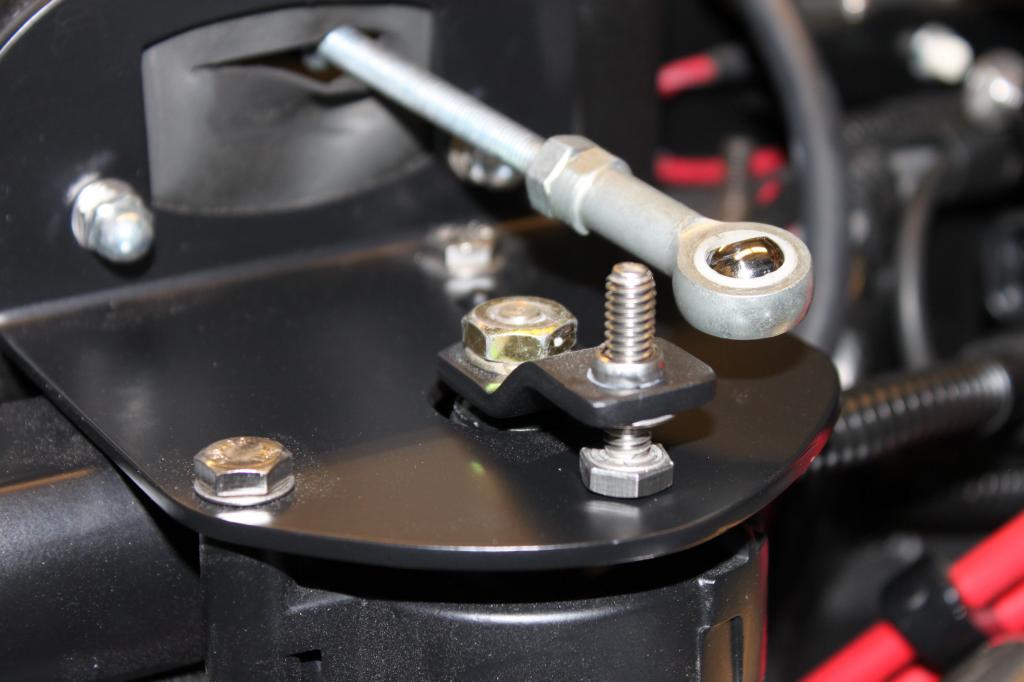
The rivet that holds the original male rod end on has to be drilled out to remove the male rod end. The 1/4" female rod end is then attached using a 1/4-20 bolt and nut. I used small pieces of brake tubing slipped over the bolt on either side of the rod end to act as spacers to allow the rod end to fully articulate in the side-to-side motion.
The wiper door linkage is attached to the firewall with 3 brackets; the bracket in the middle that also attaches the vacuum actuator needs to have the space between the 2 attachment studs opened up to accommodate the side-to-side motion of the new linkage; the hole in the fiberglass firewall that the linkage passes through also needs to be opened up accordingly.
This is not mine, but in this pic, you can see the original threaded male rod end, as well as the space in the bracket that needs to be opened up:
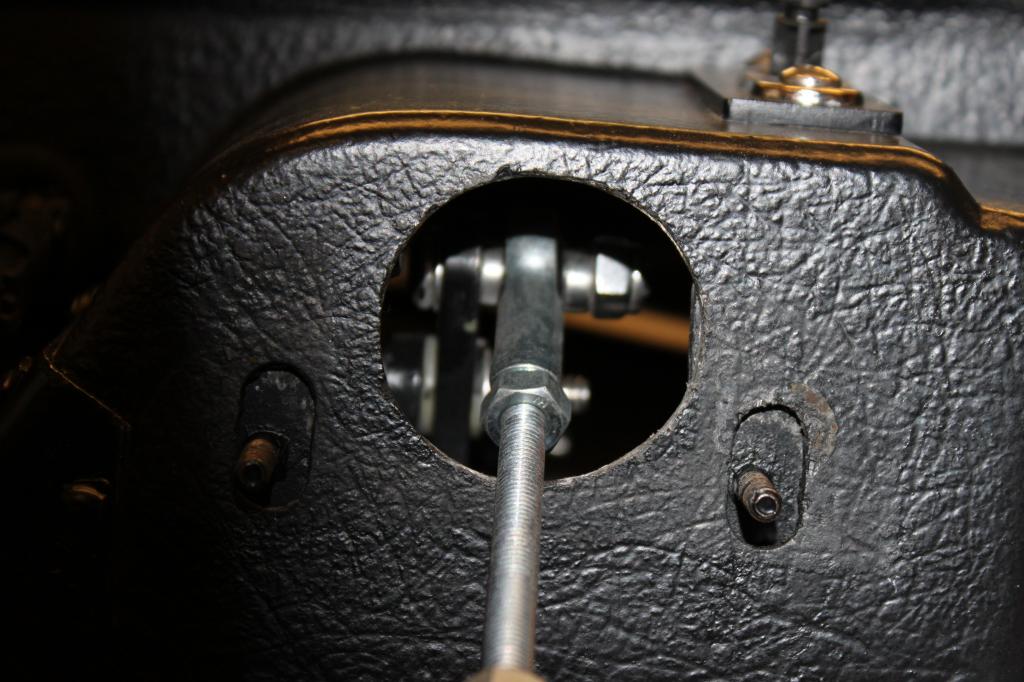
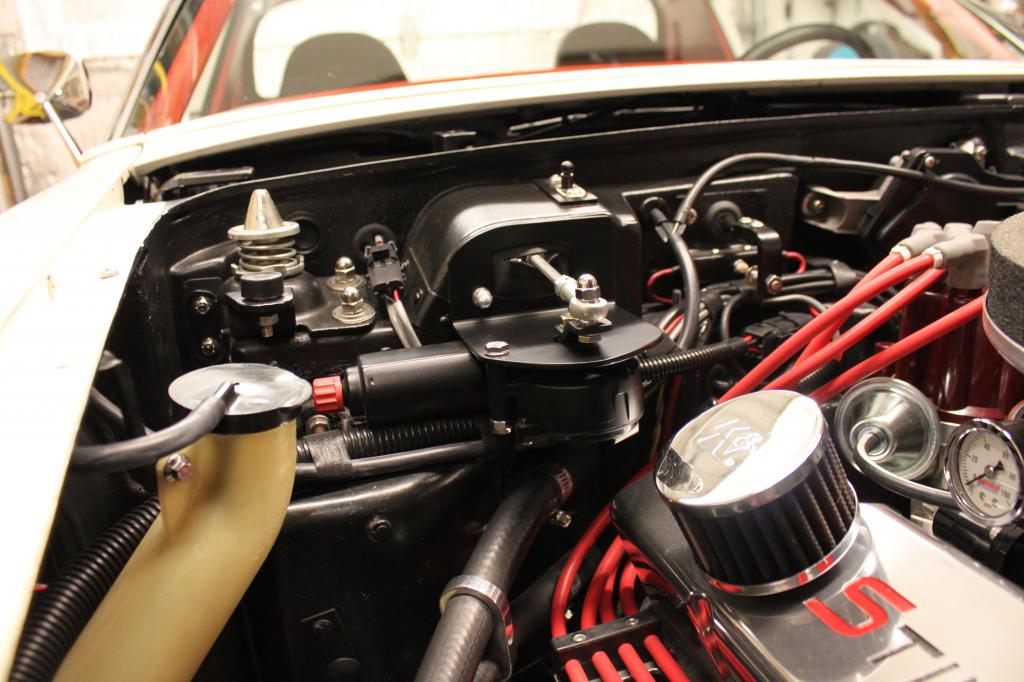
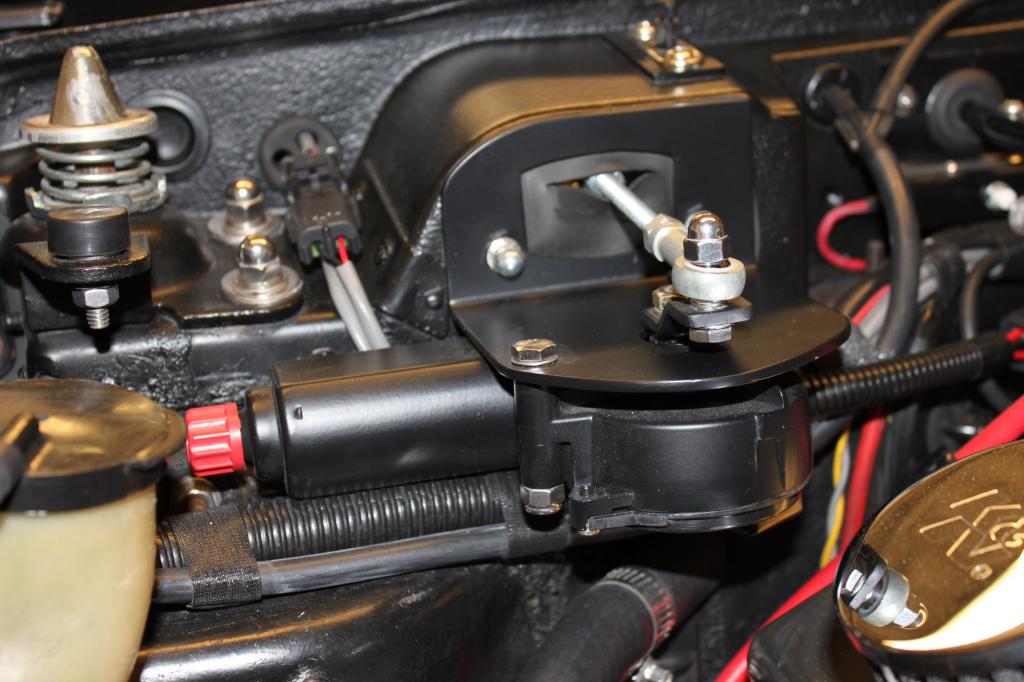
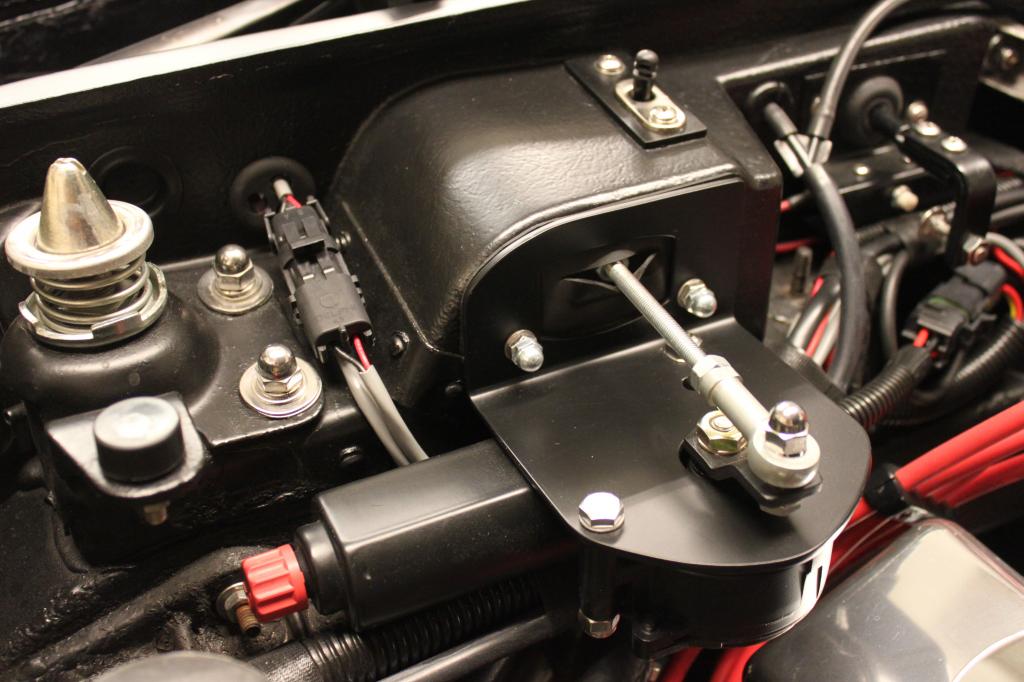
In these pics of my setup, you can see the bigger hole in the fiberglass, as well as the 1/4-20 bolt, nut, female rod end, and the brake tubing spacers on either side of the rod end. In the second pic, if you look at the metal hood latch reinforcing plate that is riveted to the fiberglass, you can see that I trimmed the part that is attached with 1 rivet on the front where the bracket I made for the motor is attached; I did this for more space for the bracket.
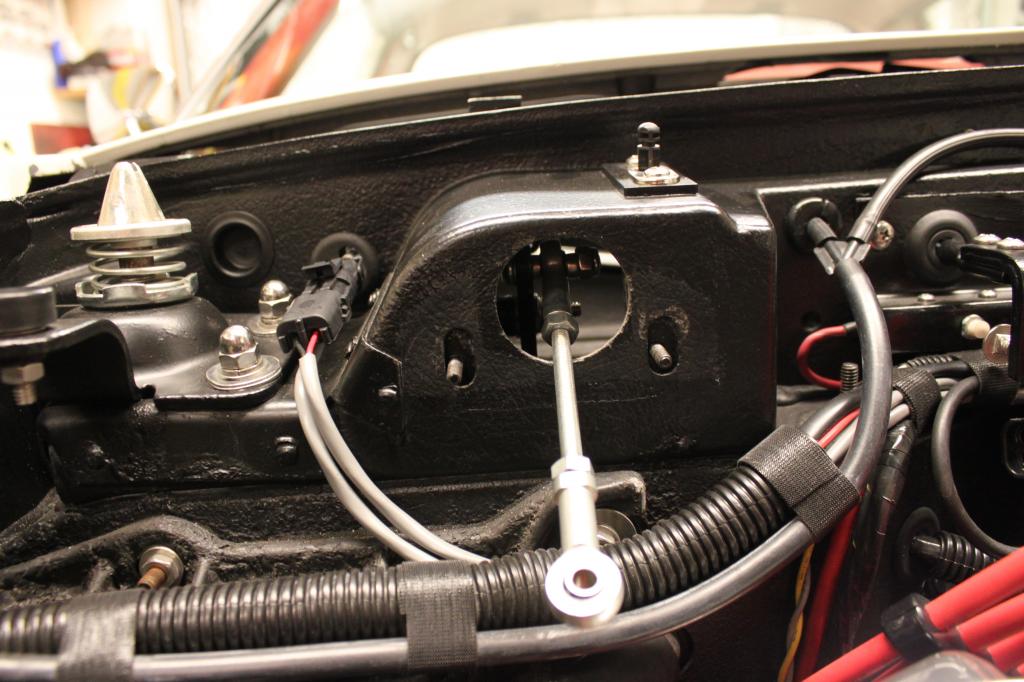
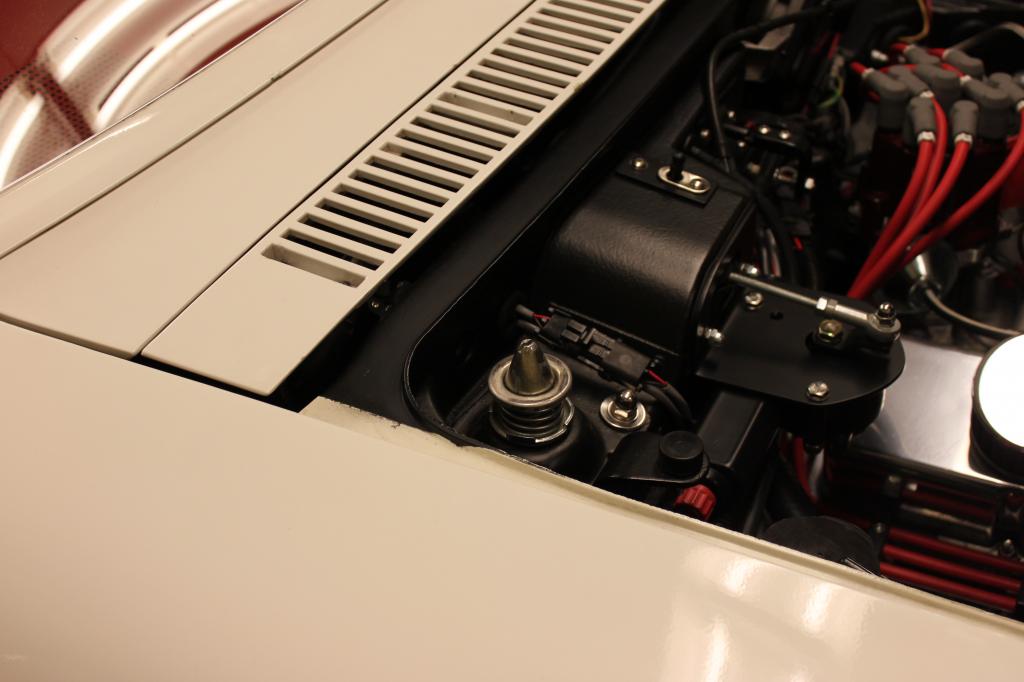
The limit switch:
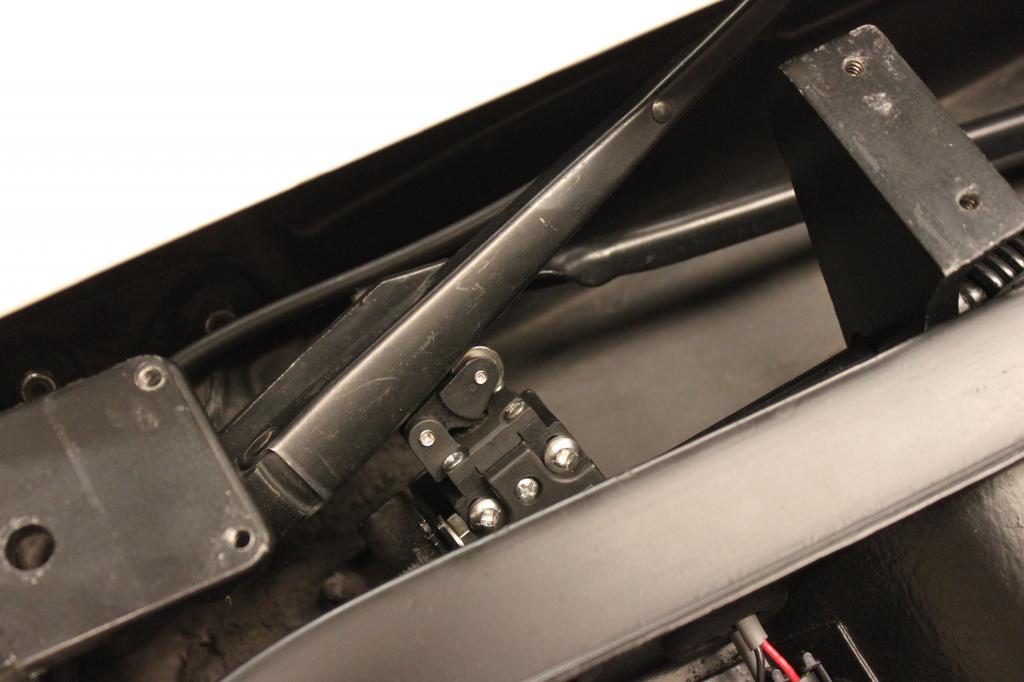
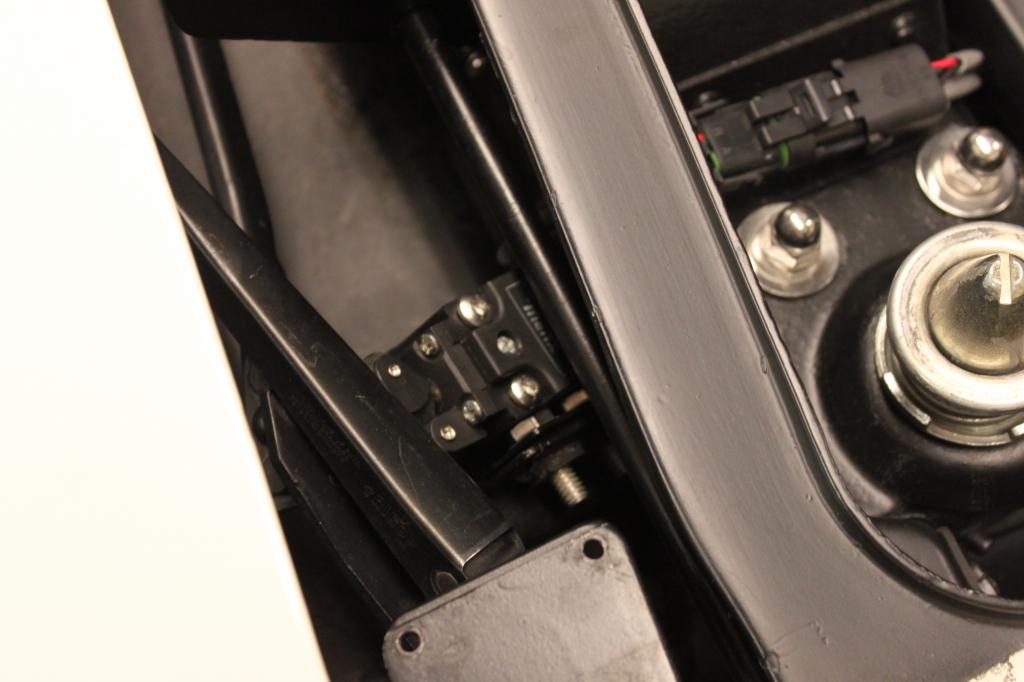
I mounted the wiper arm limit switch in the location that the stock vacuum limit switch was. I made a bracket out of 1/16" aluminum angle. I made all the holes slotted in the piece of angle to allow adjustment of both the angle to the stock mounting point and the limit switch to the angle. The position of the limit switch in relation to the wiper arm takes some trial and error fitting to get right. Any type of limit switch with a suitable type actuating arm and at least one set of normally open contacts should work. I chose the one I used because it was listed as water resistant and seemed to be a suitably small size. It was a tight fit, but it did work. As with most limit switches of this type, you can remove the 4 screws from the top and clock the arm in any one of the 4 possible positions.I had to clock mine 180 degrees from it's as-shipped position. I used a 2-pin weather pack connector mounted on the engine side of the 3 hole rubber grommet that the vacuum hoses to the original vacuum switch passed through to connect/disconnect the new limit switch from the circuit.
Here are a couple of pics of the limit switch installed:
The PWM speed controller and 5 pin relay:
Not much to tell about these 2 items. I mounted them both inside the car behind the passenger side dash, on a bracket mounted to the birdcage. I found the PWM speed controller set at about half way was the speed I liked best.
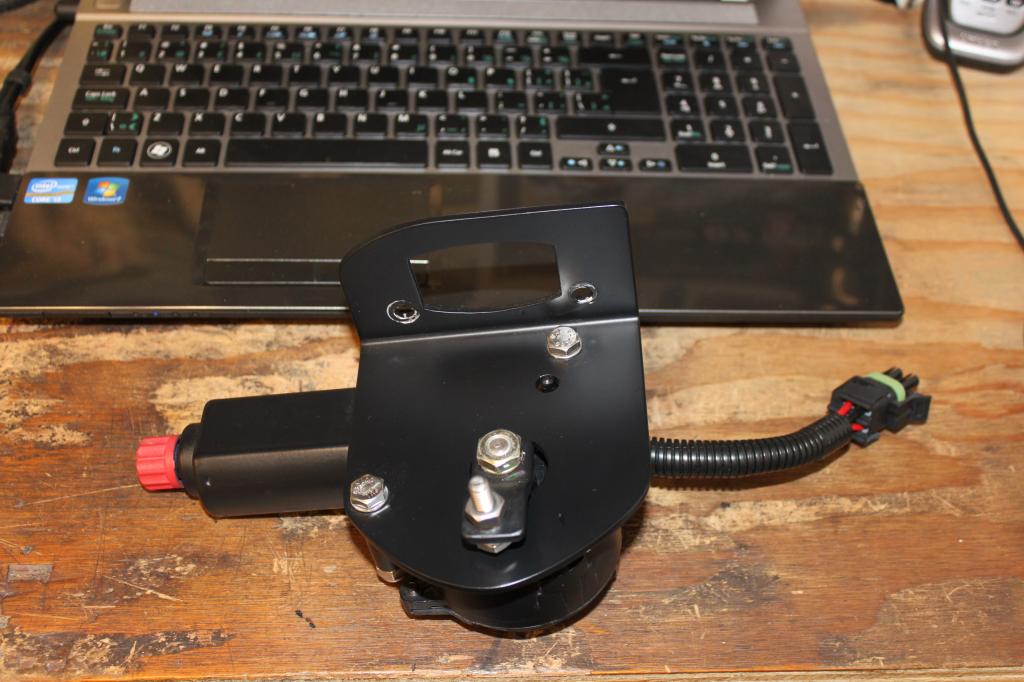
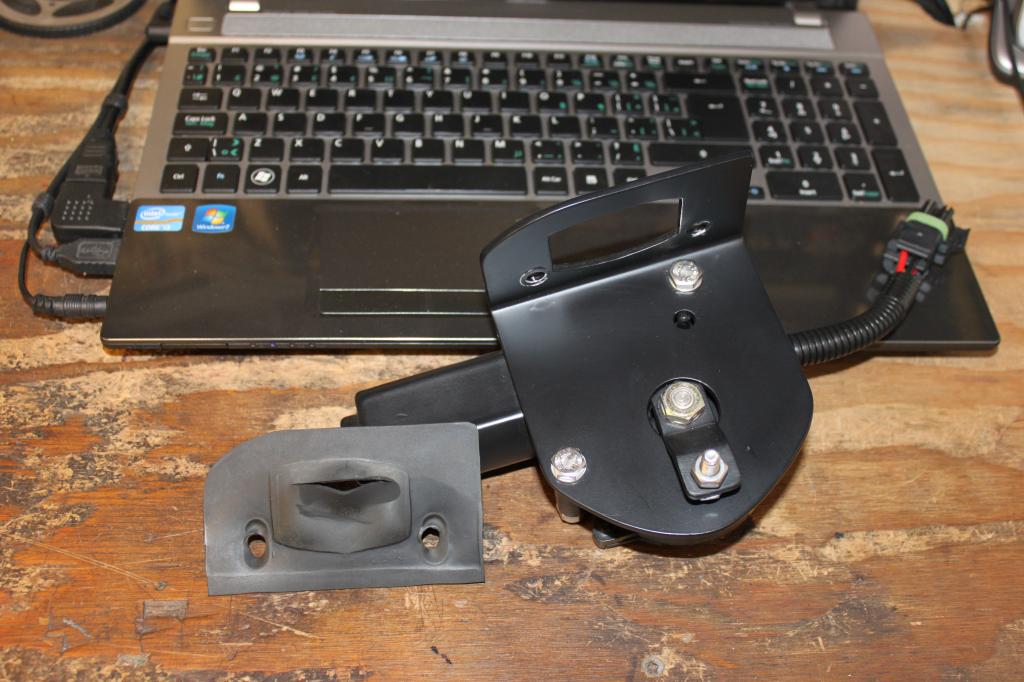
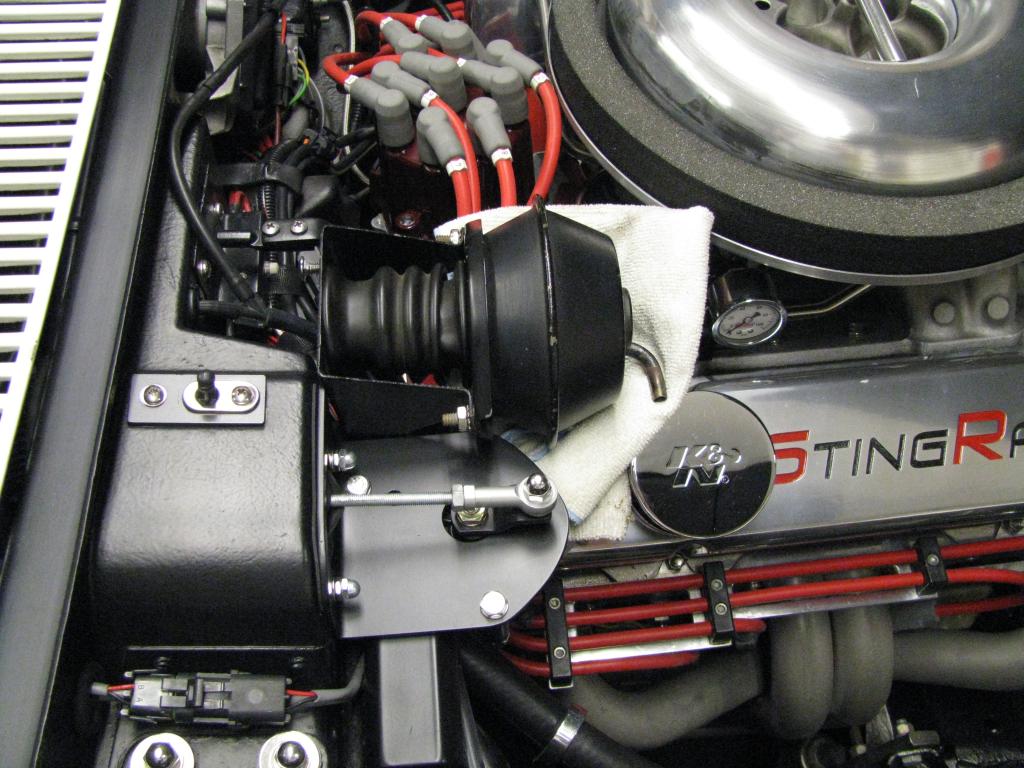
Miata electric headlight motor mods:
On the motor arm, I drilled out the original stud, and then plug welded the hole closed. Then I drilled a new hole 1 1/4" from the arm mounting hole; this measurement was based on the fact that I needed 2 1/2" total throw from the arm. To come to this conclusion, I mocked up the linkage rod to the wiper door linkage, and simply measured how much movement was required to open and close the door completely. Every car is different, your results may vary. I used a 1/4-20 bolt and nut to attach the female rod end to the motor arm, and I also used 2 more small pieces of brake tubing above and below the rod end to facilitate up and down motion of the rod end. My linkage is about 5 1/4" between the rod end mounting holes, but again, yours may be different due to differences car to car.
I completely cut off the outer mounting leg on the motor, and I cut the other 2 remaining mounting legs shorter. The mounting leg at the back which is against the firewall comes close to the factory box for the fan and heater core, so it needed to be shorter, so I just cut the other leg to match.
The motor bracket is made of 1/8" aluminum plate that I put a 90 degree bend into. The final mounting position was determined by educated guess and trial and error. The size and shape of the hole in the bracket that the linkage rod passes through was also determined by trail and error. I used a piece of 1/16" rubber that I cut to fit between the bracket and firewall to act as a gasket.
I used a 4-pin weather pack connector on the motor to connect/disconnect it from the circuit.
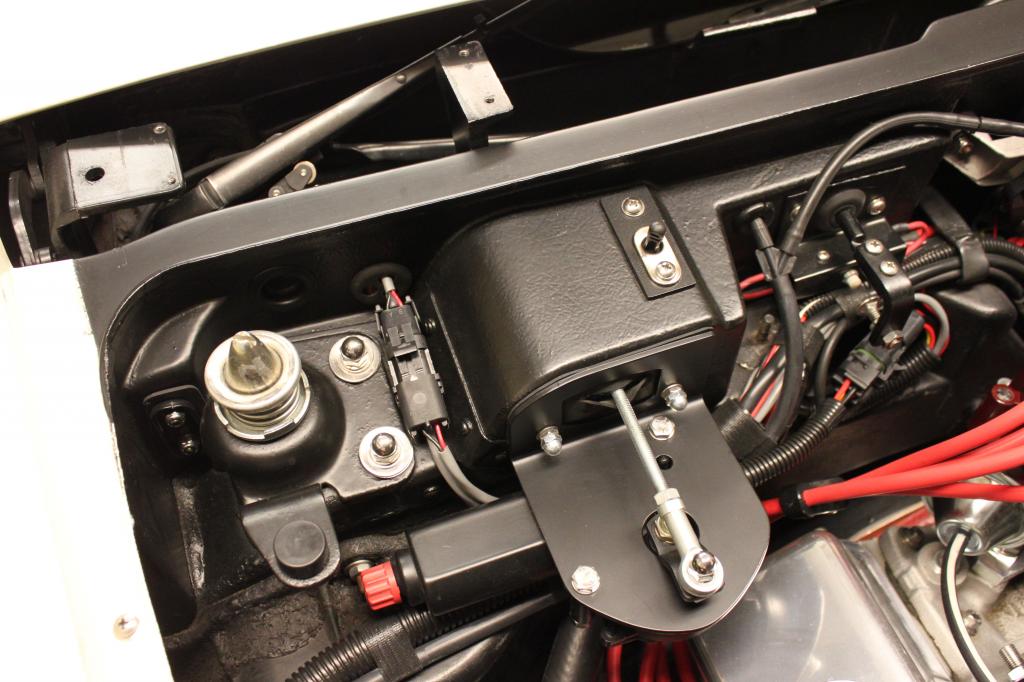
These pics show most of what I just described:
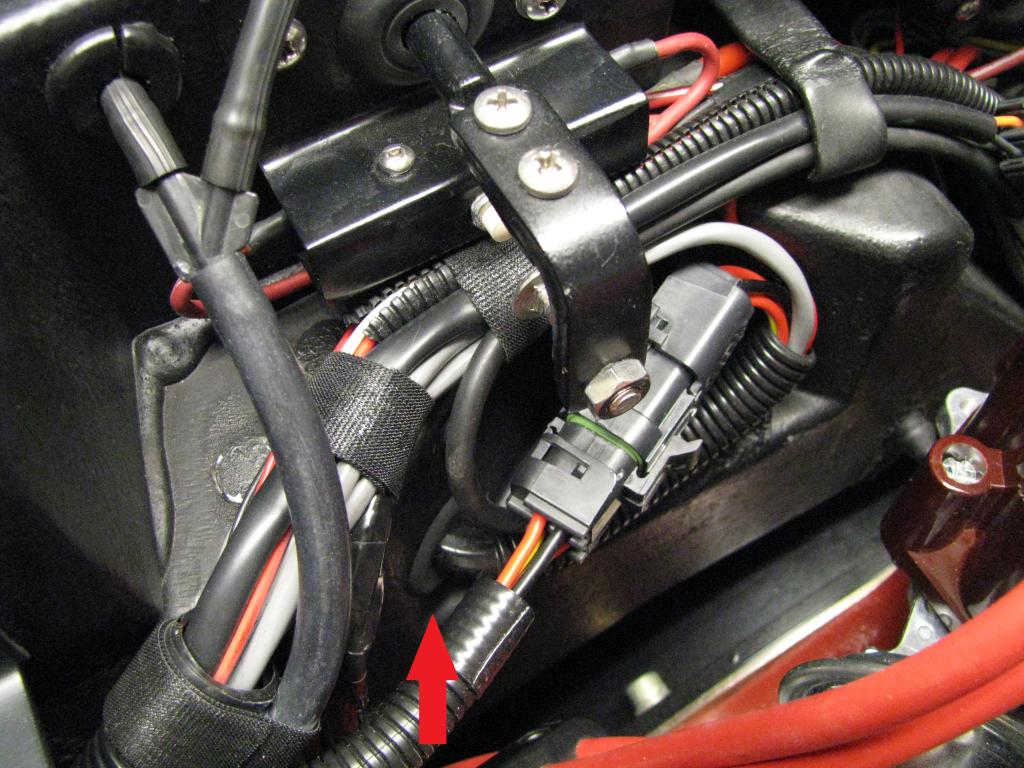
The red arrow in this next pic shows the location on the firewall that I drilled a hole and installed a grommet to pass the electric motor and limit switch wiring into the car:
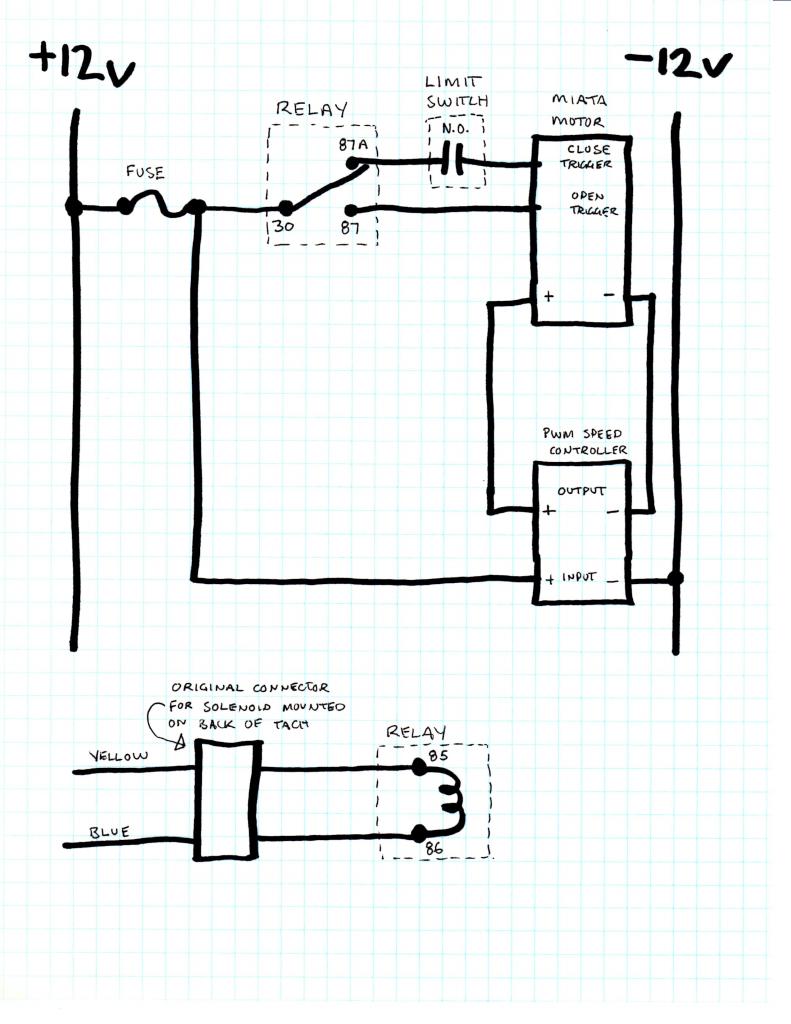
Electrical control circuit:
Here is my high-tech, 1080p, 3D electrical schematic! It is very simple. If you notice, I did not feel the need to complicate the circuit with an override switch for the wiper door motor; all you need to do is use the stock factory wiper motor override switch to open and close the door without the wipers operating. You can attach the relay coil wires to the original solenoid connector without cutting it using male 1/4" spade terminals and simply push them into the original connector. Using the original factory wiper switch energizes the solenoid wiring which in turn operates the relay though the relay coil. The system works exactly as the factory system did. Simple!
Here is a pic showing the finshed conversion parts in relation to the old stock parts:
Here are some general pics of the conversion:
Here is a video of the limit switch and the motor operating:
Here is a video of the motor operating the wiper door at full speed without the PWM controller:
I haven't decided yet if I will fabricate something to cover the linkage on the motor; everyone I have asked about it so far has said not to cover it up!
As a recap, the important features of this conversion are:
- This design has full automatic operation exactly the same as the factory vacuum, using the factory wiper switch.
- It also has a built-in safety interlock to prevent the wiper door from closing on the wipers before they park, just like the factory vacuum system does.
- The electric motor is an automotive OEM unit engineered to be exposed to the elements.
- In the event of an emergency, the wiper door can be operated manually with no tools or disassembly required.
- The entire conversion could be removed and be returned back to vacuum, and the mods to the firewall and linkage would be hidden.
- Absolutely none of the stock wiring has to be cut or altered to install it.
Any questions, please feel free to ask.

I have seen a few different ways people have already done this, specifically either using a linear actuator or an electric seat motor, so I bought one of each to decide which I liked best. I started with the linear actuator; I got as far as fabricating a temporary mounting bracket and installing it. After some tests, I decided to pull the plug on the project because there were a few things I just wasn't happy about using it, and I realized some of the same things would also bother me using a power seat motor.
What I didn't like:
- both the linear actuator and seat motor had operation speeds that were too slow for my liking
- both required wiring that while fairly simple, was still too complicated than I wanted it to be
- if there was an electrical or mechanical failure of any of the parts, both would require some amount of disassembly to manually operate the wiper door, which was something I didn't want to do on the side of the road
What I wanted:
- faster operating speed
- simple wiring with as few components and devices as possible
- full automatic operation exactly the same as the factory vacuum using the factory wiper switch
And the desired function that was absolutely the most important to me:
- The ability to operate the door manually if there is an electrical or mechanical failure of any or all parts with little or no disassembly required to do so, especially if the failure occurs with the door in the closed position and I need to open it. Some people are more concerned about minimizing the size of whatever operates the door in the engine compartment, but I really wanted simple manual control to be a priority.
I tried to figure out a way to accomplish this manual function with either the actuator or seat motor to no real avail, so it was back to the drawing board.
Then it hit me - why not try to use the same Miata headlight motor that I used on the headlight conversion! These motors can be manually operated by turning the red manual ****, so it was a question of would it actually fit and function the way I wanted. Since I had bought a couple of spares, I got them out and quickly determined that it just might work. I fabricated a prototype mounting bracket, basically guessing how it should be located, and then tweaked it to be where I wanted it. Then I prototyped a linkage, and also tweaked it after some testing to operate exactly as I wanted. It worked! All that was left to do was sort out the electrical control circuit so it would operate exactly as the factory vacuum/electric control circuit. Once I had the electrical figured out, I made my permanent mounting bracket and linkage.
I put it to the test over the entire driving season of 2014, including many washes and getting caught in the rain a few times, and I am happy to report that it works perfectly! It is a fairly inexpensive and uncomplicated conversion.
So here is a list of the parts I used:
- 1 x driver's side Miata electric headlight motor*
- 1 x PWM DC motor speed controller*
- 1 x common 12v 5 pin automotive relay (I prefer to use quality relays made by Bosch, Tyco, or Hella)
- 1 x 5 pin automotive relay connector (While not neccessary, I prefer to use these connectors)
- 1 x limit switch with at least one set of NO (normally open) contacts
- 2 x 1/4-28 female rod ends; right hand thread
- 1 x piece of 1/4-28 threaded rod (less than 6" is needed)
- some 3/8" OD metal tubing (brake or fuel type will work; I used SS fuel line)
- various nuts, bolts, and washers; mostly 1/4-20 and 10-24
- wire and wiring terminals (I use GM style multi-pin weather pack terminals)
- metal to fabricate brackets for the limit switch and the electric motor (I used 1/16" x 1" angle and 1/8" plate aluminum respectively)
* - While a PWM speed controller is not absolutely necessary, I found that without it, the Miata headlight motor operated far too fast for my liking! If you do decide to use a speed controller, you have to make sure the electric motor you buy is the isolated ground type, and not the common ground type. The common ground type will not work with a PWM controller. There is a video at the end of this post that shows the speed of the motor operating the wiper door at full speed without the PWM controller.
It seems that with some of these Probe and Miata electric motors, the motor shares a common ground with the metal housing. They are easy to identify because there is only one wire coming from the motor brushes, and the ground wire in the harness is attached to the housing with a screw; even removing the wire attached to the housing does not isolate the motor from the housing. I don't know exactly what years these common ground motors were used, but if you want to control them with a PWM controller, you will need the type with an isolated ground.
Here is pic of common ground motor on top, and an isolated ground motor on the bottom; you can easily see on the top motor the single blue wire coming from the brushes, as well as the ground wire attached to the housing with a screw:
I used this exact PWM controller, I mounted it in a Hammond project enclosure box I already had:
http://www.ebay.ca/itm/New-6V-90V-15...3D271258506428
A PWM controller like this one should also work, and it is already mounted in an enclosure:
http://www.ebay.ca/itm/10-50V-40A-DC...kAAOSw7aBVB6bc
This is the exact limit switch I used:
http://www.ebay.ca/itm/1-XZ-9103-NO-...431&rmvSB=true
Here is a pic of all the electrical devices I used for this conversion:
Mods required to the wiper door linkage and firewall:
The rivet that holds the original male rod end on has to be drilled out to remove the male rod end. The 1/4" female rod end is then attached using a 1/4-20 bolt and nut. I used small pieces of brake tubing slipped over the bolt on either side of the rod end to act as spacers to allow the rod end to fully articulate in the side-to-side motion.
The wiper door linkage is attached to the firewall with 3 brackets; the bracket in the middle that also attaches the vacuum actuator needs to have the space between the 2 attachment studs opened up to accommodate the side-to-side motion of the new linkage; the hole in the fiberglass firewall that the linkage passes through also needs to be opened up accordingly.
This is not mine, but in this pic, you can see the original threaded male rod end, as well as the space in the bracket that needs to be opened up:
In these pics of my setup, you can see the bigger hole in the fiberglass, as well as the 1/4-20 bolt, nut, female rod end, and the brake tubing spacers on either side of the rod end. In the second pic, if you look at the metal hood latch reinforcing plate that is riveted to the fiberglass, you can see that I trimmed the part that is attached with 1 rivet on the front where the bracket I made for the motor is attached; I did this for more space for the bracket.
The limit switch:
I mounted the wiper arm limit switch in the location that the stock vacuum limit switch was. I made a bracket out of 1/16" aluminum angle. I made all the holes slotted in the piece of angle to allow adjustment of both the angle to the stock mounting point and the limit switch to the angle. The position of the limit switch in relation to the wiper arm takes some trial and error fitting to get right. Any type of limit switch with a suitable type actuating arm and at least one set of normally open contacts should work. I chose the one I used because it was listed as water resistant and seemed to be a suitably small size. It was a tight fit, but it did work. As with most limit switches of this type, you can remove the 4 screws from the top and clock the arm in any one of the 4 possible positions.I had to clock mine 180 degrees from it's as-shipped position. I used a 2-pin weather pack connector mounted on the engine side of the 3 hole rubber grommet that the vacuum hoses to the original vacuum switch passed through to connect/disconnect the new limit switch from the circuit.
Here are a couple of pics of the limit switch installed:
The PWM speed controller and 5 pin relay:
Not much to tell about these 2 items. I mounted them both inside the car behind the passenger side dash, on a bracket mounted to the birdcage. I found the PWM speed controller set at about half way was the speed I liked best.
Miata electric headlight motor mods:
On the motor arm, I drilled out the original stud, and then plug welded the hole closed. Then I drilled a new hole 1 1/4" from the arm mounting hole; this measurement was based on the fact that I needed 2 1/2" total throw from the arm. To come to this conclusion, I mocked up the linkage rod to the wiper door linkage, and simply measured how much movement was required to open and close the door completely. Every car is different, your results may vary. I used a 1/4-20 bolt and nut to attach the female rod end to the motor arm, and I also used 2 more small pieces of brake tubing above and below the rod end to facilitate up and down motion of the rod end. My linkage is about 5 1/4" between the rod end mounting holes, but again, yours may be different due to differences car to car.
I completely cut off the outer mounting leg on the motor, and I cut the other 2 remaining mounting legs shorter. The mounting leg at the back which is against the firewall comes close to the factory box for the fan and heater core, so it needed to be shorter, so I just cut the other leg to match.
The motor bracket is made of 1/8" aluminum plate that I put a 90 degree bend into. The final mounting position was determined by educated guess and trial and error. The size and shape of the hole in the bracket that the linkage rod passes through was also determined by trail and error. I used a piece of 1/16" rubber that I cut to fit between the bracket and firewall to act as a gasket.
I used a 4-pin weather pack connector on the motor to connect/disconnect it from the circuit.
These pics show most of what I just described:
The red arrow in this next pic shows the location on the firewall that I drilled a hole and installed a grommet to pass the electric motor and limit switch wiring into the car:
Electrical control circuit:
Here is my high-tech, 1080p, 3D electrical schematic! It is very simple. If you notice, I did not feel the need to complicate the circuit with an override switch for the wiper door motor; all you need to do is use the stock factory wiper motor override switch to open and close the door without the wipers operating. You can attach the relay coil wires to the original solenoid connector without cutting it using male 1/4" spade terminals and simply push them into the original connector. Using the original factory wiper switch energizes the solenoid wiring which in turn operates the relay though the relay coil. The system works exactly as the factory system did. Simple!
Here is a pic showing the finshed conversion parts in relation to the old stock parts:
Here are some general pics of the conversion:
Here is a video of the limit switch and the motor operating:
Here is a video of the motor operating the wiper door at full speed without the PWM controller:
I haven't decided yet if I will fabricate something to cover the linkage on the motor; everyone I have asked about it so far has said not to cover it up!
As a recap, the important features of this conversion are:
- This design has full automatic operation exactly the same as the factory vacuum, using the factory wiper switch.
- It also has a built-in safety interlock to prevent the wiper door from closing on the wipers before they park, just like the factory vacuum system does.
- The electric motor is an automotive OEM unit engineered to be exposed to the elements.
- In the event of an emergency, the wiper door can be operated manually with no tools or disassembly required.
- The entire conversion could be removed and be returned back to vacuum, and the mods to the firewall and linkage would be hidden.
- Absolutely none of the stock wiring has to be cut or altered to install it.
Any questions, please feel free to ask.
Last edited by 7t2vette; 12-08-2015 at 08:26 PM.
 02-28-2015, 09:10 PM
#2
Team Owner


Member Since: Jul 2004
Location: Redondo Beach, California
Posts: 39,562
Received 548 Likes
on
375 Posts

Very impressive and it looks so very professional!!! I think that if GM was going to implement windshield wiper doors today, they'd go all electric and no vacuum.
 02-28-2015, 09:14 PM
#3
1969/1971/1976 Coupes

Very cool. I've been waiting for this. Ironically I was just going back through my subscribed thread on the headlight conversion where you and others were discussing the different ways to fine tune that modification. Great job and very clean lookin. Thank you for posting.
Terry
Terry
02-28-2015, 10:59 PM
#4
Safety Car

I did mine with the seat motor, and you`re right...it moves pretty slow. I LOVE what you did with this! GREAT pics & info!
 03-01-2015, 07:48 AM
#6
Drifting

Member Since: Jun 2011
Location: iowa city iowa
Posts: 1,540
Received 253 Likes
on
139 Posts
2020 Corvette of the Year Finalist (appearance mods)
C3 of Year Winner (appearance mods) 2019

I don't have wiper doors, but I just wanted to say how much I appreciate the time you take to explain all the great things you come up with.
03-01-2015, 09:17 AM
#7
Drifting
Bruce,
This is a great setup. I ran out and got all the parts and installed mine per your instructions.........And it works great!
to Bruce


now I can pass inspection, almost.
This is a great setup. I ran out and got all the parts and installed mine per your instructions.........And it works great!
to Brucenow I can pass inspection, almost.
03-01-2015, 11:12 AM
#8
Le Mans Master

Member Since: May 2003
Location: Fernandina Beach FL
Posts: 8,481
Received 3,220 Likes
on
1,732 Posts
2023 Restomod of the Year finalist
2020 C3 of the Year Winner - Modified
Nice work AND documentation!!!
Great job Bruce!!!
Great find on the waterproof roller switch!!!
I had looked at the Miata/Probe motor to do this as well. The motors are such a neat design - the trigger relays are built in and an ingenious design controlling the movement- all inside. I have used them for some other things on my build.
I went w/ the power seat motor- and yes the wiring does get complex. The linear actuator and the Miata/probe motor just wouldn't fit next to my velocity stacks.
Richard
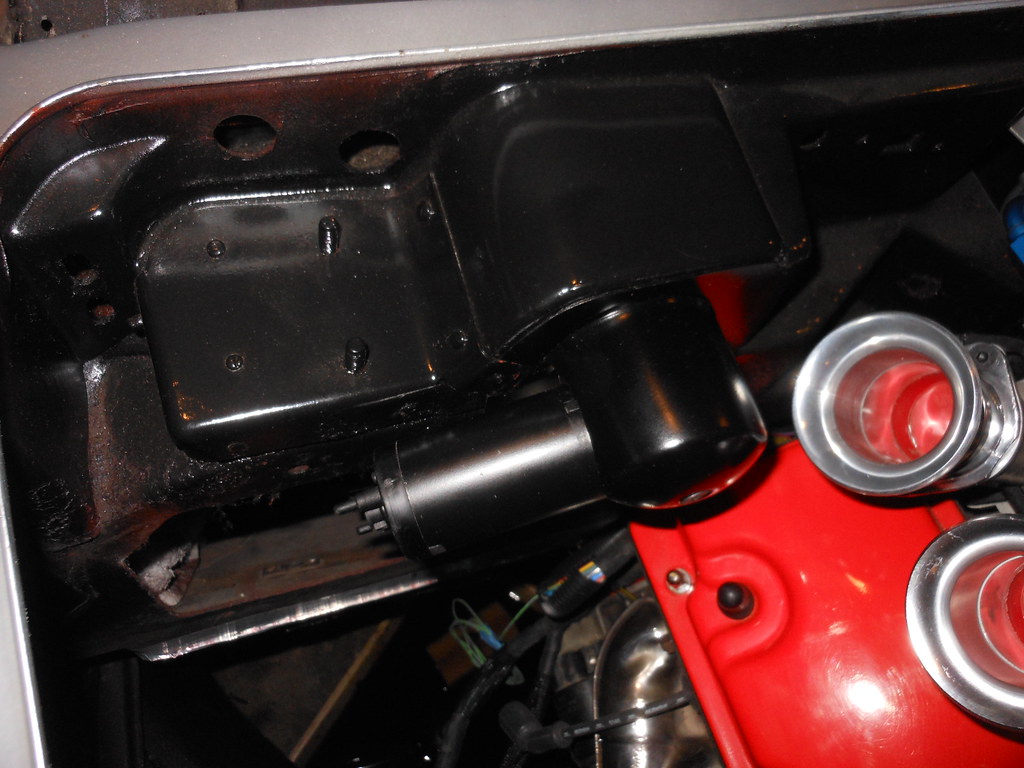 DSCN4655 by richardhayes454, on Flickr
Great job Bruce!!!
Great find on the waterproof roller switch!!!
I had looked at the Miata/Probe motor to do this as well. The motors are such a neat design - the trigger relays are built in and an ingenious design controlling the movement- all inside. I have used them for some other things on my build.
I went w/ the power seat motor- and yes the wiring does get complex. The linear actuator and the Miata/probe motor just wouldn't fit next to my velocity stacks.
Richard
DSCN4655 by richardhayes454, on Flickr
The following users liked this post:
Boros72 (06-10-2016)
03-01-2015, 11:28 AM
#9
Racer

Bruce, incredible creative design. My brain doesn't work as yours but I can still appreciate and covet it. I have detested the vac system since my first C-3 bought new in 1970. And I still don't it on my current 70 b.b. convertible. I've even dream about how nice the engine compartment would look with out the miles of vac hoses. I've even thought of pulling the vac stuff out and simply never driving at night or in the rain, But the brains of the family, my wife, gave me THAT LOOK! If you're ever in Houston and can't wait to install another of your creations, please contact me. PS I did get rid of the pesky heater hoses. I don't drive in the winter and a big block heats up rather nicely on its own. Sure looks 'clean' without those hoses. Have an early spring!
 03-01-2015, 04:17 PM
#11
Drifting
Mine isn't as clean looking as Bruce's, but I'm happy. Pretty simple to do if you follow his instructions.

Last edited by CWerner; 03-01-2015 at 05:14 PM.
03-01-2015, 08:17 PM
#13
The ORIGINAL and bestest
Thread Starter
Member Since: Oct 2000
Location: Toronto Ontario
Posts: 10,009
Received 234 Likes
on
143 Posts
Toronto Events Coordinator
Thanks to everyone for the compliments!
This is a really simple and inexpensive conversion that works great, it cost me less than $150 to do this. The commercially available unit on the market is hideous, huge, and stupidly expensive at about $1300!!
WOW Chris, I only posted this thread last night and you already got it done!!! 
Richard, I don't know where these Miata/Probe motors have been all my life!!  I want to do even more stuff with them, like your awesome James Bond license plate!!
You are right, they are an ingeniously simple but effective design.
You brought up a good point about fitment. I don't know if this conversion will work with a big block or factory AC.
This is a really simple and inexpensive conversion that works great, it cost me less than $150 to do this. The commercially available unit on the market is hideous, huge, and stupidly expensive at about $1300!!
Nice work AND documentation!!!
Great job Bruce!!!
Great find on the waterproof roller switch!!!
I had looked at the Miata/Probe motor to do this as well. The motors are such a neat design - the trigger relays are built in and an ingenious design controlling the movement- all inside. I have used them for some other things on my build.
I went w/ the power seat motor- and yes the wiring does get complex. The linear actuator and the Miata/probe motor just wouldn't fit next to my velocity stacks.
Richard
I want to do even more stuff with them, like your awesome James Bond license plate!! You are right, they are an ingeniously simple but effective design.
You brought up a good point about fitment. I don't know if this conversion will work with a big block or factory AC.
Last edited by 7t2vette; 03-01-2015 at 08:20 PM.
03-02-2015, 06:51 AM
#14

I effing love this forum! This is the next project I was going to look into. Thanks for your input sir, a fishing trip with good, cold beer is waiting for you if you find yourself in Oceanside CA.
03-02-2015, 07:12 PM
#15

I actually chose a slow linear actuator since it didn't require a wiper park before the wiper door closed.
But then again, I think I've only used wipers a couple times in the last few years.
But then again, I think I've only used wipers a couple times in the last few years.
03-02-2015, 10:00 PM
#16
The ORIGINAL and bestest
Thread Starter
Member Since: Oct 2000
Location: Toronto Ontario
Posts: 10,009
Received 234 Likes
on
143 Posts
Toronto Events Coordinator
If you do this conversion, be sure to post some pics of it.
The following users liked this post:
Kate Sturdevant (10-04-2020)
03-10-2015, 07:11 PM
#17
The ORIGINAL and bestest
Thread Starter
Member Since: Oct 2000
Location: Toronto Ontario
Posts: 10,009
Received 234 Likes
on
143 Posts
Toronto Events Coordinator
03-10-2015, 11:53 PM
#18
Terrorizing Orange Cones
Bruce, Thanks for the excellent write up on this conversion. It is definitely one of my bucket list items and can't be implemented soon enough. Tired of having my leaky vacuum system show its weaknesses, each time I fire the motor and the windshield wiper door hang open when not requested during operation.
I hope to convert to your solution before the end of this year.
I hope to convert to your solution before the end of this year.
03-12-2015, 08:31 AM
#19
Melting Slicks

Member Since: Jul 2001
Location: Massapequa Park NY
Posts: 2,604
Likes: 0
Received 10 Likes
on
8 Posts
Thanks to everyone for the compliments!
This is a really simple and inexpensive conversion that works great, it cost me less than $150 to do this. The commercially available unit on the market is hideous, huge, and stupidly expensive at about $1300!!
WOW Chris, I only posted this thread last night and you already got it done!!!
Richard, I don't know where these Miata/Probe motors have been all my life!! I want to do even more stuff with them, like your awesome James Bond license plate!!
You are right, they are an ingeniously simple but effective design.
You brought up a good point about fitment. I don't know if this conversion will work with a big block or factory AC.
This is a really simple and inexpensive conversion that works great, it cost me less than $150 to do this. The commercially available unit on the market is hideous, huge, and stupidly expensive at about $1300!!
WOW Chris, I only posted this thread last night and you already got it done!!!
Richard, I don't know where these Miata/Probe motors have been all my life!!
I want to do even more stuff with them, like your awesome James Bond license plate!! You are right, they are an ingeniously simple but effective design.
You brought up a good point about fitment. I don't know if this conversion will work with a big block or factory AC.
Extremely neat & professional looking  I plan to add this to mine as well. I'll post up some pictures of how it fits with a big block
 Jim
03-12-2015, 10:42 AM
#20
Le Mans Master
Very nice! Both the mod and the write up! Added to my list of projects