
Giddyup GO Daddy's Vette
 10-23-2015, 01:00 AM
#21
Melting Slicks

Thread Starter


Brand new calipers too. And yes, they got peed on as well. So I am wire wheeling them to get off rust and cat pee damage. Is there a better way than wirewheeling and sandpaper?
 10-23-2015, 01:01 AM
#22
Melting Slicks
Thread Starter

More of the same
10-23-2015, 01:05 AM
#24
Melting Slicks
Thread Starter

Rust and crud inside and out. How far should I go with this? Want to paint them (RED of course!) so I know they need to be pretty well crud free.Paint the inside too? Disassemble then paint?
10-23-2015, 01:15 AM
#25
Melting Slicks
Thread Starter
 That rotor is the best of the four. One has had some sort of paint spilled all over it. I will try brushing them first. Really haate the thought of turning brand new rotors! And I have more time than money, so I will brush before taking them in!
10-23-2015, 01:15 AM
That rotor is the best of the four. One has had some sort of paint spilled all over it. I will try brushing them first. Really haate the thought of turning brand new rotors! And I have more time than money, so I will brush before taking them in!
10-23-2015, 01:15 AM
#26
Melting Slicks

The carb you have is a 750 I believe, I'm not Quadrajet expert though. There are plenty of members on the forum who swear by them and i would be inclined to stick with it as long as it was rebuilt be an expert.
10-23-2015, 01:26 AM
#27
Melting Slicks
There is every chance your calipers will be okay with just new seals if they have not had brake fluid in them before. As for cleaning them up, media blasting is the easiest but elbow grease and wire buffing will get you there. I would pop the pistons out and check the bores before painting them. Probably easiest to paint them after the pistons have been refitted at least that is what I did after masking the pistons and their rubber boots (saves knocking the paint around).
10-23-2015, 01:26 AM
#28
Melting Slicks
Thread Starter

Got my steering control rod cleaned up and painted!

New sway bar being roughed into place

New Energy Suspension bushing and control rods. Any tips on putting these things in? Compress the spring? HELP!


Some places the wire wheel just doesn't reach!
10-23-2015, 08:47 PM
#29
Melting Slicks
Thread Starter
Is it possible to install the sway bar upside down? Car didn't have one on it when I got and it looks the same to me, but not going together easily. I can get a final washer and nut on top, and tighten it down with what appears to be plenty of space for final bushing, but space not there when I loosen nut to put it on, even if I have both sides tightened down at the same time. Compress the spring? IF so with what and how. Heard there is a video out there that shows doing it using wire straps but not sure I am redneck enuff for that!
 10-23-2015, 09:51 PM
#31
Instructor

Is it possible to install the sway bar upside down? Car didn't have one on it when I got and it looks the same to me, but not going together easily. I can get a final washer and nut on top, and tighten it down with what appears to be plenty of space for final bushing, but space not there when I loosen nut to put it on, even if I have both sides tightened down at the same time. Compress the spring? IF so with what and how. Heard there is a video out there that shows doing it using wire straps but not sure I am redneck enuff for that!
https://www.corvetteforum.com/forums...ar-1980-a.html
It also shows that the bar is 'sandwiched' between two rubber bushings. I don't know if your kit is supposed to be the same way.
The following users liked this post:
Andy Tuttle (10-24-2015)
10-24-2015, 12:29 AM
#32
Melting Slicks
Thread Starter
Thanks for the link! Shore enuff, mine is on upside down! Will change it and see how that goes!
10-24-2015, 02:36 AM
#33
Melting Slicks
Thread Starter
 It is amazing how having things lined up right make things go smoother! It took at little while and the one control rod was just a bit stubborn, but now they are on! Now all I need is a torque wrench to put them to factory specs! I feel really good because I have advanced the project and done something that Dad didn't do! Kinda hard to explain. Onward forward from here!
10-25-2015, 07:50 PM
It is amazing how having things lined up right make things go smoother! It took at little while and the one control rod was just a bit stubborn, but now they are on! Now all I need is a torque wrench to put them to factory specs! I feel really good because I have advanced the project and done something that Dad didn't do! Kinda hard to explain. Onward forward from here!
10-25-2015, 07:50 PM
#34
Melting Slicks
Thread Starter
Just found out my neighbor has a sandblaster! The big cabinet kind. My calipers have never had brake fluid in them. Can I use the sand blaster to clean them? It would speed the project up considerably. If I did sandblast them, how would I do it- with the old seals and good pistons in or take them out> If so, how would I get all the sand out to be sure they are not contaminated when I install new seals and install, eventually with brake fluid? I know these are simpleton questions, but it is the only way I can learn! Thanks in advance for the help guys!
10-25-2015, 07:57 PM
#35
Melting Slicks
Thread Starter
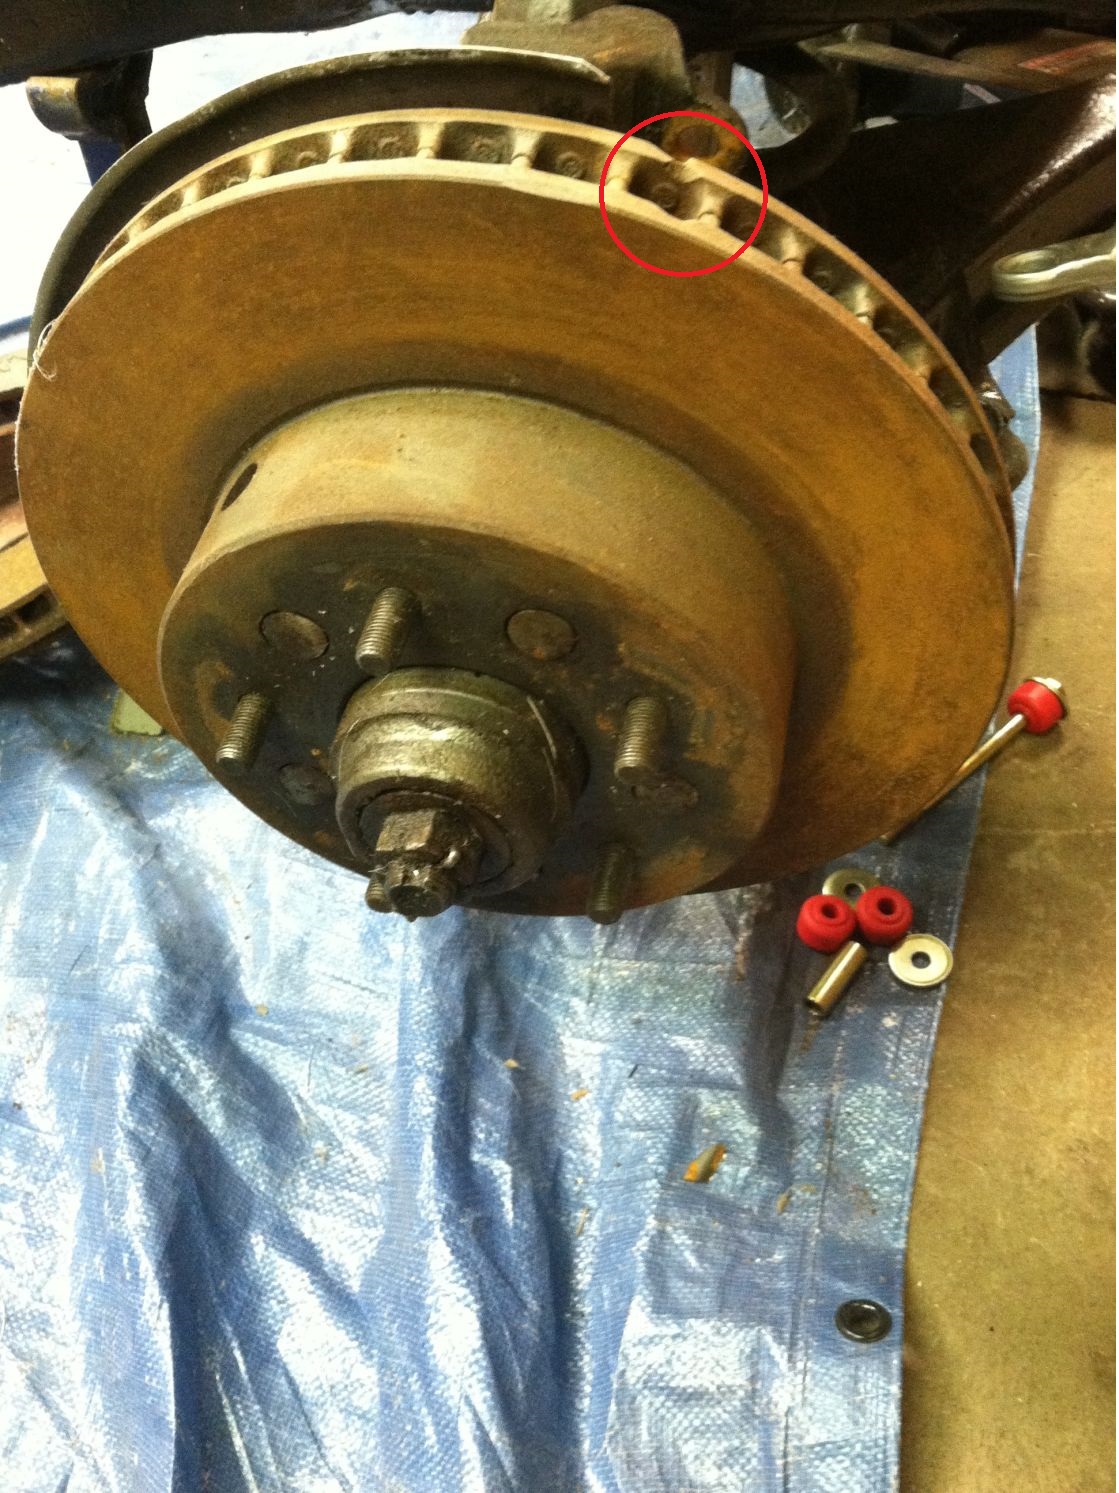
The rotor in your picture looks like it has a chip. You may want to make sure that there's not a crack on the face of the rotor.
Attachment 47924988
Attachment 47924988
10-25-2015, 08:56 PM
#36
Melting Slicks
Just found out my neighbor has a sandblaster! The big cabinet kind. My calipers have never had brake fluid in them. Can I use the sand blaster to clean them? It would speed the project up considerably. If I did sandblast them, how would I do it- with the old seals and good pistons in or take them out> If so, how would I get all the sand out to be sure they are not contaminated when I install new seals and install, eventually with brake fluid? I know these are simpleton questions, but it is the only way I can learn! Thanks in advance for the help guys!
10-25-2015, 09:26 PM
#37
Melting Slicks
Thread Starter

My sway bar installed! Need to get torque wrench and tighten to factory specs. Do I need to be concerned with the space above the bar in the bushing?
10-25-2015, 09:28 PM
#38
Melting Slicks
Thread Starter

There is the whole bar, turned upside right! Thanks 73Vettz!
10-25-2015, 09:30 PM
#39
Melting Slicks
Thread Starter

Passenger side. Note no space in bushing above bar.
10-25-2015, 09:34 PM
#40
Melting Slicks
Thread Starter

Ok this is the carb that came with the 427. Don't think it is what I want to run on the Vette. It was supposedly on the engine that was in a pickup that the previous owner was driving when he totaled the truck. The family pulled the engine and sold it to pay for the lawyer's bills. Apparently owner was in jail at the time. I didn't ask too many questions!