
How to Test Power Door Lock Switch? 1979
 12-27-2015, 04:58 PM
#1


am working through a small problem and searching here/there has left me stumped.
my car is in winter storage, and it's time for a few off-season projects. the door locks and latches have moved to the top of the list, and am making progess. cleaning and lubing the driver's door latch, keyed lock, all rod ends, hidden pivot, and actuator rod had made all the difference as the outer door handle now works easily and i can lock/unlock the car using the manual button, or key. but the actuator only functions in one direction (locking).
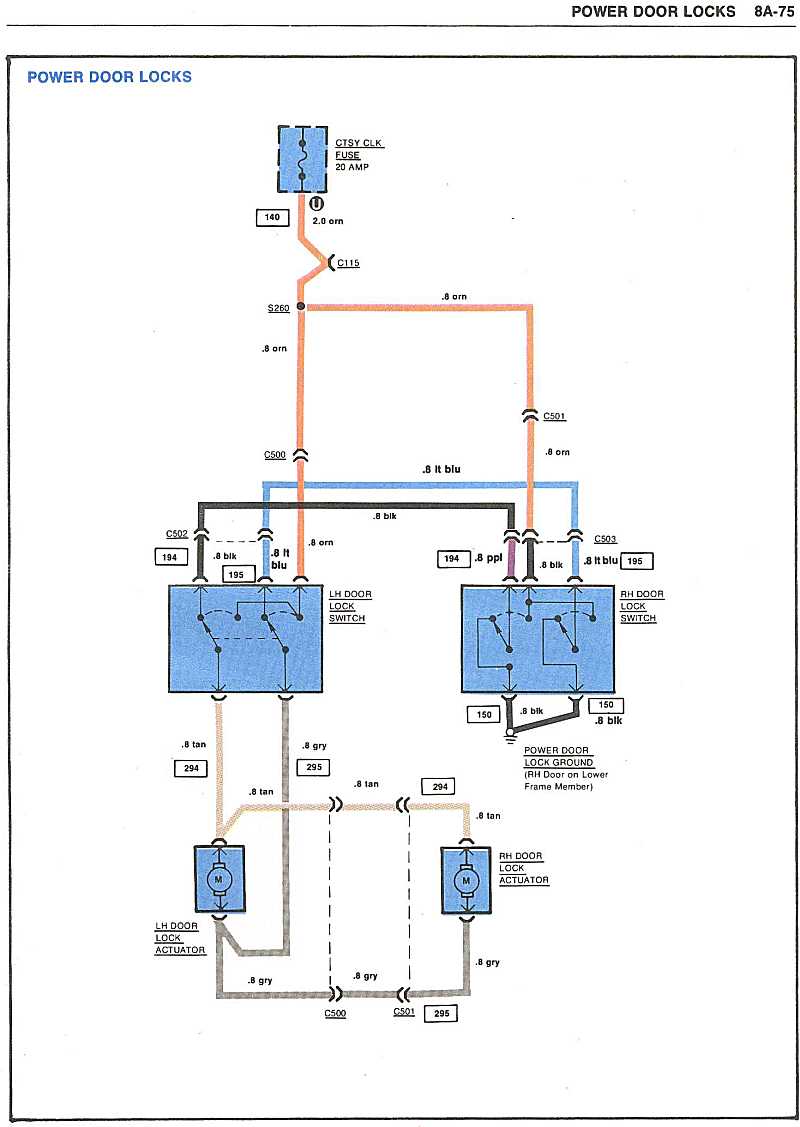
i unplugged the pigtail connection and supplied 12v to the actuator via the connector and it functions in both directions, so that's good. actuator and pigtail connection are good. by connecting the pigtail to the switch, i can only lock the door. think i have a faulty switch, but before i order a replacment, was wondering if anyone knows how to test one? nothing in my corvette service manual regarding testing, except a description of the power lock system and a wiring diagram. i have a multi-meter.
thanks, and regards,
bob p
(the passenger side needs the same attention, but i haven't been there yet. outside handle very stiff, doors don't lock/unlock via the switch).
my car is in winter storage, and it's time for a few off-season projects. the door locks and latches have moved to the top of the list, and am making progess.
cleaning and lubing the driver's door latch, keyed lock, all rod ends, hidden pivot, and actuator rod had made all the difference as the outer door handle now works easily and i can lock/unlock the car using the manual button, or key. but the actuator only functions in one direction (locking). i unplugged the pigtail connection and supplied 12v to the actuator via the connector and it functions in both directions, so that's good. actuator and pigtail connection are good. by connecting the pigtail to the switch, i can only lock the door. think i have a faulty switch, but before i order a replacment, was wondering if anyone knows how to test one? nothing in my corvette service manual regarding testing, except a description of the power lock system and a wiring diagram. i have a multi-meter.
thanks, and regards,
bob p
(the passenger side needs the same attention, but i haven't been there yet. outside handle very stiff, doors don't lock/unlock via the switch).
 12-27-2015, 05:14 PM
#2
Burning Brakes

Can you get to the connections on the back of the switch with the multimeter? You can either use the ohms scale to see if contact is being made in both directions (with power to the switch disconnected), or the voltmeter could be used.

 12-28-2015, 07:45 AM
#5
hello again, and thx!
i've supplied 12v power to the actuator via the pigtail and the actuator works in both directions. with forum member help here i was able to test the switch, and it also tests fine in the "lock" and "unlock" positions. i think this means the pigtail connections need cleaning.
prior to checking anything else i had previously cleaned the male pins of the connection, will now try to polish the female sides and report back. thx again,
bob p
12-28-2015, 01:44 PM
#6
Team Owner


You can't test switches that pass significant current with a multimeter. The important aspect you need to check is the resistance when 'rated' power is passed through the switch. When such switches get contact points that are corroded/carboned-up/pitted, the contact resistance will increase with current flow. A multimeter can't check for that.
If you think switches have significant risk of contact wear (either from many years of use or because you have no prior knowledge of how well they function), it would be best to open them up, check the contacts, clean the contacts, and apply some non-conductive grease to them to minimize arcing and corrosion in the future.
Just replacing them is NOT an option, IMO...IF those switches are factory units. The OEM switches were MUCH better quality than the present day replacements. You should replace switches ONLY if they are un-repairable. A better alternative would be to locate salvaged orginal parts and clean them up for reuse. If you do buy replacement parts, you may want to open them up and apply protectant grease to their contacts. Not putting grease on their contacts saves the manufacturer a fraction of a penny, so you just get new contacts that burn easily.
Last edited by 7T1vette; 12-28-2015 at 01:47 PM.
12-28-2015, 02:32 PM
#7
Burning Brakes
You can't test switches that pass significant current with a multimeter. The important aspect you need to check is the resistance when 'rated' power is passed through the switch. When such switches get contact points that are corroded/carboned-up/pitted, the contact resistance will increase with current flow. A multimeter can't check for that.
If you think switches have significant risk of contact wear (either from many years of use or because you have no prior knowledge of how well they function), it would be best to open them up, check the contacts, clean the contacts, and apply some non-conductive grease to them to minimize arcing and corrosion in the future.
Just replacing them is NOT an option, IMO...IF those switches are factory units. The OEM switches were MUCH better quality than the present day replacements. You should replace switches ONLY if they are un-repairable. A better alternative would be to locate salvaged orginal parts and clean them up for reuse. If you do buy replacement parts, you may want to open them up and apply protectant grease to their contacts. Not putting grease on their contacts saves the manufacturer a fraction of a penny, so you just get new contacts that burn easily.
If you think switches have significant risk of contact wear (either from many years of use or because you have no prior knowledge of how well they function), it would be best to open them up, check the contacts, clean the contacts, and apply some non-conductive grease to them to minimize arcing and corrosion in the future.
Just replacing them is NOT an option, IMO...IF those switches are factory units. The OEM switches were MUCH better quality than the present day replacements. You should replace switches ONLY if they are un-repairable. A better alternative would be to locate salvaged orginal parts and clean them up for reuse. If you do buy replacement parts, you may want to open them up and apply protectant grease to their contacts. Not putting grease on their contacts saves the manufacturer a fraction of a penny, so you just get new contacts that burn easily.
As for cleaning old switches, I've found it to be only a very temporary fix in nearly every case. Power switches don't fail because they're dirty, but rather because the contacts are pitted and burnt. You can file them down, but that removes the plating that was put on during manufacture to prevent exactly what you're trying to repair. The only right way to refurbish a switch is to reshape the contacts, then have them hard silver plated. Unfortunately, you could probably install five aftermarket switches for the cost of having that done.
12-28-2015, 04:32 PM
#8
Safety Car


am working through a small problem and searching here/there has left me stumped. but the actuator only functions in one direction (locking).
i unplugged the pigtail connection and supplied 12v to the actuator via the connector and it functions in both directions, so that's good. actuator and pigtail connection are good. by connecting the pigtail to the switch, i can only lock the door. think i have a faulty switch, but before i order a replacment, was wondering if anyone knows how to test one? nothing in my corvette service manual regarding testing, except a description of the power lock system and a wiring diagram. i have a multi-meter.
i unplugged the pigtail connection and supplied 12v to the actuator via the connector and it functions in both directions, so that's good. actuator and pigtail connection are good. by connecting the pigtail to the switch, i can only lock the door. think i have a faulty switch, but before i order a replacment, was wondering if anyone knows how to test one? nothing in my corvette service manual regarding testing, except a description of the power lock system and a wiring diagram. i have a multi-meter.
I went through a similar exercise with my 78 several years ago and published this article on a once popular Corvette magazine. You are on the right track but this may offer some additional issues to track down.
Hope this proves additional insights to solving this perplexing problem.
Tired of Twisting: Time to Power Up those 30-year Locks
The following users liked this post:
454Luvr (12-28-2015)
12-28-2015, 06:29 PM
#10
hello and many thx for the replies and links!
i was previously getting inconsistant/flaky results when testing the switch in the "unlock" position, and would like to stay with the oem switch if possible. didn't see a way to disass it to clean contacts, so i sprayed the internals w/wd40 and blew out w/compressed air. much better! consistant/repeatable results when testing by multi-meter, so i'll plug it in and give it a try. the car is in winter storage, and the door panel is off so that part is easy.
may be a few days though, winter storm is approaching and i gotta attach my snowplow and get the chains on.
bob p
12-29-2015, 01:49 AM
#11
Team Owner
I've not had much problem cleaning up contacts on 'original' switches. The contacts are alloy metal that are much more durable than the copper stuff we get today. Maybe I'm lucky, but most are just blackened with carbon from contact arcing. Not a lot of pitting...and what was there could be cleaned with light sanding.
It is also important to put add contact grease when rebuilding them. Over the years, I've probably opened up 6 or 7 factory switches and not found any serious damage.
It is also important to put add contact grease when rebuilding them. Over the years, I've probably opened up 6 or 7 factory switches and not found any serious damage.
12-29-2015, 11:31 AM
#12
Burning Brakes
hello and many thx for the replies and links!
i was previously getting inconsistant/flaky results when testing the switch in the "unlock" position, and would like to stay with the oem switch if possible. didn't see a way to disass it to clean contacts, so i sprayed the internals w/wd40 and blew out w/compressed air. much better! consistant/repeatable results when testing by multi-meter, so i'll plug it in and give it a try. the car is in winter storage, and the door panel is off so that part is easy.
may be a few days though, winter storm is approaching and i gotta attach my snowplow and get the chains on.
bob p
i was previously getting inconsistant/flaky results when testing the switch in the "unlock" position, and would like to stay with the oem switch if possible. didn't see a way to disass it to clean contacts, so i sprayed the internals w/wd40 and blew out w/compressed air. much better! consistant/repeatable results when testing by multi-meter, so i'll plug it in and give it a try. the car is in winter storage, and the door panel is off so that part is easy.
may be a few days though, winter storm is approaching and i gotta attach my snowplow and get the chains on.
bob p
05-06-2021, 09:51 AM
#13
i know, right? updating my thread from 2015. 
i never did get to the passenger side circuit for testing during the winter of 2015, then other summer priorities over the years bumped the door lock project way down the list. since purchasing my '79 in 2013 i try to get one expensive project accomplished each summer: new carpeting/underlayment, new calipers/pads all around, full magnaflow exhaust w/high flow cat and mufflers, new front springs and shocks all around, front spoiler prepped and painted, etc. then there's the little stuff: all fluids changed, trans serviced, sway bar and composite spring rubber bushings replaced, wheel bearing service, full tune-up, hood insulation replaced, all dash bulbs replaced, carb adjustment/vac gauge, headlight actuator seal and relay replaced, on and on. great fun really, and immediate gratification. i do most of the work myself when possible (self assessment is key here) and it's great fun.
anyhow, here's how i solved my power lock problem. i previously had no "unlock" function from either the driver's and passenger side, however the "lock" function worked fine from both sides. that meant i had power via the runner to the passenger side, and also a good ground. both switches tested good in the "lock" and "unlock" mode. when jumping the driver's actuator from pigtail label "A" to "C" and then "D", the actuator worked in both directions. that meant the pigtail harness and actuator were both good. moving to the passenger side, the actuator only functioned in one direction. hmmmmmm.
knowing the actuator is just a rod moving back and forth inside a reversible magnet (or something like that) i suspected an electrical connection somewhere. using my mm, i checked continuity of the pigtail harness and found it was good. i measured voltage at "A" and found 12.4v and polished the ground connection at the door panel. using a pointy-ended hook i fab'd from a coathanger, i unhooked the actuator connector and found a lightly corroded spade connector on the actuator. to save myself the effort of drilling out and replacing the rivets with another type of fastener, i polished both spade connectors in situ and found that both locks now work perfectly, from either switch.
when reassembling, every accessible connector was polished and lightly coated with dieletric grease. i could have installed new switches, actuators and pigtails with the same results but with a little less satisfaction in knowing what the problem really was.
many thx to this forum for providing resources needed to solve this. i have the GM service manual and a GM wiring diagram, but diagnostic methods from the members here helped a great deal. on to the next project!
The following users liked this post:
interpon (05-06-2021)