
69 C3 convertible restore
 03-25-2016, 10:20 PM
#21
Instructor

Thread Starter

I know when I went to do my shimming I had the doors on as well as the clip. I started with 3 shims at each location checking door gaps as well as overall body levelness. With the body on my pulley system I was able to lift the body enough to adjust the shims accordingly. The pictures shown are great but they are brand new cars and unfortunately the cars that most of us are restoring all have some kind of story. Its a big important step so be patient and get it to the best your car will allow it to be. Once that is accomplished the other things will start to show what needs to be done. Oh one more thing, don't be surprised if you have no shims at a location or maybe even 2.
You can do it!!! Oh I forgot that I had the correct tire pressure and on the ground. Worked for me, just trying to help, it's your car.
RVZIO
You can do it!!! Oh I forgot that I had the correct tire pressure and on the ground. Worked for me, just trying to help, it's your car.
RVZIO
 03-26-2016, 05:52 AM
#22


RVZIO sorry for the long delay. Thanks for the encouragement. I think starting with 3 at each location will be my next attempt. I'm kinda around your neck of the woods...well quite a bit west of you in Greenbrier WVA visiting family over Easter. I'll post how things go when I get back.
RVZIO
Last edited by SB64; 03-26-2016 at 05:52 AM.
03-26-2016, 10:24 AM
#23
Instructor
Thread Starter
Hi 69,
I think the only thing I can add is to be sure to note that 2 of the of the dimensions are to the TOP side of the mount (2&3) and the #4 dimension is to the UNDER side of the mount. The symbol appears near the #1 mount dimension too, but it's unclear if that dimension it to the upper or lower side of #1???
Regards,
Alan
Last edited by 69C3dreaming; 04-01-2016 at 02:56 PM. Reason: spelling
04-01-2016, 03:10 PM
#24
Instructor
Thread Starter

Well I'm back on the project. I've set up a datum using front gauge hole and #3 body mount. I'd hoped to use trailing arm bolt hole but couldn't make it happen with the body in place. Here's my numbers compared to the frame chart . The measurements seem to confirm the extra shims needed at #4 to line the body up. Short of taking the frame back to Vette Products, I'll pack it full of shims and keep moving along. Maybe once the full body weight and suspension are installed the frame numbers may change? Well to anyone reading, Thanks for looking any input is appreciated.
Front Frame Tip 14 1/2"
Front Gauge hole set at 16"
#1 mount 15 3/4"
#2 mount 14 7/16"
#3 mount 14 3/8"
#4 mount 22 1/8"
Rear Frame Tip Top 24 9/16"
04-01-2016, 04:10 PM
#25
Team Owner

Member Since: Sep 2006
Location: Westminster Maryland
Posts: 30,173
Likes: 0
Received 2,878 Likes
on
2,515 Posts

Hi 69,
Well, you're certainly doing your home work.
I think you're worrying needlessly.
All frames needed some shims on some body mounts.
There are St.Louis pictures showing mounts with a zero indicated and with a 6 indicated.
Carry On!
Regards,
Alan
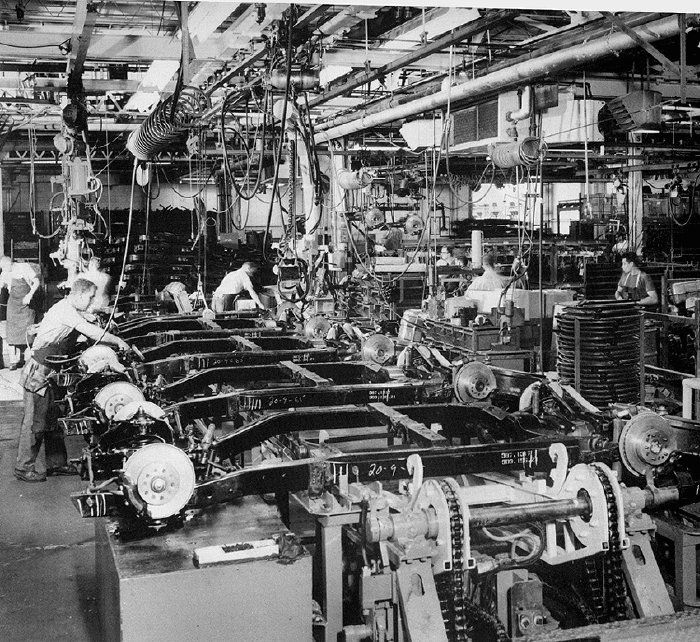
This is the frame line in St.Louis in 66, the shim count is in slashes not arabic numbers, but you can see the wide variation.
Well, you're certainly doing your home work.
I think you're worrying needlessly.
All frames needed some shims on some body mounts.
There are St.Louis pictures showing mounts with a zero indicated and with a 6 indicated.
Carry On!
Regards,
Alan
This is the frame line in St.Louis in 66, the shim count is in slashes not arabic numbers, but you can see the wide variation.
Last edited by Alan 71; 04-01-2016 at 04:10 PM.
04-01-2016, 04:34 PM
#26
Instructor
Thread Starter
Hi 69,
Well, you're certainly doing your home work.
I think you're worrying needlessly.
All frames needed some shims on some body mounts.
There are St.Louis pictures showing mounts with a zero indicated and with a 6 indicated.
Carry On!
Regards,
Alan
This is the frame line in St.Louis in 66, the shim count is in slashes not arabic numbers, but you can see the wide variation.
I might be working off bad information and making too big a deal. I thought someone told me that 5 shims was cut off before GM called the frame out of spec but that doesn't seem the case. Sometimes I have to make 3 lefts to make a right hand turn...
 I'll get there might be the long way around. Thanks again.
05-29-2016, 09:34 PM
I'll get there might be the long way around. Thanks again.
05-29-2016, 09:34 PM
#28
Instructor
Thread Starter
Sorry for the long delay. The shim count is in addition to the solid mounts. I'm not sure of the year but at some point factory switched to rubber spacers. I believe shims were still needed even with rubber mounts.
06-03-2016, 08:49 PM
#29
Instructor
Thread Starter
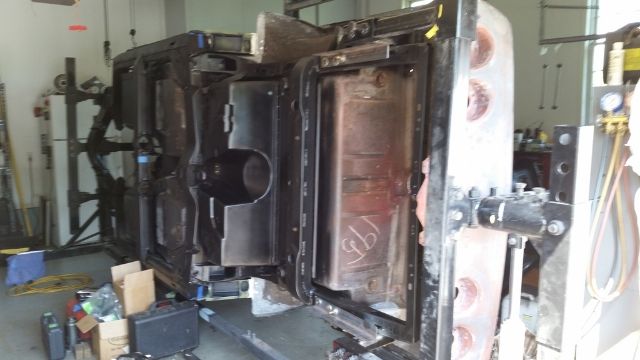
I've been busy and haven't achieved much lately. I did pick up a rotisserie off CL and finally have the car mounted. It's been great for cleaning the underbody. I'm painting some underneath and hope to start riveting brackets soon.
 06-04-2016, 06:17 AM
#30
RVZIO
06-05-2016, 10:48 AM
#31
Instructor
Thread Starter
Hey RVZIO, hope all is well.
I was on the fence about buying one but so far it's been great. I'd found some cracks in the underbody and all the grime that needs cleaned. This saved my from laying on my back under the car cleaning and doing glass repairs.My car is stripped to the bare bones and extremely light right now you can spin one handed. Not sure how a full frame and body would rotate but right now can't complain.
I was on the fence about buying one but so far it's been great. I'd found some cracks in the underbody and all the grime that needs cleaned. This saved my from laying on my back under the car cleaning and doing glass repairs.My car is stripped to the bare bones and extremely light right now you can spin one handed. Not sure how a full frame and body would rotate but right now can't complain.
06-05-2016, 10:59 AM
#32
Hey RVZIO, hope all is well.
I was on the fence about buying one but so far it's been great. I'd found some cracks in the underbody and all the grime that needs cleaned. This saved my from laying on my back under the car cleaning and doing glass repairs.My car is stripped to the bare bones and extremely light right now you can spin one handed. Not sure how a full frame and body would rotate but right now can't complain.
I was on the fence about buying one but so far it's been great. I'd found some cracks in the underbody and all the grime that needs cleaned. This saved my from laying on my back under the car cleaning and doing glass repairs.My car is stripped to the bare bones and extremely light right now you can spin one handed. Not sure how a full frame and body would rotate but right now can't complain.
RVZIO
06-05-2016, 04:03 PM
#33
Nam Labrat


Member Since: Sep 2013
Location: New Orleans Loo-z-anna
Posts: 33,884
Received 4,156 Likes
on
2,728 Posts

THAT'S a great way to get to ANYTHING!

06-07-2016, 10:05 PM
#34
Instructor
Thread Starter
I've been looking off and on for a while, CL and Ebay . If you look new with the accessory kit probably $1,200 to $1,500. I happened across this one for $750, guy used it to restore his malibu then stored it at a family members house. Lucky for me his uncle asked him to move it and had no where to store it. We have an agreement when I'm done he gets first chance to buy it back. He's hoping to have a garage by then.
06-08-2016, 05:53 AM
#35
I've been looking off and on for a while, CL and Ebay . If you look new with the accessory kit probably $1,200 to $1,500. I happened across this one for $750, guy used it to restore his malibu then stored it at a family members house. Lucky for me his uncle asked him to move it and had no where to store it. We have an agreement when I'm done he gets first chance to buy it back. He's hoping to have a garage by then.

RVZIO

 06-13-2016, 07:21 PM
#37
Instructor
Thread Starter
I've also finished black out painting the floors and under body. Found two more cracks to fix...Grrrrrrr Guess if I stopped looking wouldn't find anymore. They're right above the rear storage area. Next to the brackets for the rear shoulder belts. They'll have to wait till later when body is off the frame again.
 06-14-2016, 08:23 AM
#39
I've also finished black out painting the floors and under body. Found two more cracks to fix...Grrrrrrr Guess if I stopped looking wouldn't find anymore. They're right above the rear storage area. Next to the brackets for the rear shoulder belts. They'll have to wait till later when body is off the frame again.

RVZIO
