When you click on links to various merchants on this site and make a purchase, this can result in this site earning a commission. Affiliate programs and affiliations include, but are not limited to, the eBay Partner Network.
We have learned to use the heat gun and razor blade (after upturning the corners of the blade and bottom edge buy rubbing it on a piece of cardboard). Below s a short video that may be helpful. Still have door jambs and back of car, but we are getting there!
Also some pictures of our progress and essential items:
Long handled razor blade holder (don't waste your time with the plastic ones, learned the hard way they melt)
Lots of razor blades ...
I have the same job ahead of me on my '71 and I want to do a great job but still make it easier on myself (my momma didn't raise no dummy). Therefore, I think I understand the part about turning the corners of the blades up, but what exactly do you mean by turning up the bottom edge or did I misunderstand? Ant possibility you have a photo?
Pull the bottom edge of the razor blade backwards, against your jeans or cardboard. Just puts a slight "upturn" to the edge. Made a huge difference in preventing gouges once we started doing the corners and the edge this way. Good luck! It is a tedious undertaking, but hopefully all the attention to detail will be worth it when you get to see the finished product! This is my first experience, learning a lot as I go.
Pull the bottom edge of the razor blade backwards, against your jeans or cardboard. Just puts a slight "upturn" to the edge. Made a huge difference in preventing gouges once we started doing the corners and the edge this way. Good luck! It is a tedious undertaking, but hopefully all the attention to detail will be worth it when you get to see the finished product! This is my first experience, learning a lot as I go.
Post pictures!!
OK, I believe I understand it now. I guess I was trying to overthink it.
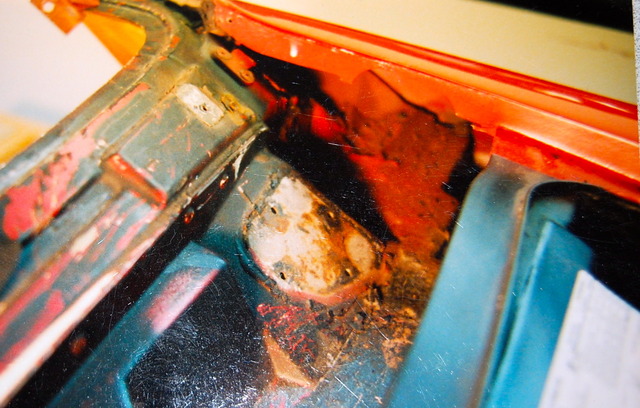
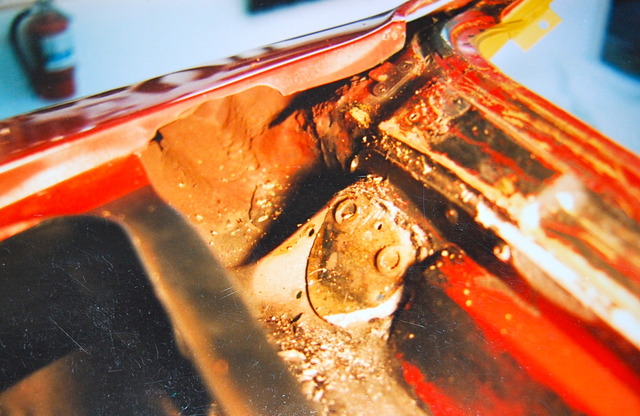
1.) How do I clean up the windshield wiper bay area? It is a MESS! Paint scraped easily off the lower window, but the entire bay is YUCK! And of course I busted off 2 screw heads that attach the wiper door! UGH! Have the 2 remaining pivot bolts soaking. They were not even rusted, shiny clean metal, busted clean off. Pretty sure they engineered these to brake off so you would have to purchase $22 replacement bolts!!
2.) What is the flat seal like material that was under the sill plate? Cannot find in any of my product catalogs? Is it just part of the carpet underlay/jute?
3.) Some pictures of the damage, best pictures I could get. Got a nasty hand full of sharp glass on the most recent repair done from the garage oops. Is is safe to say this repair was less than satisfactory? (DUB?)
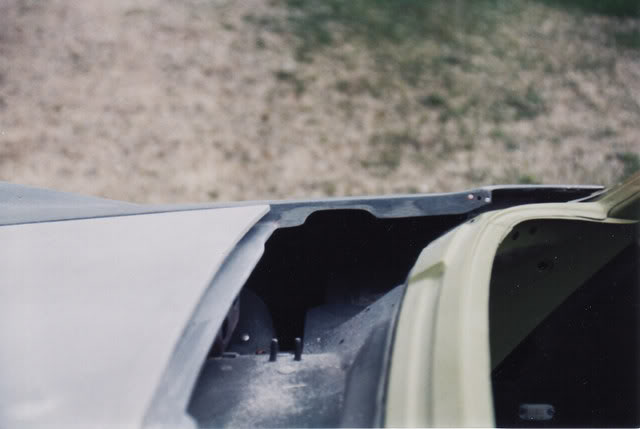
4.) Other pictures are of the damage to the rear fin area from below, that I previously showed from above with all the bondo.
Hi c1n,
(1)
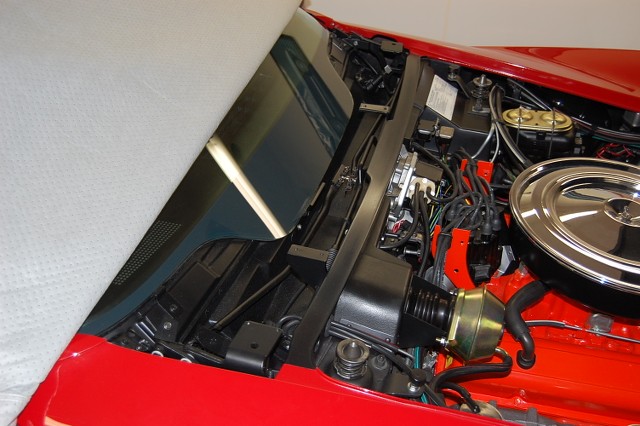
The wiper bay was quite roughly finished and sloppily sealed.
It was painted semi-gloss black after the body was painted.
The wiper system transmissions, linkage, arms and blade holders, were semi-gloss black.
The wiper door mechanism was painted semi-gloss black, but not the white nylon bushings. (Duplicate THAT?!?)
People spend little to lots of time on the wiper bay�. it's up to the individual.
(2)
The black rubber seal looks to me to be an owner inspired addition.
(3)
I'll let DUB comment on the very rough looking fiberglass work!
Oh Alan, I knew I could count on you to post C3 picture ****! If I could fold my arms, nod my head, crunch my nose and my wiper bay could look like yours!!! "Poof" There are layers of tar like material all in the bay. What would be the best plan of attack to clean all that out?
Oh Alan, I knew I could count on you to post C3 picture ****! If I could fold my arms, nod my head, crunch my nose and my wiper bay could look like yours!!! "Poof" There are layers of tar like material all in the bay. What would be the best plan of attack to clean all that out?
I will try to look underneath, had a better idea when I had the gas tank out. I do know that the "oops" repair, from the recent damage at the shop, looks bad on the inside. Lots of sharp fiberglass that I unfortunately found with my fingers. Appears to be a sloppy repair, but I will snap a picture and let you pass judgement. The fiberglass repair on the back fin seems VERY stable, still not clear why on God's green earth they put SO much bondo on it. The shape looks much better with it all sanded out.
EXACTLY Nicole!!!
This is why I take out ALL fillers and laminated fiberglass that someone had done..because it was THEIR interpretation on how to repair it...which will more than likely differ from mine when I get it cleaned up.
AS for cleaning up the wiper/colw area. I use a heat gun and a scraper and get the stuff to come off. Then I use lacquer thinner and bunch of paper towels and scotch brite to get it cleaned up. It all depends on to what level my cusomer wants it to look. I also make sure that IF I remove the wiper arm housings that they get a sealer applied to them and around them to stop water leaks.
AS for the crack I can see in your photos of the rear damage.. I would still grind it all out. and laminate in new mat and resin. If you are wanting to know how...PM me and we can talk about it. For what it is worth...this is still not a big deal...just to let you know...this repair is not that bad.
Hi c1n,
What you do in the wiper bay depends on how much effort you want to put into it. And also, how far you want to take things apart. At the minimum I'd think you would remove the body color from the wiper arms since these are seen when the wipers are in use.
If you want to go further:
You might begin by removing all the loose debris and scraping out the loose sealer.
You could then remove all the layers of paint and primer so you can see the sealer.
You might remove the worst of the sealer that's not doing anything and then reseal the bay using something like black roofing cement from the home store.
Then you could paint the area semi-gloss black as it was originally.
Regards,
Alan
Not that it means anything at all...but I would have to say that just about every Corvette I have worked on from 1968-1982 has had some form of spray-able undercoat or sealant applied in the wiper cowl area. It has usually been applied on the shafts for your wipers and also the bottom two of the four bolts that would hold the main pedal assembly. Also...on some year models it is also applied where the trash screens are located on each side of the cowl/plenum area. As a matter of fact... the vacuum hose for the outside fresh air vent actuator is covered along with the rubber hose for your windshield wiper arm fluid. Also sealant is all around the bracket on the 1969-1972 wiper door cars that have the vacuum switch for the right wiper arm I recently worked on an 1969 that was that way.
Nicole...if you are pulling the wiper door assembly...pull it WITH the door attached. if you need help..I can help you in this ( if needed) and there IS a reason why you want to do it this way.
Also....if you go crazy in the cowl/plenum area...OR...even if you don't...there is an area that you WILL want to look at and dig out the factory sealant due to it is more than likely needing it and it can be easily replaced with BETTER sealants......which will more than likely be used in other areas of your restoration...so it will NOT be a waste of money.
My fingers needed a rest from the sanding! Decided to attempt repair of the tabs with the Plastex repair kit. I practiced on some "less important" household repairs with the kit. Not sure the pictures do it justice, but I am very impressed.
Pictures are pretty obvious:
Good tab
Bad tab
Mold taken of good tab (allowed to cool and removed)
Mold placed on bad tab
Plastex product (liquid and powder) placed into mold, cure X 1 hour and mold carefully removed
NEW TAB!! Still needs to be cleaned up with Dremel, but looks satisfactory for my needs.
I have to say I am amazed at your desire to get your Corvette back to being right again....so...PLEASE excuse me but I cannot stay silent here.
We know I was not there watching this being performed and I am only commenting on photo of the end result.
What I fear is that this piece will snap off. And that is because I do not know if you really prepped the underside really well so this product would adhere ( which I am sure you did).....but the 'general rule of thumb' is to apply the new product on the top side surface and feather it back onto the top surface....thus requiring the top surface to be prepped and tapered so the new product would adhere.....which I do not see in the photo.
I will add that IF you plan on testing the repair so the clip can go back on....I would seriously be careful and possibly spread the clip out a little bit so it does not have that much 'bite' to it.
IF this clip ...when you down inside it where the fiberglass will be....you can see a little bent tab that protrudes to the inside of the clip. I will often times take my cut-off wheel and carefully grind that little ear or tab flat.....so the clip will slide on and not grab the portion of the fiberglass tab as aggressively as it more than likely did initially. Please remember that all the clip has to do is go on and allow the screw to engage it and lay flat. because once the clip is slid on and the screw is in it..the clip will never go anywhere. So not need for it to be so hard to clip on and pull off.
And obviously when I am done with modifying the clips.,..I apply stuff on them so the clip will not rust....because I do not have them in when I am painting the car...they go in when I am done painting the car.
I have to say I am amazed at your desire to get your Corvette back to being right again....so...PLEASE excuse me but I cannot stay silent here.
DUB
I totally understand your concern. I researched this product quite a bit before purchasing it. Had lots of positive reviews with use on plastic as well as fiberglass. I used it on a few high use items around the house, including a broken rake, and it HOLDS!!
Repair to tabs(s) after sanding/filing.
I was not gentle at all while sanding and filing, and it showed no signs of failure. I figure nothing to lose since purchasing a new rocker panel is not chump change. This tab has been broken a long time and we did not know till we removed it.
This is a great collection of what you did for your car. My wife has a 71 that was stored at her mother's house for the last 9 years. I tried to get it running last year and was somewhat successful. I tried again this week and found a ruptured fuel line. I got it home and fixed the fuel line. Now the question is if I want to do what you did or somewhere in between. Thanks for all of the documentation on what you did. Looking forward to the 'rest of the story'.
Best of luck with your 71 project. We decided to first get our 68 in safe operating order. She was drive-able but had several issues that needed to be addressed. Quickly learning one thing leads to many others...
Our goal is have her road worthy, as much as possible, during this process. We feared if we did a frame off restoration, the time and the cost would make us lose interest and willingness to push forward. The most accurate statement I have heard was "make a budget and set a time frame for your restoration, then double both". Yep, that sums it up.
So far, so good. We still drive her around, just to get a drink from Sonic our out to see my Mom. It makes her happy to see we are attempting the restoration my Dad did not get to see to completion.
There are so many very knowledgeable/helpful folks on this forum. We are definitely learning as we go, and could not do any of this without CF thread searches or the responses to our MANY questions.
We removed the front window (bottom and corner) trim. It pushed easily up and off the clips.
When we removed the white paint, under we found black. Under the black there is, IMO, beautiful shiny metal. Not sure if it is aluminum or SS, but it is in great shape and shined up nicely with 0000 steel wool.
Can we leave it this way, will it maintain its appearance, or are we better off to have it painted? As stated before, we are not attempting to obtain NCRS standards.
I will write this and that is IF you are driving this car with the paint off of it and the fiberglass is bare....you must have a......
Only because allowing any petroleum based crap to get on this fiberglass is opening up a dynamic that will make you WISH you had not done that. Basically ANYTHING that gets on it now that is a foreign substance that you will have to deal with.
Hi c1n,
"Can we leave it this way, will it maintain its appearance, or are we better off to have it painted? As stated before, we are not attempting to obtain NCRS standards."
Certainly you can leave it that way.
It has nothing to do with "NCRS standards".
When I see a car with unpainted trim I generally think the person who painted the car didn't want to make the effort to paint the trim.
The trim and it's unpainted detail is part of what makes 68-72 cars different from the rest.
Regards,
Alan

 03-19-2017, 08:17 PM