When you click on links to various merchants on this site and make a purchase, this can result in this site earning a commission. Affiliate programs and affiliations include, but are not limited to, the eBay Partner Network.
Hi c,
It's good that it's getting some careful attention at this point in it's life thanks to your efforts!
It's hard to believe that these cars will soon be 50 years old!!!!!
It's frightening to think about how old I'll be when IT'S 50!
Regards,
Alan
Nice photo of the appearance of the paint on the bumper guard.
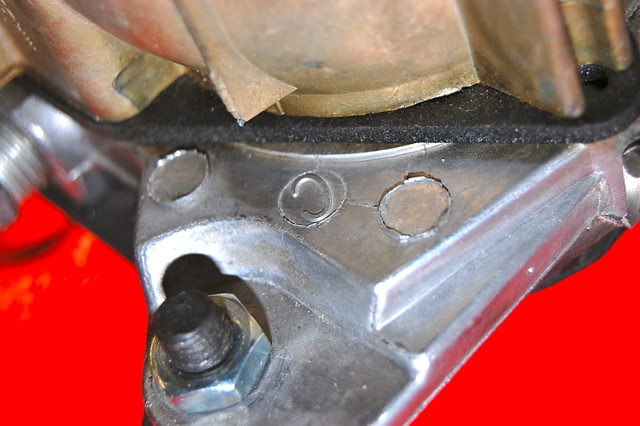
What is the shape of the 2 studs that are used for mounting the rear of the q-jet?
If you have removed the condenser for your A/C. make sure yo seal off those lines REALLY WELL. And that also means the lines on the condenser also. Keep this system sealed up as much as you can and the best you can. UNLESS you plan on buying everything new for it.
Also...if you plan on removing the radiator support at some point...you will find on the right side that the upper bolt will more than likely be covered by a molded piece of fiberglass that protects the two lines that go through the inner skirt. When removing it use a heat gun to soften the adhesive an it will easily pry off but you will have to get it hot...about 170 degrees F.
What brand are those wheel jackstands? Those are awesome
MYLIFTSTAND.COM
These are very secure, but you need to have a floor jack that will raise your car roughly 23 inches to raise/extend the myliftstand. I researched and bought the Daytona floor jack through Harborfreight.com,
( on sale now for 179 ) works perfect. The stands are well made by a fella in Illinois. Very easy to do business with. Worth the money, to me anyway.
These are in the lowest position & locked, insert jack to raise higher and lock in place.
Hi c,
It's good that it's getting some careful attention at this point in it's life thanks to your efforts!
It's hard to believe that these cars will soon be 50 years old!!!!!
It's frightening to think about how old I'll be when IT'S 50!
Regards,
Alan
Nice photo of the appearance of the paint on the bumper guard.
What is the shape of the 2 studs that are used for mounting the rear of the q-jet?
Alan the carb # 7040208 is evidently from 1970 GM/Chevy pick up (identical to the 7040202 used in the 70' Corvette with auto. I investigated this on
carbkitsource.com.
Oh well after 47yrs I should not be surprised the carb was replaced.
I have a 7040202 on my work bench at the house. I can see if the date is close to what you need. I got it on eBay for parts, but isn't frozen. I only needed the vacuum tube in the rear for TCS connection.
Old and new Vacuum Actuators located between the headlights.
Rear of nose emblem
Front of nose emblem
Drivers side front Vac tube routing with strap
Original washer fluid bag and tube. Located in front of the Vacuum canister on the drivers side firewall. Absolutely poor engineering by GM, in my humble opinion.
Horns. Located at front nose.
Red painted nut used for grounding wire harness and strap location
Head lamp actuator
Horn relay located on drivers side fender.
Brake Proportioning Valve for 1970 Corvette
More numbers found behind the passenger metal footwell plate.
Hi c,
More interesting photos!
I like seeing the difference in the color and shape of the hose 'dots' on the relays (right is a service replacement or reproduction?). Are the 'pipes' slightly different in size from left (smaller) to right?
Also the t-strap on the vacuum hoses. The originals are noticeably different than those available now. Try to save all of those that appear to be original to the car.
Keep them coming!
Regards,
Alan
I just realized your car has the same job number as my 71�.186 !
Hi c,
It's good that it's getting some careful attention at this point in it's life thanks to your efforts!
It's hard to believe that these cars will soon be 50 years old!!!!!
It's frightening to think about how old I'll be when IT'S 50!
Regards,
Alan
Nice photo of the appearance of the paint on the bumper guard.
What is the shape of the 2 studs that are used for mounting the rear of the q-jet?
Hi c,
The part number and date stamps typically tell the tale on carburetors.
The gaskets that extend a distance beyond the carb body indicate a rebuild since original gaskets were very close to the shape of the carburetor body.
The rear fasteners were studs with nuts but no washers.
The studs typically had a small tapered unthreaded portion at the top.
What are you seeing?
Regards,
Alan
A raised C is often found on the base plate� perhaps indicating Chevrolet?
Replacement gasket.
Stud isn't typical.
I see what you mean. The carb was replaced because the # 7040208 (& date is wrong ) was used in the GM Chevy truck series but it is I believe identical in parts to the Corvette # 7040202. This is probably why it was chosen.
Thanks for the lesson as always.
Received a original 17 1/2 " Radiator Cooling Fan 7 Blade/ # 3955182 for my car today. Feels like
Christmas in April ! 17 1/2" 7 blade Cooling fan for a 350V8/300hp with A/C<br/>
Engine bay & dash harness removed, not to bad but I have to say the connector located on the steering column is a pain in the rear. Electrical wiring/fuse block/connections at 47 years was definitely due for an upgrade everywhere. Just have to finish the rear interior light, tail lights, power window(s).
1970 Corvette Coupe Interior Dash & Engine bay electrical harnesses

 03-26-2017, 10:28 AM