
Windshield wiper door... GRRR
 03-20-2017, 09:07 PM
#1
Le Mans Master

Thread Starter
Took the windshield moldings off, to prep for paint, no problems, just a lil' coaxing to push them off the clips.
Then I see 4 bolt heads and attempt to remove the wiper door. The bolt head snapped clean off.... NOW what?! The bolt was not even rusty.
Then I see 4 bolt heads and attempt to remove the wiper door. The bolt head snapped clean off.... NOW what?! The bolt was not even rusty.
 03-21-2017, 05:40 AM
#2
Melting Slicks


Did you get the other 3 out? Soak them first with a penetrating oil.[PB Blaster, Kroil] Try to tighten the other bolts before trying to loosen just a bit. Work back and forth slowly. It took me 3 days one time to get a bolt out. Once you get the door off you'll have to drill and retap the holes and if you mess that up I have another trick. Just ask. T
03-21-2017, 07:59 AM
#3
Le Mans Master
Thread Starter
Did you get the other 3 out? Soak them first with a penetrating oil.[PB Blaster, Kroil] Try to tighten the other bolts before trying to loosen just a bit. Work back and forth slowly. It took me 3 days one time to get a bolt out. Once you get the door off you'll have to drill and retap the holes and if you mess that up I have another trick. Just ask. T
03-21-2017, 08:08 AM
#4
Team Owner

Member Since: Sep 2006
Location: Westminster Maryland
Posts: 30,173
Likes: 0
Received 2,878 Likes
on
2,515 Posts

Hi c1n,
Because of the configuration of the bolts they're very easy to break.
The material the door is made from contributes to the difficulty in getting them out.
The door can be repaired. There's someone on this Forum that offers the service.
You'll know how to do it the NEXT time!!!!
Regards,
Alan
It's pretty easy to see where and why it'll break!
Last edited by Alan 71; 03-21-2017 at 08:16 AM.
03-21-2017, 08:36 AM
#5
Le Mans Master
Thread Starter
 Looks made to fail for sure! I can tell you, I don't plan to do this again. Hopefully this project with be a once in a lifetime endeavor HAHA. After this is all said and done, only plan to spend time driving her and waxing her!
  One simple thing leads to 5 other.
Last edited by c1nicole; 03-21-2017 at 09:12 AM.
03-21-2017, 10:36 AM
#6
Team Owner
Member Since: Sep 2006
Location: Westminster Maryland
Posts: 30,173
Likes: 0
Received 2,878 Likes
on
2,515 Posts
Hi c1n,
When you're finished you'll realize what a good time you had and will want to do another!
Regards,
Alan
When you're finished you'll realize what a good time you had and will want to do another!
Regards,
Alan
03-21-2017, 12:29 PM
#7
Racer


Same thing happened to me and had a friend who was a machinist who repaired mine. Make sure you use Anti Seize compound before re-installing. Makes it easier to remove if you decide to take the door off again. Good luck getting it re-installed with those bushings. What a PITA!
03-21-2017, 08:10 PM
#8
Melting Slicks


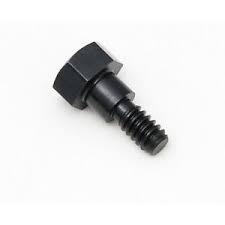
I do not think that GM intended those bolts to ever be removed. I have a couple of over the counter NOS one's, and they have Loc-Tite applied to the threads. I think that the original bolts had it on them also. It makes sense, you did not want one of the bolts to back out and tear up the fender edge.
The bolts are called "shoulder bolts" and are used a lot in making dies and for fastening lawn mower parts. Lou
The bolts are called "shoulder bolts" and are used a lot in making dies and for fastening lawn mower parts. Lou
03-21-2017, 09:14 PM
#9
Team Owner
Those shoulder bolts are kind of hard to find, I just used plain bolts, and so the door rides a tad loose going up and down, but when closed or open, there is no slop.....AND
to keep the bolts from being too snug, I cut a screwdriver slot in the end of the bolts, and so to make it easy to screw them home into position, and then take some RTV and plug the outboard end of the holes in the door/mechanism and that keeps the bolts in position, when necessary just dig the RTV out and then use screwdriver to unscrew the bolts....simple as pie, really.....

to keep the bolts from being too snug, I cut a screwdriver slot in the end of the bolts, and so to make it easy to screw them home into position, and then take some RTV and plug the outboard end of the holes in the door/mechanism and that keeps the bolts in position, when necessary just dig the RTV out and then use screwdriver to unscrew the bolts....simple as pie, really.....
The following users liked this post:
c1nicole (03-22-2017)
03-22-2017, 09:27 AM
#10
Team Owner
Member Since: Sep 2006
Location: Westminster Maryland
Posts: 30,173
Likes: 0
Received 2,878 Likes
on
2,515 Posts
Hi c1n,
My recommendation would be to USE the PROPER bolt for this application.
Besides the unthreaded portion of the shank acting as a pivot bearing surface in the linkage, the transition from threaded section to shank acts as a stop between the linkage arms and the door when the bolt is in place.
Regards,
Alan
03-22-2017, 10:32 AM
#11
Le Mans Master
Thread Starter
Video, 7:39. If I drill out the area where the screw broke off and use this method to repair? Thoughts? Way cheaper than $60 plus shipping to send off for repair. The bolts are not cheap either. $16 plus shipping for 4?
03-22-2017, 10:55 AM
#12
Team Owner
Member Since: Sep 2006
Location: Westminster Maryland
Posts: 30,173
Likes: 0
Received 2,878 Likes
on
2,515 Posts
Hi,
In the recent past member Dave J has volunteered to do the repair for free� you pay the shipping. I'll bet he knows what he's doing!
Regards,
Alan
In the recent past member Dave J has volunteered to do the repair for free� you pay the shipping. I'll bet he knows what he's doing!
Regards,
Alan
Last edited by Alan 71; 03-22-2017 at 10:56 AM.
03-22-2017, 11:21 AM
#13
Burning Brakes

Thanks Alan,
I'm shipping 2 doors out this week, and I have others in line. I can help you out, although I'm not the fastest gun in the west. Let me know if I can help.
I'm shipping 2 doors out this week, and I have others in line. I can help you out, although I'm not the fastest gun in the west. Let me know if I can help.
The following users liked this post:
c1nicole (04-03-2017)
03-22-2017, 02:34 PM
#14
Drifting

Nice service to offer to the forum members. I'm currently debating replacing the original style wiper door system onto my 68 racer or going with the FIA style wiper door elimination panel. The car currently has a later long style hood, but a short style L88 will be making it's way up to me eventually.
03-22-2017, 03:38 PM
#15
Le Mans Master
Thread Starter
Thank you!
Once I see how many bolts I ruin, I'll contact you about details of repair.
Could you share what you do to repair the broken bolts? I seem to have a knack for breaking things and creating more work ($$$) for myself. Guess that is part of classic car restoration. One thing leads to another. Pretty sure I was stripping paint before created this new adventure for myself.
03-22-2017, 04:00 PM
#16
Burning Brakes
Once I see how many bolts I ruin, I'll contact you about details of repair.
PM sent
The following users liked this post:
c1nicole (04-03-2017)
03-22-2017, 07:40 PM
#18
The ORIGINAL and bestest
Member Since: Oct 2000
Location: Toronto Ontario
Posts: 10,009
Received 234 Likes
on
143 Posts
Toronto Events Coordinator

Years ago when I started my restoration, all four of my wiper door bolts broke during disassembly!! 
After assessing the situation, I realized that the hole in the plastic bushings as well as the unthreaded shoulder portion of the original bolt were pretty much the same diameter as a 1/4-20 bolt.
I made a simple pilot jig to drill out the broken bolts, and then I installed stainless 1/4-20 Heli-Coil inserts. This allowed me to use regular 1/4-20 bolts to attach the wiper door to the linkage; I used stainless Phillips head bolts.
If you are not comfortable or confident doing this kind work , then I suggest you have a professional do it. There is some tolerance in the wiper door linkage to allow some slight misalignment of the holes in the wiper door, but it isn't much.
03-23-2017, 01:29 AM
#19
Team Owner
A 'pilot jig' which locates in the undamaged counter-bore at the outer end of each bolt hole is absolutely mandatory, if your repair has any chance of providing a smooth operating wiper door. The alignment of those bolt holes is CRITICAL for door function. Drill off-line just a bit, and the door binds up. And, if you bugger-up that counter-bore, there is no good way to salvage that door.
Last edited by 7T1vette; 03-23-2017 at 01:30 AM.
04-03-2017, 06:33 PM
#20
Race Director


I know I am going to get some of you to possibly roll your eyes at me...but...
I DO AGREE that the dissimilar metal issue is a very well know issue here on these wiper door bolts. Technically...steel can not weld itself to aluminum. It is no different than the exhaust studs in your cast iron exhaust manifold 'welding' themselves to the manifold. It can not happen. They can seize with each other but not become one. I guess it is how the term 'welding' is being used.
I have also repaired enough of these broken bolts that I do know that it is 'somewhat' critical that the screws are where they need to go...but they do not HAVE TO go exactly where they went. The reason I am stating this as a fact....is that many of the wiper doors that came into my shop rather brutally damaged by someone who should have well enough alone....I had to repair them and knowing that the holes were not prefect...and yet....the wiper door worked perfect and still works perfect.
Getting these holes to be back where GM had them is obviously best. The MAIN THING is NOT drilling and tapping the hole at a SEVERE ANGLE. THAT is where you can have some issues.
The wiper door frame and assembly is not as precise as many may feel. Each pivot point has the plastic bushings where they are riveted together...and even when I restore the wiper door frame assembly due to the heads of the rivets are all but rusted off...the assembly is snug and there seems to be no movement at these new plastic bushings and rivets....SO...due to the distance from one side to the other...if the holes in the wiper door are off a little bit...I have yet to find that the door will not work. 'Possibly' the only issue is that the wiper door frame may need a slight bit if shimming...but that also is doubtful...because the hole in the wiper door is not off a mile....because the hole was off .010"
I do know that some of these new epoxies can be used to repair these areas due to the torque needed for the bolts are well within the capabilities of the repair material. It is amazing on what some of this 'new stuff' can do when a repair is needed.
DUB