
Broken Gauge Bezel Repair
 11-25-2005, 07:53 PM
#1
Pro

Thread Starter
I am adding a DIN sized head unit, new gauges and veneer to my gauge bezel. I don't know why but when it came time to cut the original bezel I could not do it. It will most likely never be put back in and end up in my old original parts museum, but I still could't do it. So I searched for a cheap, ugly and unbroken bezel to cut and refinish. I found one that a forum member was selling for a reasonable price so I bought it from him. Unfortunately it was not packed very well and it broke in transit. I suppose I could have asked for my money back but it really wasn't that much. Instead I saw it as a challenge to fix it.
It broke where most of them break at the narrowest part of the wing. Fortunately only one side broke.
You cannot just glue it together and expect it to hold. You need to reinforce the joint.
First to secure the joint while I worked on it I wrapped (4) 3-1/2"x1/4" rubber bands top to bottom around the bezel.
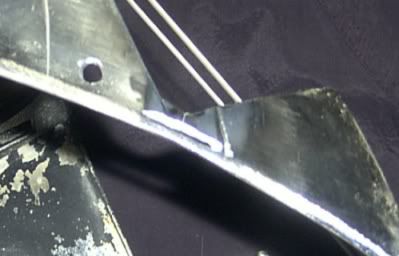
Then I got out my handy dandy Dremel and with a #420 Cut-off wheel I cut a full depth slot 3/4" long across the break. So that you miss the raised portion on the inside use the step of the indentation near the edge as a guide. If you cut to far in and hit the raised portion it can be fixed in the end with a little J.B. Weld, so don't dispair if you hit it.
Here is a picture of where I cut the slot (I apologize for the poor quality of all of the photos, it is hard to take pictures of small shiney parts):
Once the slot was cut I cut a 3/4"x1/4" piece of steel for a key. I used an old 2x6 joist hanger I had lying around for the source, but any piece of 0.035" thick steel will do.
Next I took off the rubber bands and applied J.B. Weld to one side of the break. I re-aligned the break and put the rubber bands back on and wiped off any exess J.B. Weld.
Then I put several layers of masking tape on the inside to keep everything flush to that surface.
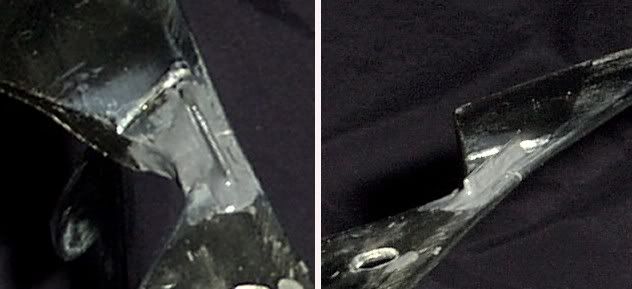
Then I filled the slot with J.B. Weld and pressed the key into the slot until I could feel it hit the tape. Then added J.B. Weld all around the key with a toothpick for good measure.
Here is a picture of the key glued in:
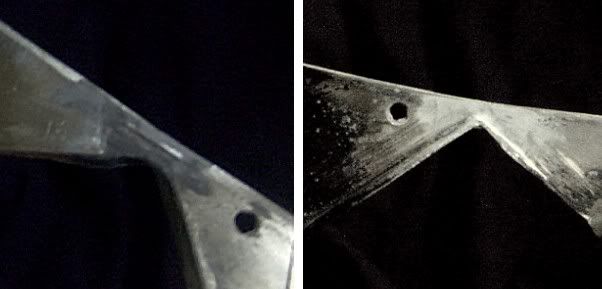
After the J.B. Weld cures completely carefully grind the key flush with the bezel and add a thin layer of J.B. Weld to the inside surface. Once the thin layer cures sand it smooth.
Here is a picture of the completed repair:
So simple yet so simple.
The joint appears to be as strong as and hopefully stronger than the unbroken side.
If I had to do it again I would make the key a little narrower to reduce the amount of grinding. The finished key ends up around 0.1" wide.
Now I'm ready to Cut, Grind and Refinish.
So if your bezel is broken try to fix it and refinish it before throwing down the money for a new or used one.
If both sides are broken I still think it's fixable just a little harder to secure the joints while making the repair. I would most likely hold one side together with a piece of sheet steel and a couple of clamps while I repaired the first side.
Hope this helped someone,
David
It broke where most of them break at the narrowest part of the wing. Fortunately only one side broke.
You cannot just glue it together and expect it to hold. You need to reinforce the joint.
First to secure the joint while I worked on it I wrapped (4) 3-1/2"x1/4" rubber bands top to bottom around the bezel.
Then I got out my handy dandy Dremel and with a #420 Cut-off wheel I cut a full depth slot 3/4" long across the break. So that you miss the raised portion on the inside use the step of the indentation near the edge as a guide. If you cut to far in and hit the raised portion it can be fixed in the end with a little J.B. Weld, so don't dispair if you hit it.
Here is a picture of where I cut the slot (I apologize for the poor quality of all of the photos, it is hard to take pictures of small shiney parts):
Once the slot was cut I cut a 3/4"x1/4" piece of steel for a key. I used an old 2x6 joist hanger I had lying around for the source, but any piece of 0.035" thick steel will do.
Next I took off the rubber bands and applied J.B. Weld to one side of the break. I re-aligned the break and put the rubber bands back on and wiped off any exess J.B. Weld.
Then I put several layers of masking tape on the inside to keep everything flush to that surface.
Then I filled the slot with J.B. Weld and pressed the key into the slot until I could feel it hit the tape. Then added J.B. Weld all around the key with a toothpick for good measure.
Here is a picture of the key glued in:
After the J.B. Weld cures completely carefully grind the key flush with the bezel and add a thin layer of J.B. Weld to the inside surface. Once the thin layer cures sand it smooth.
Here is a picture of the completed repair:
So simple yet so simple.
The joint appears to be as strong as and hopefully stronger than the unbroken side.
If I had to do it again I would make the key a little narrower to reduce the amount of grinding. The finished key ends up around 0.1" wide.
Now I'm ready to Cut, Grind and Refinish.
So if your bezel is broken try to fix it and refinish it before throwing down the money for a new or used one.
If both sides are broken I still think it's fixable just a little harder to secure the joints while making the repair. I would most likely hold one side together with a piece of sheet steel and a couple of clamps while I repaired the first side.
Hope this helped someone,
David
Last edited by GATOR454; 11-25-2005 at 09:53 PM.
 11-25-2005, 08:03 PM
#2

i wonder if fiberglass resin (2 part resin/hardner) would have worked better than the j.b. weld?? being the repair was done on metal your probably correct, if it was a plastic benzal resin
 11-26-2005, 07:51 PM
#4
Drifting

Member Since: May 2003
Location: Melbourne, Victoria, Australia, the World
Posts: 1,634
Likes: 0
Received 2 Likes
on
1 Post

I used low temp filler rod for pot metal to weld mine. Just filed/sanded it back to smooth on the front and no one notices the repair.
I have done several repairs to pot metal using these rods. They used to be demonstrated at car shows by welding up aluminium cans with 1/4" holes in them.
I have done several repairs to pot metal using these rods. They used to be demonstrated at car shows by welding up aluminium cans with 1/4" holes in them.
11-27-2005, 10:35 PM
#5
Originally Posted by RHD '68 L89
I used low temp filler rod for pot metal to weld mine. Just filed/sanded it back to smooth on the front and no one notices the repair.
I have done several repairs to pot metal using these rods. They used to be demonstrated at car shows by welding up aluminium cans with 1/4" holes in them.
I have done several repairs to pot metal using these rods. They used to be demonstrated at car shows by welding up aluminium cans with 1/4" holes in them.
 11-27-2005, 11:23 PM
#6
Drifting
Member Since: Mar 2003
Location: Canberra AUSTRALIA
Posts: 1,608
Likes: 0
Received 2 Likes
on
2 Posts
St. Jude Donor '05-'06
Originally Posted by RHD '68 L89
I used low temp filler rod for pot metal to weld mine. Just filed/sanded it back to smooth on the front and no one notices the repair.
I have done several repairs to pot metal using these rods. They used to be demonstrated at car shows by welding up aluminium cans with 1/4" holes in them.
I have done several repairs to pot metal using these rods. They used to be demonstrated at car shows by welding up aluminium cans with 1/4" holes in them.
Pete
11-27-2005, 11:37 PM
#7
Team Owner

Originally Posted by RHD '68 L89
I used low temp filler rod for pot metal to weld mine. Just filed/sanded it back to smooth on the front and no one notices the repair.
I have done several repairs to pot metal using these rods. They used to be demonstrated at car shows by welding up aluminium cans with 1/4" holes in them.
I have done several repairs to pot metal using these rods. They used to be demonstrated at car shows by welding up aluminium cans with 1/4" holes in them.
 11-28-2005, 09:07 AM
#8
Pro
Thread Starter
Originally Posted by RHD '68 L89
I used low temp filler rod for pot metal to weld mine. Just filed/sanded it back to smooth on the front and no one notices the repair.
I have done several repairs to pot metal using these rods. They used to be demonstrated at car shows by welding up aluminium cans with 1/4" holes in them.
I have done several repairs to pot metal using these rods. They used to be demonstrated at car shows by welding up aluminium cans with 1/4" holes in them.
 09-12-2014, 02:31 PM
#10
Team Owner
Member Since: Sep 2006
Location: Westminster Maryland
Posts: 30,173
Likes: 0
Received 2,878 Likes
on
2,515 Posts
Hi Paul,
That's a very nicely done repair.
One thing I'll mention is that the 'bridge' between the upper and lower part of the bezel doesn't have to be so shallow.
It was designed to be easily broken in the event of a crash; thus it's shape.
The bridge can't be any THICKER 'side to side', but can be considerably DEEPER 'front to back'. There's room next to the lower dash pads to do this.
In doing repairs on bezels I found this increase in the size of the 'bridge' to give the bezels more strength, which they really need, because people continue to push too hard on the top part trying to get the bezel to upper dash pad fit in better alignment, is a good idea..
Regards,
Alan
Last edited by Alan 71; 09-12-2014 at 05:53 PM.
The following users liked this post:
c1nicole (03-21-2024)
09-12-2014, 04:44 PM
#11
Safety Car

I repaired mine the same way.... then proceeded to break it again when I was pulling my wiper switch to repair.
I bought like 6 of these bezels in one auction on eBay cheap ( all broken the same way) because my original was butcher up
I bought like 6 of these bezels in one auction on eBay cheap ( all broken the same way) because my original was butcher up