
My Differential Rebuild Paper


 03-30-2008, 11:39 PM
#22
Safety Car

Thread Starter
I've been running 1 - 1 1/2 thou clearance on both sides for a number of years without any trouble. I don't see the need for more clearance than that as it is a low speed application and there is admirably good access to the line of contact for the grease. I also like the idea of having minimal wobble in what, in these cars, is an upper contol arm.
As far as using a flapper wheel to trim off the ends . . . not what I'd call precision work. I'm sure it can be done close enough to be successful, but keeping the end perfectly perpendicular to the axis of rotation seems like a pretty good idea.
I'd also be concerned with going through the case hardening. Not sure how deep it runs in current aftermarket stuff, but it seems to have been GD thin in the stock pieces from years ago.
Gary used to run his yokes within 1-2 thou. He has changed his procedure where he indicates the ends of the yokes using a granite surface plate and a machinist vice. Then he grinds down the ends of the yokes to get more endplay using a surface grinder. Tom's differentials doesn't run the endplay within 1 or 2 thou either - Gary confirmed this with me. The reason for more endplay is because you want more oil to get between the cross shaft and yoke end. I don't own a surface grinder - this paper is for those who don't own a machineshop and want to do most of the work themselves. You'll need to get shims ground by a local machineshop to setup the posi unit correctly - I got my shims ground to size by Gary using his surface grinder.
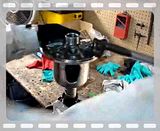
I also talked to him regarding setting up my yoke endplay using a very fine grit flap wheel on my high speed angle grinder. He said to use the dykem on the ends of the yokes and try to make it as parallel as I possibly can. This is why I used the dykem - I wanted to sand off a uniform thickness on the yoke tip. Is it as precise as using a surface Grinder? No, and I already knew it wasn't. The cross shaft is hardened steel - the new yokes and cross shaft will not wear like they would in the stock setup because they are both extremely hard.
Believe me, I have asked Gary every question and concern you can think of, including on how to fit my yokes at home in my garage.
Last edited by stinger12; 03-30-2008 at 11:42 PM.

 03-31-2008, 09:10 AM
#24
Tech Contributor
The stock yokes should case hardened to 030" but that does vary and the mid to late C3's had poor, if any, hardening. 75-79 were bad. The rebuilt yokes should be a hardened tip and I don't believe that they are case hardened. Hardened tool steel? regardless I doubt removing 005 -010 will be a problem.
As for the final endplay. Check most rebuilt/exchange units and they are all over the place, at least the ones I've seen. 025-030 would not be a surprise to find. Build a posi in the fast, stock way leaves a lot of play in them. If the rebuilder takes the time to setup a stock posi to the correct spec and use the springs then the endplay will be less. As just about everyone knows now, I don't build posi's like that. As a result when I'm done tuning them the endplay with new and even some original yokes is between 0- 002" That is too tight for me. There is no spec on yoke endplay to be found, unless you can get into the original prints at GM. I have set endplay at 002 and didn't have a problem but opened it up to 005-010" I want a little movement there without loading the snap ring as much. I also want to get oil in there. I remove 003-006 from yokes on average to gain the gap I want. I do it on a KO Lee surface grinder but it can be done carefully with a wheel. Given the lack of resources Jeremy had the job turned out exceptional.
Also given the fact that thousands of these cars are driven daily with yoke endplay well over 010" makes this a non issue. It would be an interesting check to record the endplay on 20-30-40 restored vettes to see where they fall.
Also I have ground some of the early yokes to fit and reused them. One was a 68 I just did with lower miles. The yokes had about 005 wear on them, the endplay in the stock posi was over 030". After I tuned the posi and ground the yokes 003-005 I had the 005-008 I wanted. This saved the guy $200 over rebuilt yokes and they should last a good long time.
Last edited by GTR1999; 03-31-2008 at 09:13 AM.
03-31-2008, 11:25 AM
#25
Safety Car
Thread Starter
The stock yokes should case hardened to 030" but that does vary and the mid to late C3's had poor, if any, hardening. 75-79 were bad. The rebuilt yokes should be a hardened tip and I don't believe that they are case hardened. Hardened tool steel? regardless I doubt removing 005 -010 will be a problem.
As for the final endplay. Check most rebuilt/exchange units and they are all over the place, at least the ones I've seen. 025-030 would not be a surprise to find. Build a posi in the fast, stock way leaves a lot of play in them. If the rebuilder takes the time to setup a stock posi to the correct spec and use the springs then the endplay will be less. As just about everyone knows now, I don't build posi's like that. As a result when I'm done tuning them the endplay with new and even some original yokes is between 0- 002" That is too tight for me. There is no spec on yoke endplay to be found, unless you can get into the original prints at GM. I have set endplay at 002 and didn't have a problem but opened it up to 005-010" I want a little movement there without loading the snap ring as much. I also want to get oil in there. I remove 003-006 from yokes on average to gain the gap I want. I do it on a KO Lee surface grinder but it can be done carefully with a wheel. Given the lack of resources Jeremy had the job turned out exceptional.
Also given the fact that thousands of these cars are driven daily with yoke endplay well over 010" makes this a non issue. It would be an interesting check to record the endplay on 20-30-40 restored vettes to see where they fall.
Also I have ground some of the early yokes to fit and reused them. One was a 68 I just did with lower miles. The yokes had about 005 wear on them, the endplay in the stock posi was over 030". After I tuned the posi and ground the yokes 003-005 I had the 005-008 I wanted. This saved the guy $200 over rebuilt yokes and they should last a good long time.
As for the final endplay. Check most rebuilt/exchange units and they are all over the place, at least the ones I've seen. 025-030 would not be a surprise to find. Build a posi in the fast, stock way leaves a lot of play in them. If the rebuilder takes the time to setup a stock posi to the correct spec and use the springs then the endplay will be less. As just about everyone knows now, I don't build posi's like that. As a result when I'm done tuning them the endplay with new and even some original yokes is between 0- 002" That is too tight for me. There is no spec on yoke endplay to be found, unless you can get into the original prints at GM. I have set endplay at 002 and didn't have a problem but opened it up to 005-010" I want a little movement there without loading the snap ring as much. I also want to get oil in there. I remove 003-006 from yokes on average to gain the gap I want. I do it on a KO Lee surface grinder but it can be done carefully with a wheel. Given the lack of resources Jeremy had the job turned out exceptional.
Also given the fact that thousands of these cars are driven daily with yoke endplay well over 010" makes this a non issue. It would be an interesting check to record the endplay on 20-30-40 restored vettes to see where they fall.
Also I have ground some of the early yokes to fit and reused them. One was a 68 I just did with lower miles. The yokes had about 005 wear on them, the endplay in the stock posi was over 030". After I tuned the posi and ground the yokes 003-005 I had the 005-008 I wanted. This saved the guy $200 over rebuilt yokes and they should last a good long time.
Yeah, what he said
 03-31-2008, 11:28 AM
#26
Safety Car
Thread Starter
03-31-2008, 09:36 PM
#27
Drifting

When you set up your clutches did you ever check your final set up with a in. torque wrench? It would be nice if we had some type of reference,than just by feel.
Nice job thanks for all your effort.
Gary
Nice job thanks for all your effort.
Gary
03-31-2008, 09:52 PM
#28
Safety Car
Thread Starter
Last edited by stinger12; 03-31-2008 at 09:55 PM.


 04-01-2008, 10:25 AM
#37
Instructor


Just one quick question. Do you have a name or P/N for the yellow setup grease that GM sells? I just know if I go in and ask for the "yellow stuff to setup differentials" I'm going to get a blank stare from the other side of the parts counter. Thanks
04-01-2008, 01:50 PM
#38
Safety Car
Thread Starter
I'll get the part number from the garage later on tonight - it comes in a tube, I think it was 7 or 8 bucks, but it should last you the entire rebuild.
04-01-2008, 05:10 PM
#39
Race Director


Excellent write up. I will save this one along with the one Gary wrote and I should be able to handle the rear diff. Thanks for taking the time and effort to put it all together for us. 