
Rear seal or bearing cap oil leak qestions??
 10-04-2008, 09:47 AM
#1
Melting Slicks

Thread Starter

Member Since: Nov 2005
Location: Green Valley Arizona
Posts: 3,186
Likes: 0
Received 106 Likes
on
71 Posts

Have a small oil leak at rear of oil pan that is not the oil pan. Looks to be the rear main bearing cap is seeping between the block and the cap. I know I put sealent there, but apparently did not get something correct.
So can I drop the pan, and remove the rear main bearing cap with all the drivetrain attached (flywheel, clutch, transmission) or will that put to much load on the crankshaft and other bearings? Does this make sense?
So can I drop the pan, and remove the rear main bearing cap with all the drivetrain attached (flywheel, clutch, transmission) or will that put to much load on the crankshaft and other bearings? Does this make sense?
 10-04-2008, 10:37 AM
#2
Le Mans Master

The answer to your question is yes. It causes no problem to drop the rear bearing cap and change the seal.
Basic, easy to follow, do it once rear main seal change.
Once you have the pan down, remove the oil pump and pickup. Remove the rear main cap. The lower half of the seal is right there. Don't scratch the bearing. Take a small screwdriver and pop the lower half out of the cap, then use the screwdriver, (I have one that I did a little bit of grinding on so it's got a better flat end) and push on the exposed end of the upper half of the seal. You may hve to tap it a little bit to break the upper seal loose. Drive it out until you can get a good grip on it and then just walk it on out. Now the old seal is out, clean the block and the seal groove with something like brake cleaner, just hose it out really well.
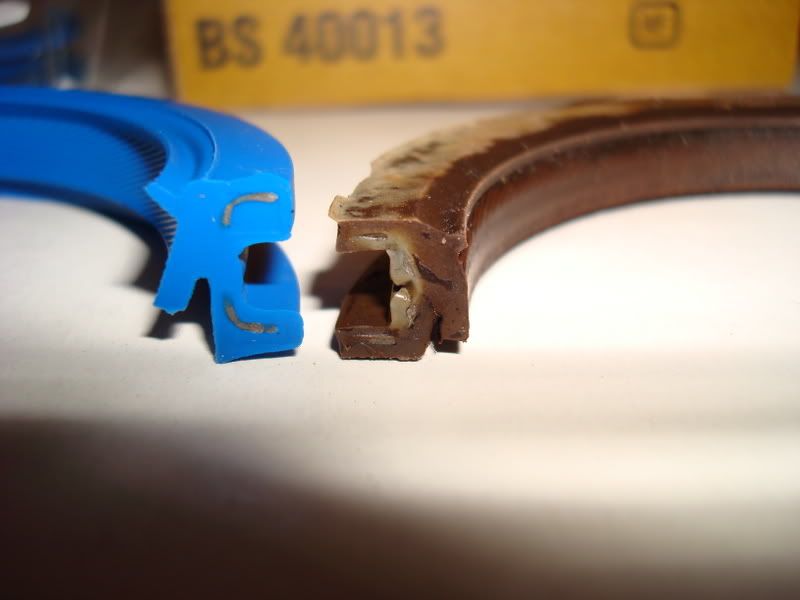
The trick part is next. GM and the aftermarket have 3 different widths of rear seals. The difference in them is from the dust lip on the back to the wiper lip on the forward side of the seal. The best (and widest one) is the one you need to find. The biggest distance between the two lips. You may have to hunt for it. GM had them all under the same part number, but there are different ones. The side of the seal that is "UP" in this picture is the "FRONT"

Take the rear main cap to your bench grinder and use the wire wheel on the mating surfaces adjacent to the seal. Look at the second picture. Where you want to buff the cap is where the sealant is applied. Don't get so far forward to catch the bearing. Buff the cap, get it really clean. Then hose it down with the brake cleaner too. Let it dry while you install the upper half of the seal.

In the package there is a little plastic "spoon". Use it to install BOTH the upper and lower halves. Put a little bit of grease on the lips of the upper seal. If you don't, the rib on the inside of the seal gets sliced off and will seep underneath the seal.

Once you have the lower seal in place, wipe a little bit of grease on the lips of that seal too. Apply a very thin coat of form-a-gasket or an anerobic sealer or something like that on the cap next to the seal. Just above the pan gasket groove. Install the cap, torque to specs and install the oil pump, and pan. Use a dab of RTV at the corners where the gasket turns to go over the cap or timing cover. Do this on both the old style 4 piece gaskets AND the new one piece..
I've done literally hundreds of rear main seals over 15+ years of working for Chevy dealers and NEVER had to do the same one twice.
Basic, easy to follow, do it once rear main seal change.
Once you have the pan down, remove the oil pump and pickup. Remove the rear main cap. The lower half of the seal is right there. Don't scratch the bearing. Take a small screwdriver and pop the lower half out of the cap, then use the screwdriver, (I have one that I did a little bit of grinding on so it's got a better flat end) and push on the exposed end of the upper half of the seal. You may hve to tap it a little bit to break the upper seal loose. Drive it out until you can get a good grip on it and then just walk it on out. Now the old seal is out, clean the block and the seal groove with something like brake cleaner, just hose it out really well.
The trick part is next. GM and the aftermarket have 3 different widths of rear seals. The difference in them is from the dust lip on the back to the wiper lip on the forward side of the seal. The best (and widest one) is the one you need to find. The biggest distance between the two lips. You may have to hunt for it. GM had them all under the same part number, but there are different ones. The side of the seal that is "UP" in this picture is the "FRONT"
Take the rear main cap to your bench grinder and use the wire wheel on the mating surfaces adjacent to the seal. Look at the second picture. Where you want to buff the cap is where the sealant is applied. Don't get so far forward to catch the bearing. Buff the cap, get it really clean. Then hose it down with the brake cleaner too. Let it dry while you install the upper half of the seal.
In the package there is a little plastic "spoon". Use it to install BOTH the upper and lower halves. Put a little bit of grease on the lips of the upper seal. If you don't, the rib on the inside of the seal gets sliced off and will seep underneath the seal.
Once you have the lower seal in place, wipe a little bit of grease on the lips of that seal too. Apply a very thin coat of form-a-gasket or an anerobic sealer or something like that on the cap next to the seal. Just above the pan gasket groove. Install the cap, torque to specs and install the oil pump, and pan. Use a dab of RTV at the corners where the gasket turns to go over the cap or timing cover. Do this on both the old style 4 piece gaskets AND the new one piece..
I've done literally hundreds of rear main seals over 15+ years of working for Chevy dealers and NEVER had to do the same one twice.
Last edited by TimAT; 10-04-2008 at 10:39 AM.
The following users liked this post:
7t2vette (04-01-2016)
10-04-2008, 12:57 PM
#3
Melting Slicks
Thread Starter
Member Since: Nov 2005
Location: Green Valley Arizona
Posts: 3,186
Likes: 0
Received 106 Likes
on
71 Posts
Of course I replaced the seal when I did the engine rebuild last year and used the widest one that was in the gasket kit that I got. I knew there were two different widths, but not three!! May be that is my problem...I need a wider one than what was in the kit. Do you have any dimensions for the widest one?
Anyways, thanks for the super great instructions and advice. I will be doing this little task quite soon. I need to check to see if it leaks only after driving or it leaks with engine running. I know it does stop after 5 - 10 drops.
Anyways, thanks for the super great instructions and advice. I will be doing this little task quite soon. I need to check to see if it leaks only after driving or it leaks with engine running. I know it does stop after 5 - 10 drops.
10-04-2008, 02:10 PM
#4
Le Mans Master
The wide seal is a Fel-Pro. I don't know what the part number is but it's blue color. I always used the widest one I could find, but in the dealer these were NOT new cars- some had pretty big miles on the clock.
kwplot34 has the part number for the wide seal, but I think the mods kicked him off when his satellite internet went down in a storm and he logged on using a dial-up with the same username. Go figure.
kwplot34 has the part number for the wide seal, but I think the mods kicked him off when his satellite internet went down in a storm and he logged on using a dial-up with the same username. Go figure.

 10-05-2008, 03:27 AM
#7
Le Mans Master
Both on the C2 forum and in a recent NCRS Restorer article there have been reports of Fel-Pro p/n 2900 having leakage issues soon after installation. Apparently the Fel Pro 2912 has not had the same leakage issue.
10-05-2008, 09:10 AM
#8
Melting Slicks
Thread Starter
Member Since: Nov 2005
Location: Green Valley Arizona
Posts: 3,186
Likes: 0
Received 106 Likes
on
71 Posts
I used the FelPro gasket kit when I did the rebuild 1.5 years ago. Engine has been sitting since then and only started last weekend. I did rotate the engine and spin the oil pump several times during this period, but the gasket may have torn due to sitting so long.
Guess I will just replace it in a couple of weeks.
The part number to use is the FelPro 2912?
Guess I will just replace it in a couple of weeks.
The part number to use is the FelPro 2912?
11-01-2008, 11:26 AM
#9
Racer

Member Since: Jul 2005
Location: Yerington NV
Posts: 420
Likes: 0
Received 0 Likes
on
0 Posts

What Felpro part number did you end up using and how did it work out?
I was looking through the local autoparts store stuff and didn't even see a Felpro 2912 ?????
http://www.partsamerica.com/ProductL...+Main+Seal+Set
But there is Felpro single lip, double-lip and Offset double lip ??????
11-01-2008, 12:52 PM
#10
Le Mans Master
What Felpro part number did you end up using and how did it work out?
I was looking through the local autoparts store stuff and didn't even see a Felpro 2912 ?????
http://www.partsamerica.com/ProductL...+Main+Seal+Set
But there is Felpro single lip, double-lip and Offset double lip ??????
11-09-2008, 09:57 PM
#11


I wouldn't rely on just the blue color. I am currently rebuilding a 350 and went out to the garage to see what was in my Felpro gasket set, No. 2629, that I just got from Northern Auto with the engine kit. The rear seal is blue, but looks to be a darker blue than in Noonies picture (unless it is just a lighting issue in his picture), and has the part no. P2900 on the package. It looks identical to Noonie's picture, except of lighter color blue.
Now, I am confused if I should go looking for the referenced 2912.
Ralph
Now, I am confused if I should go looking for the referenced 2912.
Ralph
11-09-2008, 10:04 PM
#12
Le Mans Master
Look at the seal and see how far the lips are apart. All the distance does is put the seal lip in a different spot on the crank. I like the wide seal because of that. There could be a host of reasons yours has a different number. Use it. Should be no problem.
07-14-2012, 03:58 PM
#13
Instructor

Member Since: Jul 2012
Posts: 156
Likes: 0
Received 0 Likes
on
0 Posts
I wouldn't rely on just the blue color. I am currently rebuilding a 350 and went out to the garage to see what was in my Felpro gasket set, No. 2629, that I just got from Northern Auto with the engine kit. The rear seal is blue, but looks to be a darker blue than in Noonies picture (unless it is just a lighting issue in his picture), and has the part no. P2900 on the package. It looks identical to Noonie's picture, except of lighter color blue.
Now, I am confused if I should go looking for the referenced 2912.
Ralph
Now, I am confused if I should go looking for the referenced 2912.
Ralph
 It looks the same as the blue one, double sealed. I will lay it side by side of the 2900 and compare. Will let you know.
07-14-2012, 04:45 PM
It looks the same as the blue one, double sealed. I will lay it side by side of the 2900 and compare. Will let you know.
07-14-2012, 04:45 PM
#14
Instructor
Member Since: Jul 2012
Posts: 156
Likes: 0
Received 0 Likes
on
0 Posts
I wouldn't rely on just the blue color. I am currently rebuilding a 350 and went out to the garage to see what was in my Felpro gasket set, No. 2629, that I just got from Northern Auto with the engine kit. The rear seal is blue, but looks to be a darker blue than in Noonies picture (unless it is just a lighting issue in his picture), and has the part no. P2900 on the package. It looks identical to Noonie's picture, except of lighter color blue.
Now, I am confused if I should go looking for the referenced 2912.
Ralph
Now, I am confused if I should go looking for the referenced 2912.
Ralph
 04-25-2023, 01:23 PM
#16

I am installing a 2912 made by fel-pro tonight. I will let you know how it works. I had to order it in. I ordered it from auto zone and it came in 2 days later. It looks the same as the blue one, double sealed. I will lay it side by side of the 2900 and compare. Will let you know.
It looks the same as the blue one, double sealed. I will lay it side by side of the 2900 and compare. Will let you know.
