
Spring Remover J-22944 Any Interest?
 03-28-2010, 08:53 PM
#1
Le Mans Master

Thread Starter
Member Since: May 2003
Location: Fernandina Beach FL
Posts: 8,481
Received 3,220 Likes
on
1,732 Posts
2023 Restomod of the Year finalist
2020 C3 of the Year Winner - Modified

For those of you that have messed w/ the "free" tool loan at the local Auto Parts place-and then had to purchase the tool because you destroyed the chinese junk- This ones for you!!!
If you have ever tried to replace an original or Big block spring -you know the headache of the threaded spring compressor-won't compress enough and then the "fingers" get caught between the coils and impossible to remove....
I knew there had to be a better way- The "J-22944"
After looking at it- Did a search and they were nowhere to be found.
Hence- the idea to make a "New and Improved" one-
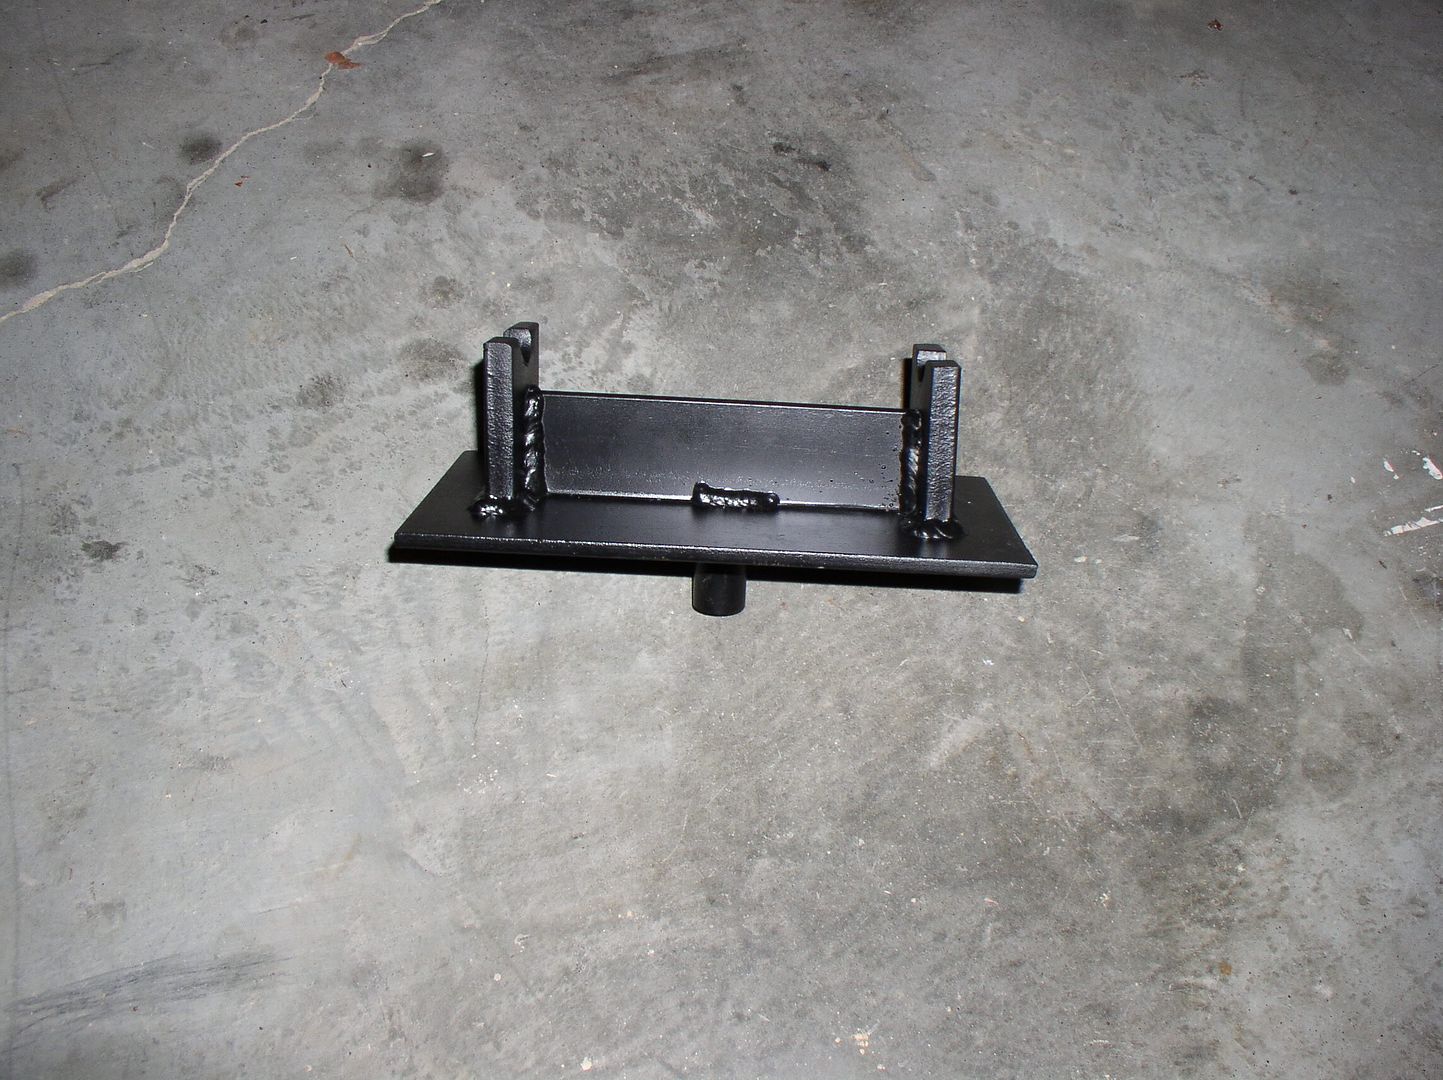
I whipped this up at my buddies machine shop w/ some scrape metal laying around.
I improved it by adding a fitting that'll go right in a standard floor jack-
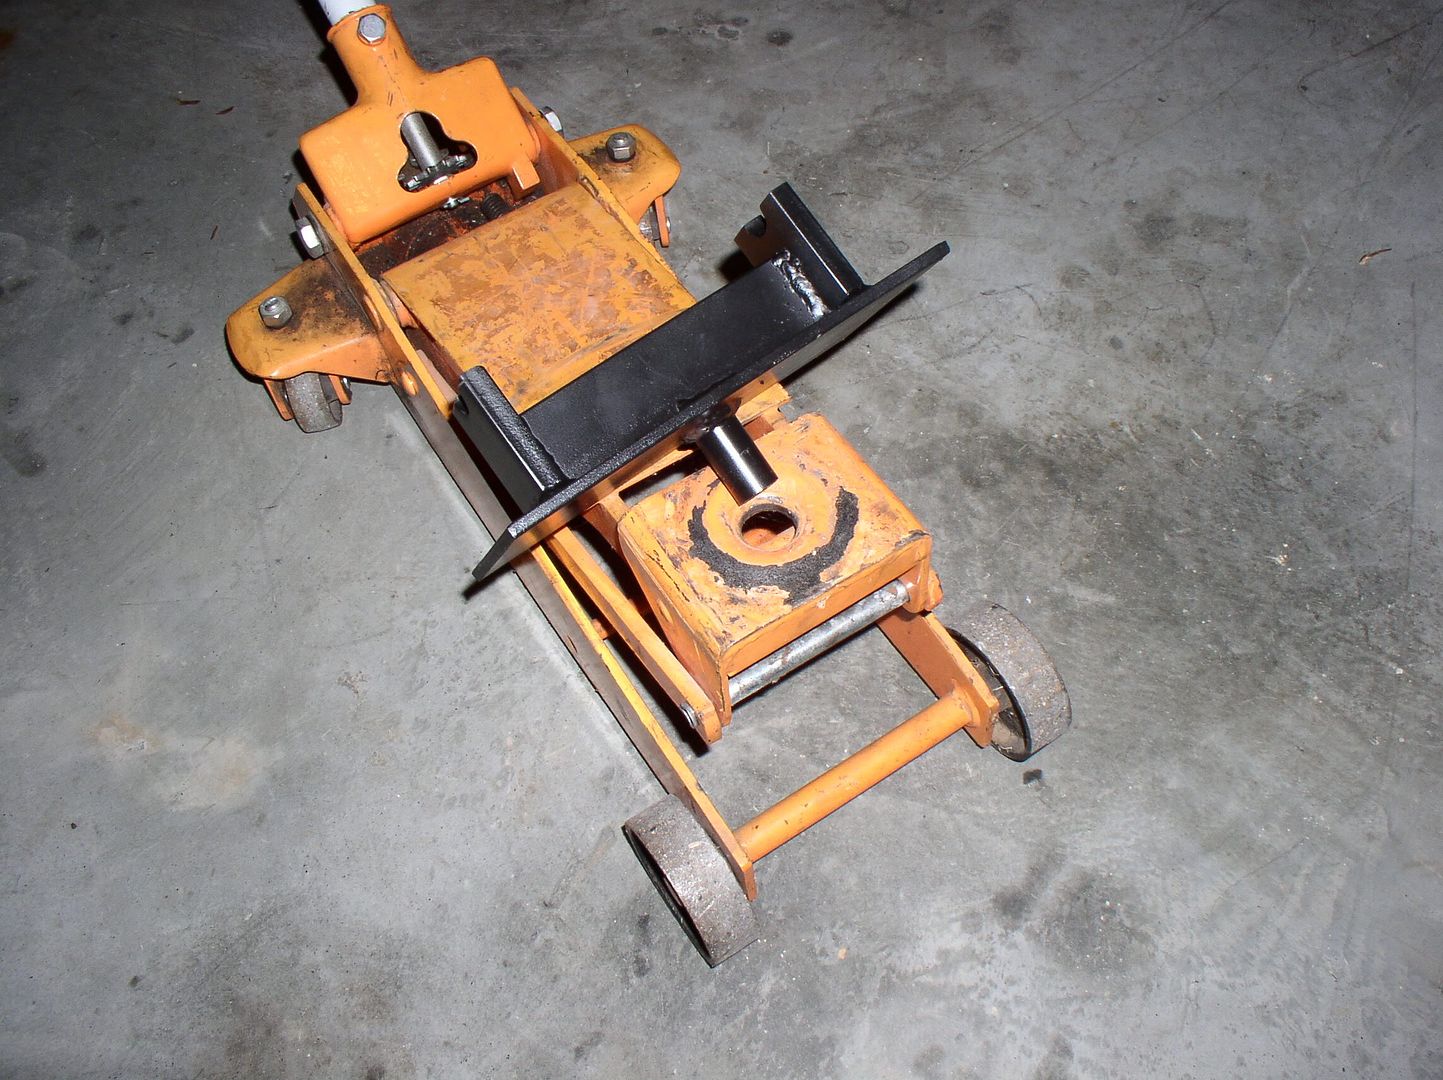
Here's what it'll look like in action-

Any interest? I can make several more. Price? It's got to be a lot quicker than the threaded spring compressor.
Ideas to improve it? I'd put a cut heater hose over the A-Arm cross shaft to protect the paint/powdercoating..
Richard
If you have ever tried to replace an original or Big block spring -you know the headache of the threaded spring compressor-won't compress enough and then the "fingers" get caught between the coils and impossible to remove....
I knew there had to be a better way- The "J-22944"
After looking at it- Did a search and they were nowhere to be found.
Hence- the idea to make a "New and Improved" one-
I whipped this up at my buddies machine shop w/ some scrape metal laying around.
I improved it by adding a fitting that'll go right in a standard floor jack-
Here's what it'll look like in action-
Any interest? I can make several more. Price? It's got to be a lot quicker than the threaded spring compressor.
Ideas to improve it? I'd put a cut heater hose over the A-Arm cross shaft to protect the paint/powdercoating..
Richard
Last edited by Richard454; 04-15-2010 at 10:34 AM.
 03-29-2010, 09:08 PM
#2
Le Mans Master
Thread Starter
Member Since: May 2003
Location: Fernandina Beach FL
Posts: 8,481
Received 3,220 Likes
on
1,732 Posts
2023 Restomod of the Year finalist
2020 C3 of the Year Winner - Modified
It'll work w/ this jack as well-Just had to pull a couple pins out.
Richard
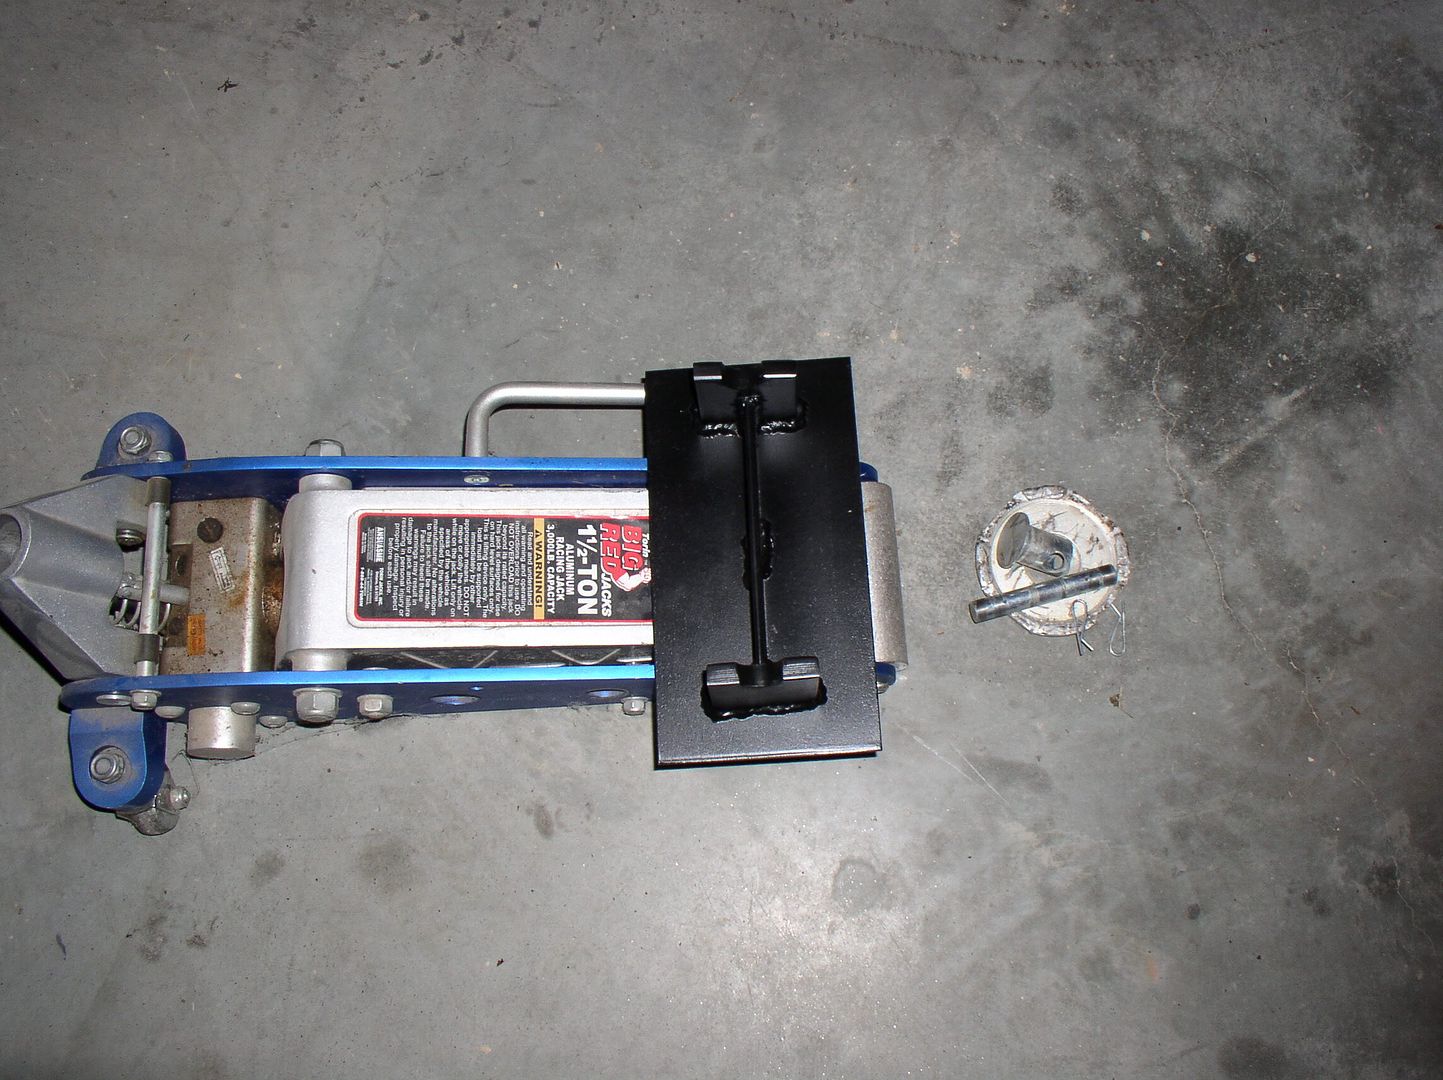
Richard
03-29-2010, 09:36 PM
#3
Burning Brakes

Member Since: Dec 2008
Location: 2011,2012 ECS CC 10.50 CHAMP Massapequa NY
Posts: 1,057
Likes: 0
Received 4 Likes
on
4 Posts

I take the shock out and put a 1/2" threaded rod up where the shock goes and put a steel plate on the top and at the bottom of the control arm. I pop the lower ball joint and back off on the bottom nut lowering the lower control arm. The spring cant pop out because the rod is there.
03-29-2010, 10:20 PM
#5
Team Owner

I work on Historic racing Vettes. We change the front springs in the pits................no clamps........ no rods..... no special anything.
The front up with tires off. Place a floor jack about a 1/4 inch below the hanging lower A-arm. pull the cotter pins out and remove the ball joint nut. place a 2 pound sledge hammer against the upper spindle arm ball joint and whack it with a big hammer. The tapered ball joint popped apart and the spriing weight slams the lower A-Arm angainst the jack. take the top nut off the shock and the bottom two bolts and remove the shock out of the midle. lower the jack slow and remove the spring.
stuff in the spring..........put new anti seize on the ball joint tapered shaft. raise the lower AA with spindle arm on the upper AA ball joint. insure that the spring is in the pocket. Compress enough to install the shock and bolt it in place. TQ the ball joint nuts to 80 FP
Your ready to go back out
I've changed so many it hurts to think about
I never even thought about taking the back of the arm off like that. I can see that it is another way to skin a cat. Is the lining up of the bolts a PITA with spring pressure involved?
Last edited by gkull; 03-30-2010 at 09:24 AM.
03-30-2010, 06:40 PM
#6
Team Owner

Member Since: Jul 2004
Location: Redondo Beach, California
Posts: 39,565
Received 548 Likes
on
375 Posts

Your homemade version of the J-22944 looks professional and certainly looks a lot easier to use than the coil compressor things.
I bought a coil compressor and just gave up on it after reading about a forum members technique. Essentially the same as gkull's but with one modification to allow spring replacement in a bare frame.
I needed to install a BB spring in a bare frame roller. With the control arms installed, the spindle connected to the upper control arm via it's ball joint and only the lower ball joint stud to spindle needed to be bolted together....I dropped the lower arm manually and placed the spring in place. Naturally the expanded spring would not allow the lower control arm ball joint stud to mate into the spindle for bolting (actually tightening the ball joint stud nut). So to force the lower control arm up, compressing the spring, until the lower ball joint stud mated into the lower spindle mounting hole, a floor jack would start to compress the spring, but with no engine, the frame wuold just start to elevate, not allowing the spring to compress any more. What to do??? Solution...Move the body of the jack under the frame extention, in front of the control arm, and CHAIN the jack to the frame. Wrap a chain around the frame and jack body and put a bolt through teh chain loops. Now when you start to jack up the control arm, the frame can't move up. The spring is easily compressed. (The lifting pad of the jack is under the lower ball joint)
The only slightly annoying thing with the above technique, is that when teh spring starts to compress, it doesn't exactly move up into the upper frame tower correctly. I used a BFHammer to bang the coil into place. Overall it was an easy process. The jack meant no muscle power is required.
03-30-2010, 09:26 PM
#7
Melting Slicks

Member Since: Jul 2001
Location: Massapequa Park NY
Posts: 2,604
Likes: 0
Received 10 Likes
on
8 Posts
Very nice work, changed the springs once on a Gran Prix I used to have by removing the back of the arm. Yes - it was a royal PITA to get it lined back up with just the jack.
I never even thought about taking the back of the arm off like that. I can see that it is another way to skin a cat. Is the lining up of the bolts a PITA with spring pressure involved?
03-31-2010, 01:25 PM
#8
Team Owner
Member Since: Jul 2004
Location: Redondo Beach, California
Posts: 39,565
Received 548 Likes
on
375 Posts
I've been thinking, why did the factory recommend this method of r and r-ing the spring. Best I can think of is that this tool compresses the spring with it going naturally into the correct position in the spring tower. Also, you don't have to seperate the ball joint on the lower control arm. That's good because seperating the ball joint can be difficult and also you usually damage the rubber ball joint boot.
How much would you want for your spring tool?
How much would you want for your spring tool?
03-31-2010, 01:55 PM
#9
Burning Brakes
I really like what you made here. I hate working with coil springs. Scares the hell outa me especially stock long springs like in my fathers 55 chevy.
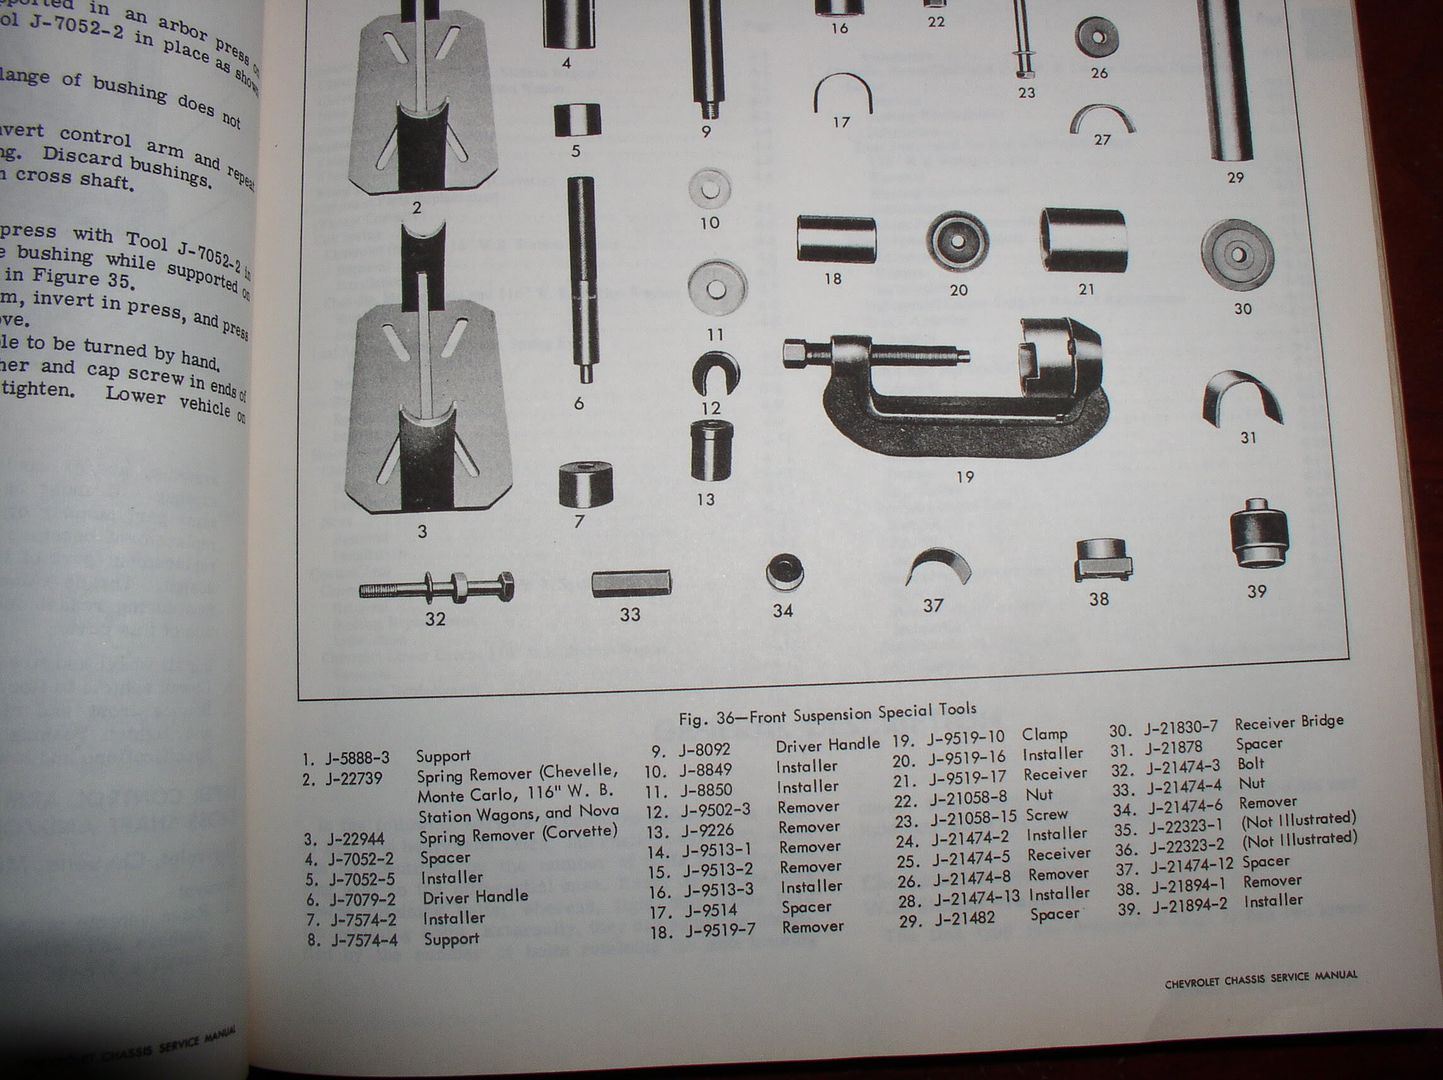
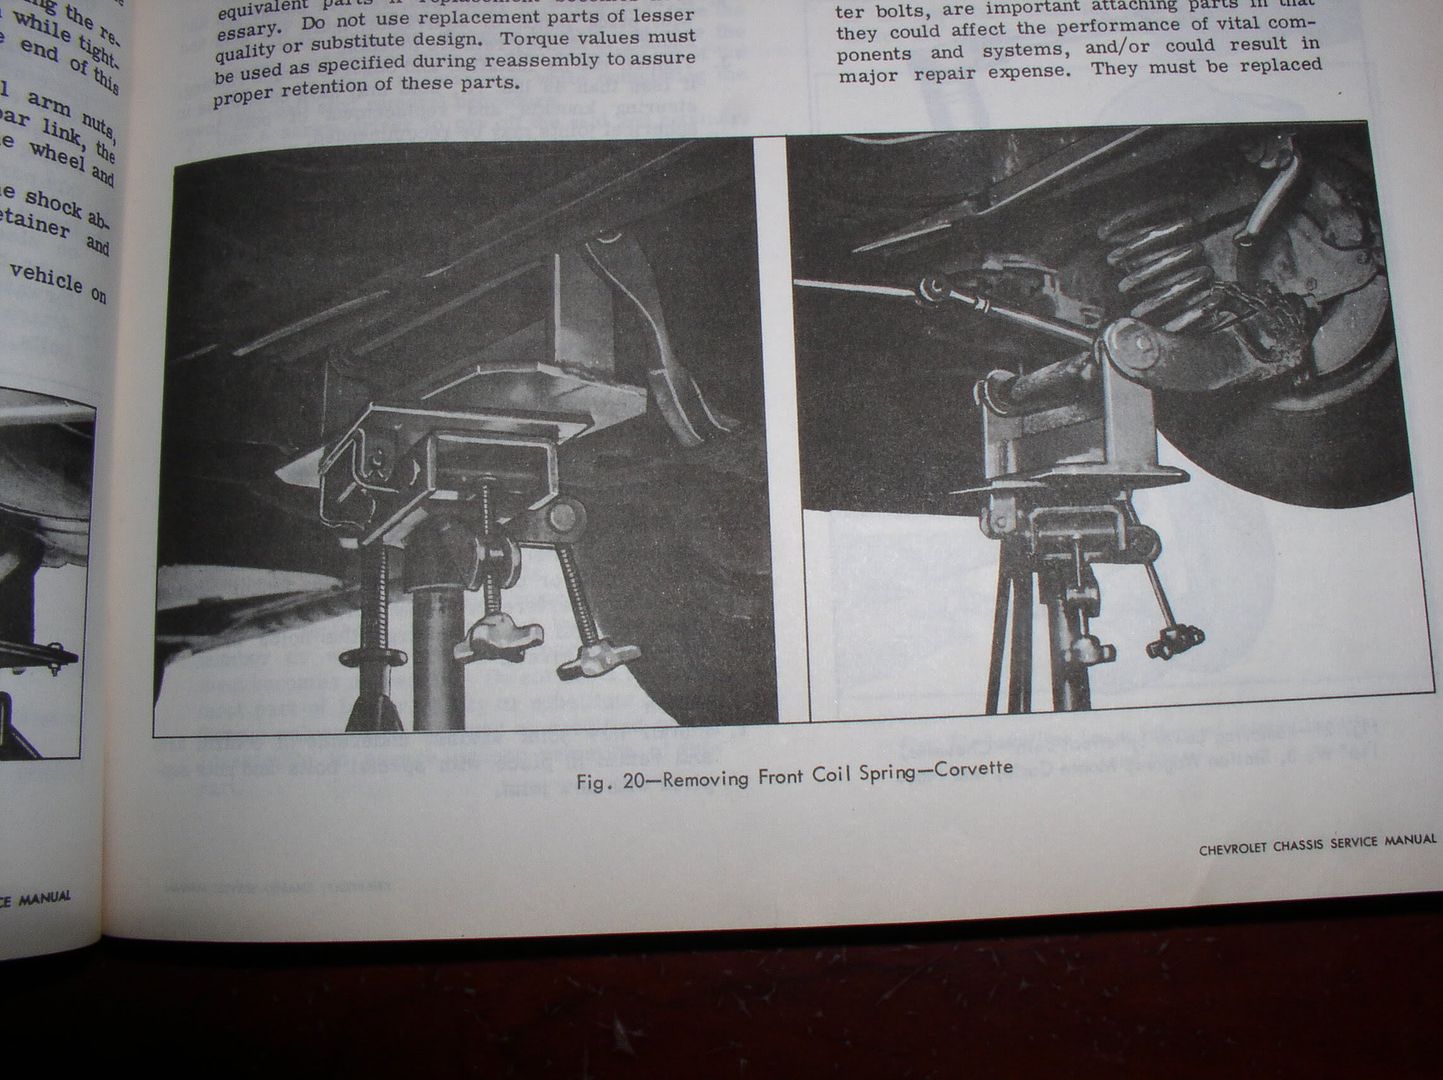
One recommendation (maybe I'm being picky) it appears the original tool caught the lower control arm by the control arm bushings and NOT the crossshaft as you are. Take a look at figure 20 from the chassis manual.
I think you'll have more purchase and surface area and a wider stance on the control arm (not to mention the tool will be trapped in the control arm bushing openings keeping it from walking around or being prone to instability if the arm is moving as it will when being jacked up. It also appears the original tool was held stable on the jacking mechanism by screws so it could not tilt off the jack plate when pressure was applied.
Just my two cents.... Nice tool.
03-31-2010, 02:12 PM
#10
Race Director

It is a great tool. I change my springs that way too, I don't like damaging the ball joint boots.
I just used a jack under the control arm but my springs had already been changed and were not the longer stock ones so there wasn't a large drop like the OEM springs would produce
I just used a jack under the control arm but my springs had already been changed and were not the longer stock ones so there wasn't a large drop like the OEM springs would produce
03-31-2010, 03:06 PM
#11
Team Owner
 03-31-2010, 09:22 PM
#12
Le Mans Master
Thread Starter
Member Since: May 2003
Location: Fernandina Beach FL
Posts: 8,481
Received 3,220 Likes
on
1,732 Posts
2023 Restomod of the Year finalist
2020 C3 of the Year Winner - Modified
One recommendation (maybe I'm being picky) it appears the original tool caught the lower control arm by the control arm bushings and NOT the crossshaft as you are. Take a look at figure 20 from the chassis manual.
I think you'll have more purchase and surface area and a wider stance on the control arm (not to mention the tool will be trapped in the control arm bushing openings keeping it from walking around or being prone to instability if the arm is moving as it will when being jacked up. It also appears the original tool was held stable on the jacking mechanism by screws so it could not tilt off the jack plate when pressure was applied.
Just my two cents.... Nice tool.
Keep the comments coming-
Richard

 04-05-2010, 10:17 PM
#14
Le Mans Master
Thread Starter
Member Since: May 2003
Location: Fernandina Beach FL
Posts: 8,481
Received 3,220 Likes
on
1,732 Posts
2023 Restomod of the Year finalist
2020 C3 of the Year Winner - Modified
I went to two metal yards and they are Not selling scrap cut off's anymore due to the increase in the price of scrap metal. Why? The supply is down- but the international demand is up.
Only had 20ft lengths and wanted $10 a cut....So-my buddy (the welder) and I went and see his friend-(Who's a welding instructor at a local technical college)in hopes had some scrap metal I needed- He was all out of the bar stock-all he had have was either too small or stainless...Should be in by the end of this week. Dang it!!!
I've tried the piece (on my buddy's 69) and worked w/ no problems at all.
I've also purchased a Powdercoat system- and will be powdercoating them. My hopes is to have them ready this upcoming weekend.
Richard
