
Shift Linkage Adjustment on Muncie M21
 06-17-2010, 11:52 PM
#1
Melting Slicks

Thread Starter
Is there a DIY instruction page on how to adjust the linkage on my 68 Muncie M21?
I'm having troubles getting it into 1st without hitting the center console. There is a good 1/2 inch at the bottom when in 2nd but 1st is so tight it is touching the console.
It also seems to get stuck in reverse once in a while (rarely) but when it does it is a REAL pain to get it out of reverse. It's like it is stuck in 1st and reverse at the same time. Car won't move forward but really stuck bad in reverse.
Looking for an instruction page with diagrams and pictures and a picture or measurements of the tool needed.
shmoky
 06-18-2010, 05:55 AM
#2
Racer

Most Corvettes I've seen have a second set of holes in the shifter arms on the transmission. This will shorten the shifter throws considerably. If yours don't have these holes, a machine shop can drill them. I've never seen a reverse arm with a second hole. I had mine drilled.
 06-18-2010, 07:48 AM
#4
Safety Car


This tip may not apply, but once my shifter linkage plate was mounted, we had to insert a golf tee thru the "drill bit hole" to adjust the linkage. We then adjusted the rods The golf tee could then be broken and taken out. We found this a much easier way rather then unbolting/bolting the shifter housing plates.
06-18-2010, 08:29 AM
#5
Race Director

This tip may not apply, but once my shifter linkage plate was mounted, we had to insert a golf tee thru the "drill bit hole" to adjust the linkage. We then adjusted the rods The golf tee could then be broken and taken out. We found this a much easier way rather then unbolting/bolting the shifter housing plates.
 06-19-2010, 10:31 PM
#6

Do you have a hurst shifter? If so, you definitely need to line up the 3 "lever arms", put a drillbit (that's what I used) through the hole (which is towards the front bottom of the shifter plate on the drivers side) to lock them in place. Now you can go about adjusting rod length.
I also suggest taking your shifter off the transmission (disconnect rods first), take it apart and clean it thoroughly. Mine was so nasty it pretty much didn't work after sitting for 9 months. Also, get new lever pins and bushings, b/c I'm sure yours are worn out.
I also suggest taking your shifter off the transmission (disconnect rods first), take it apart and clean it thoroughly. Mine was so nasty it pretty much didn't work after sitting for 9 months. Also, get new lever pins and bushings, b/c I'm sure yours are worn out.
06-20-2010, 09:32 AM
#7
Melting Slicks
Thread Starter
Thanx for the replies. To be more specific I do NOT have a Hurst shifter. (sounds like if I did it would be easy to adjust)
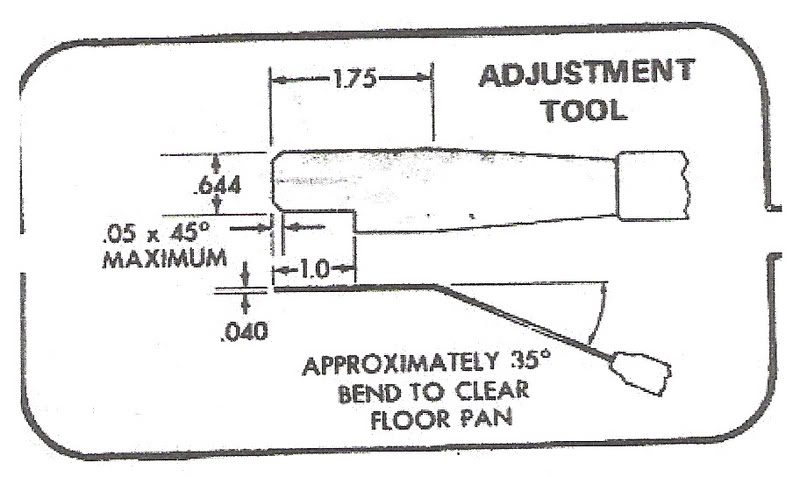
I've seen that diagram before Roger but couldn't remember/find it again. You say to "slide tool in shifter". Can you explain as to where to slide it into please.
shmoky
I've seen that diagram before Roger but couldn't remember/find it again. You say to "slide tool in shifter". Can you explain as to where to slide it into please.
shmoky
06-20-2010, 09:49 AM
#8
Race Director
There will be a flat slot on the drivers side of the shifter, and the same slots through all 3 shift levers inside the shifter. Once you slide the tool through the shift levers are locked in the neutral position. To be honest I have not tried to use the tool in the drawing , my tool is exactly the same but without the handle. I've heard others say the tool with the handle goes in fine.
 06-20-2010, 11:17 AM
#10
Melting Slicks
Member Since: Apr 2006
Location: Airdrie Alberta
Posts: 2,084
Likes: 0
Received 11 Likes
on
10 Posts

here is a pic of the linkage. I went with the alternate holes to shorten the throw, much nicer.
Looks like the adjustment tool would be a major pain to use with the body on.

Looks like the adjustment tool would be a major pain to use with the body on.
06-20-2010, 11:35 AM
#11
Former Vendor
Member Since: Aug 2006
Location: Jeffersonville Indiana 812-288-7103
Posts: 76,656
Received 1,813 Likes
on
1,458 Posts
St. Jude Donor '08-'09-'10-'11-'12-'13-'14-'15
You'll find a detailed PDF file on how to adjust the linkage here: http://willcoxcorvette.com/repairand...lp.php?hID=177
Willcox
Willcox
06-20-2010, 01:51 PM
#12
Team Owner


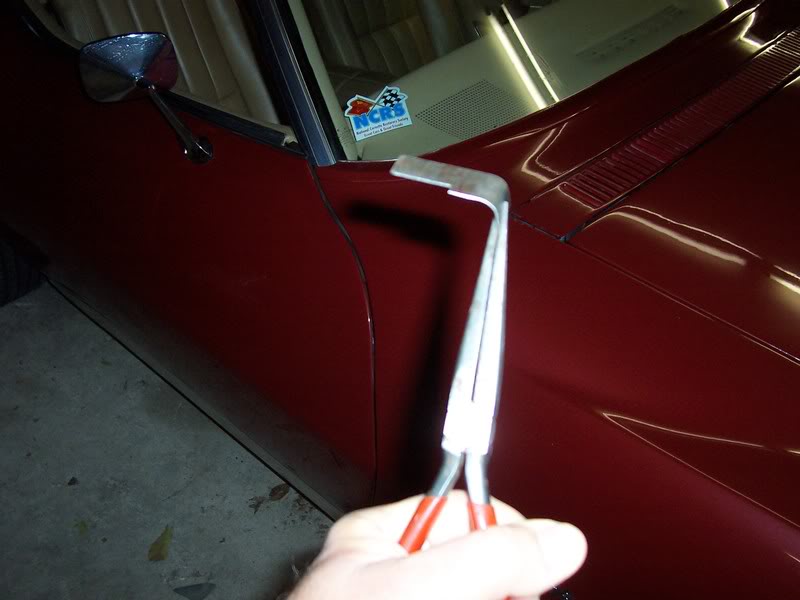
Thanks Willcox! That is the diagram I have in my head. I think it is the same or similar diagram with instructions in the 1968 GM Service Manual. I had a heck of a time finding the hole (slot) for that tool from underneath. I think I actually inserted it from above - using the small piece like Roger is showing, of course after removing console and all boots.
06-20-2010, 10:34 PM
#13
Former Vendor
Member Since: Aug 2006
Location: Jeffersonville Indiana 812-288-7103
Posts: 76,656
Received 1,813 Likes
on
1,458 Posts
St. Jude Donor '08-'09-'10-'11-'12-'13-'14-'15
No problem..
Boy, I need to do that one over again and make it a better read. Actually this is in most assembly and service manuals. In the AIM's it is one of "those" pages that seem to bad on every volume.
Rogers got the perfect tool, but even then it can be a pain to get in place.
I really do need to make a cleaner picture. Were doing a body off on a 65 so that would be a great chance to snap a good picture to label up.. Were about 2 months from that point right now.
Willcox
06-21-2010, 12:27 AM
#14
Melting Slicks

I made a tool similar to what is shown in the service manual.
Worked great while the body was off.
I haven't been able to find a way to get this tool in place with the body on.
Seems I'd need to drop the shifter out, insert the tool, remount and adjust.
The drop it out again to remove? Doesn't seem to be enough room to reach
the slot with the body on.
Worked great while the body was off.
I haven't been able to find a way to get this tool in place with the body on.
Seems I'd need to drop the shifter out, insert the tool, remount and adjust.
The drop it out again to remove? Doesn't seem to be enough room to reach
the slot with the body on.
06-21-2010, 08:01 PM
#15
Burning Brakes

Member Since: Oct 2003
Location: New Carlisle IN
Posts: 1,080
Likes: 0
Received 68 Likes
on
56 Posts

I bought a new shifter for my 73 when I thought it was bad. It came with a rectangualar piece of sheet metal to put in the slot. I was able to do it with the body on. If I can find that piece tomorrow I will try to take a pictue of it but it was just a rectangle and nothing special about it. I never did install the new shifter. I just adjusted my current one and it still works fine. I am keeping the new one as a spare though.
06-22-2010, 02:46 PM
#16
Drifting

Irritatingly my Hearst shifter is more frequently getting 'linkage bound' - gets jammed in second - I have to get underneath and bang the linkage over with a wrench - a real pita!
06-27-2010, 10:23 AM
#17
Drifting
 - tightened it up and what a difference - I really hadn't noticed the deteriation in shifting quality - now I have back those nice, precise machine quality shifts
  08-09-2010, 02:29 PM
#18
 08-09-2010, 07:05 PM
#19
Drifting
Mine is an early Muncie box with threaded selector shafts, the shift rod arms secured by nuts - whereas the later boxes use tapped shafts and bolts to secure shift rod arms. In my case the 'flats' on the first/second selector shaft are worn allowing the arm to rotate a little - enough to allow first and second gear selection to be imprecise - my short term fix was to cut/file/shape a 'shim' to take up the clearance.
08-09-2010, 07:09 PM
#20
Race Director
Mine is an early Muncie box with threaded selector shafts, the shift rod arms secured by nuts - whereas the later boxes use tapped shafts and bolts to secure shift rod arms. In my case the 'flats' on the first/second selector shaft are worn allowing the arm to rotate a little - enough to allow first and second gear selection to be imprecise - my short term fix was to cut/file/shape a 'shim' to take up the clearance.