
LS1 & T56 Swap into 82
 07-17-2011, 09:46 PM
#21
Instructor

Thread Starter

Thanks,
~ Kip
 07-18-2011, 07:43 AM
#22
Safety Car

Member Since: Aug 2001
Location: North Easton Mass
Posts: 4,883
Likes: 0
Received 8 Likes
on
8 Posts

I have a hand-drawn relay circuit diagram for all the relays if you need one.

Rick B.
07-18-2011, 10:29 AM
#23
Instructor
Thread Starter
For testing purposes you can just run power to the fuse or even the fuel pump connector to see if it runs. You will want to put a relay in the circuit for operational use because the ecu is only going to provide probably milliamps of current from it's fuel pump signal. That's enough to turn a relay on and off but the 20 amp circuit passing through the relay is what is going to power the pump.
.
.

I was afraid I may be creating a dangerous situation, just wigs me thinking I'm putting power to something inside a combustable liquid.
Yep, I've got relays ready to go that will turn on the pump using the signal from the ECU. Thanks!
07-18-2011, 07:08 PM
#24
Safety Car
Member Since: Aug 2001
Location: North Easton Mass
Posts: 4,883
Likes: 0
Received 8 Likes
on
8 Posts
Rick B.
04-29-2012, 02:14 PM
#25
Instructor
Thread Starter
After throwing the old girl on the back burner due to life, I'm finally diving back in and have hit my first hitch again.
I have had the engine in twice and both times I couldn't get both mounts connected to the frame. I have worked at for hours trying all sorts of things. I'm to the point that I'm thinking the mounts are not quite right or the frame is off. Any tips?
I have had the engine in twice and both times I couldn't get both mounts connected to the frame. I have worked at for hours trying all sorts of things. I'm to the point that I'm thinking the mounts are not quite right or the frame is off. Any tips?


 01-02-2016, 03:06 PM
#29
Instructor
Thread Starter
Been so long, couldn't believe it.
After losing two years going back to school, changing jobs, moving and now finally getting back to working on the vette.
Completed the wiring - reused the new to me LS1 harness, integrating it with the harness from the C3.
Note: Test your wiring harness!!!! Tested all the connections and found the camshaft position sensor wires were damaged and needed repair.
Installed new lead specifically for the power to the items for the new stuff going to a distribution block with fuses and relays:
Fuel Pump - Signal from the PCM
Coil Packs - Signal from Ignition
Fans Lo/Hi - Signal from PCM - to be installed
For the Starter, went with push button to engage the starter. Went this route having issue with the relay integrated into the automatic shifter. Since, I'm switching to a manual I would want the clutch switch and will add this at some point down the way as a good safety measure when starting.
Video of it running to follow soon.
Ran into a couple issues when trying to start. Put in fresh gas, primed the motor, but no start. Initially, forgot to install a VATS bypass. Then wasn't sure the coils were getting enough juice from the 8 year old battery, even with a charge/starter. Pulled a lead to a plug and installed an old plug and sure enough no spark. Replaced battery, and after a couple of short starts where it seemed she was trying to run...
My dad was on the scene and thankfully opened up the throttle body during startup and she fired up without issue. After a few seconds he was able to let go of the the throttle body and she kept going... I squealed like a little girl and probably wet myself.
Items to do:
Bulkhead connectors to move the PCM into the cab.
Bleed and install the slave cylinder.
Mount the slave and install the trans.
Install new u-joints and driveshaft.
Install accessories.
Install radiator and power steering hoses.
Intake/Airfilter.
And Gauges/Electrical Cleanup.
WOOOOOOOOOOOOOOOOTT!!!!!

 03-07-2016, 02:35 PM
#32
Instructor
Thread Starter
Headers are in: Melrose has the Speedhound headers, great pieces. Went in without a problem.
Transmission is in, for some reason, it was a real bear to get in. Really didn't want to align well, not sure why. Alignment tool was spot on, everything was done "by the book" just was a complete struggle.
Recommend finding bulkhead connectors for moving your ECU into the cab, military style have some 45 pin connector units that I'm going to try out, pics to come. This will have a nice connection between the wiring harness in the engine bay transitioning to hiding in the interior through the firewall.
Next items: installing the new u-joints, confirming/adjusting pinion angle, installing bulkhead connectors, and push to start button (been trying to find a lambo style or aircraft cover military type switch - unsuccessfully).
07-26-2016, 02:13 PM
#34
Instructor
Thread Starter
Finally some updates:
Yes, I’m lazy. I haven’t uploaded the video of it running for all of 10 seconds, but felt it was a bit premature given the issues I’ve run into and only recently made forward progress after several bumps along the way.
Original driveshaft fits with LS1/T56 combo!!! WHAAAT??! Felt like I won the lottery.
So, a few pointers/recommendations:
• Grounds!!! GROUNDS!!! – Made the stupid mistake of not updating or at least cleaning my original grounds. DO IT! Save yourself some hassle and install a few extra grounds and clean the originals!!
• FI hose isn’t FI submersible hose. Use gasoline submersible rated FI hose for fuel sending units. I now hate ethanol even more.
• Just because something is new, doesn’t mean it isn’t broken. Purchased a starter with bad contacts causing me to chase my tail for two months.
Things actually accomplished:
• New U-joints Installed (Driveshaft)
• Pinion Angle Checked
• Custom Image Corvette cross member installed, fit perfect!
• Troubleshooting crank sensor error
• Troubleshooting low fuel pressure
• Troubleshooting poor starting/main fuse blowing
• Two button start setup (one button for ACC, Fuel Pump relay power (activation still controlled by PCM), run condition notification to PCM, and coil power; second button for power to engage starter)
• Mock up of coolant hoses
• New custom bent brake lines
Current Focus:
• PCV system with catch can
• Installation of submersible rated hose for fuel sending unit
• Installing shift plate with shift rod (probably not their names)
• Bleed clutch
• Bleed rear brakes
• Test Coolant system
To Do:
• Install bulkhead connector to move PCM into cabin and clean up electrical system
• Install Accessories (Alternator and PS initially)
• Install dash with new gauges
Big hurrah will be getting the old girl down to my home from the farm so things on the interior and exterior can move forward much faster. Been a long drawn out project having only the chance to work on the car a weekend a month. Between forgetting tools, delays, not having the car handy to measure and test to determine what I actually need. Been a real test of my patience. Was close to wanting to give up a few times (freaking new starter not working was a big smack to the face).
I have a new found respect for those who have done the swap and still holding my breath – that mine will soon be running in another couple months.
08-15-2016, 05:25 PM
#36
Instructor
Just a heads up tip
Before you do the cooling system, If you are using the original radiator I thoroughly recommend you get it serviced, had mine done recently after an LS1Swap and finding it was boiling over with no visible issues, found out the radiator was 80% blocked, the guy showed me a core that was 20% and said that was enough to cause overheating. Best $165.00 I've spent in a while, Runs sweet as and on only one 16" electric fan 3000cfm.
Before you do the cooling system, If you are using the original radiator I thoroughly recommend you get it serviced, had mine done recently after an LS1Swap and finding it was boiling over with no visible issues, found out the radiator was 80% blocked, the guy showed me a core that was 20% and said that was enough to cause overheating. Best $165.00 I've spent in a while, Runs sweet as and on only one 16" electric fan 3000cfm.
08-16-2016, 02:18 AM
#37
Instructor
Thread Starter
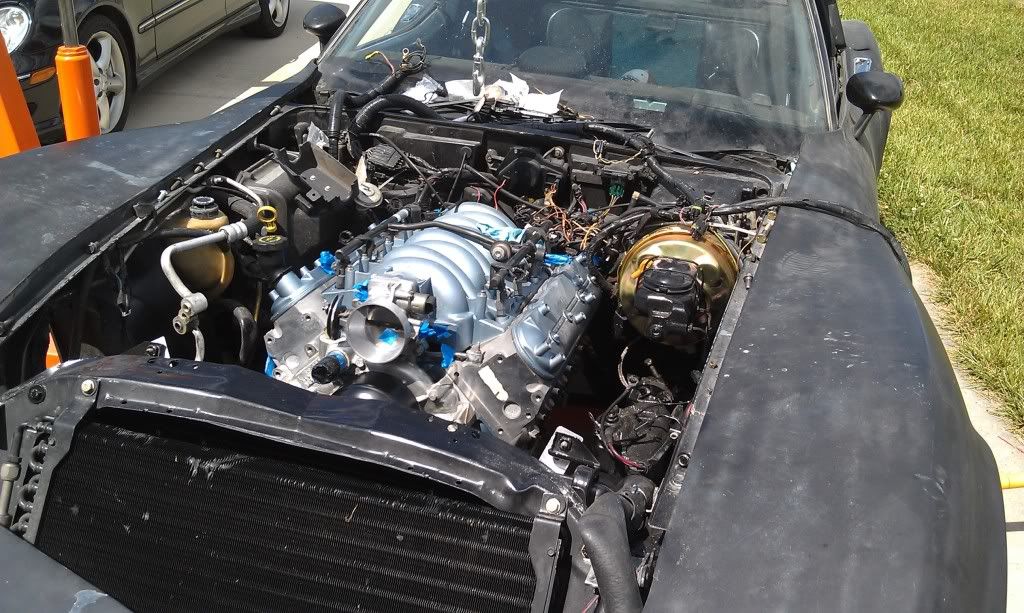
Transmission installed and Headers Mounted:

Wired up all relays in order (need to label them). Grounds are in black. Yellow is IGN: wired to On/Off button. Provides power to fuel pump relay (PCM signals Pump), Coils, and signals PCM of start condition.
Starter is wired to secondary momentary switch.

As she sits, finally running on all cylinders (video was taken at this moment).

Still has a lot of small piddly things to do before on the road.

Wired up all relays in order (need to label them). Grounds are in black. Yellow is IGN: wired to On/Off button. Provides power to fuel pump relay (PCM signals Pump), Coils, and signals PCM of start condition.
Starter is wired to secondary momentary switch.
As she sits, finally running on all cylinders (video was taken at this moment).
Still has a lot of small piddly things to do before on the road.
Last edited by Kipring; 08-16-2016 at 02:31 AM. Reason: Trouble tagging images
02-21-2017, 01:27 PM
#38
Instructor
Thread Starter
Geez, I'm slower than molasses in January.
Finally running, but not drivable for anywhere more than 5 min or less.
Final list of to dos:
Later on the list:
Finally running, but not drivable for anywhere more than 5 min or less.
Final list of to dos:
- Mount Radiator Fluid Reservoir
- Mount buttons for ACC/ON and IGN in Dash
- Clean up Wiring
- Finish Building Exhaust
Later on the list:
- Build Mounting Brackets for "new" leather seats out of an RX-8
- Prep for Paint
- Linear Actuators for Headlights
02-23-2017, 02:36 AM
#40
Instructor
Transmission installed and Headers Mounted:
Wired up all relays in order (need to label them). Grounds are in black. Yellow is IGN: wired to On/Off button. Provides power to fuel pump relay (PCM signals Pump), Coils, and signals PCM of start condition.
Starter is wired to secondary momentary switch.
As she sits, finally running on all cylinders (video was taken at this moment).
Still has a lot of small piddly things to do before on the road.

