
Front body/frame bolting
 01-05-2011, 07:20 PM
#1
Instructor

Thread Starter
Member Since: May 2007
Location: Houston TX
Posts: 130
Likes: 0
Received 0 Likes
on
0 Posts

I'm deep into a body mounts replacement project on my '80. I'm about ready to lift one side and I've disconnected just about everything necessary...but maybe one!??
On the procedure written for a '77 he describes a body to frame extention bolt on both sides that is hard to see...he's right. I don't see any conn after removing the bumper cover and nose bushing bolt. My assy manual doesn't show any other conn either. Am I missing something??...or is that not part of the '80 design?
Thks
 01-06-2011, 01:15 AM
#2
Melting Slicks


I'm deep into a body mounts replacement project on my '80. I'm about ready to lift one side and I've disconnected just about everything necessary...but maybe one!??
On the procedure written for a '77 he describes a body to frame extention bolt on both sides that is hard to see...he's right. I don't see any conn after removing the bumper cover and nose bushing bolt. My assy manual doesn't show any other conn either. Am I missing something??...or is that not part of the '80 design?
Thks
If you have an A.I.M. for 1980 it is on page UPC 14A, Sheet 2.
For the A.I.M. I have, that is page 560, but as the assembly manuals come from different sources they sometimes have different page numbers. I don't think the original Manuals had page numbers, but were identified by Uniform Parts Classification "UPC" Group and Sheet number.
This front body mount was severely deteriorated on my 1980. Unfortunately, most vendors don't identify it in their catalogs. If you need one, PM me for a readily available PN that will work. (Inexpensive, and most all the vendors selling C2 parts have them.)
01-06-2011, 11:53 AM
#3
Instructor
Thread Starter
Member Since: May 2007
Location: Houston TX
Posts: 130
Likes: 0
Received 0 Likes
on
0 Posts
Sorry for the loss of my pic. I did a sort on my Photobucket album and that may have caused the loss.
Anyway, thanks for the feedback and, yes, I aware of the front "donut" mount on the nose. The bolt came out easily.
I'm looking for any other body/frame connection on the front end.
The procedure for a '77 called for removing a bolt to the frame extension from the bumper bracket but I'm guessing the bracket is different on that year.
I also notice the radiator support is tight to the front frame on both sides. Is that going to bind if I lift one side at a time??
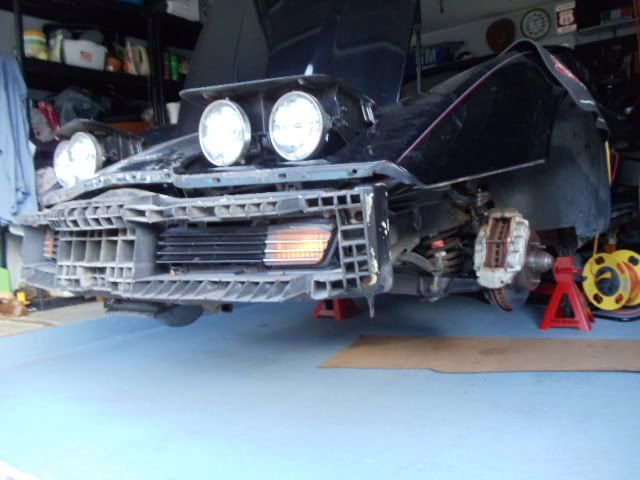
01-06-2011, 02:19 PM
#4
Team Owner


Member Since: Jun 2000
Location: Southbound
Posts: 38,928
Likes: 0
Received 1,468 Likes
on
1,247 Posts
Cruise-In II Veteran

The 77 hardware is different from the 80-82 hardware due to the new front bumpers and bumper covers on the 80-82s. 79s do not have the donut as mapman described.
Lifting one side at a time is "unnatural" for a C3; bodies were lowered on the assembly line (dropped) and all the mounting bolts went in at the same time. Be careful with the one side approach.

Lifting one side at a time is "unnatural" for a C3; bodies were lowered on the assembly line (dropped) and all the mounting bolts went in at the same time. Be careful with the one side approach.
Last edited by Easy Mike; 01-06-2011 at 02:21 PM.
01-06-2011, 05:30 PM
#5
Instructor
Thread Starter
Member Since: May 2007
Location: Houston TX
Posts: 130
Likes: 0
Received 0 Likes
on
0 Posts
Agree, I'm concerned about the side lift. Several threads have shown it can be done on earlier C3s but there would seem to be a chance of "torquing" the body and causing a crack...maybe unseen.
Would like to hear from any '80 owner who has done this body mount replacement project and how they lifted the body (w/o removing it completely).
I'm also considering a lift from the bottom with four bottle jacks and wide flat boards under the floor pans...a lift described by someone on another forum. That would seem to allow a straight lift of 4+ inches and allow work on all mtng sites at the same time.
Anyone have any experience doing that type of lift???
01-06-2011, 10:11 PM
#6
Heel & Toe
Member Since: Nov 2010
Posts: 23
Likes: 0
Received 0 Likes
on
0 Posts
First i agree with Evershark about jacking up one side. I have a 77 off the frame in the carport now. You need a good six inches to comfortably get the center most four body mounts out.
As far as your question there are not any true body to frame bolts in the front end forward of the tires. The bolt located behind the front wheel just behind the wheel house it the closest true body to frame bolt. Then there are two bolts attaching the radiator support to the facebar support which also serves as the reserve vacuum tank. I think they are referring to the bolt on a 77 that is a each in of the facebar bolting it to the fenders which you do not have. At least not in the same location. I am not familiar with the donut on and 82. If you look at the pic there is a hole in each inside corner of the fender on a 77. This bolts to each end of the facebar where yours doesn't have a hole.
http://image.corvettefever.com/f/how...nt_removed.jpg
Last edited by mnbryant2001; 01-06-2011 at 11:01 PM.
01-06-2011, 10:52 PM
#7
3rd Gear

Member Since: Jan 2011
Location: HOLLYWOOD FL
Posts: 3
Likes: 0
Received 0 Likes
on
0 Posts
I BUILT MY 80 FROM SCRATCH .. BASED ON PARTS FROM ONE I WRAPPED AROUND A TREE. i GOT A 79 FRAME FOR THE TRUE DUAL CROSS MEMBER AND GOT A 1980 BODY FROM A WRECK, THERE IS A DOUGHNUT IN THE FROM CENTER OF THE FRAM BEHIND THE BUMPER A TOTAL OF FIVE BOLTS HOLDING THE BODY TO THE FRAME.. DONT FORGET THE STEERING COLUMN IS NOT GOING TO ALLOW THE LIFT WITH OUT REMOVAL
Last edited by CUSTOM 80; 01-06-2011 at 10:55 PM.
01-07-2011, 10:27 AM
#8
Instructor
Thread Starter
Member Since: May 2007
Location: Houston TX
Posts: 130
Likes: 0
Received 0 Likes
on
0 Posts
Thnx for the feedback. I'm confused about the "five bolts holding the body to the frame" comment. I count NINE, four on each side and one on the nose....or, are you referring to some others I don't know about?????
01-07-2011, 10:51 AM
#9
Melting Slicks
I also had some rust deterioration issues on the #4 frame mounts. The deterioration was not visible until I removed the bolt/washer/pads. Repair by welding on the frame required a body off in any case.
01-07-2011, 01:24 PM
#10
Instructor
Thread Starter
Member Since: May 2007
Location: Houston TX
Posts: 130
Likes: 0
Received 0 Likes
on
0 Posts
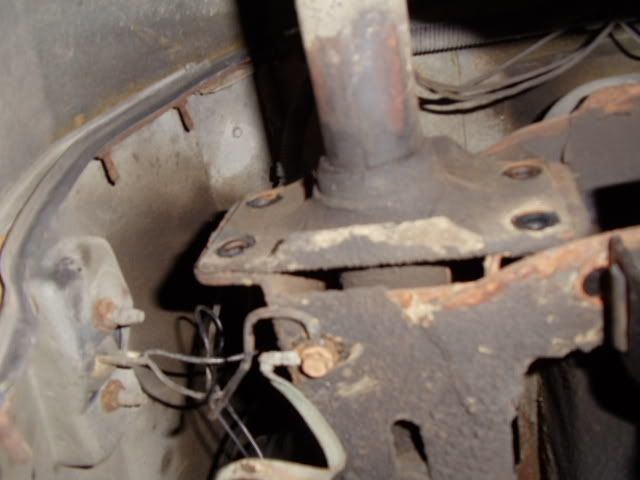
Not bragging...complaining...all my bolts either broke or broke loose in the caged nuts even after days of soaking with penetrant. Some were corroded to less than half the orig diam. I have cut #2 and #3 on passenger side with sawzall and will have to do the same on drivrs side.
Bird cage and body base on #3 are rusted out so I'm replacing with some Zip "channel inserts"
Some more pics below. So, to your point, I'm going to try to lift the body straight up 5-6 inches to assess damage...expecting I may have to take it off to do proper repairs.!!
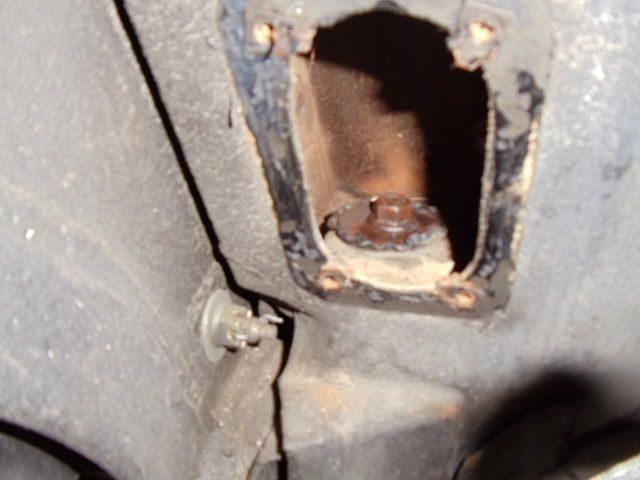
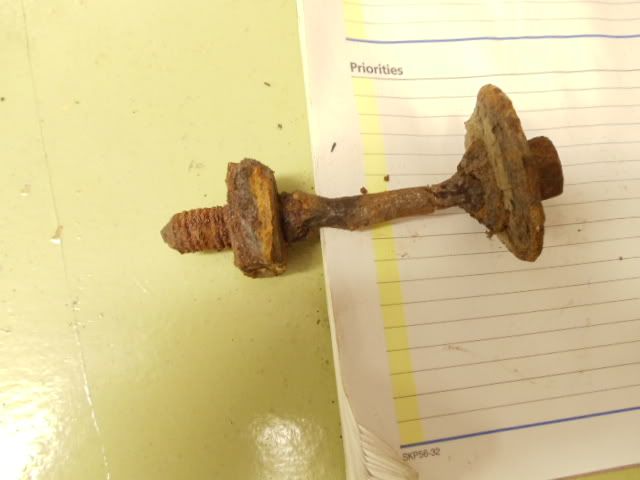
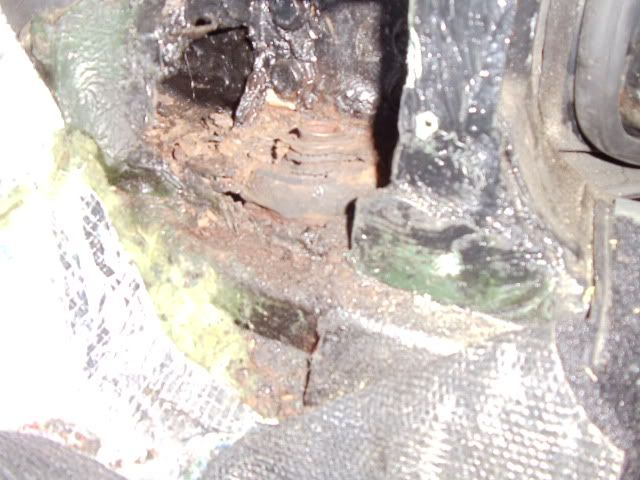
Passenger #2 mount...severe corrosion needs insert.
Bird cage and body base on #3 are rusted out so I'm replacing with some Zip "channel inserts"
Some more pics below. So, to your point, I'm going to try to lift the body straight up 5-6 inches to assess damage...expecting I may have to take it off to do proper repairs.!!
Passenger #2 mount...severe corrosion needs insert.
01-07-2011, 04:18 PM
#12
Team Owner
Member Since: Jun 2000
Location: Southbound
Posts: 38,928
Likes: 0
Received 1,468 Likes
on
1,247 Posts
Cruise-In II Veteran
01-07-2011, 05:22 PM
#13
Instructor
Thread Starter
Member Since: May 2007
Location: Houston TX
Posts: 130
Likes: 0
Received 0 Likes
on
0 Posts
Thanks, again...and yes, in the rear I've disconnected the bumper at the conn to the frame. Four bolts on each side.
And...the antenna ground wire shown below is off.
I've also unhooked the emergency brake cable and unbolted the battery ground cable.
I'm going to lift at four pts underneath, front pans and behind the seats, with addl support in the front under the center of the radiator frame.
I'll try to take some pics of the setup before the "launch".
01-07-2011, 07:34 PM
#14
Drifting


I need to replace the body mounts on my '80 this winter, but I was planning to do one side at a time. I have some instructions on HOW TO REPLACE THE 8 BODY MOUNTS ONE SIDE AT A TIME. I also have two sets of illustrated instructions I assembled from posts here.
How do you plan to lift both sides at the same time?
How do you plan to lift both sides at the same time?
01-08-2011, 06:09 PM
#15
Instructor
Thread Starter
Member Since: May 2007
Location: Houston TX
Posts: 130
Likes: 0
Received 0 Likes
on
0 Posts
We were successfull lifting the front end 3-4in with two bottle jack under the floor pans and front support under the radiator frame. Can't go higher w/o removing the fan and shroud.
The rear is another problem. The right side of the bumper flange shown in the earlier picture I posted doesn't clear the edge of the frame you can see right above it. So, I either have to remove the poly bumper or the extension shown...four more bolts on the poly bumper and two sides...ugh!!
Anybody who has done a body off must know the answer to disconnecting the rear...any recommendations would be greatly appreciated.
01-09-2011, 08:08 AM
#16
Instructor
Thread Starter
Member Since: May 2007
Location: Houston TX
Posts: 130
Likes: 0
Received 0 Likes
on
0 Posts
DUH...it's now clear my disconnection at the rear is useless.
The extension from the bumber to the frame goes further into the frame. The unbolting shown above is worthless! And that is true whether you lift on the side or wherever.
You must unbolt at the bumber and somehow remover the extension or the poly bumper...a much bigger job.
The extension from the bumber to the frame goes further into the frame. The unbolting shown above is worthless! And that is true whether you lift on the side or wherever.
You must unbolt at the bumber and somehow remover the extension or the poly bumper...a much bigger job.
01-09-2011, 08:39 AM
#17
Heel & Toe
Member Since: Nov 2010
Posts: 23
Likes: 0
Received 0 Likes
on
0 Posts
Yep those are typical bolts. I was fortunate that the prior owner of mine keep it in storage for years.
Those extensions are shock absorbers for rear impact. Not sure what the minimum you will need to remove is since I am doing a body of restoration. If I recall right the bumper has to come off before the reinforcement bar will.
Those extensions are shock absorbers for rear impact. Not sure what the minimum you will need to remove is since I am doing a body of restoration. If I recall right the bumper has to come off before the reinforcement bar will.

