
New 12 Bolt, Off Set T/As, & Suspension Upgrades
 04-21-2011, 12:03 AM
#21
Burning Brakes

Thread Starter
I decided to add some more detail photos of my 12 bolt internals for those interested in my build....
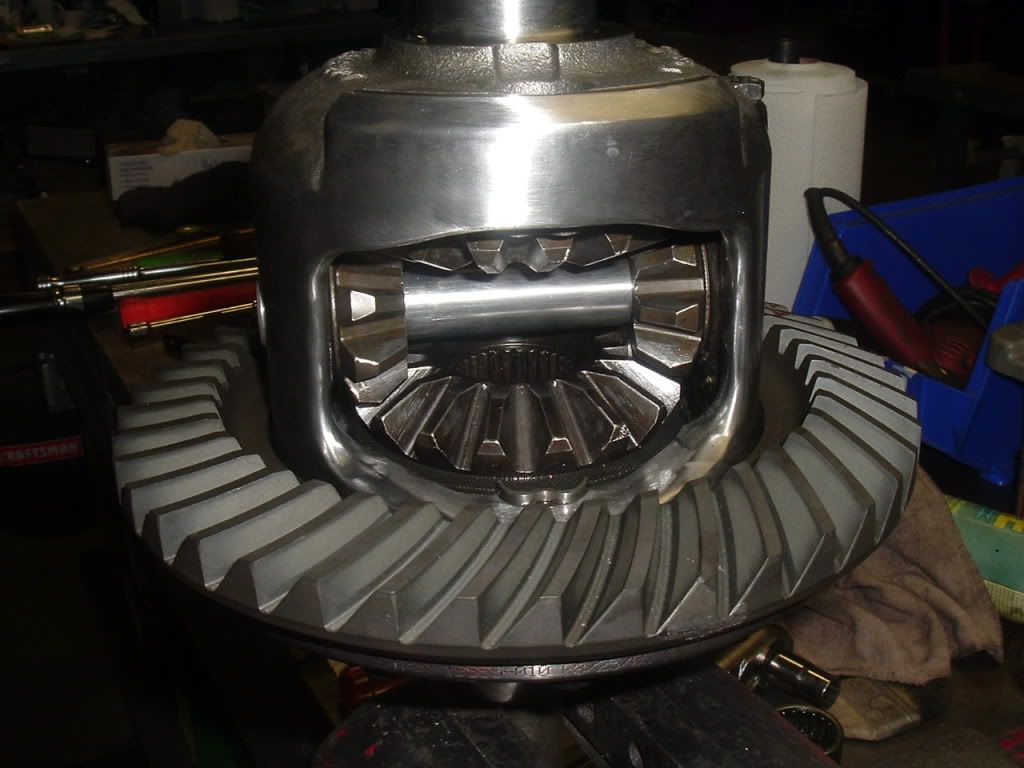
Posi w/ ring & pinion installed, tuned, & polished. Notice the spiders have also been radiused by hand grinding.
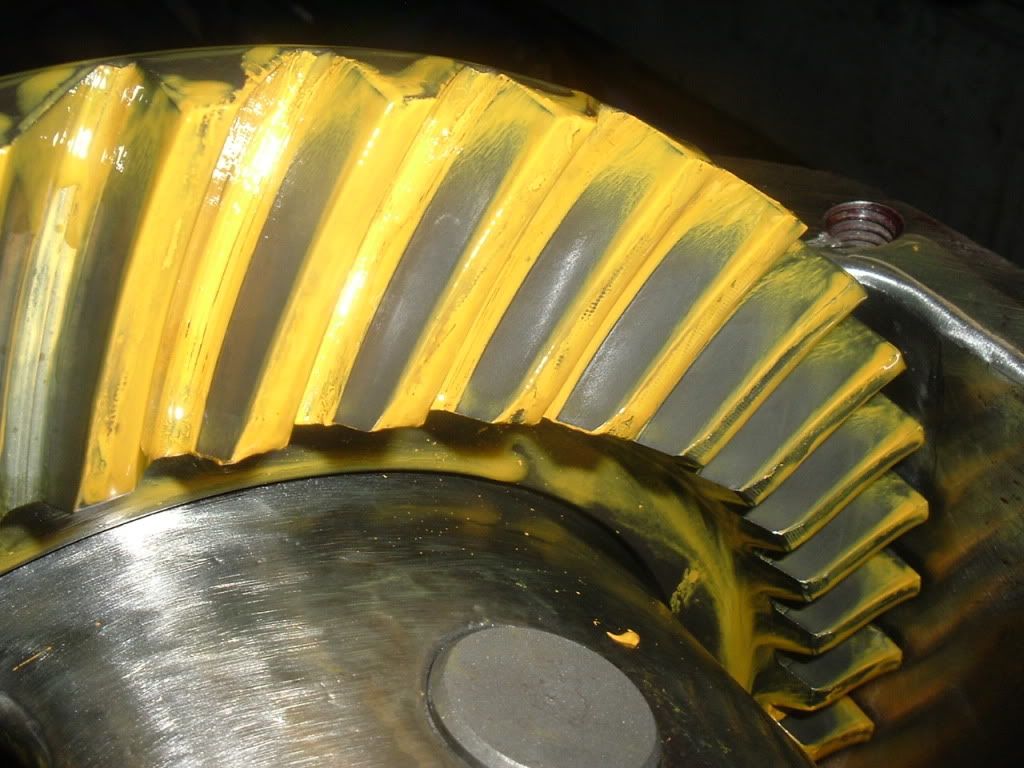
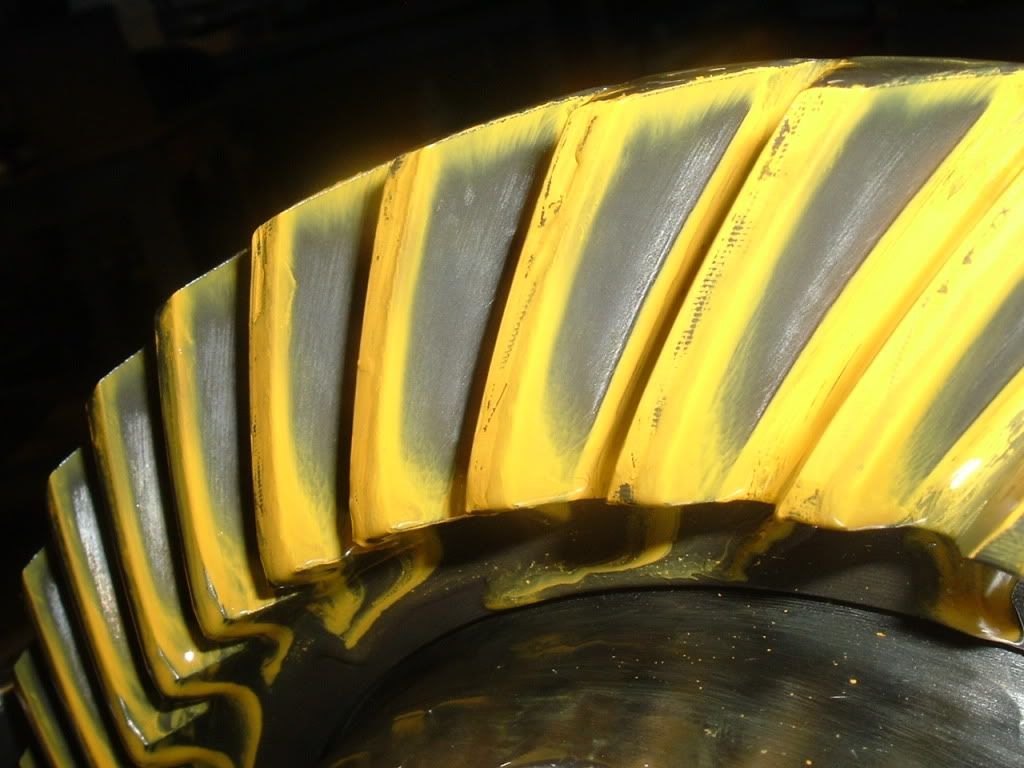
Patterned gears-
Final Drive:
Final Coast:
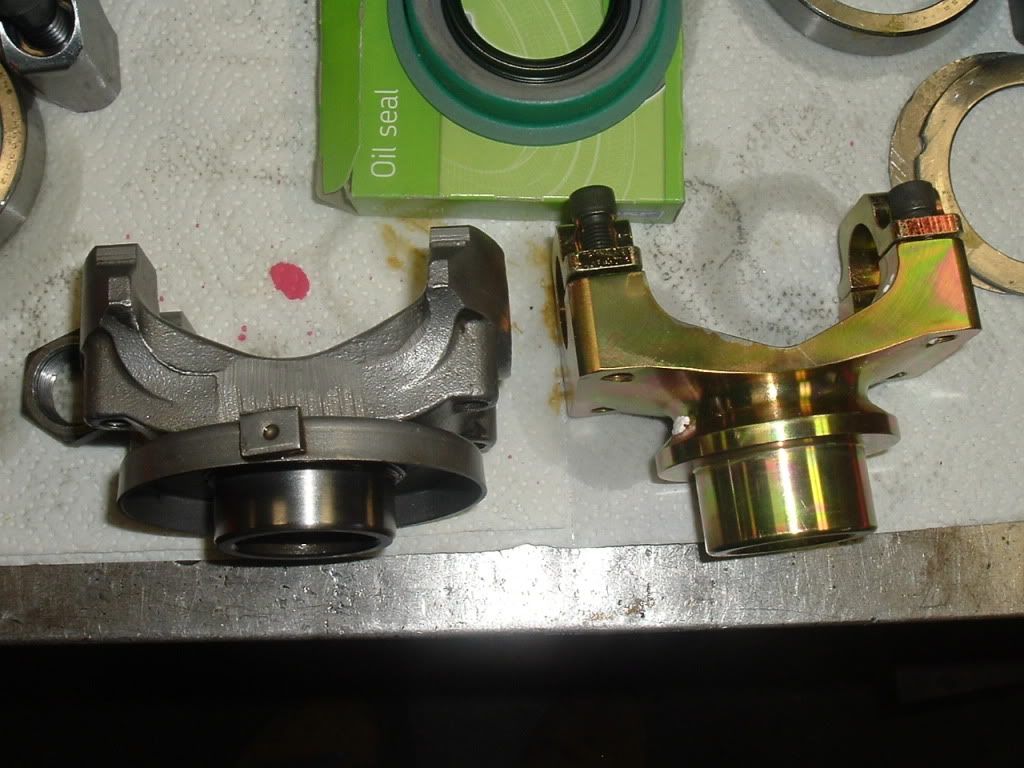
A stock yoke compared to a billet yoke:
I am expecting this baby to be smooth and quiet and I don't think I will be let down.

Posi w/ ring & pinion installed, tuned, & polished. Notice the spiders have also been radiused by hand grinding.
Patterned gears-
Final Drive:
Final Coast:
A stock yoke compared to a billet yoke:
I am expecting this baby to be smooth and quiet and I don't think I will be let down.
 04-21-2011, 02:24 AM
#22
is that pinion yoke specific to C3's, or is it a Chevy 12-bolt piece?
or are the one and the same?
or are the one and the same?
04-21-2011, 10:52 PM
#23
Burning Brakes
Thread Starter
In the first photo there is a posi case with spider gears inside and a ring gear on the outside. The pinion gear is a smaller gear that drives the ring gear. The yoke is what the drive shaft connects to outside of the differential. The Posi is a Series 4 case made by Eaton (std mfg), the ring and pinion gears are made by Richmond (very well known mfg), and the yoke is a commercially available billet steel aftermarket piece but I don't recall from whom.
04-22-2011, 03:59 PM
#24
Premium Supporting Vendor
Looking good Ray. Mike does nice work. Let him know he may have to shave the upper mounting bolts a bit so it won't hit the body. I supply the longer bolts b/c I need to get as much shank as possible. That and the fact that the next bolt size shorter won't let the nyloc engage.
I would start out at 8 on compression and 10 on rebound and adjust from there.
I would start out at 8 on compression and 10 on rebound and adjust from there.
Last edited by Van Steel; 04-22-2011 at 04:02 PM.
04-22-2011, 08:53 PM
#25
Ray, I had my Vette aligned Thurs. I didn't get to drive very much only 8 miles. Rain is forecasted for the next 4 days.I had a couple of small problems. The upper shock mount bolts are about 1/4 to long and the brake lines were short. I took a 20in. 3/16 line and bent it by hand.The bolts I will cut them off. I am excited that it is done and can drive it now.Charlie
04-23-2011, 12:06 AM
#26
Burning Brakes
Thread Starter
Looking good Ray. Mike does nice work. Let him know he may have to shave the upper mounting bolts a bit so it won't hit the body. I supply the longer bolts b/c I need to get as much shank as possible. That and the fact that the next bolt size shorter won't let the nyloc engage.
I would start out at 8 on compression and 10 on rebound and adjust from there.
I would start out at 8 on compression and 10 on rebound and adjust from there.
We received the new rear brake lines today and all appears it will work, final fit tomorrow morning. The upper shock mount bolt on the driver side had to be shortened to keep it out of the battery box, but the passenger side was fine.
I'll have to play with the shock settings tomorrow...the QA directions lead me to think that you have 3 full revolutions and something like 20 clicks per revolution (paper work is at the shop); so are you talking about clicks starting on the 3rd revolution or from initial or am I totally off? I think the QA papers said to start on about 10th click of 3rd rev for "stiff--drag racing" setting. Anyway we'll set the rear ride height tomorrow and set a starting point for C & R.
Thanks again---you guys are super supporters!
Last edited by Ray Y; 04-23-2011 at 12:16 AM.
04-23-2011, 12:13 AM
#27
Burning Brakes
Thread Starter
Ray, I had my Vette aligned Thurs. I didn't get to drive very much only 8 miles. Rain is forecasted for the next 4 days.I had a couple of small problems. The upper shock mount bolts are about 1/4 to long and the brake lines were short. I took a 20in. 3/16 line and bent it by hand.The bolts I will cut them off. I am excited that it is done and can drive it now.Charlie
Glad to hear you are on the road!
The weather is crap here too but I'm a few a weeks away from being road ready so it's not like you being done and having to watching it rain.
I know you only have a few miles on her, but what do you think?
Did you get the suspension set down where you had planned?
I forgot, did you go single or dual adjust in the rear?
 04-24-2011, 01:45 AM
#29
Burning Brakes
Thread Starter
Thanks Ritchie! It's been a blast as it always is.
Well these update photos will be a teaser for sure, because they didn't turn out well at all....way too dark. I forgot to take the camera off the close up setting and as you will see (or not) how the rear came out. The rear is now done and the front suspension is disassembled. Need to get a few parts from up front sent out for powder coating and get a new set of sway bar bushings but it should come back together pretty quickly.
The 1" longer braided rear brake lines that Van Steel sent did the trick. I really like the cleaned up look without a leaf spring and the stance will be great once the final setting is done. It's currently sitting at 27 5/8" from the floor to the lower lip of the rear tire fender well. Once the springs compress a little I think 27" is about where I want to end up. This will be about 1.25" above the tire.
Here's a pic of the coil over set up at completion. Yes the blue tape is gone now, just insurance we didn't ruin the powder coating while adjusting the stance.
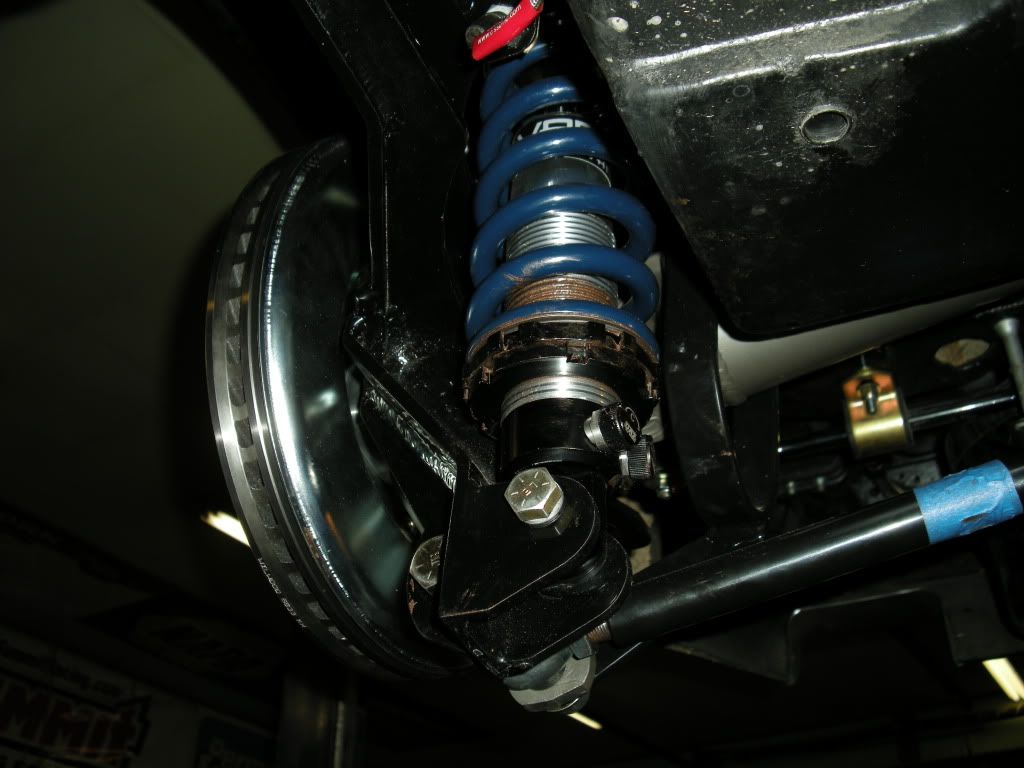
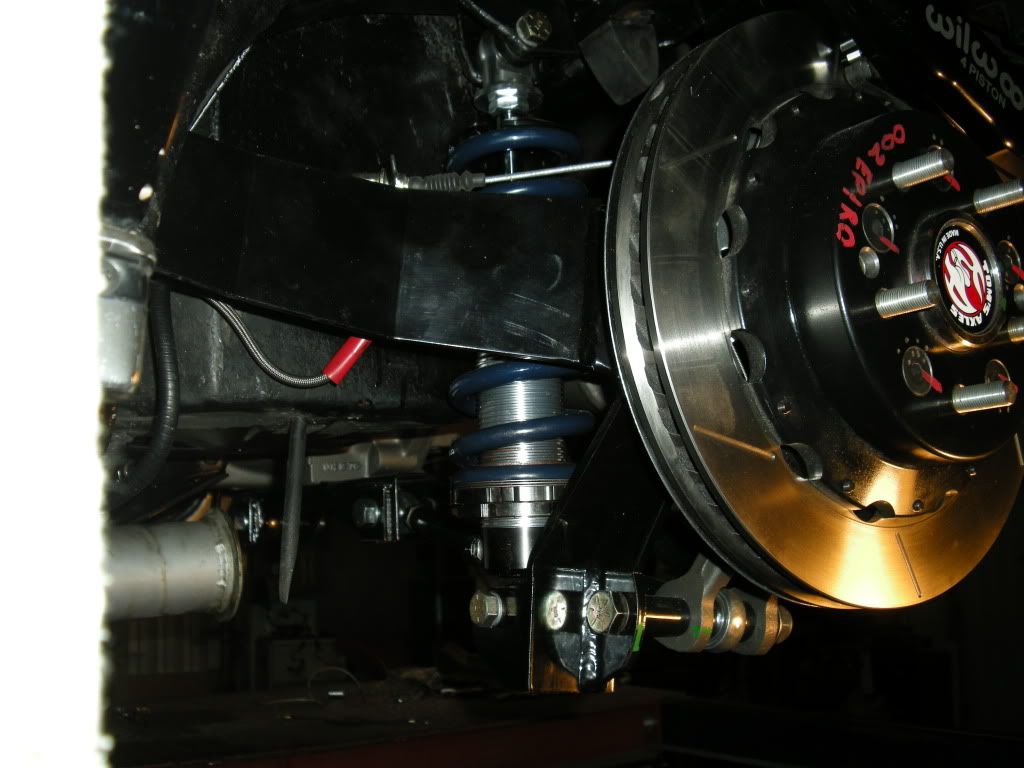
The Van Steel shortened rear sway bar fits very nicely. We did have to slightly modify the tire carrier upper lid and the lower tub to clearance the sway bar, but even if you did carry a spare it would not interfere with the fit of it. I don't carry a spare and instead use the tub to hide my electric fuel pump, filter, and a Slime Compressor Kit.
And here's a photo that will leave guessing until I can back over to Mike's next week end and take a better photo with the correct camera setting....
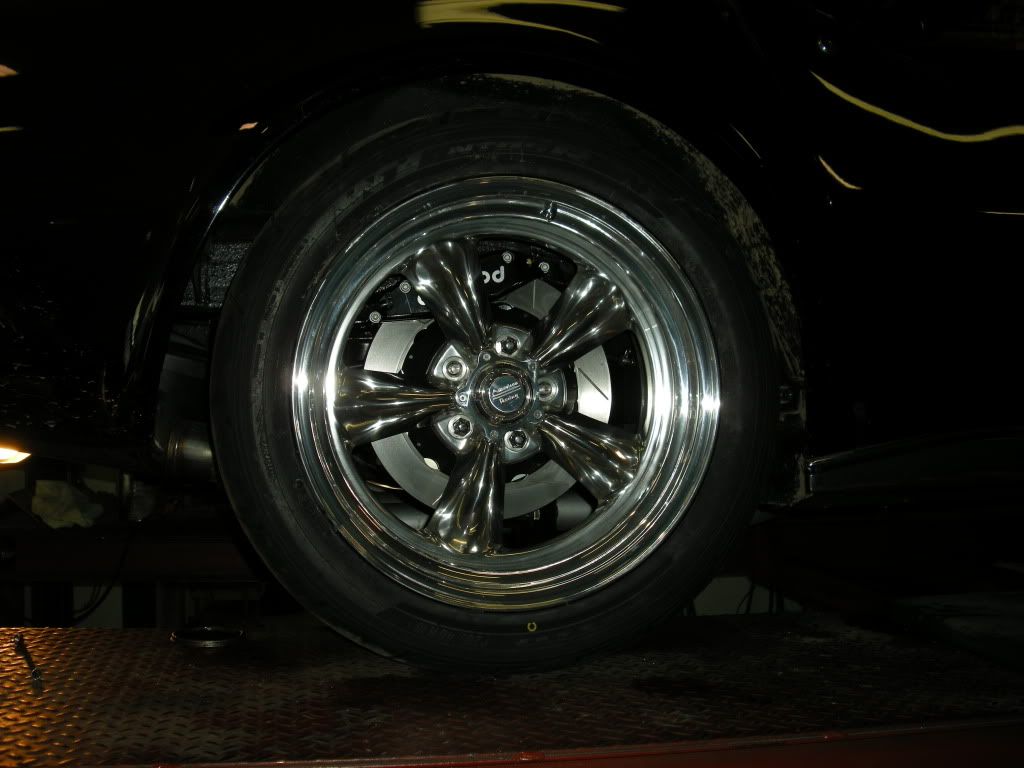
American Racing Torq Thrust II, 9.5" wide with 5.5" BS, Nitto NT05R 285/40ZR/18. Trust me it really does look great!
Well these update photos will be a teaser for sure, because they didn't turn out well at all....way too dark. I forgot to take the camera off the close up setting and as you will see (or not) how the rear came out. The rear is now done and the front suspension is disassembled. Need to get a few parts from up front sent out for powder coating and get a new set of sway bar bushings but it should come back together pretty quickly.
The 1" longer braided rear brake lines that Van Steel sent did the trick. I really like the cleaned up look without a leaf spring and the stance will be great once the final setting is done. It's currently sitting at 27 5/8" from the floor to the lower lip of the rear tire fender well. Once the springs compress a little I think 27" is about where I want to end up. This will be about 1.25" above the tire.
Here's a pic of the coil over set up at completion. Yes the blue tape is gone now, just insurance we didn't ruin the powder coating while adjusting the stance.
The Van Steel shortened rear sway bar fits very nicely. We did have to slightly modify the tire carrier upper lid and the lower tub to clearance the sway bar, but even if you did carry a spare it would not interfere with the fit of it. I don't carry a spare and instead use the tub to hide my electric fuel pump, filter, and a Slime Compressor Kit.
And here's a photo that will leave guessing until I can back over to Mike's next week end and take a better photo with the correct camera setting....
American Racing Torq Thrust II, 9.5" wide with 5.5" BS, Nitto NT05R 285/40ZR/18. Trust me it really does look great!
04-24-2011, 10:43 AM
#30
Race Director

Member Since: Jan 2000
Location: Corsicana, Tx
Posts: 12,607
Received 1,875 Likes
on
913 Posts
2020 C2 of the Year - Modified Winner
2020 Corvette of the Year (performance mods)
C2 of Year Winner (performance mods) 2019
2017 C2 of Year Finalist

Wow....neat stuff!
Looking great!
JIM
Looking great!
JIM
 04-24-2011, 11:27 PM
#32
Burning Brakes
Thread Starter
Thanks for the compliments guys!
Kevin-
Needless to say your dad has had a huge influence on this part of the project. His expertise on the diff and TA build ups is top flight.
Kevin-
Needless to say your dad has had a huge influence on this part of the project. His expertise on the diff and TA build ups is top flight.
04-26-2011, 01:01 PM
#33
Premium Supporting Vendor
Thanks Van Steel!!! You guys have been great to work with! My only criticism out of everything (which I think is pretty minor) is put part #s on your bags. It's probably not a big deal unless you have a lot of stuff laying around.
We received the new rear brake lines today and all appears it will work, final fit tomorrow morning. The upper shock mount bolt on the driver side had to be shortened to keep it out of the battery box, but the passenger side was fine.
I'll have to play with the shock settings tomorrow...the QA directions lead me to think that you have 3 full revolutions and something like 20 clicks per revolution (paper work is at the shop); so are you talking about clicks starting on the 3rd revolution or from initial or am I totally off? I think the QA papers said to start on about 10th click of 3rd rev for "stiff--drag racing" setting. Anyway we'll set the rear ride height tomorrow and set a starting point for C & R.
Thanks again---you guys are super supporters!
 05-01-2011, 01:32 PM
#35
Burning Brakes
Thread Starter
Thanks for the compliments Rob.
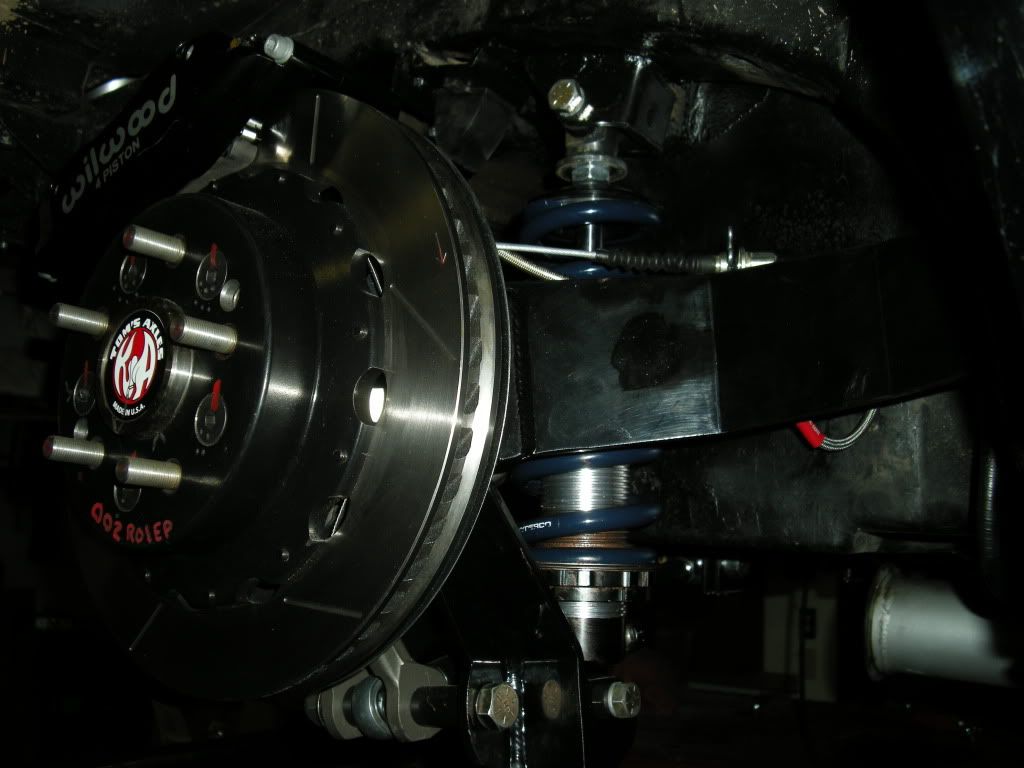
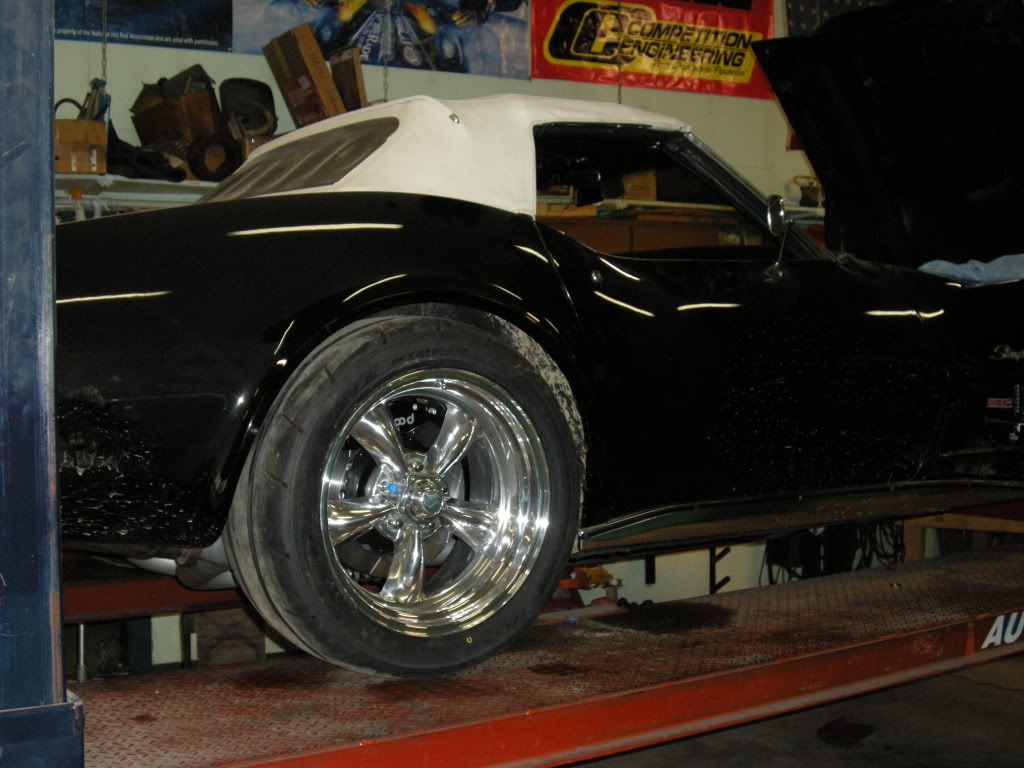
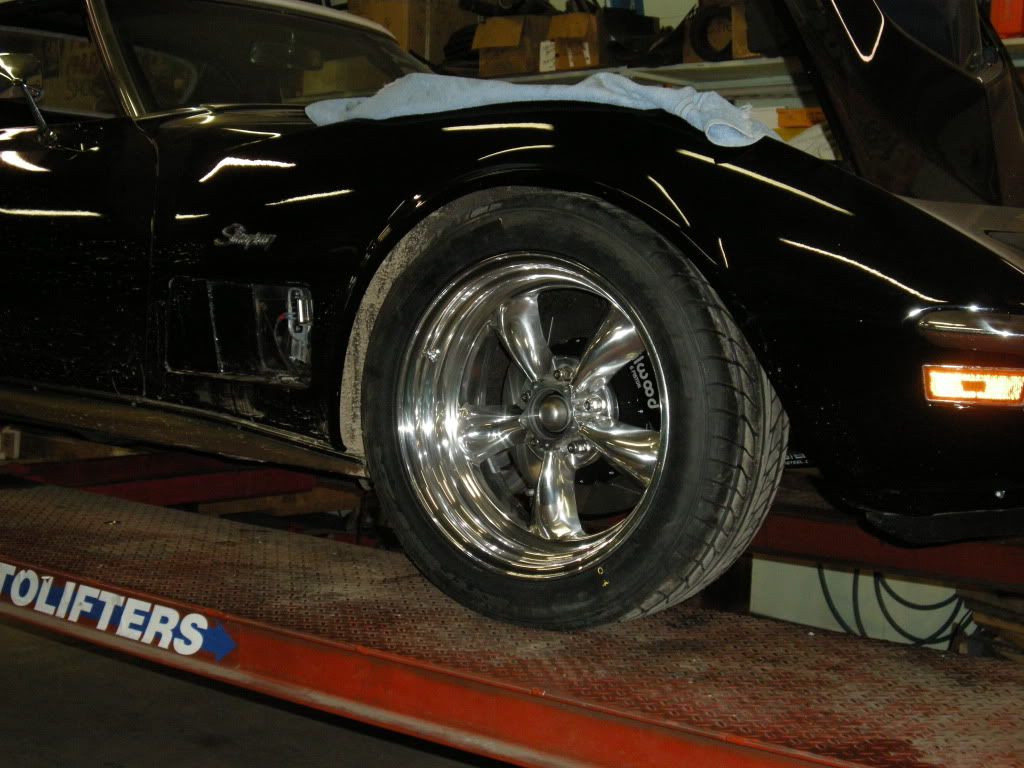
Well it's getting a closer to driving season here (it only snowed twice this week) and the car is coming along nicely. The front brakes & suspension are nearly complete and the stance has been rough set.
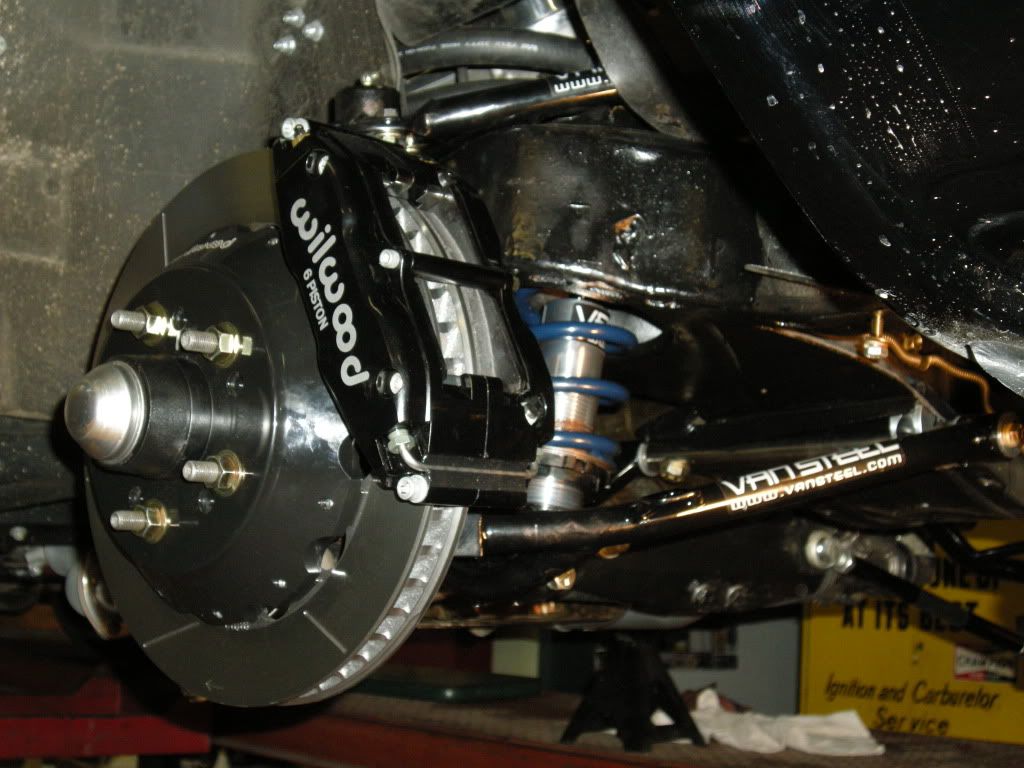
The Wilwood 6 Piston front big brake kit (13" rotors) looks really sweet and they should perform great. For the money spent however I'm a little disappointed that the hats are drilled for 2 different lug patterns which means you can't attach them with fasteners other than the lug nuts since the 4" alternate bolt pattern does not line up with the OEM rivet locations & if you drilled the hats for that location you would loose a lot of strength since the holes would now overlap, so wheel lug mounting it is. Wilwood also uses fine threads on the rear rotor to hat mounting bolts and coarse threads on the fronts....So the ARP upgrade bolt kit I bought in fine thread only covers the rears. You can see the 4" pattern in the photo below if you look close.
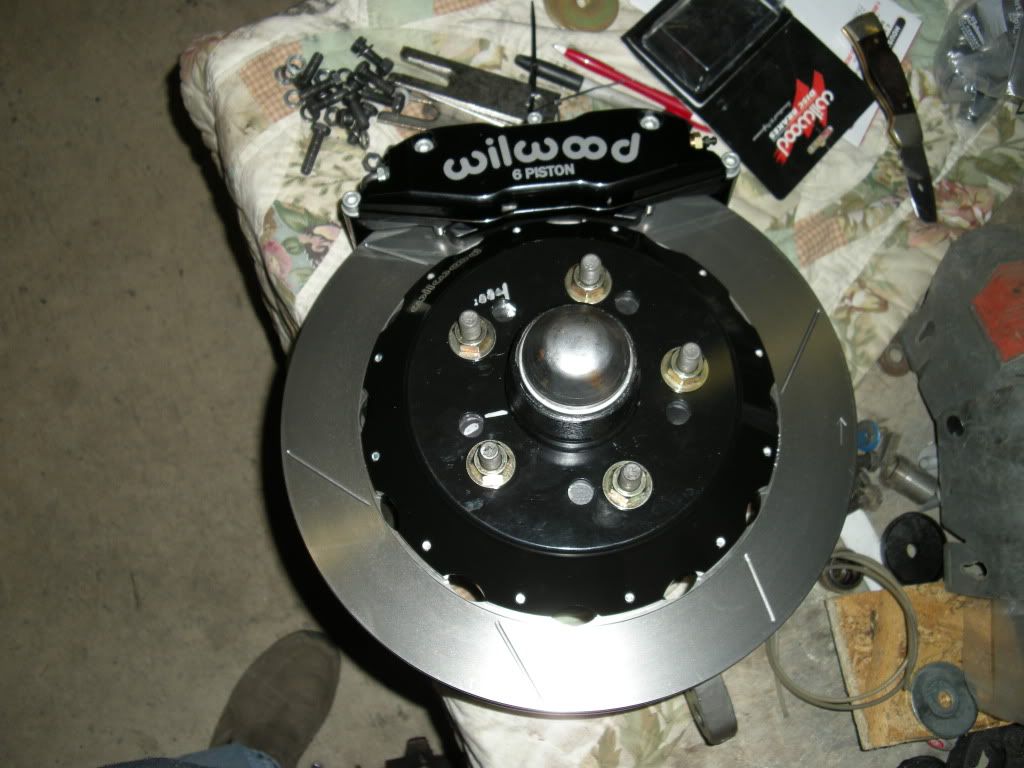
With the 13" rotors you can not use the dust shield on the back side which is no big deal, just save the money and don't order them.
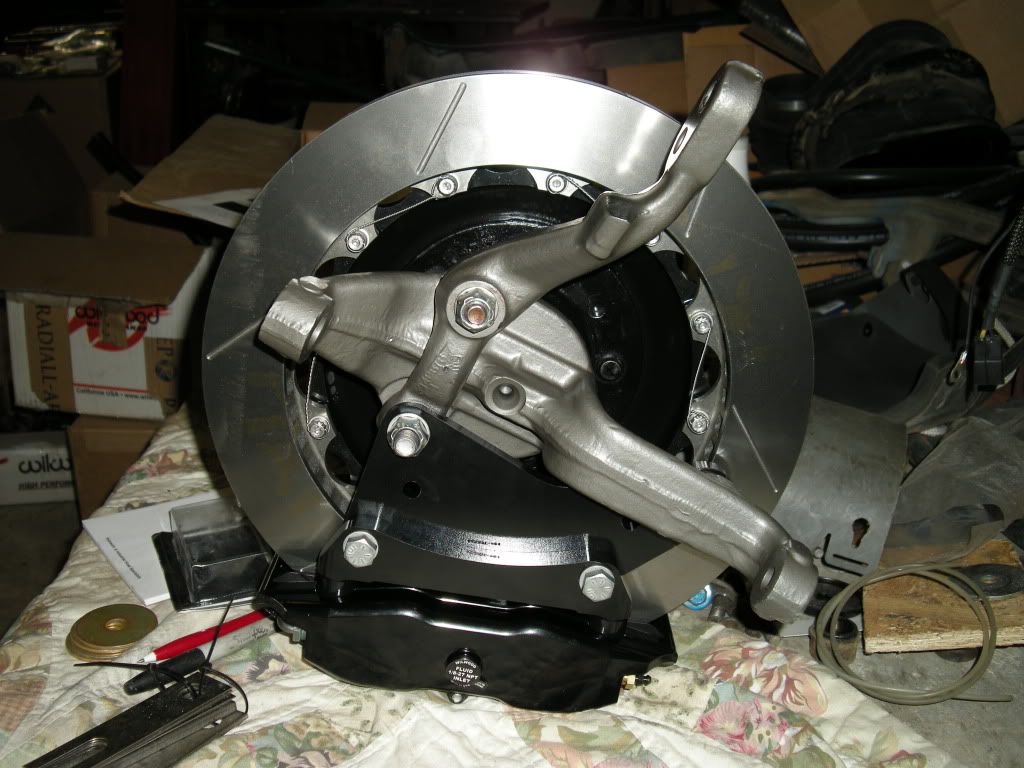
The VanSteel tubelar A-Arms and QA1 Coil Overs are very clean looking. Mike had to modify the VB&P Shock Spreader Bar bracket (not shown in the photo below) slightly to get it to attach properly to the upper A-Arm studs, nothing radical.
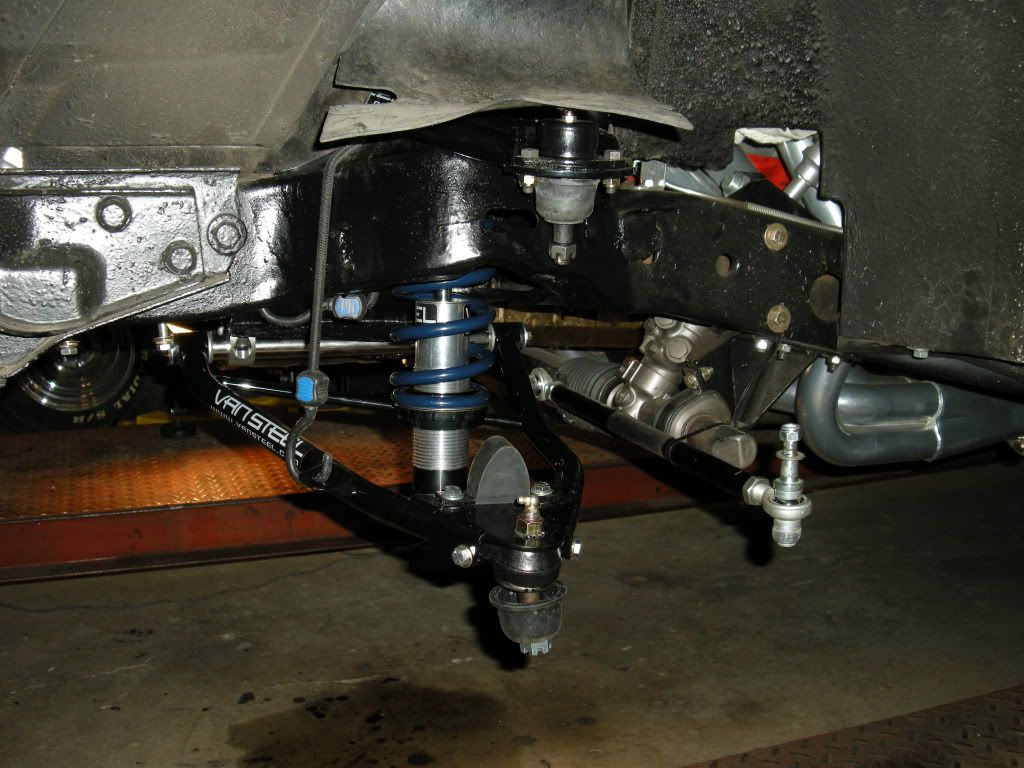
There's still some final hook up work to be done, but we got it back on all 4 wheels to get the stance set up as a starting point. I know it will settle a little after driving it some, so we're starting a little higher than where the final ride height will be set. The QA1 Coil Over kit makes the dial in really simple to adjust. And for those of you cringeing over the mud in the wheel wells and on the sides of the car, it will wash off...there was a big snow melt puddle right in front of the shop door a few weeks ago when I pulled in.
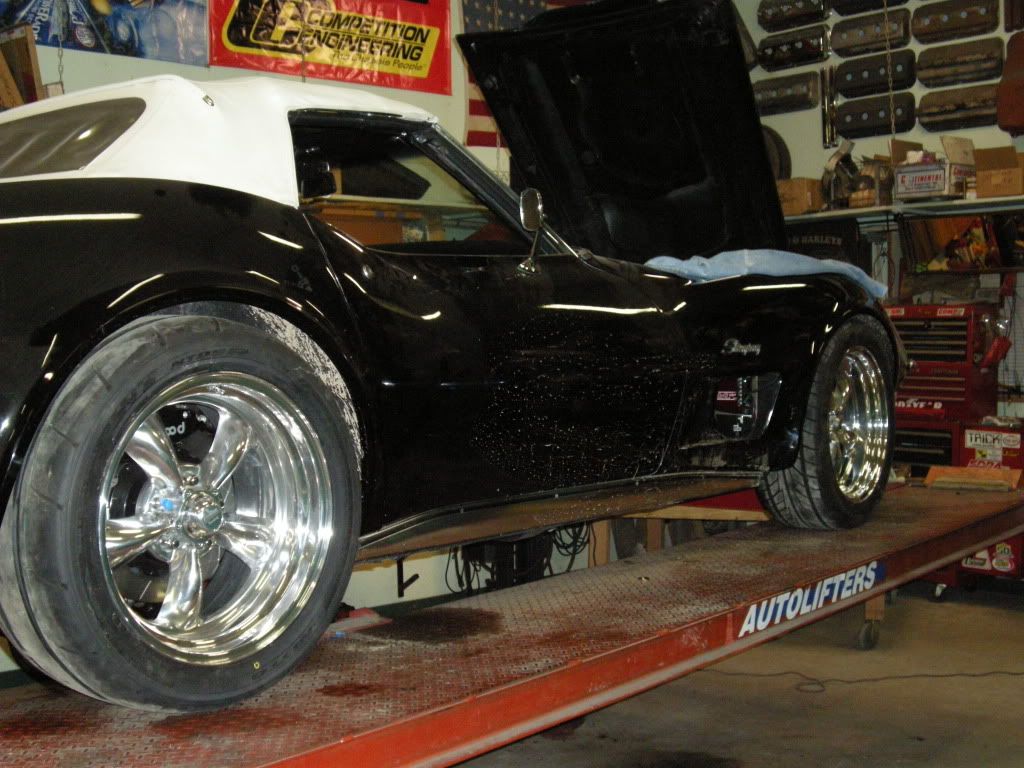
I think it's going to look really good once it's got the final stance dial in done and she gets cleaned up. I have ordered an Al Knoch Stay Fast Top in black that will go on later this month to finish up this year's project list.
I've been wanting to come up with some kind of DRL (daytime running lights) for the front in lieu of using the park lamps because with them on people behind you don't seem to notice when the brake lamps come on as well, even with the LEDs installed back there. So now there is a set of PIAA 1400's (in amber) hiding behind the grills that run off the ignition switch but can still be swithched off as well. Now you can see me coming from the front, and from the rear if you hit the brakes it has a much greater visual impact since the park lights are no longer on.

I'm trying to locate an Oil Temperature Gauge from an '81-82 based on another thread going on here on the C3 Forum to replace the OEM clock with. I have the found the sender unit but I can't find the gauge. I've checked at least 5 differenent vendor websites for one with no luck. Anyone know where to get one of these and a part # for it?
Later guys!
Well it's getting a closer to driving season here (it only snowed twice this week) and the car is coming along nicely. The front brakes & suspension are nearly complete and the stance has been rough set.
The Wilwood 6 Piston front big brake kit (13" rotors) looks really sweet and they should perform great. For the money spent however I'm a little disappointed that the hats are drilled for 2 different lug patterns which means you can't attach them with fasteners other than the lug nuts since the 4" alternate bolt pattern does not line up with the OEM rivet locations & if you drilled the hats for that location you would loose a lot of strength since the holes would now overlap, so wheel lug mounting it is. Wilwood also uses fine threads on the rear rotor to hat mounting bolts and coarse threads on the fronts....So the ARP upgrade bolt kit I bought in fine thread only covers the rears. You can see the 4" pattern in the photo below if you look close.
With the 13" rotors you can not use the dust shield on the back side which is no big deal, just save the money and don't order them.
The VanSteel tubelar A-Arms and QA1 Coil Overs are very clean looking. Mike had to modify the VB&P Shock Spreader Bar bracket (not shown in the photo below) slightly to get it to attach properly to the upper A-Arm studs, nothing radical.
There's still some final hook up work to be done, but we got it back on all 4 wheels to get the stance set up as a starting point. I know it will settle a little after driving it some, so we're starting a little higher than where the final ride height will be set. The QA1 Coil Over kit makes the dial in really simple to adjust. And for those of you cringeing over the mud in the wheel wells and on the sides of the car, it will wash off...there was a big snow melt puddle right in front of the shop door a few weeks ago when I pulled in.
I think it's going to look really good once it's got the final stance dial in done and she gets cleaned up. I have ordered an Al Knoch Stay Fast Top in black that will go on later this month to finish up this year's project list.
I've been wanting to come up with some kind of DRL (daytime running lights) for the front in lieu of using the park lamps because with them on people behind you don't seem to notice when the brake lamps come on as well, even with the LEDs installed back there. So now there is a set of PIAA 1400's (in amber) hiding behind the grills that run off the ignition switch but can still be swithched off as well. Now you can see me coming from the front, and from the rear if you hit the brakes it has a much greater visual impact since the park lights are no longer on.
I'm trying to locate an Oil Temperature Gauge from an '81-82 based on another thread going on here on the C3 Forum to replace the OEM clock with. I have the found the sender unit but I can't find the gauge. I've checked at least 5 differenent vendor websites for one with no luck. Anyone know where to get one of these and a part # for it?
Later guys!
05-01-2011, 05:12 PM
#36
Le Mans Master

the 9"Ford is a great piece the 12 bolt has less parasitic loss but changes in gearing are simpler and the Dana. 60 is stronger but heavier and again harder gear swaps.
05-02-2011, 01:53 PM
#37
Pro


Ray, do you have bump-stops under the upper control arms on the top of the frame? When I swapped my upper control arms for tubular (VB&P) to get more caster, I noticed mine were missing. The 72 AIM shows them but now that I see your setup I'm wondering if I should even bother.
I really like your suspension setup. I won't be racing mine but before I spend a grand on a fiberglass leaf spring, offset trailing arms and QA1 shocks, I'm going to go for a couple of hundred more and get the Van Steel rear coilover setup. I might have to do something about the look at the rear with a cut-down tire tray to show it off. I'm thinking of a 4-inch rallye wheel with a v-dub size emergency spare. That'd let me section the carrier down a few inches (it's a little beat up already).
I really like your suspension setup. I won't be racing mine but before I spend a grand on a fiberglass leaf spring, offset trailing arms and QA1 shocks, I'm going to go for a couple of hundred more and get the Van Steel rear coilover setup. I might have to do something about the look at the rear with a cut-down tire tray to show it off. I'm thinking of a 4-inch rallye wheel with a v-dub size emergency spare. That'd let me section the carrier down a few inches (it's a little beat up already).
05-02-2011, 04:48 PM
#38
Melting Slicks

Member Since: Jan 2003
Location: Doha
Posts: 2,876
Likes: 0
Received 13 Likes
on
6 Posts
St. Jude Donor '08
Cool!  .. can you please post a pic of the rear of the car? I want to see how the wide tires look on your car because this is my plan for next year (if $$$ permits!)
.. can you please post a pic of the rear of the car? I want to see how the wide tires look on your car because this is my plan for next year (if $$$ permits!)
05-02-2011, 10:59 PM
#39
Burning Brakes
Thread Starter
I found a used Oil Temp Gauge today at Wilcox and it should be here tomorrow. The timing was good as the dash was still partially disassembled from getting the heater core fixed. I had just replaced it 2 years ago with a new Delco unit but it developed a leak right where the tubes are soldered. The repair shop they see this a lot since the manufacturers have switched to lead free solder. It's no longer lead free. Anyway, the gauge will replace the clock that doesn't work.
Bob-
I'm 99% certain that there is no bumper for the upper, only the one that mounts on the lower. Most likely I will not be back to the shop until Saturday to verify, but I'll let you know.
Hamad-
Yes I will take a rear view pic of the car this weekend and post it so that you can see the tire fitment. Bear in mind these early C3s probably vary some in the body fit and I'm using a 5.5" backspace on a 9.5" wheel with offset TAs. If you run stock TAs or different wheel backspacing/wider wheels it will be different. With the combo I'm running, I could probably go 295 wide but barely.
Is it Saturday yet????
05-03-2011, 11:15 PM
#40
Intermediate

Member Since: Mar 2007
Location: Dallas Texas
Posts: 34
Likes: 0
Received 0 Likes
on
0 Posts

Ray,
I finally had a sec to check-out your thread. WOW! That is some car you have put together. I really like what you've done. Very cool, very functional and darn near bullet proof. I would sure love a ride in that machine, especially in your neck of the woods. Until that happens, keep sending pics of the car - particularly some with it moving. Congrats, my friend, on a job well done and enjoy!
I finally had a sec to check-out your thread. WOW! That is some car you have put together. I really like what you've done. Very cool, very functional and darn near bullet proof. I would sure love a ride in that machine, especially in your neck of the woods. Until that happens, keep sending pics of the car - particularly some with it moving. Congrats, my friend, on a job well done and enjoy!