
After much adieu, And so it begins...

 08-05-2012, 11:32 AM
#22
Team Owner

Member Since: Sep 2006
Location: Westminster Maryland
Posts: 30,173
Likes: 0
Received 2,878 Likes
on
2,515 Posts

Hi R74,
I really wonder about the chance you're taking with those trailing arms.
While the LARGE hole is obvious, I'd think the metal in the rest of the arm has become very thin too since it's given up so much material to the rust.
I realize the $$ involved but I don't think welding a plate is a good option.
You might find that you have to go very far beyond the hole to find metal you can successfully weld to.
Believe me I understand about being on a budget! But....
Regards,
Alan
08-06-2012, 06:04 PM
#23
Instructor

Thread Starter

@ Alan: once again an insightful and thought provoking post... lets see what my trailing arms look like after sand blasting and go from there. You have me 33% convinced to get a replacement but I still feel massive amounts of steel and welding could make it strong again. Of course lets see what the sand blast reveals!
 08-06-2012, 07:02 PM
#24
@ Alan: once again an insightful and thought provoking post... lets see what my trailing arms look like after sand blasting and go from there. You have me 33% convinced to get a replacement but I still feel massive amounts of steel and welding could make it strong again. Of course lets see what the sand blast reveals!
11-05-2012, 10:03 PM
#26
Race Director

Member Since: Jan 2000
Location: Corsicana, Tx
Posts: 12,608
Received 1,875 Likes
on
913 Posts
2020 C2 of the Year - Modified Winner
2020 Corvette of the Year (performance mods)
C2 of Year Winner (performance mods) 2019
2017 C2 of Year Finalist

I might have a trailing arm or two laying around if I haven't given them away yet. I'd donate them to you for the cost of shipping.
If not...I just gave a buddy a set of new Vette Brake offset arms....maybe I can get him to donate his old ones?
Let me know.
JIM
If not...I just gave a buddy a set of new Vette Brake offset arms....maybe I can get him to donate his old ones?
Let me know.
JIM
11-07-2012, 01:35 PM
#28
Instructor
Thread Starter
Questions I have at this point:
I am not restoring the vapor canister system. As far as I can tell my nicely POR15 gastank will just have a line going to the engine and thats it. There is a port on the top on either side of the tank... should I plug one and leave the other open? Should I install a length of line on one to some sort of air filter for breather purposes and to keep gas from splashing out?
Thoughts about my rocker channels: They look to be about 70% good, the areas under the #2 mounts are solid. Only the #3 mount areas have dissolved away. Is it possible to do just the long channel inserts and the back #3 insert, but not the #2 mount inserts?
Also: What are some good tips for removing the #3 access panel covers without damaging them?
Last edited by Raider74; 11-07-2012 at 02:05 PM.
11-07-2012, 02:07 PM
#29
Race Director
If that is the line that goes to the vapor canister then fix it and run a line to an older model vapor canister that only has an inlet from the tank to outlet to the PCV you will thank yourself later, my garage stunk with my old non functioning canister. On a '80 there's 9,000 ports on it, I went and got an older one with 2 ports and now the garage smells fine
11-12-2012, 10:24 AM
#30
Instructor
Thread Starter
If theres one thing that doesn't bother me at all its the smell of gas. Believe me, I drive a baja bug as a daily, where if I take a right turn hard enough... gas will flow out of the breather tube down the side of my trunk. Mmmmmm the smell of fresh gas. 
My 'ray gets parked outside anyways so Its a no brainer- No clunky canister systems for me. Just a line for the engine to suck gas and a port for the tank to suck in air as the gas leaves will be fine for me...
Now then... my real question is how to safely remove the #3 access cover fiberglass chunks safely... my #3 mount areas are devastated and from pics I have seen... taking these covers off makes doing the #3 insert really nice. I was only able to locate one comment about heating it and using a knife-like scraper to peel it off.... can someone elaborate please?
11-12-2012, 12:20 PM
#31
Melting Slicks

lol
much ado about nothing
It's Shakespeare, not Grammar **** (does "he" go by GN for short?)
Still, adieu, in French, means "until God" or more traditionally "goodbye" which actually seems to fit in this situation because it's out with old, in with the new.
much ado about nothing
It's Shakespeare, not Grammar **** (does "he" go by GN for short?)
Still, adieu, in French, means "until God" or more traditionally "goodbye" which actually seems to fit in this situation because it's out with old, in with the new.
11-12-2012, 01:38 PM
#32
Instructor
Thread Starter
Indeed SuperBuickGuy,
An accurate assessment.
Still hoping for a touch of elaboration and advice on the removal of the access panel sections, behind the #3 mount from someone who had done this and possesses the knowledge. I'd like to learn the heating/scraper method but I don't know where to start....
Still hoping for a touch of elaboration and advice on the removal of the access panel sections, behind the #3 mount from someone who had done this and possesses the knowledge. I'd like to learn the heating/scraper method but I don't know where to start....


 01-18-2014, 09:02 PM
#34
Instructor
Thread Starter
Tie Rod Assemblies:

(Set to measured lengths of original tie rods.)
Tapping the Control Arms:

(For ball joint installation.)
Upper Control Arm Assemblies Ready:


(Bad control arm bushing replaced.)
(Set to measured lengths of original tie rods.)
Tapping the Control Arms:
(For ball joint installation.)
Upper Control Arm Assemblies Ready:
-
(Bad control arm bushing replaced.)
Steering Box and Idler Arm Installed:

(Ready to assemble steering.)
01-19-2014, 11:26 AM
#35
Nam Labrat


Member Since: Sep 2013
Location: New Orleans Loo-z-anna
Posts: 33,897
Received 4,174 Likes
on
2,736 Posts

AAAAAAAAAhaaaa.....it's good to see that you're still at it!
01-19-2014, 11:45 AM
#36
Burning Brakes


Member Since: Sep 2012
Location: coon rapids mn
Posts: 818
Likes: 0
Received 0 Likes
on
0 Posts
every thing looks great ! keep the up dates coming .I am working up the nerve to do a frame off fix up my self .and threads like this help alot .I am telling myself it will be a long term project .
01-19-2014, 12:28 PM
#37
agreed - these have always been that voice in the ear going "you can do this...go for it!". I read so many I started mine in December!
This is a great example of time and energy serving the corvette enthusiast well.
This is a great example of time and energy serving the corvette enthusiast well.
03-31-2014, 01:54 AM
#38
Instructor
Thread Starter
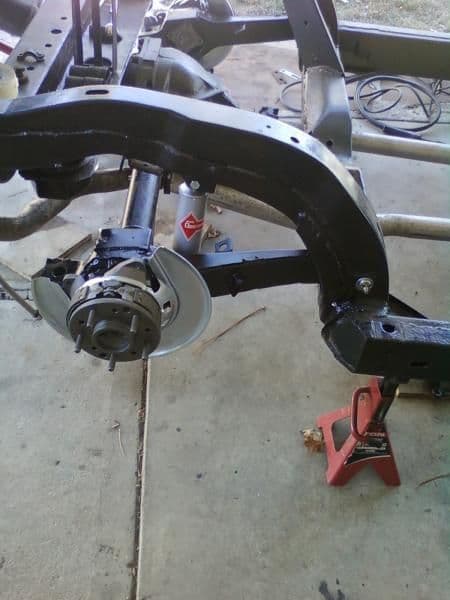
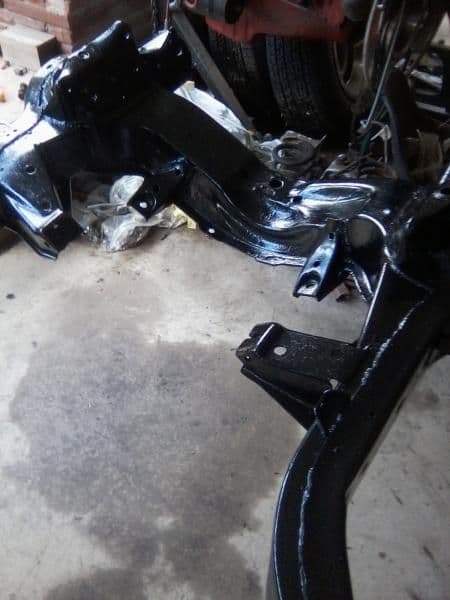
Another update!
Lower A-Arms


Mounting the upper A-Arms with new hardware/shims:


Compressing the spring and installing lower A-Arm:


Attaching the knuckle and tie rods:


New shocks:

Complete suspension/steering:

Brake valve and new lines:


Lower A-Arms
Mounting the upper A-Arms with new hardware/shims:
Compressing the spring and installing lower A-Arm:
Attaching the knuckle and tie rods:
New shocks:
Complete suspension/steering:
Brake valve and new lines:
Sorry the last one is kind of blurry.
Stay tuned! Up next comes the engine and tranny!
03-31-2014, 07:10 PM
#39
Nam Labrat
Member Since: Sep 2013
Location: New Orleans Loo-z-anna
Posts: 33,897
Received 4,174 Likes
on
2,736 Posts
It looks great!
I can't stand it!
Everyone is passing me up!
(Stinking PTSD......wouldn't wish it on a rat!)
I can't stand it!
Everyone is passing me up!
(Stinking PTSD......wouldn't wish it on a rat!)
03-31-2014, 08:07 PM
#40
Le Mans Master

take those springs back out and paint them!!!
Looks great though.
Looks great though.