
Lifting body off the frame to install new lines; 1971 Coupe
 12-05-2016, 02:13 PM
#21
8th Gear


Member Since: Dec 2016
Location: Texas
Posts: 8
Likes: 0
Received 0 Likes
on
0 Posts
Hi Tx,
Welcome!
Remember that although the loosening of the body mounts are discussed in detail in this thread there are some other things that will need to be loosened on your 72, (if they're not already,) like the front and rear bumper- brackets, and the core support to front crossmember bolts before the body can be lifted at all.
If the body has been disassembled then the several inch lift is more straight forward.
How apart is your car?
Regards,
Alan
Thank you for the quick reply.
So far I have pulled the motor and trans.
Taken out the gas tank and fuel lines.
I have started to loosen the body mounts.
I will do the front and rear bumper brackets next.
Is the core support you refer to, for the radiator?
Thank you
Regards,
Jon
 12-05-2016, 03:17 PM
#22
Team Owner

Member Since: Sep 2006
Location: Westminster Maryland
Posts: 30,173
Likes: 0
Received 2,878 Likes
on
2,515 Posts

Hi Jon,
Yes, the core support is for the radiator.
It's bolted to the front crossmember with 2 bolts. They need to come out if you leave the core support in place when you lift.
Regards,
Alan
The 2 bolts are reached from below through 2 holes in the front crossmember.

Yes, the core support is for the radiator.
It's bolted to the front crossmember with 2 bolts. They need to come out if you leave the core support in place when you lift.
Regards,
Alan
The 2 bolts are reached from below through 2 holes in the front crossmember.
Last edited by Alan 71; 12-05-2016 at 03:17 PM.
12-05-2016, 04:14 PM
#23
Burning Brakes

I'm not sure if I have any more pics that would help. My car was stripped. It was literally the shell sitting on the frame. I had the body mount bolts on the opposite side I was lifted started, but not tightened. Just enough to make sure I didn't push the body right off the other side of the frame. It's been a while, but I think I lifted it too the point I could insert my hand in between the rocker sills and the frame. Part of my goal was to paint as much of the frame as I could without having to pull the body completely off.
12-06-2016, 04:24 PM
#24
8th Gear
Member Since: Dec 2016
Location: Texas
Posts: 8
Likes: 0
Received 0 Likes
on
0 Posts
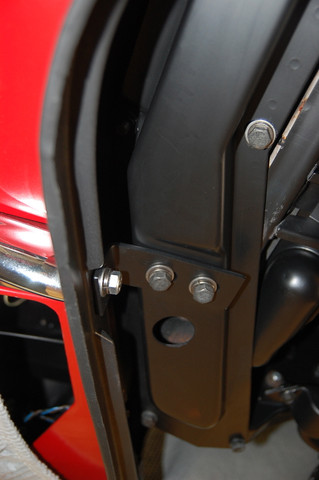
I had removed the bottom body molding and saw a steel part where you attached your jack, see attached picture. Is that part of the frame or the body ?
12-06-2016, 04:47 PM
#25
Team Owner
Member Since: Sep 2006
Location: Westminster Maryland
Posts: 30,173
Likes: 0
Received 2,878 Likes
on
2,515 Posts
Hi Tj,
That's an important question.
What your finger is pointing at/touching is the rocker channel that's part of the BIRDCAGE and thus part of the body.
Regards,
Alan
The 'lifting-strap' kits that some vendors sell have formed 'hooks' that are shaped to fit around the outside of the body, below the rocker channel and slightly up between the inside of the channel and the frame rail… think "J' shaped.
You can place lengths of 2x4 along that channel and jack from there. The wood helps to spread the weight load along the length of the channel.
You can see that being done in LC's #10 post in this thread.
Last edited by Alan 71; 12-06-2016 at 04:56 PM.
12-08-2016, 08:08 PM
#26
8th Gear
Member Since: Dec 2016
Location: Texas
Posts: 8
Likes: 0
Received 0 Likes
on
0 Posts
Also does the steering box have to be unbolted?
Thank you
Last edited by Txparts; 12-08-2016 at 08:13 PM. Reason: Error
12-09-2016, 08:51 AM
#27
Le Mans Master


Member Since: Jul 2006
Location: charlotte north carolina
Posts: 8,117
Likes: 0
Received 100 Likes
on
92 Posts

The steering column assembly can be disconnected at the rag joint. Don't forget about the various electrical grounding wires that are attached to the body at one end and the frame at the other.
12-09-2016, 09:19 AM
#28
Team Owner
Member Since: Sep 2006
Location: Westminster Maryland
Posts: 30,173
Likes: 0
Received 2,878 Likes
on
2,515 Posts
Hi TXJ,
There are 6 bolts for the front bumper and bumper guards.
2 in the center of the bumper and 1 at each end. There's a bolt that goes through there lower valance into each of the bumper guard.
There are 3 bolts for each rear bumper plus a bolt for the 2 rear valance braces.
Remember, with these bolts out the bumper are loose from the car. They will need too be fitted back into position after you're finished with the work you're doing.
TXJ,
I don't mean to be hard here but if you need to ask how many bolts there are you're in over your head. Getting the body ready to lift is a LOT OF WORK and needs to be done in a thoughtful way!
Do you have an AIM for your car? If not, you NEED it NOW!
If you do have an AIM have you studied the pages for the mounting of the front and rear bumpers and their associated parts?
Should you have someone more knowledgeable helping you with this?
Regards,
Alan
I'll add some photos of the front bumper bolts.
Each end.
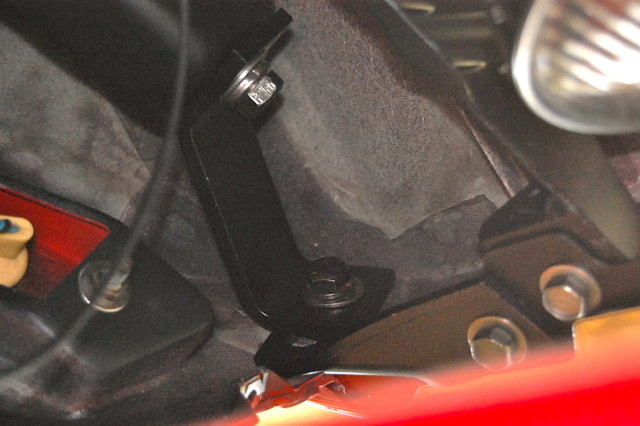
Center.

There are 6 bolts for the front bumper and bumper guards.
2 in the center of the bumper and 1 at each end. There's a bolt that goes through there lower valance into each of the bumper guard.
There are 3 bolts for each rear bumper plus a bolt for the 2 rear valance braces.
Remember, with these bolts out the bumper are loose from the car. They will need too be fitted back into position after you're finished with the work you're doing.
TXJ,
I don't mean to be hard here but if you need to ask how many bolts there are you're in over your head. Getting the body ready to lift is a LOT OF WORK and needs to be done in a thoughtful way!
Do you have an AIM for your car? If not, you NEED it NOW!
If you do have an AIM have you studied the pages for the mounting of the front and rear bumpers and their associated parts?
Should you have someone more knowledgeable helping you with this?
Regards,
Alan
I'll add some photos of the front bumper bolts.
Each end.
Center.
Last edited by Alan 71; 12-09-2016 at 10:04 AM.
12-09-2016, 09:43 AM
#29
8th Gear
Member Since: Dec 2016
Location: Texas
Posts: 8
Likes: 0
Received 0 Likes
on
0 Posts
Hi TXJ,
There are 6 bolts for the front bumper and bumper guards.
2 in the center of the bumper and 1 at each end. There's a bolt that goes through there lower valance into each of the bumper guard.
There are 3 bolts for each rear bumper plus a bolt for the 2 rear valance braces.
Remember, with these bolts out the bumper are loose from the car. They will need too be fitted back into position after you're finished with the work you're doing.
TXJ,
I don't mean to be hard here but if you need to ask how many bolts there are you're in over your head. Getting the body ready to lift is a LOT OF WORK and needs to be done in a thoughtful way!
Do you have an AIM for your car? If not, you NEED it NOW!
If you do have an AIM have you studied the pages for the mounting of the front and rear bumpers and their associated parts?
Should you have someone more knowledgeable helping you with this?
Regards,
Alan
I add some photos of the front bumper bolts.
Each end.
Center.
Thank you for the reply.
The rear bumper was pretty straightforward, however the front was hard to locate. I appreciate your assistance and the pictures.
Best regards,
Jon
12-09-2016, 10:06 AM
#30
Team Owner
Member Since: Sep 2006
Location: Westminster Maryland
Posts: 30,173
Likes: 0
Received 2,878 Likes
on
2,515 Posts
Hi Jon,
Good!
I hope the pics prove to be a help!
Regards,
Alan
Good!
I hope the pics prove to be a help!
Regards,
Alan
12-09-2016, 10:23 AM
#31
8th Gear
Member Since: Dec 2016
Location: Texas
Posts: 8
Likes: 0
Received 0 Likes
on
0 Posts
Alan,
Also in response to your other question, the Aim is to replace the fuel lines, install the new gas tank.
Then install the rebuilt motor and rebuilt trans and get her running again.
BTW the brakes are already done I didn't have and issues installing the new brake lines.
Best Regards.
Jon
Also in response to your other question, the Aim is to replace the fuel lines, install the new gas tank.
Then install the rebuilt motor and rebuilt trans and get her running again.
BTW the brakes are already done I didn't have and issues installing the new brake lines.
Best Regards.
Jon
12-09-2016, 10:25 AM
#32
8th Gear
Member Since: Dec 2016
Location: Texas
Posts: 8
Likes: 0
Received 0 Likes
on
0 Posts
12-09-2016, 10:34 AM
#33
Team Owner
Member Since: Sep 2006
Location: Westminster Maryland
Posts: 30,173
Likes: 0
Received 2,878 Likes
on
2,515 Posts
Hi Jon,
Your reply made me wonder�. when I wrote AIM, (not aim), I was referring to the Assembly Instruction Manual not what your aim for the project is.
Do you have one of those?
Regards,
Alan
Your reply made me wonder�. when I wrote AIM, (not aim), I was referring to the Assembly Instruction Manual not what your aim for the project is.
Do you have one of those?
Regards,
Alan