When you click on links to various merchants on this site and make a purchase, this can result in this site earning a commission. Affiliate programs and affiliations include, but are not limited to, the eBay Partner Network.
I guess I don't understand how this switch works. On my '74 if you twist the headlight switch the lights on the gauges gets brighter or dimmer. If I turn it all the way counterclockwise the underdash lights come on.
I guess I don't understand how this switch works. On my '74 if you twist the headlight switch the lights on the gauges gets brighter or dimmer. If I turn it all the way counterclockwise the underdash lights come on.
You need to think of it as a independently powered system. It has two lines of power going into the electric motors, one to open them and one to close them. The line that opens them does so when it reads a positive 12 volts going into a relay. It closes them when no volts are read by the relay. So whenever the signal wire senses 12 volts, the relay sends power to open the headlight buckets, when no power is read, the relay sends power to the headlight buckets to close. The 12 volts read can come from anywhere you choose it to come from, the lighting system or some other source, of course you would want it to synch with your choice about when to open and close the buckets. Hundreds and hundreds of these electrical headlight motor systems have been successfully converted. It is quite popular and an easy conversion.
Last edited by rworley6641; 06-03-2016 at 08:19 PM.
I guess I don't understand how this switch works. On my '74 if you twist the headlight switch the lights on the gauges gets brighter or dimmer. If I turn it all the way counterclockwise the underdash lights come on.
When I converted to Probe / Miata actuators, I bought a parts store headlight switch for a 1984 Corvette. It was a direct swap and it has a terminal on it to handle the signal to the actuators. All other functions are the same.
Last edited by wendellp601; 06-03-2016 at 08:54 PM.
Reason: Stupid Autocorrect
**************************************** ************
I can"t imaging driving down the road at speed - turning the instrument light dimmer by accident/unintentional and loosing your headlights- I would NOT do this!!! You could NEVER let someone else drive the car w/o completely understanding how uncool this really is- unless you really don't like them and have an agreed value policy- which would probably be denied as this is an accident waiting to happen.
If anyone has even lost their headlight at speed - you KNOW what I am talking about!!!
If I were to do something like this- I would put a safety feature on it- like have a relay normally open and ONLY close when you put the brake on- That would lessen the possibility of going dark at speed...
I prefer to just turn on the headlights- and they go up- turn them off and they go down. What Greg AKA "Illegal vette" is use the switch to "service" the lights. Now THAT makes sense.
As I said before the C4 switch works fine- but using a standard 5 pin Bosch relay and a couple of diodes there is no need to run wires back inside the cabin the to the headlight switch- and just plug it in-line w/ the headlights- no need to modify the factory harness or plugs.
Originally Posted by rworley6641
You need to think of it as a independently powered system. It has two lines of power going into the electric motors, one to open them and one to close them. The line that opens them does so when it reads a positive 12 volts going into a relay. It closes them when no volts are read by the relay. So whenever the signal wire senses 12 volts, the relay sends power to open the headlight buckets, when no power is read, the relay sends power to the headlight buckets to close. The 12 volts read can come from anywhere you choose it to come from, the lighting system or some other source, of course you would want it to synch with your choice about when to open and close the buckets. Hundreds and hundreds of these electrical headlight motor systems have been successfully converted. It is quite popular and an easy conversion.
Incorrect-
The motors have TWO trigger wires- BOTH needing to see +12Vs for the complete 180� of rotation. Switching +12V to the open trigger wire when the motor is up or open - will not do anything- as the contact inside the motor rests on the plastic break in the wheel. You'll have to put +12V on the close trigger to make motor close- or travel anther 180�.
Originally Posted by Illegal Vette
I just completed my installation and am delighted with the results. They open and close quickly and quietly and no more vacuum problems. After removing all the hoses and actuators I cleaned and adjusted the headlight mechanisms before trying the brackets and motors. I ended up with the motors in the outside position for best fit:
This part of the installation went pretty smoothly, I ended up needing a little longer stroke after adjusting the headlights to open all the way and am trying to locate a couple more motor arms to make it perfect but nobody but me would probably notice. The wiring was pretty easy with Richard454's help. I wired the harness to the alternator for power and located the relay in the engine compartment to keep it as dry as possible. I also replaced the under dash vacuum switch with a switch from amazon:
That is what's so cool about this conversion, there are so many different configurations that can be used to accomplish the successful replacement of the OEM vacuum system.
And while some would agree with or not agree with a particular configuration, America remains free and it remains the choice of the C3 owner to choose. Having assisted several "hundred" C3 owners with their successful conversions to electric motors opening their headlight buckets over the last two years, I believe I have the concept down. But, thanks for the attempt to give what I hope is a constructive critique.
Thanks Richard, it was easier because of your help! By the way I was able to do it without removing the hood. I was going to but after removing the actuators I felt like their was enough room to use my angle grinder to make room for the linkage rod and sure enough there was. Putting the motors in was tight but I was careful and got them in without too much trouble.
I converted my wiper door by using an ordinary 12v industrial actuator with 2" stroke.
Cost landed on approx 120USD plus labor.
It was easy enough to fit it by modifying the linkage.
The box hiding it ended up being 2" (5cm).
It don't take up as much space as the old vacuum bell once did..
There have been many great methods posted in this thread regarding the wiper door conversion. However, your installation seems to be the most compact in the engine compartment. Would you be willing to share more about your installation? For instance more details on the actuator (manufacturer, mdl. number etc.), actuator cover, your wiring method etc. Thanks in advance for the update. https://www.corvetteforum.com/forums...s/thumbsup.gif
Has anyone thought of a way to hook up an override to replace the vacuum override switch as well? Don't really want to turn on the headlights to service things. Would a simple rocker switch wire hey not just reach in underneath the headlights & manually pull them up ed in do the trick?
Reach in under the headlights & pull down on the mechanism manually.
You can push it back up when finished, no mods required!
I posted this in another thread somewhere, but thought it should be in here too. As far as over-ride switches, I went with a couple power window switches in the ashtray. (The lighter socket will be a USB port for music). I made a plate of aluminum, cut the holes for the switches, then fit the plate in the bottom of the ashtray compartment.
Next, I had to make a bracket for the bottom, to mount the switches in. I also had to make sure the switches were low enough to be able to close the ashtray door.
The forward switch will be headlight doors, and the rear switch is for the wiper door. This looks gives you a "stock" appearance, hides the switches, yet keeps them close.
I LOVE some of the ideas that have come up in this thread so far.... and sharing all these ideas is what makes this forum so great!
Reach in under the headlights & pull down on the mechanism manually.
You can push it back up when finished, no mods required!
Read a little further into the thread. Richard figured out a way. I have a functional override push/pull switch in the factory location, the wiring diagram is in the thread.
I posted this in another thread somewhere, but thought it should be in here too. As far as over-ride switches, I went with a couple power window switches in the ashtray. (The lighter socket will be a USB port for music). I made a plate of aluminum, cut the holes for the switches, then fit the plate in the bottom of the ashtray compartment.
Next, I had to make a bracket for the bottom, to mount the switches in. I also had to make sure the switches were low enough to be able to close the ashtray door.
The forward switch will be headlight doors, and the rear switch is for the wiper door. This looks gives you a "stock" appearance, hides the switches, yet keeps them close.
I LOVE some of the ideas that have come up in this thread so far.... and sharing all these ideas is what makes this forum so great!
Nice work Jim!!!
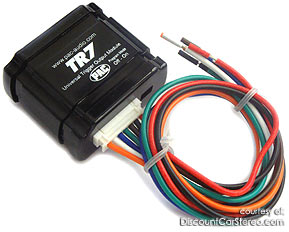
I found a little piece that will do a lot of stuff- less than $20
"Universal Trigger Output Module" TR7-pac
Programmable -can take the inputs- swap polarity-pulse to constant or constant to pulse- latch-timed etc- really neat piece.
It's a really cool problem solver. Got mine off eBay for less than $15 shipped. I wanted a single momentary switch (SPST- single pole single throw) to control my door locks. One push- doors unlock- two pushes within 3 seconds -they lock. Can easily use for the headlight door or wiper door.
You could actually set a timer for you headlight- so when you leave your car it could close the headlight from seconds the minutes!!!
Works great!!! No latching relays to stay on and pull power -AKA parasitic draw on the battery. It was smaller than I thought it would be- easy to program with LED confirmation.
This is a very long thread and I haven't read through it entirely. So If this has been brought up before, then I apologize ahead of time.
For those of you who want to go electric and also need some additional space up front, I've gotten rid of the majority of the vacuum and frame assembly and installed linear actuators, available from Ebay for about $34 each side. Needs a bracket which is easy to make. There are different speed actuators available. The ones I got are pretty slow, but I don't see a need to have to lamps come up or down instantly. I think there is a kit that uses a similar approach.
To wire in the actuators, all you need is a single multipole relay wired the one of the headlights and to the battery. When the lights go on, the relay comes on and raises the headlamps. When the lights go off, the headlamps are lowered, regardless of whether the ignition is on or off. There are no parasitic losses when the lights are off.
I can provide a schematic for the relay and wiring.
Yes- if you don't want fast headlights...I will use mine to "old school" warn the drivers coming down the road there is a cop ahead...
They are fast enough to do that!!
The problem w/ the linear actuators- aside from having to use either a current limit type electronic box or several limit switches - and/or a manual control switch for their operation.
IS the less expensive ones were NOT designed for exterior use- unlike the Probe/Miata motors which were specifically designed to handle the elements - whether it be hot/cold or wet.
The Probe/Miata motors are not only internally switched- but even have an "electronic brake." They just require trigger for up and down-and +12V and a ground.
Here's the insides-not to mention they motors have over 30 years of testing in the field!!!
Yes- if you don't want fast headlights...I will use mine to "old school" warn the drivers coming down the road there is a cop ahead...
They are fast enough to do that!!
The headlights are still instantaneous. To flash your lights you don't need the entire assembly to raise and lower.
Originally Posted by Richard454
The problem w/ the linear actuators- aside from having to use either a current limit type electronic box or several limit switches - and/or a manual control switch for their operation.
The limit switches are already built into the actuators. Nothing else to buy. There are no control switches needed, just a single relay and everything is automatic.
Originally Posted by Richard454
IS the less expensive ones were NOT designed for exterior use- unlike the Probe/Miata motors which were specifically designed to handle the elements - whether it be hot/cold or wet.
Valid point. I've seen some weatherproof ones, but they were a bit more $.
Originally Posted by Richard454
Wiring the Probe/Miata- tell me which looks easier?
Certainly the Miata one is easy. The linear one is also easy, as it only requires one double pole relay and no control switch.
I only put the linear info out for info only, not to judge which is better or worse. The Miata option would not have worked in my case as I needed the extra space up front. I'll draw up a schematic.
The slow motion of the linear seat motor was what caused me to abandon that idea for the wiper door. It worked very well, but was just too slow opening & closing. I made a new bracket for the Miata motor to mount to the firewall in place of the wiper door vac canister.... now I just need to get the linkage hooked up, then hopefully it flips up & down as fast as the headlight doors do.
As you can see, the seat motor (top photo) is a little neater, as it sits tighter to the firewall... but the bracket allowed some flexing, which was an issue.
The Miata motor, (2nd photo) sits out a little more, but I was able to put a heavier bracket on.
My car has the stock 270 horse engine, so I don`t expect any clearance problems from that. If Richard can stuff that beast in his engine bay without clearance issues from the wiper door motor..... then I should be OK!!
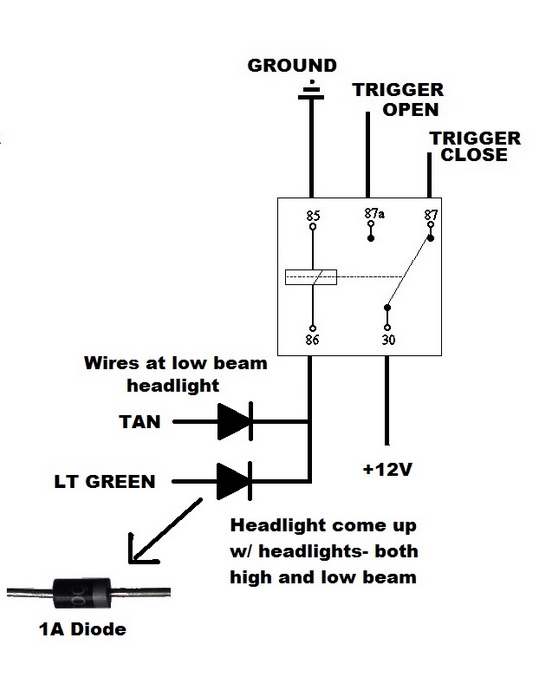
Since your trigger wire is on the low beam, it seems like the lights would go down if you turned on the hi beams at which time the low beam is turned off.
Since your trigger wire is on the low beam, it seems like the lights would go down if you turned on the hi beams at which time the low beam is turned off.
Yep- or you could run a wire to the cabin-and hit the wire before the dimmer - or diode isolate like my harness does-
My harness- plugs in- no splicing or dicing required!!!

 06-03-2016, 04:55 PM


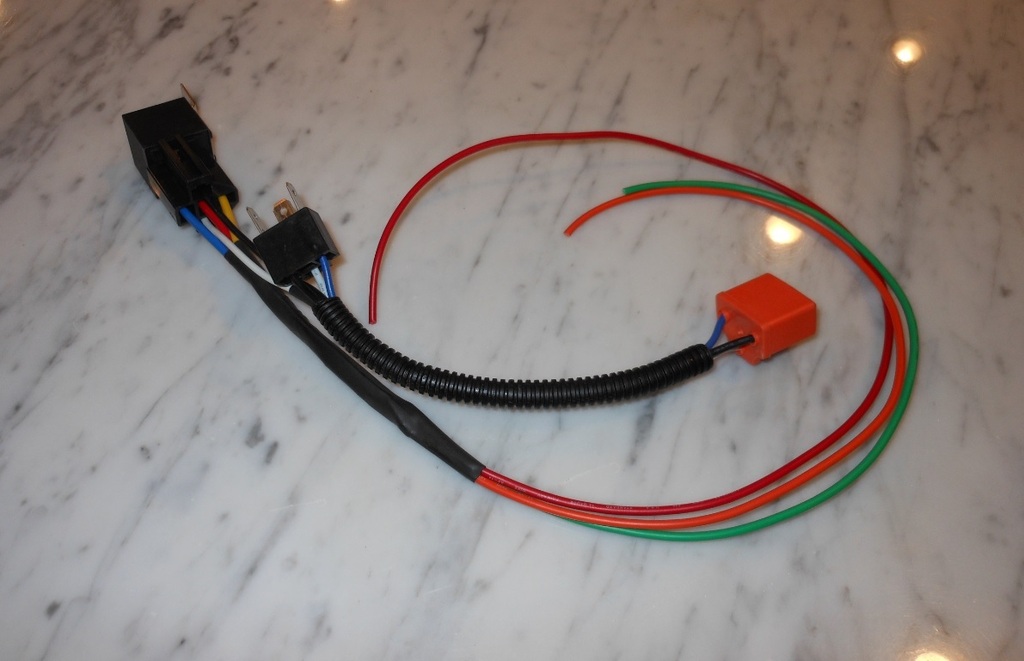
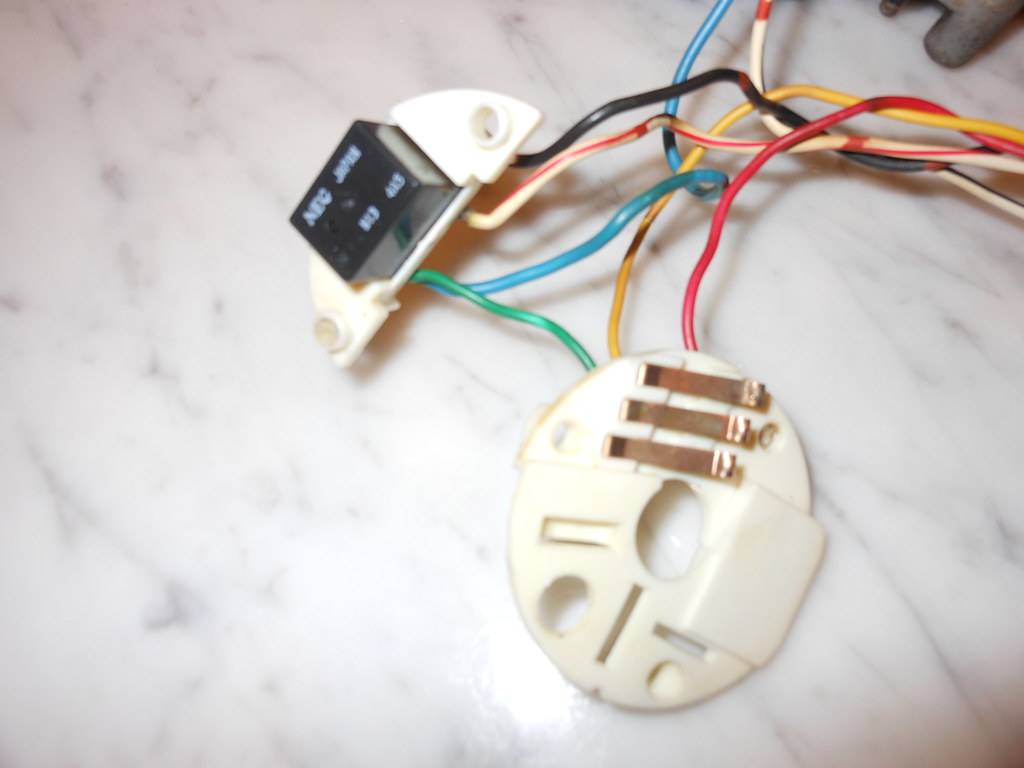 DSCN4669
 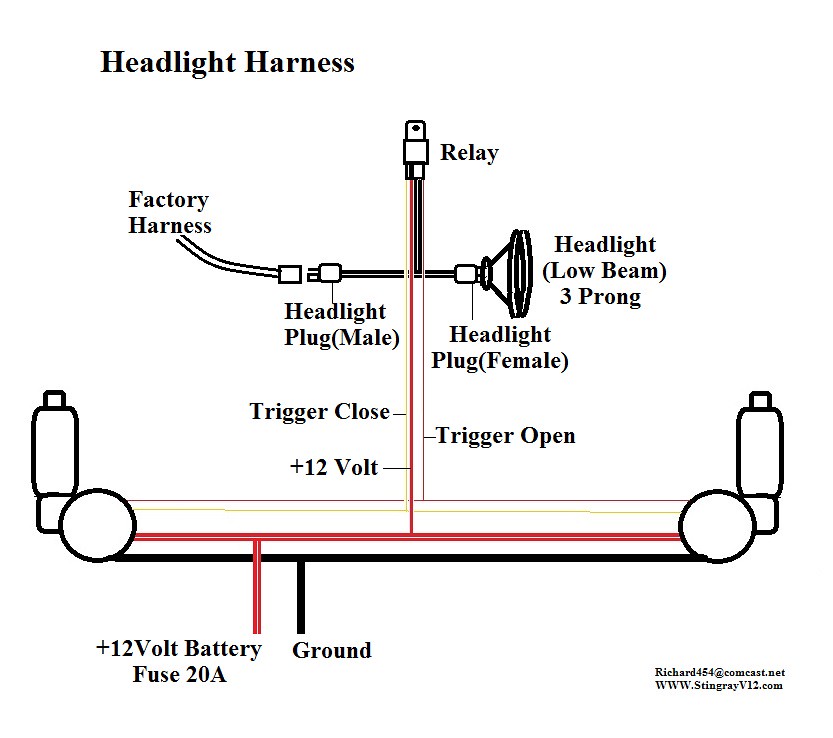 Headlight harness
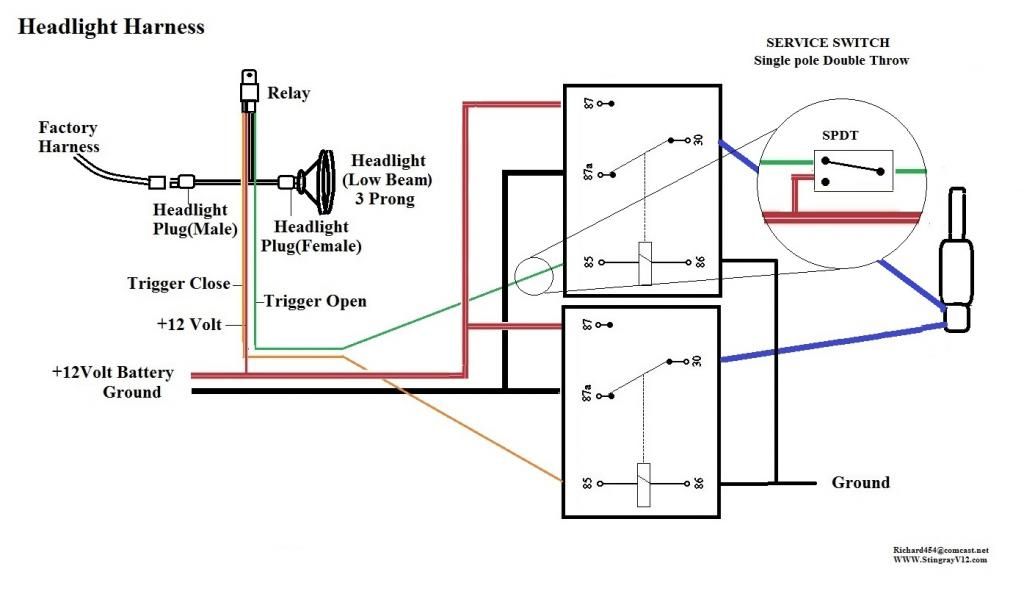

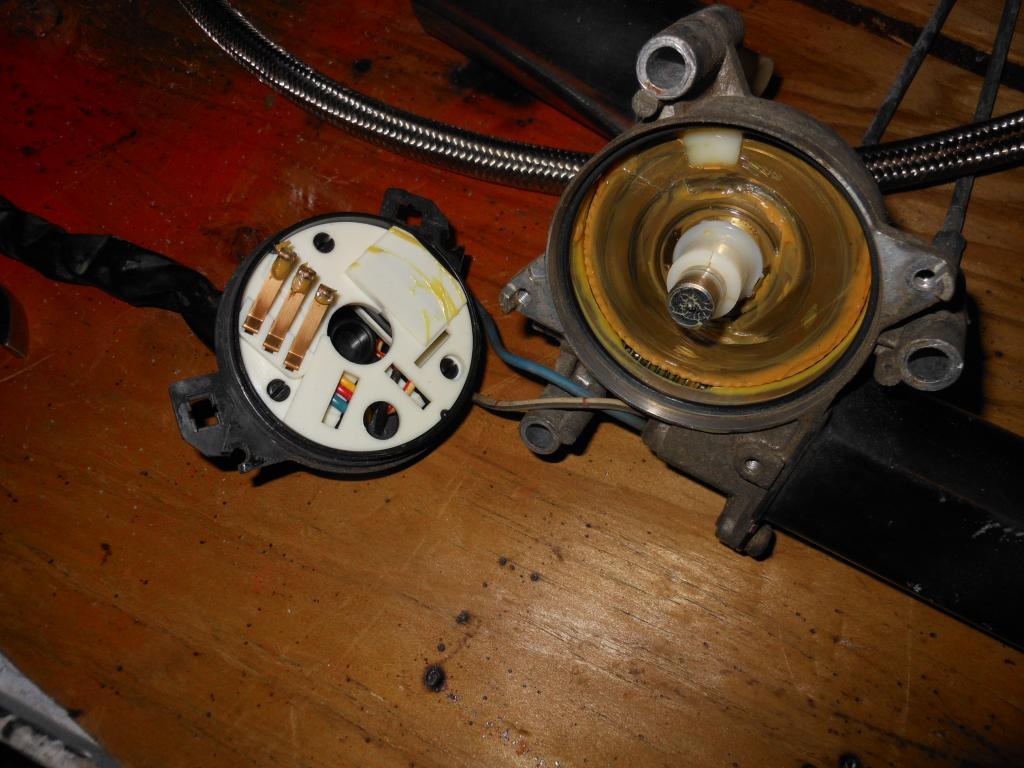
 but I still find it interesting