
C3 cold air intake--on LS3!
 10-19-2012, 07:45 PM
#21
Advanced

Thread Starter

So that last car looks a lot like the earliest post above--another way of getting air from up near the windshield. I like it--I'm not sure on clearance though--it's starting to look like doing the install then figure out the air intake.
I emailed K&N asking them for models, prints, or even dimensions. I'm not really sure why they would want to keep that data secret. I will have to buy one where I can return it, and measure it! I wonder if you--or Jeff you said? has any pictures of the hinges he built? That is a very clean idea. It seems cleanest to get it in there that way.
I really thought there would be more guys who had solved these--they are all tied together--headers, engine location, and intake. I guess that is why guys take the engine in and out a dozen times during a swap. Seems crazy as so many Vette guys are doing these swaps, and there really is not a well documented recipe out there. Lots of artists though--man what sweet builds! I hope I can build one like that 427 someday too--an LS3 is about all I can swing!


 I built that when I was helping Josh out at Custom Image Corvettes when they were here in Iowa
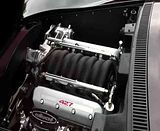 10-19-2012, 11:54 PM
#23


But then again..there is so much noise everywhere else that I'm not sure I'd notice it.
I'd reallly look into reversing that intake (well, if it's true that it is reversible)....methinks that would solve many of your problems.
I'd reallly look into reversing that intake (well, if it's true that it is reversible)....methinks that would solve many of your problems.
10-20-2012, 09:30 PM
#24
Burning Brakes

Yes you can reverse the intake. They do it on rock crawlers/Jeeps all the time and get air from inside the cab. BUT, look at the pics above, the throttle body would be in the firewall, or you would have to move the engine forward 5 or 6 inches.
10-21-2012, 10:51 AM
#25
..well, that's drag. Hmmmm.
10-21-2012, 11:10 AM
#26
Team Owner

Befor you spend too much on aftermarket headers, read this:
http://www.carcraft.com/techarticles...e_header_test/
http://www.carcraft.com/techarticles...e_header_test/
and the above substantiates what he told me years ago.....I did buy a set from him though, as I knew they fit my highly modified '72 vert.....
 10-21-2012, 11:49 AM
#27
Melting Slicks


On my LS swap, I didnt have room to run the air intake right or left due to the AC compressor and alternator. And I was using a mechanical fan, so strait ahead was out of the question. So with the L88 hood, I wrapped around the intake tube, and put the filter on top of manifold. It draws air from the back of the hood.
Another pic.
In progress, the metal hold down box was intended as a temprary fix, but I never swapped it out. I also mounted the TAC module to the back.

Another pic.
In progress, the metal hold down box was intended as a temprary fix, but I never swapped it out. I also mounted the TAC module to the back.
How did you make the mold ?
10-21-2012, 12:02 PM
#28
Instructor

 10-21-2012, 12:19 PM
#29


Initial mold for coil covers and base was 3 pieces of plywood. Cover with aluminum foil to prevent from sticking, lay out glass mat, cloth, resin.
The box for the filter was wood too, covered in aluminum foil. I laid up the glass directly on the base.
Curved parts were styrofoam and/or drywall joint compound for the form covered with elmers glue (school stuff) to prevent the resin from eating it. A foam "noodle" float is 4" around and makes a great air tube. A hot glue gun works well to adhere foam pieces together. After the resin sets, just hack out the foam and joint compund with a knife. Lime away eats out the elmers school glue and the rest of the joint compound. Rinse with water.
10-25-2012, 11:25 PM
#30
Advanced
Thread Starter
Would you happen to have pictures of the mold and glass work you did? This seems like a fun addition to the work--it really adds class to the look. If no pics, maybe a link to someplace (or better for me, a book I could buy on the subject?). Seems like some of you guys are artists with this stuff-- but trying to sort out the tricks like you listed above seems impossible without some in-depth writing.
I'm still curious about the hinges too. The idea of the hood lifting up and out to make room for the cold air intake is very good--and the hood looks real trick lifted up that way. TONS of custom hinges out there, but nothing like this. Any more info possible there? Might just be a design/build item.
Les
10-26-2012, 07:29 AM
#31
Sorry, not much in the way of pics. I did shoot the one below when I discovered the fan was in the way in front, alt to the left, AC to the right. That only left turning around to the back. This is a "noodle" cut and glued to make the tube mold.

10-26-2012, 09:41 AM
#32
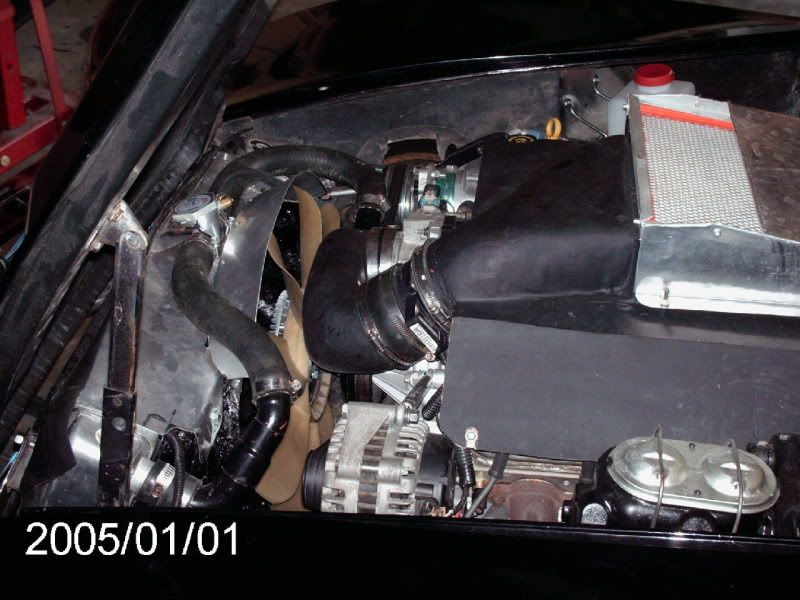
Gary's intake is just like a Camaro LT1 SS intake. Google this "Camaro LT1 SS intake" and you may save yourself some fabrication.
The Camaro intake design was my 2nd option for a CAI into my LSX motor vs the pic you see from Gordon above. The pic from Gordon is of my ride and this design is called an "over the radiator" OTR and is very popular in Australia is where I got the idea from that Brent did a good job of building.
The Camaro intake design was my 2nd option for a CAI into my LSX motor vs the pic you see from Gordon above. The pic from Gordon is of my ride and this design is called an "over the radiator" OTR and is very popular in Australia is where I got the idea from that Brent did a good job of building.
Last edited by Hadez; 10-26-2012 at 10:22 AM.
10-26-2012, 11:21 AM
#33
Damn, here I thought I invented something new.....
As for a link on fiberglass fabrication, just search the web, plenty out there. You can buy polyester resin, mat, and cloth at West Marine or even most auto parts stores.
One trick to getting it to release from flat sections is to cover with aluminum foil. The foil doesn't work well with curved sections since wrinkles get stuck in the resin. You also have to cover all foam with elmers glue or drywall compound to prevent the resin from melting it.
Last edited by Garys 68; 10-26-2012 at 11:36 AM.
10-27-2012, 06:05 PM
#34
Drifting

Here is a quote from my build thread http://forums.corvetteforum.com/c3-t...under-way.html
There are some build shots of the headers installed on the car in the build thread.
These headers worked so much better than the Melrose junk.
There are some build shots of the headers installed on the car in the build thread.
These headers worked so much better than the Melrose junk.
Just a little update, I have been cleaning and painting parts to go back onto the motor, I hope to button up the short block and drop it back into the car Saturday. I will fit the headers and see how well they fit, hopefully they work out, if not I want to get them shipped back quickly so I can get a return credit.
I received these today from Kooks, I hope that they fit because they are a very nice quality set of headers.


I was going to use the pace setter F body headers, but with the motor now running at a suspected 600 HP level, I didn't want to restrict the Exhaust, I wounder if I should have went with the 2'' primaries instead of the 1 7/8'', I though the 2'' was possibly to big???
Riggs
I received these today from Kooks, I hope that they fit because they are a very nice quality set of headers.
I was going to use the pace setter F body headers, but with the motor now running at a suspected 600 HP level, I didn't want to restrict the Exhaust, I wounder if I should have went with the 2'' primaries instead of the 1 7/8'', I though the 2'' was possibly to big???
Riggs
Last edited by riggs 74; 10-27-2012 at 07:15 PM.
10-27-2012, 09:34 PM
#35
Advanced
Thread Starter
Read your entire thread Riggs--that was the best dang write up I have read--but a little intimidating, you went through some very serious hits. I will not buy the Melrose after GordonM's low comment--then you having to cut them around the rack. I am partially disabled, so though I know how to do things, my body doesn't cooperate! I can't be doing it over--I'm afraid I'll be paying people to do much of it--though I'm buying all the parts and laying out every single step I can plan for.
Seems like stock position worked for you, and GordonM worked at 1" back--so seems like equal or back is better than forward. I'm thinking stock position is where I'll start. Kooks look AWESOME. Your intake is just the 90 and KN cone--and working good for now...that is a much easier answer.
I'm doing LS3 crate, and built a 4L60 with 4L65-70 upgrades--as well as upgrades to that--not sure level 5 though. Did you change rear differential too?
I don't think I saw any final pictures of your gauge set. I don't want to lose the C3 look, so was planning on do mechanical cable x drive for speedo. Probably fix that as another project. I can do more of that stuff.
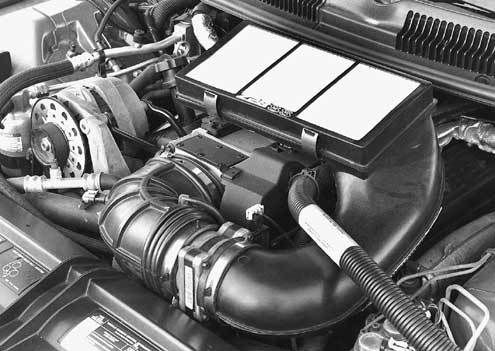
I'm interested now to see how folks build the air boxes to that position for the intake. I've seen how the Fbodies do it.
Lots of discussion about recirc on the fuel lines. Some guys run both lines all the way to the engine bay, then return thru the Vette filter from there. They claim cooler fuel. I'm still considering it.
Thanks again,
Les
Seems like stock position worked for you, and GordonM worked at 1" back--so seems like equal or back is better than forward. I'm thinking stock position is where I'll start. Kooks look AWESOME. Your intake is just the 90 and KN cone--and working good for now...that is a much easier answer.
I'm doing LS3 crate, and built a 4L60 with 4L65-70 upgrades--as well as upgrades to that--not sure level 5 though. Did you change rear differential too?
I don't think I saw any final pictures of your gauge set. I don't want to lose the C3 look, so was planning on do mechanical cable x drive for speedo. Probably fix that as another project. I can do more of that stuff.
I'm interested now to see how folks build the air boxes to that position for the intake. I've seen how the Fbodies do it.
Lots of discussion about recirc on the fuel lines. Some guys run both lines all the way to the engine bay, then return thru the Vette filter from there. They claim cooler fuel. I'm still considering it.
Thanks again,
Les
10-27-2012, 10:08 PM
#36
Burning Brakes
I am running a regulator at the fuel rail with a return all the way back to the tank. The way Chevy did it originally. Regulating pressure in the tank or near the tank may be a little easier. Most people don't realize that Chevy made the change to in the tank regulation for emission purposes, not performance. You will get better fuel temp and pressure by regulating at the engine. Another plus is that any crud in the line (fuel additive deposits) has a chance to exit back to the tank, otherwise it has no place to go but the injector.
10-27-2012, 10:41 PM
#37
Drifting
I would set the motor in the stock or 1'' forward, mine are in the stock position, I think, and I wish I had more room between the fire wall and motor. When I had to pull the motor for the rebuild, I had a lot of trouble getting to the upper trans to motor bolts, I got to them but it was a real pain. On my set up I have alot of room between the Balancer and front cross member, how ever I think it would be close if I was one inch forward for the steering rack clearance to F body oil pan.
Yes my intake as of right now is just a 90 and a KN filter on the end of that, but I am looking to build something soon to capture some cool air from the front of the radiator.
For the fuel line I am running the C5 filter that has the built in regulator and a single 3/8 Line to the motor, no complaints yet about hot fuel.
My rear diff has not been upgraded, I don't plan on any hard launches with sticky tires, so I shouldn't have any problems with it breaking, the tires seam to just sit and smoke as soon as I hit the throttle, not good on the tires, but puts a huge smile on my face every time. LOL
Here is a walk around video that shows the motor pretty well, you may get some good viewing info from watching it.
http://www.youtube.com/watch?v=JxHvbqD7aOo
Riggs
10-28-2012, 06:31 AM
#38
Race Director

My motor is actually in the stock position. I tried originally in the 1 inch back position. It was to close to the firewall and things just did not line up. I did this for possible oil pan clearance with the rack. I then moved it back to the original location. The pan to rack clearance is tight but it fits. So I left it there and am much happier in the stock location. The firewall clearance is much better.
10-28-2012, 08:42 AM
#39
I went with the standard mounts too. The 1" setback mounts put the engine really close to the firewall. In addition, I went to a BBC 621 bell housing, and it was hitting the tunnel. I suspect that's due to a slightly higher engine position, compressed body mounts and sagging fiberglass floor.
10-28-2012, 04:15 PM
#40
Advanced
Thread Starter
I have bought 6061 Aluminum tubing --3/8 & 1/2" to run the fuel line. I got a couple of straight sticks and an annealed roll with the intent of running it into the engine bay, then using the c5 Vette filter regulator just prior to running Teflon-SS braid to the reversed fuel rails. I looked at the regulators plus filter, but couldn't convince myself it was a better idea for the money. Now I've got too much tubing! I'm sure it will get used!
The guys at Vetteaid suggested 1/2" forward. From you three guys, it seems like that is about right. I'm installing the Steeroids rack during the engine swap. I read the rack building threads, but feel more confident overpaying for one that requires no testing myself. Seems like with Kooks & 1/2" forward I'll be ok.
On your walk around video Riggs (my wife has confirmed I'm nuts now that I'm watching cars run on YouTube), the Kooks look low. How low is your ride compared to stock? Wheels/tires dropped some, springs lowered some--maybe 2"? Do you ever scrape--or is it in that sweet spot just above scraping?
I checked out the link in Riggs build thread for power steering reservoir. I did the hydroboost, SS lines, Willwood calipers and rotors all around about three months ago. I like the looks of it, and it seems like you have three connections. First, does it have two for the return, and second, do they sell just the reservoir? Seemed like full kits only--I haven't called yet though. I can run a Y, but think two returns might look cleaner(?)
Love the stop power--what a huge difference. I got a great deal on the Willwood six pistons on front (fours in rear,) from a small shop in California. Saved a couple hundred off next closest price. With only 220 go HP, I don't need that much whoa-- but I intend to! Wish I'd have upgraded to the Willwood master--it looks much better!
You need a new under-hood insulation blanket Riggs--something with two black stripes down it maybe! Maybe I'll wear out the new Firestones sooner than anticipated!

