
TH400 to 200-4R conversion with pictures.
 12-10-2012, 09:58 PM
#1
Drifting

Thread Starter

Whether you buy a performance rebuilt unit or a core and rebuild it, you still have to adapt it to your car. These are my experiences and the kits I have used.
I have probably read every thread in the archives on this subject. I am posting this thread for a reference and will update it with as many links and pictures of my experience as I feel are relevant. It's all the people who shared their knowledge here that gave me the confidence to take this on.
My car is a 74 that came stock with a TH400. I bought a used transmission that I plan to rebuild but want to install it first to get the fit and adjustments correct. Who knows, I might get lucky. I will update this thread with the test drive results soon but wanted to get the installation shots up. So here they are.
My favorite links for this subject are at the bottom of this post.
This is a CZF from an 87 Monte Carlo SS
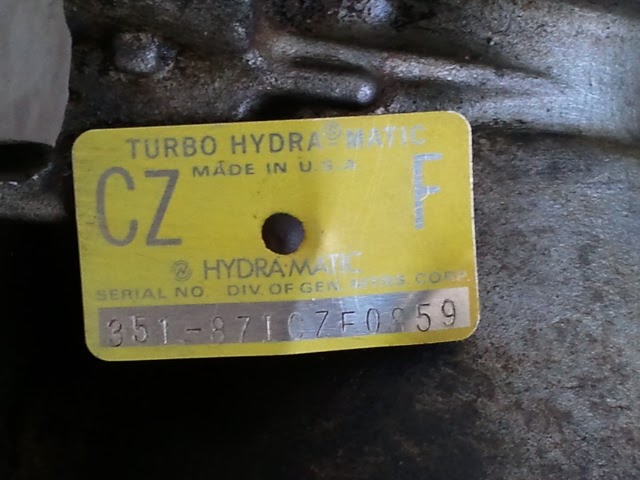
The tag is located on the tail shaft area

The torque converter that came with it is a performance factory lock-up unit called a D5. It is rated right around 2k

The word "METRIC" is a dead give away that you have a 2004R. Also it looks like a two compartment pan. When I was in kindergarten 35 or so years ago, they warned us of this new system of measurement. Finally got to use the other half of my tool set.

I bought a lock up kit from www.bowtieoverdrives.com . It basically automatically locks the converter when you shift to 4th. You will replace the solenoid.

Disconnect the factory 3rd gear pressure switch

And use the harness they provide to connect to the new 4th switch that comes in the kit.

The harness clips to the factory connector.

This is the TV plunger. The BTO kit has a new stiffer spring to make sure it doesn't stick. (Thats the old one in the pic) Remove that bolt.

Then pull that little pin and the plunger comes out so you can swap the spring. Easy stuff here.

Just making sure it goes all the way in.

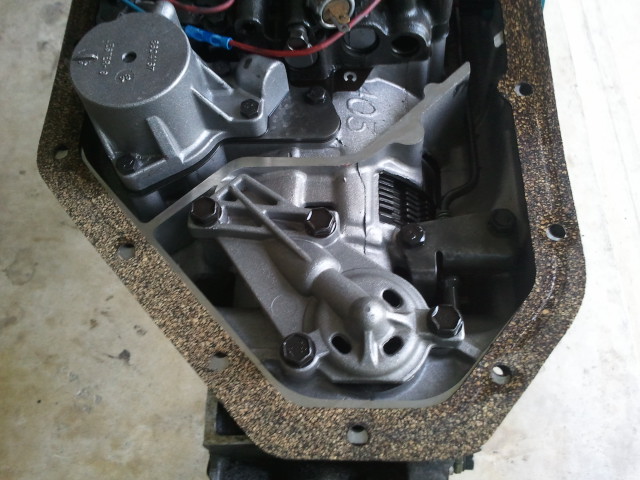
Here is a shot of the Valve Body. Note the pink paint and CZ5. The Grand Nationals, Monte Carlo ss, and 442's were some of the ones to get the performance valve body.

The governor on these units shifts at around 5250 rpm and the CZ will also shift into 4th at WOT. Grand National wont.
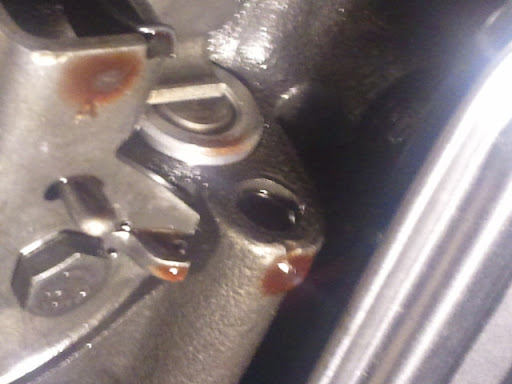
This little O-ring on at the tip of the input shaft is essential if you want to lock up the converter.

Here are the two transmissions side by side. The 200-4r on the right has a standard TH350 yoke in this shot.

Take the transmission mount from the th400 and put it on your 200-4r

You are going to have to bend the lines a little if you want to reuse them. Both units use 1/4 in pipe thread fittings. The th400 is TOP= in Bottom = out.

The 200-4R is opposite. TOP = out Bottom = in

Okay, now I did this at home with 4 jack stands 2 jacks and a bunch of wood blocks. My jack only goes up 17 or 18 inches max. So I could not lift the car high enough to put the trans on a jack and roll it under the car. I had to put the trans under the car and then put it on the jack. Here is how that went.
Used a wrench to hold the converter in place.

Put the trans on a towel and lifted the tail and angled it under the car.

Then used some framing studs as simple machines. Had to think back to third grade on this one.

Basically just lifted it up an inch or two at a time on one side using 1x4 spacers, then went to the other and lifted it up.

Yes, I made a transmission jack adapter out of plywood.

KaBlamo! it bolts right up.

And here is the best part of all! I left the mount bolts loose till I could verify they would align. They did perfectly. (Naturally there is a bolt under the crossmemeber)

Yokes... Far right, TH400 / Center, stock TH350 / Left, a Spicer Corvette 27 spline yoke. The th350 yokes are longer but the th400 has a bit of a tail shaft and the 200-4r doesn't so it works out.

Little more meat on the TH400

TH400 vs TH350

The Spicer 27 spline will match the drive shaft perfect. Using this yoke I did not have to make any changes to the drive shaft. It bolts right back in.

Odd pic but the drive shaft U-joint is also a smaller diameter

Factory dipstick


So there you go. I have not made the shifter connections or conversion but that is a straight forward kit. Also, I plan to test drive the car without the lock up just to see what I have.
Depending on the outcome, there may be another thread soon titled "How to rebuild a 200-4R"
LINKS
About the 200-4R and finding a performance unit.
http://web.archive.org/web/200701281.../thm2004r.html
http://www.drwtransmission.com/thm_200-4r.htm
http://www.442.com/oldsfaq/oft200.htm
http://www.hemmings.com/hmn/stories/...feature26.html
http://www.chevyhiperformance.com/te...smission_swap/
http://forums.corvetteforum.com/c3-t...ome-on-in.html
http://forums.corvetteforum.com/c3-t...anny-swap.html
U-joints and yokes
http://www.drive-lines.com/ujs/uj_conversion.php
http://forums.corvetteforum.com/c3-t...n-u-joint.html
Upgrades, repairs and performance.
http://web.archive.org/web/200704291...transpage.html
https://www.wittrans.com/Schematic.a...mission=200-4R
http://www.superchevy.com/technical/...d/viewall.html
http://forums.corvetteforum.com/c3-t...-2-w-pics.html
http://www.montecarloss.com/SSThunder/drivetrain.html
http://www.tciauto.com/tc/cooler-fittings
Vendors
http://www.ckperformance.com/resourc...4RCATALOG.html
http://www.bowtieoverdrives.com
http://www.transmissioncenter.net/200-4r.htm
Best forum for 200-4R
http://www.turbobuick.com/forums/for...ssion-talk.12/
Thanks for looking, good luck!
john.
I have probably read every thread in the archives on this subject. I am posting this thread for a reference and will update it with as many links and pictures of my experience as I feel are relevant. It's all the people who shared their knowledge here that gave me the confidence to take this on.
My car is a 74 that came stock with a TH400. I bought a used transmission that I plan to rebuild but want to install it first to get the fit and adjustments correct. Who knows, I might get lucky. I will update this thread with the test drive results soon but wanted to get the installation shots up. So here they are.
My favorite links for this subject are at the bottom of this post.
This is a CZF from an 87 Monte Carlo SS
The tag is located on the tail shaft area
The torque converter that came with it is a performance factory lock-up unit called a D5. It is rated right around 2k
The word "METRIC" is a dead give away that you have a 2004R. Also it looks like a two compartment pan. When I was in kindergarten 35 or so years ago, they warned us of this new system of measurement. Finally got to use the other half of my tool set.
I bought a lock up kit from www.bowtieoverdrives.com . It basically automatically locks the converter when you shift to 4th. You will replace the solenoid.
Disconnect the factory 3rd gear pressure switch
And use the harness they provide to connect to the new 4th switch that comes in the kit.
The harness clips to the factory connector.
This is the TV plunger. The BTO kit has a new stiffer spring to make sure it doesn't stick. (Thats the old one in the pic) Remove that bolt.
Then pull that little pin and the plunger comes out so you can swap the spring. Easy stuff here.
Just making sure it goes all the way in.
Here is a shot of the Valve Body. Note the pink paint and CZ5. The Grand Nationals, Monte Carlo ss, and 442's were some of the ones to get the performance valve body.
The governor on these units shifts at around 5250 rpm and the CZ will also shift into 4th at WOT. Grand National wont.
This little O-ring on at the tip of the input shaft is essential if you want to lock up the converter.
Here are the two transmissions side by side. The 200-4r on the right has a standard TH350 yoke in this shot.
Take the transmission mount from the th400 and put it on your 200-4r
You are going to have to bend the lines a little if you want to reuse them. Both units use 1/4 in pipe thread fittings. The th400 is TOP= in Bottom = out.
The 200-4R is opposite. TOP = out Bottom = in
Okay, now I did this at home with 4 jack stands 2 jacks and a bunch of wood blocks. My jack only goes up 17 or 18 inches max. So I could not lift the car high enough to put the trans on a jack and roll it under the car. I had to put the trans under the car and then put it on the jack. Here is how that went.
Used a wrench to hold the converter in place.
Put the trans on a towel and lifted the tail and angled it under the car.
Then used some framing studs as simple machines. Had to think back to third grade on this one.
Basically just lifted it up an inch or two at a time on one side using 1x4 spacers, then went to the other and lifted it up.
Yes, I made a transmission jack adapter out of plywood.
KaBlamo! it bolts right up.
And here is the best part of all! I left the mount bolts loose till I could verify they would align. They did perfectly. (Naturally there is a bolt under the crossmemeber)
Yokes... Far right, TH400 / Center, stock TH350 / Left, a Spicer Corvette 27 spline yoke. The th350 yokes are longer but the th400 has a bit of a tail shaft and the 200-4r doesn't so it works out.
Little more meat on the TH400
TH400 vs TH350
The Spicer 27 spline will match the drive shaft perfect. Using this yoke I did not have to make any changes to the drive shaft. It bolts right back in.
Odd pic but the drive shaft U-joint is also a smaller diameter
Factory dipstick
So there you go. I have not made the shifter connections or conversion but that is a straight forward kit. Also, I plan to test drive the car without the lock up just to see what I have.
Depending on the outcome, there may be another thread soon titled "How to rebuild a 200-4R"
LINKS
About the 200-4R and finding a performance unit.
http://web.archive.org/web/200701281.../thm2004r.html
http://www.drwtransmission.com/thm_200-4r.htm
http://www.442.com/oldsfaq/oft200.htm
http://www.hemmings.com/hmn/stories/...feature26.html
http://www.chevyhiperformance.com/te...smission_swap/
http://forums.corvetteforum.com/c3-t...ome-on-in.html
http://forums.corvetteforum.com/c3-t...anny-swap.html
U-joints and yokes
http://www.drive-lines.com/ujs/uj_conversion.php
http://forums.corvetteforum.com/c3-t...n-u-joint.html
Upgrades, repairs and performance.
http://web.archive.org/web/200704291...transpage.html
https://www.wittrans.com/Schematic.a...mission=200-4R
http://www.superchevy.com/technical/...d/viewall.html
http://forums.corvetteforum.com/c3-t...-2-w-pics.html
http://www.montecarloss.com/SSThunder/drivetrain.html
http://www.tciauto.com/tc/cooler-fittings
Vendors
http://www.ckperformance.com/resourc...4RCATALOG.html
http://www.bowtieoverdrives.com
http://www.transmissioncenter.net/200-4r.htm
Best forum for 200-4R
http://www.turbobuick.com/forums/for...ssion-talk.12/
Thanks for looking, good luck!
john.
Last edited by johnt365; 04-02-2016 at 09:18 PM.

The following 8 users liked this post by johnt365:
430t (06-14-2021),
carriljc (06-05-2021),
colonel328 (12-21-2020),
Jeffs82c3 (01-27-2021),
LenWoodruff (03-11-2022),
and 3 others liked this post.
12-10-2012, 10:23 PM
#2
Race Director

Great write up and pics. I think you'll be thrilled with the results. I've put these in a couple of cars now and think it's the best mod as far as making the cars enjoyable to drive.
Hopefully you won't have to start the rebuild thread
Hopefully you won't have to start the rebuild thread


 12-12-2012, 08:40 AM
#6
Drifting
Thread Starter
A note on auxiliary coolers You gotta have one !
I spoke with David Husek. He is one of the few performance experts for the 200-4r at http://www.turbobuickperformance.com/
He said he was having shift issues with a unit in a car and had tried everything. He changed the S-tube fin cooler to a LPD (low pressure drop) stacked plate cooler and it shifted fine. This makes sense since the pressure controls so many aspects of the shifting.
I then called Bowtie OD and spoke with Chris and he had never experienced this. So the jury is out on this one. I have an old school S-tube so will try to report back with my experience.
Anybody else experience an issue with S-tube cooler and a 200 or 700?
Last edited by johnt365; 12-12-2012 at 08:44 AM.
12-12-2012, 11:35 AM
#7
your use of wood for the install was mechanical genius
the info about the coolers makes sense if the 's' one was marginal and plugged , the LPD's make a lot of sense, but are a bit more spendy
the info about the coolers makes sense if the 's' one was marginal and plugged , the LPD's make a lot of sense, but are a bit more spendy
Last edited by oldalaskaman; 12-12-2012 at 11:37 AM.
12-12-2012, 02:56 PM
#8
Drifting
Thread Starter
Thanks.
Here are a couple things I have discovered today.
1. The stock crossmember will work for mounting but that rear pan bolt, hidden in the picture above, is impossible to remove. To remove the rear pan bolt I had to loosen the trans mount bolts and jack up the trans a little to gain access. I assume an after market crossmember would not have that issue.
2. The exhaust is completely in the way and hard to deal with. When I get it running, even if I only have 2 forward gears, I am taking it straight to an exhaust shop. I am going to have them use V-band clamps from the headers to just behind the cross member so the tubes can be easily removed.
3. The Bowtie Overdrive throttle bracket is closer than my other so the pull is not as long. I need to figure out a way to correct that.
I have the pan off to verify that the TV plunger is being fully depressed at full throttle.

 12-12-2012, 08:20 PM
#10
Team Owner


Thanks.
Here are a couple things I have discovered today.
1. The stock crossmember will work for mounting but that rear pan bolt, hidden in the picture above, is impossible to remove. To remove the rear pan bolt I had to loosen the trans mount bolts and jack up the trans a little to gain access. I assume an after market crossmember would not have that issue.
2. The exhaust is completely in the way and hard to deal with. When I get it running, even if I only have 2 forward gears, I am taking it straight to an exhaust shop. I am going to have them use V-band clamps from the headers to just behind the cross member so the tubes can be easily removed.
3. The Bowtie Overdrive throttle bracket is closer than my other so the pull is not as long. I need to figure out a way to correct that.
I have the pan off to verify that the TV plunger is being fully depressed at full throttle.
Here are a couple things I have discovered today.
1. The stock crossmember will work for mounting but that rear pan bolt, hidden in the picture above, is impossible to remove. To remove the rear pan bolt I had to loosen the trans mount bolts and jack up the trans a little to gain access. I assume an after market crossmember would not have that issue.
2. The exhaust is completely in the way and hard to deal with. When I get it running, even if I only have 2 forward gears, I am taking it straight to an exhaust shop. I am going to have them use V-band clamps from the headers to just behind the cross member so the tubes can be easily removed.
3. The Bowtie Overdrive throttle bracket is closer than my other so the pull is not as long. I need to figure out a way to correct that.
I have the pan off to verify that the TV plunger is being fully depressed at full throttle.
I had a pix of mine years ago, but lost it in a computer crash....
what you are doing is creating a lattice work/structure under the top section of the loop, so the exhaust is maybe a inch or so lower then normal.....which is nothing....
 12-13-2012, 09:39 PM
#11
Drifting
Thread Starter
mrvette, I have read every post you have made regarding your od conversions. I have seen a picture of this mod and can tell you its outside my skill set. However, I do want to say that you made a great point on yokes. If I may paraphrase, just because you can use a standard loop yoke- don't. It makes removal in the future near impossible.
Now then, I spent all day playing with throttle pull and TV set up. I want to recommend this link. http://www.bowtieoverdrives.com/Inst...s/TV_101-1.pdf The first sentence sums it up. "A typical 700R4/2004R installation costs between $1000 to $2500, requires many hours of labor,
skinned knuckles and no small amount of thought, ingenuity and fabrication skills." (all day on just throttle pull)
Per Chris at BTO he gave me the idea to put a 6x32 x1in screw in the bottom hole of the TV bracket and put a lock nut on it to hold the spring.


A couple things to note. I used the BTO system because I felt confident the TV pull geometry would be correct. There are other throttle brackets and tv correction plates.
It is NOT hard for these brackets to bend under the force of the throttle pull. I had to bend mine back to place.
Also, this bracket assm. will raise your throttle bracket so you may need to also raise your connecting point on the linkage so the pull is straight back. This may also cause interference with your air cleaner if it is close.
The BTO bracket is also closer to the connector than the one I had before. As a result, the cable was now too long and I could not achieve WOT. I went under the dash and used a small electrical butt connector to crimp around the cable and take up the slack.
I also removed the TH400 kick down switch in case it was causing any resistance.
Now then, I spent all day playing with throttle pull and TV set up. I want to recommend this link. http://www.bowtieoverdrives.com/Inst...s/TV_101-1.pdf The first sentence sums it up. "A typical 700R4/2004R installation costs between $1000 to $2500, requires many hours of labor,
skinned knuckles and no small amount of thought, ingenuity and fabrication skills." (all day on just throttle pull)
Per Chris at BTO he gave me the idea to put a 6x32 x1in screw in the bottom hole of the TV bracket and put a lock nut on it to hold the spring.
A couple things to note. I used the BTO system because I felt confident the TV pull geometry would be correct. There are other throttle brackets and tv correction plates.
It is NOT hard for these brackets to bend under the force of the throttle pull. I had to bend mine back to place.
Also, this bracket assm. will raise your throttle bracket so you may need to also raise your connecting point on the linkage so the pull is straight back. This may also cause interference with your air cleaner if it is close.
The BTO bracket is also closer to the connector than the one I had before. As a result, the cable was now too long and I could not achieve WOT. I went under the dash and used a small electrical butt connector to crimp around the cable and take up the slack.
I also removed the TH400 kick down switch in case it was causing any resistance.
The following users liked this post:
Pheengurs (10-28-2023)
12-14-2012, 12:19 PM
#12
Team Owner
I have been happy with my shortcut install of the TV cable, what I had to do was cut out a section of my pass side floorboard, to get at the cooling lines, I also had to widen the tunnel on that side, as my car was OEM with a Muncie 4 spd, and so I believe had a narrower trans tunnel...so the TV cable comes up straight and up/over the HVAC ducting, I had a buddy weld a cable plate to a support rod that went from trans tunnel to steering column support....put a rubber supported small cable clamp around the gas pedal, up about 2" or so from the rubber foot part, this allowed about a 4" piece of stiff steel wire to grab a bent nail that fits the head into the trans cable just nice...loop the two together, and checked I had the correct pull on the cable....
With the Trans Go shift kit, that rascal can go from chirping tires, to early shifts, I have it in between just so I know it shifts solid....and with good timing.....
edit...I forget, reason it was done this way is because the engine induction is a LT1 intake on a L98 engine....injection, and I had a rough time finding a cable bracket, so made one, and there is no room for the trans on it...so it became a stepchild.....
Last edited by mrvette; 12-14-2012 at 12:21 PM.
12-14-2012, 12:32 PM
#13

Another item for people to consider when transplanting a 2004r. as others have brought up is the lock up converter. When I was having my tranny and converter built I specified a 2000 stall without the lockup feature. It does raise the rpm's a little bit at highway speeds but my car is pretty high geared anyway. It runs 2500 rpm. at 80 mph. and leaving the lockup feature out saves some rotating weight and simplifies things a bit. There is a retrofit kit for the valving that gets installed in the tranny if you're leaving the clutches out of the converter. A lot of people want the lockup converter feature and that's fine but I just wanted to point out the other option.
12-14-2012, 12:44 PM
#14
Team Owner
Another item for people to consider when transplanting a 2004r. as others have brought up is the lock up converter. When I was having my tranny and converter built I specified a 2000 stall without the lockup feature. It does raise the rpm's a little bit at highway speeds but my car is pretty high geared anyway. It runs 2500 rpm. at 80 mph. and leaving the lockup feature out saves some rotating weight and simplifies things a bit. There is a retrofit kit for the valving that gets installed in the tranny if you're leaving the clutches out of the converter. A lot of people want the lockup converter feature and that's fine but I just wanted to point out the other option.
12-14-2012, 07:34 PM
#15
in the , for what its worth' category, these can be modified for non-lockup by leaving out a few parts, drilling a few holes , and changing some wires, but as mrvette prev. stated they do run hotter and it probably isnt good for them without the mods. hope this helps.
Last edited by oldalaskaman; 12-14-2012 at 07:36 PM.
12-14-2012, 11:17 PM
#16
Drifting
Thread Starter
Here are the final pics of my TV and throttle set up as well as a quick video on the TV adjustment prodedure.
I have decided to be content with 98% perfection on this. The issue was that when I mounted the BTO throttle bracket to the BTO TV bracket, it would flex and bend at WOT. So it is really hard to get the throttle pull all the way without going over. As soon as you go over, the bracket bends.
So, I machined my previous throttle bracket to work with the BTO tv bracket. You will have to fabricate something here to fit your set up. This is just what worked for me.


Here is the video of setting the TV. Basically I pushed the D shapped button, pushed the cable sleave all the way back and then got in the car and pushed the gas pedal to WOT. You have to force it the last way till it rachets out.
http://youtu.be/Rg3Yu-wcBXU
Finally, I had someone depress the gas pedal and verified the TV plunger was fully depressed.
I have decided to be content with 98% perfection on this. The issue was that when I mounted the BTO throttle bracket to the BTO TV bracket, it would flex and bend at WOT. So it is really hard to get the throttle pull all the way without going over. As soon as you go over, the bracket bends.
So, I machined my previous throttle bracket to work with the BTO tv bracket. You will have to fabricate something here to fit your set up. This is just what worked for me.
Here is the video of setting the TV. Basically I pushed the D shapped button, pushed the cable sleave all the way back and then got in the car and pushed the gas pedal to WOT. You have to force it the last way till it rachets out.
http://youtu.be/Rg3Yu-wcBXU
Finally, I had someone depress the gas pedal and verified the TV plunger was fully depressed.
Last edited by johnt365; 12-15-2012 at 07:39 AM.
12-15-2012, 12:06 AM
#18
Drifting
Thread Starter
Yes, I was told the issue was the angle of my throttle pull, and that I needed to raise the connecting stud on the linkage. In the picture below, you can see that I have a pretty horizontal pull. Originally, it was one hole lower.

I guess I could raise it to that large hole with some type of bushing. However, to me, the bracket material is either not strong enough or does not have enough support to keep it from flexing.
The ideal throttle bracket would adjust forward and backwards and be made of billet or something strong.
The kit was more expensive than other options. If it works, it will be worth it.
12-15-2012, 12:19 AM
#19
the speed shops sell some nice billet versions that may work, spendy though. found this also
http://www.jegs.com/i/Holley/510/20-95/10002/-1
I bought one for mine , very sturdy.
your throttle cable looks pretty good, is that angle for the tv cable working good.?
this is the billit version
http://www.jegs.com/i/CSR/170/631R/10002/-1
http://www.jegs.com/i/Holley/510/20-95/10002/-1
I bought one for mine , very sturdy.
your throttle cable looks pretty good, is that angle for the tv cable working good.?
this is the billit version
http://www.jegs.com/i/CSR/170/631R/10002/-1
Last edited by oldalaskaman; 12-15-2012 at 12:25 AM.
12-15-2012, 07:23 AM
#20
Drifting
Thread Starter
Alaska, Please post a pic if can of your bracket system and linkage connections. Does that bracket bend or flex at all under load?
that is the angle the bto kit establishes. The tv bracket is on a plate that sits under your carb which is what it is. I am impressed with the adjustable cam that mounts to the linkage. I assume this is correct and the cable is tight as a guitar string.
I still need to:
Mount trans pan
Bend cooling lines
Mount exhaust sys
Attach cooling hoses
Attach shifter
And fill with fluid
*** This is a very NON plug and play area of this swap. I think it would be great of others could post pictures of the TV and throttle cable mount and linkage correction brackets that they have had success with***
Last edited by johnt365; 12-15-2012 at 07:47 AM.