
Glass Bead Blasting -
 10-25-2013, 09:33 PM
#1


'72 Corvette Restoration - NCRS Style
I bead blasted a couple of other parts today in the cabinet resulting in an almost "aluminum" color to the metal. Is there a method to restore the desired natural finish look to the metal after glass bead blasting?
I bead blasted a couple of other parts today in the cabinet resulting in an almost "aluminum" color to the metal. Is there a method to restore the desired natural finish look to the metal after glass bead blasting?
 10-25-2013, 09:40 PM
#2
Sorry, I was crafting the post when I accidently pushed the wrong button...
A little more information here. My goal is for an NCRS correct restoration. As such some parts came out of the factory at GM with a natural steel finish. Glass Bead blasting left the wrong finish color on a couple of parts as mentioned. Has anyone else ever run into this issue? If so, what did you do to return the part to a natural steel finish/color?
Regards,
Roger
10-25-2013, 09:42 PM
#3
Team Owner


Member Since: Oct 2004
Location: altered state
Posts: 81,242
Received 3,043 Likes
on
2,602 Posts
St. Jude Donor '05

Have the parts tumbled afterwards they will look like they were just cast yesterday
10-26-2013, 12:52 AM
#4
Melting Slicks


Keep in mind that Glass Bead is just one of many Media's that can be used. And there are at least 3 grades of Glass Bead. A lot depends on what material Your working on and what finish You want.
10-26-2013, 12:56 AM
#5
Le Mans Master


Get some Eagle 1 Mag wheel cleaner and a stainless steel wire brush, clean all the residue off gently brushing the aluminum parts, wash with distilled water. This will bring back the natural finish the part had from GM rather than lining the pocket of some NCRS "go to" guy who will do nothing but, empty your pockets. I am upset when I see painted aluminum parts on a NCRS car, I came form the Era of the 1970's when many of these cars were low mileage and never exhibited the finishes I observe on many NCRS restorations but, then these guys are also involved in the judging of these cars and hammer deduction points on cars not done by known restorers.
My buddy tried 2 starters in a 66 Corvette restored by some NCRS guy name Perkel (?) none of them operated reliably even though they wereserial number and "date correct" for the 66 Vette. He installed a Bosch rebuilt starter, has performed flawlessly for years now and cost about 1/4 the price of the NCRS correctly restored starter.
My buddy tried 2 starters in a 66 Corvette restored by some NCRS guy name Perkel (?) none of them operated reliably even though they wereserial number and "date correct" for the 66 Vette. He installed a Bosch rebuilt starter, has performed flawlessly for years now and cost about 1/4 the price of the NCRS correctly restored starter.
10-26-2013, 08:28 AM
#6
Team Owner
Member Since: Sep 2006
Location: Westminster Maryland
Posts: 30,173
Likes: 0
Received 2,878 Likes
on
2,515 Posts
Hi Roger,
I believe it depends on what material the part is made of as to how well the original 'as cast' look can be maintained or restored.
Blasting is a fairly quick way to strip a part, but not always the best way if the appearance of the surface of the part is important after it's been stripped.
On cast iron parts it's pretty easy to do, but on parts cast from softer material like alternator cases, aluminum valve covers, and some parts of the transmission cases, it's more difficult to maintain the look of the original 'cast surface'.
I think while blasting can be used on MANY parts, it's best used on steel parts, like brackets, a-arms, which will be painted.
What parts/finish are you concerned about?
Regards,
Alan
I believe John Pirkel, who is now deceased, did pretty terrific work on starters, generators, regulators, etc, for more than 20 years. His son continues their business. The OPERATION of parts they restore and sell was/is warrantied for one year.

 10-26-2013, 11:57 PM
#8
I'm not familiar with the type of tumbler you might be referring to. Is it a commercial grade device that I'd have access to only if I found a shop with one of them? What kind of media is used in them?
10-27-2013, 12:00 AM
#9
Get some Eagle 1 Mag wheel cleaner and a stainless steel wire brush, clean all the residue off gently brushing the aluminum parts, wash with distilled water. This will bring back the natural finish the part had from GM rather than lining the pocket of some NCRS "go to" guy who will do nothing but, empty your pockets. I am upset when I see painted aluminum parts on a NCRS car, I came form the Era of the 1970's when many of these cars were low mileage and never exhibited the finishes I observe on many NCRS restorations but, then these guys are also involved in the judging of these cars and hammer deduction points on cars not done by known restorers.
My buddy tried 2 starters in a 66 Corvette restored by some NCRS guy name Perkel (?) none of them operated reliably even though they wereserial number and "date correct" for the 66 Vette. He installed a Bosch rebuilt starter, has performed flawlessly for years now and cost about 1/4 the price of the NCRS correctly restored starter.
My buddy tried 2 starters in a 66 Corvette restored by some NCRS guy name Perkel (?) none of them operated reliably even though they wereserial number and "date correct" for the 66 Vette. He installed a Bosch rebuilt starter, has performed flawlessly for years now and cost about 1/4 the price of the NCRS correctly restored starter.
10-27-2013, 12:08 AM
#10
Hi Roger,
I believe it depends on what material the part is made of as to how well the original 'as cast' look can be maintained or restored.
Blasting is a fairly quick way to strip a part, but not always the best way if the appearance of the surface of the part is important after it's been stripped.
On cast iron parts it's pretty easy to do, but on parts cast from softer material like alternator cases, aluminum valve covers, and some parts of the transmission cases, it's more difficult to maintain the look of the original 'cast surface'.
I think while blasting can be used on MANY parts, it's best used on steel parts, like brackets, a-arms, which will be painted.
What parts/finish are you concerned about?
Regards,
Alan
Thanks everyone for their suggestions. One other suggestion I heard from someone else was to have the parts shot peened. I don't believe that is something that can be done in a home shop. I don't know what type of shop would be able to do something like that.
10-27-2013, 12:14 AM
#11
Gale, now being more specific on the type of parts I'm bead blasting (see above), is there a glass bead that is more suitable? Tried using a "medium" blasting material called Black Diamond was too abrasive, i.e., it left the surface very "pitted". The end surface color of the part was a light gray.
10-27-2013, 12:25 AM
#12
Le Mans Master
The aluminum sheen is from aluminum oxide bead interlaced with metal surface, one reason why I won't blast aluminum cylinder heads, hard to remove imbeded beads from aluminum. Use a stainless wire brush to clean surfaces, you can do this by hand, with a wire cup in a drill motor, or a wire wheel on a bench grinder. One other method, take parts to a metal plating shop and have them prep parts with de-ionized wash they use before plating process but, you will end up with some oxidation after this process.
I just spent the day prepping suspension parts and hardware to take to the plating shop next week. I wish I could find a reliable young person to perform this work but, many I have tried seem to not be able to disassemble simple mechnical items without destroying them and never seem to be able to retain instructions on how to use a bead blaster. Have fun cleaning
I just spent the day prepping suspension parts and hardware to take to the plating shop next week. I wish I could find a reliable young person to perform this work but, many I have tried seem to not be able to disassemble simple mechnical items without destroying them and never seem to be able to retain instructions on how to use a bead blaster. Have fun cleaning
10-27-2013, 08:56 AM
#13
Team Owner
Member Since: Sep 2006
Location: Westminster Maryland
Posts: 30,173
Likes: 0
Received 2,878 Likes
on
2,515 Posts
Hi Roger,
I have similar questions to what you asked.
The parts you mention had finishes (or lack of a finish) that I have have found difficult to duplicate.
The front springs being hot rolled I'd think would have a grayish scaly surface on them. How long that appearance lasted I don't know.
The strut rods were forged which involves heat; so I'd think they would have darkened areas. I see chassis' that have the strut rods with a flat dark gray surface that doesn't give the appearance of paint but I'm not sure what it is.
The t-arm spindle carriers were forged too so would have a similar finish to the strut rod EXCEPT that they have machined surfaces too. I'd think those surfaces would be bright steel (until they rusted) and the carrier itself might have an 'oily' look to it since I'd think some oil would have been used during the machining processes.
I've been puzzled for a long time how to duplicate these finishes and have tried to come up with finishes other than the usual cast blast, etc..
There's a whole world of restoration beyond the spray can.
I'm having fun plating small parts and maybe I'll next spend some time on 'forged' finishes.
What are you doing for 'forged' parts?
Regards,
Alan
Plating
Forged
I have more success (I think?) with fasteners and parts that were painted than those large cast iron parts.
I have similar questions to what you asked.
The parts you mention had finishes (or lack of a finish) that I have have found difficult to duplicate.
The front springs being hot rolled I'd think would have a grayish scaly surface on them. How long that appearance lasted I don't know.
The strut rods were forged which involves heat; so I'd think they would have darkened areas. I see chassis' that have the strut rods with a flat dark gray surface that doesn't give the appearance of paint but I'm not sure what it is.
The t-arm spindle carriers were forged too so would have a similar finish to the strut rod EXCEPT that they have machined surfaces too. I'd think those surfaces would be bright steel (until they rusted) and the carrier itself might have an 'oily' look to it since I'd think some oil would have been used during the machining processes.
I've been puzzled for a long time how to duplicate these finishes and have tried to come up with finishes other than the usual cast blast, etc..
There's a whole world of restoration beyond the spray can.
I'm having fun plating small parts and maybe I'll next spend some time on 'forged' finishes.
What are you doing for 'forged' parts?
Regards,
Alan
Plating

Forged

I have more success (I think?) with fasteners and parts that were painted than those large cast iron parts.
 10-27-2013, 11:29 AM
#14


 10-27-2013, 11:44 AM
#15
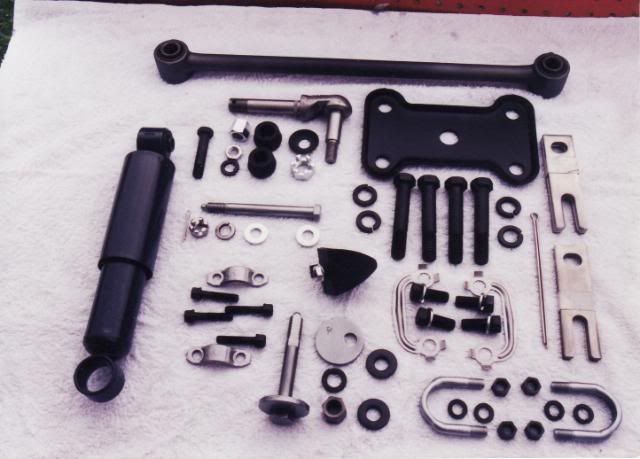
Alan. I have everything apart on the chassis and I'm just now trying to clean everything up and figure out how to get the right surface finishes. My brother purchased a Caswell Copy Cad kit to plate the bolts and brackets and such. So I guess I'm still trying to figure out what to do. Here are a couple of ideas I got off of another forum for returning the glass bead blast parts to original look.
1. Shot peen entire surface after heat treatment. Peening intensity measured according to SAE J442 specifications must be .012-.015" A. SAE 330-390 cast steel shot desired". "Spray or dip with Lucas Rustproofing #635 compound or equivalent for rust prevention. (mix 7 parts water with 1 part rustproof compound)"
2. Heat the part in an oven to about 200�F then wipe them down with used motor oil. They will smoke a bit, after that then treat with BoeShield.
As far as shot peening, I bet it would be difficult to find someplce that could do that for me. Still pondering idea #2.
On your plating, what process did you use? Also I know there are alot of bolts that are prolly supposed to be black phosphate finish. Does that coating actually rub off or is it on there pretty good?
One more question that you might know the answer to. Are all the front/rear bumper support brackets and valence brackets to be painted semi-gloss black? How about the rear bumper support rods? Same for them? Looks like from your profile, you have a '71?
Roger
10-28-2013, 12:16 AM
#16
Roger
10-28-2013, 09:00 AM
#17
Team Owner
Member Since: Sep 2006
Location: Westminster Maryland
Posts: 30,173
Likes: 0
Received 2,878 Likes
on
2,515 Posts
Hi,
To do the phosphate finish I use the materials from Palmetto Enterprises.
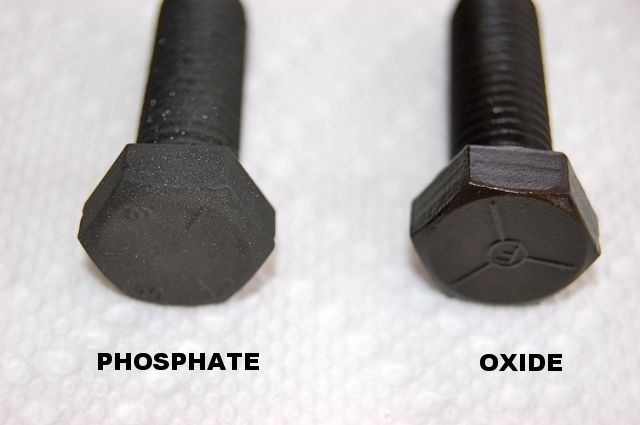
Manganese phosphate is the very dark gray sparkly finish that's on the bolt in the picture. The hood latch bases, seat track bases, rear window tray hinges, etc., are manganese phosphate, plus some other bolts are too.
I also use the Zinc phosphate which is a lighter gray.
Phosphating is a fairly simple process in which the phosphate liquid is heated to 200 degrees and the parts immersed for 5 to 10 minutes. I then spray the part with PreLube 6 from Quanta Products to seal it.
Black oxide is even easier. I buy the liquid from Caswell. The part is immersed in the room temperature liquid, then rinsed in clear water, and immersed in a oil based bath. The part stays a bit shiny (as in the picture) for a few days, but then becomes duller.
I have the Caswell Copy Cad/Zink kit from Caswell too. I'm just in the process of learning how to use it.
Big Fun!
Regards,
Alan
To do the phosphate finish I use the materials from Palmetto Enterprises.
Manganese phosphate is the very dark gray sparkly finish that's on the bolt in the picture. The hood latch bases, seat track bases, rear window tray hinges, etc., are manganese phosphate, plus some other bolts are too.
I also use the Zinc phosphate which is a lighter gray.
Phosphating is a fairly simple process in which the phosphate liquid is heated to 200 degrees and the parts immersed for 5 to 10 minutes. I then spray the part with PreLube 6 from Quanta Products to seal it.
Black oxide is even easier. I buy the liquid from Caswell. The part is immersed in the room temperature liquid, then rinsed in clear water, and immersed in a oil based bath. The part stays a bit shiny (as in the picture) for a few days, but then becomes duller.
I have the Caswell Copy Cad/Zink kit from Caswell too. I'm just in the process of learning how to use it.
Big Fun!
Regards,
Alan