
1979 Rehabilitation
 11-17-2013, 08:22 PM
#1
Racer

Thread Starter

Member Since: Sep 2002
Location: Englewood CO
Posts: 293
Likes: 0
Received 0 Likes
on
0 Posts

One day when I was a kid, my dad decided to go out while mom wasn't home and he returned with a 1979 Corvette. Let's just say this didn't go over too well with my mom, lol. It sat in the garage for years after that in need of some major work. In high school I'd saved up money to buy a car, but my dad made a deal with me that if I fixed the Vette, it could be mine to drive around. I got it running and used it for school, but had to leave it behind when I went off to college.
Fast forward 9 years later, and I was finally able to retrieve it from my parent's garage now that I had a garage of my own to work on it in. And thus my rebuild begins....
It sat for a really long time so there is nothing too terrible on it (besides paint and interior) but there isn't really anything great on it either. So I decided that I will go ahead and pull the body and strip it down to the bare frame so I can clean everything up and go through it. Pretty much anything that has rubber or a gasket needs to be replaced. I'm also paranoid about rust so I figure this is a good way to prevent it.
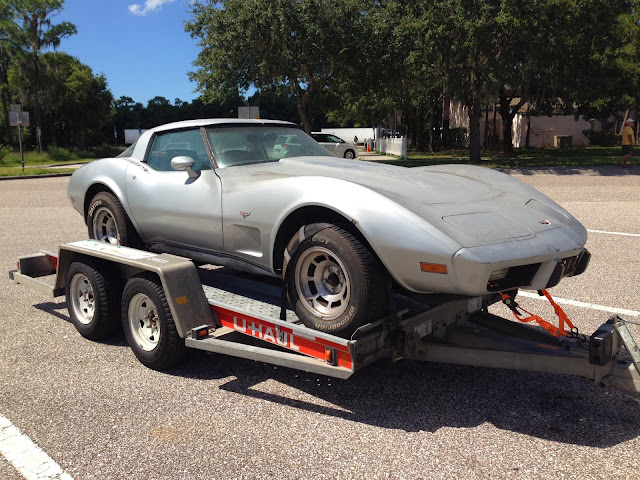
Here it is on the trailer when I took it across the state of Florida to my house.
Here are the seats and the interior of the car. All must be replaced later.


Trying to get the 8 bolts out that hold the body to the frame. Only got 3 out of the 4 driver side ones out.

Furthest rear bolt would not come out. The part it threads into must have broken loose so the bolt just spun freely. Ended up cutting the bolt.

Also got the rear number removed and some wires from the frame.

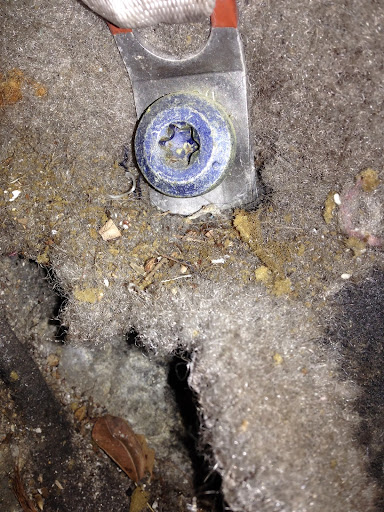
First question for you guys, how do you remove the seat belt attachment points that go into the frame? What type of bit do I need and where can I get one?
Fast forward 9 years later, and I was finally able to retrieve it from my parent's garage now that I had a garage of my own to work on it in. And thus my rebuild begins....
It sat for a really long time so there is nothing too terrible on it (besides paint and interior) but there isn't really anything great on it either. So I decided that I will go ahead and pull the body and strip it down to the bare frame so I can clean everything up and go through it. Pretty much anything that has rubber or a gasket needs to be replaced. I'm also paranoid about rust so I figure this is a good way to prevent it.
Here it is on the trailer when I took it across the state of Florida to my house.
Here are the seats and the interior of the car. All must be replaced later.
Trying to get the 8 bolts out that hold the body to the frame. Only got 3 out of the 4 driver side ones out.
Furthest rear bolt would not come out. The part it threads into must have broken loose so the bolt just spun freely. Ended up cutting the bolt.
Also got the rear number removed and some wires from the frame.
First question for you guys, how do you remove the seat belt attachment points that go into the frame? What type of bit do I need and where can I get one?


 11-17-2013, 09:59 PM
#5
Melting Slicks

I believe that's a size 50 torx head. got mine at Lowes.
11-18-2013, 04:00 PM
#6
Burning Brakes

Are you sure that goes into the frame? I just pulled the body off my 78 and didn't have to remove any of the seat belts. Those bolt through to reinforcement plates on the floor/body.
11-18-2013, 06:19 PM
#7
Racer
Thread Starter
Member Since: Sep 2002
Location: Englewood CO
Posts: 293
Likes: 0
Received 0 Likes
on
0 Posts
Thanks for everyone else telling what bit I need for that as I will need to remove it to replace the carpet.

 11-18-2013, 07:34 PM
#9
Burning Brakes
There's been a whole lot of banter lately on people deciding to pull bodies when they may not have to (replacing body mounts, etc).
To me, pulling the body and redoing the chassis (with your own hands, on your own schedule) is like the ultimate project. Yes, the car is laid up for a while, but let's face it, these cars are old, and the only way to really get them close to new is to go deep.
I say, enjoy the ride and make sure you are happy with what you have. Lord knows we'll never recover anywhere near the costs.
Good luck with the project!
11-24-2013, 08:38 PM
#10
Racer
Thread Starter
Member Since: Sep 2002
Location: Englewood CO
Posts: 293
Likes: 0
Received 0 Likes
on
0 Posts
There's been a whole lot of banter lately on people deciding to pull bodies when they may not have to (replacing body mounts, etc).
To me, pulling the body and redoing the chassis (with your own hands, on your own schedule) is like the ultimate project. Yes, the car is laid up for a while, but let's face it, these cars are old, and the only way to really get them close to new is to go deep.
I say, enjoy the ride and make sure you are happy with what you have. Lord knows we'll never recover anywhere near the costs.
Good luck with the project!
To me, pulling the body and redoing the chassis (with your own hands, on your own schedule) is like the ultimate project. Yes, the car is laid up for a while, but let's face it, these cars are old, and the only way to really get them close to new is to go deep.
I say, enjoy the ride and make sure you are happy with what you have. Lord knows we'll never recover anywhere near the costs.
Good luck with the project!
11-24-2013, 08:53 PM
#11
Racer
Thread Starter
Member Since: Sep 2002
Location: Englewood CO
Posts: 293
Likes: 0
Received 0 Likes
on
0 Posts
Made a little bit of progress this weekend. Managed to get the driver side number 2 body mount bolt undone. I also removed all of the body mount bolts on the passenger side. The number 2 mount on the passenger side came out much easier after I got some good breaker bars on them. I ended up having to cut off the passenger side number 4 body mount bolt, same as driver side. I guess a lot of water gets kicked up there. Also managed to get the front bumper removed. That was a PITA but I'm glad it is done with.

Also removed the steering column.

I removed the parking brake connection and a few other electrical connections in the engine compartment. I think the only thing left is to disconnect the starter, radiator and some AC connections.
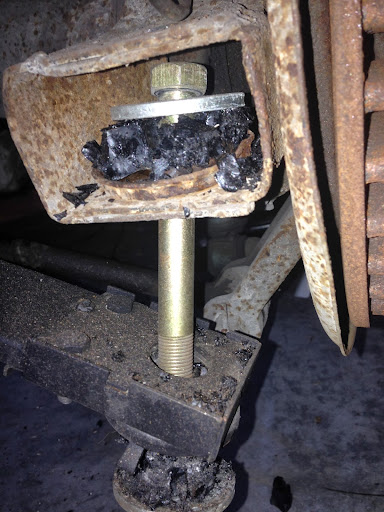
What are people's opinions on poly bushings compared to rubber? When I installed my leaf spring in 2004 I opted for the poly bushings because I thought they would have lasted longer than rubber but these have disintegrated. Below is a picture of it. I was surprised how much they have fallen apart, the spring has been pretty much unloaded since 2007 (car on jack stands).
Also removed the steering column.
I removed the parking brake connection and a few other electrical connections in the engine compartment. I think the only thing left is to disconnect the starter, radiator and some AC connections.
What are people's opinions on poly bushings compared to rubber? When I installed my leaf spring in 2004 I opted for the poly bushings because I thought they would have lasted longer than rubber but these have disintegrated. Below is a picture of it. I was surprised how much they have fallen apart, the spring has been pretty much unloaded since 2007 (car on jack stands).
12-08-2013, 09:57 PM
#12
Racer
Thread Starter
Member Since: Sep 2002
Location: Englewood CO
Posts: 293
Likes: 0
Received 0 Likes
on
0 Posts
Made some progress. Pulled the body and engine. Removed the steering linkages and I will being to take apart the front suspension. Only one real rusty area that needs to be taken care of is the rearmost driver side body mount.


12-10-2013, 07:41 PM
#14
Intermediate

Member Since: Aug 2013
Location: n.y.
Posts: 45
Likes: 0
Received 0 Likes
on
0 Posts
just purchased the same year and was thinking of doing the same thing,have a 383 stroker motor ordered also purchase new rotors,brakes,calipers,carpet floor pans,suspension kit,radiater power steering lines and lots of chrome etc,is there a manual on what bolts have to be removed,some of it looks pretty intimidating like steering column and wiring.thanks for any help my email is ernest3203@wmconnect.com

 01-18-2014, 01:47 PM
#17
Racer
Thread Starter
Member Since: Sep 2002
Location: Englewood CO
Posts: 293
Likes: 0
Received 0 Likes
on
0 Posts
just purchased the same year and was thinking of doing the same thing,have a 383 stroker motor ordered also purchase new rotors,brakes,calipers,carpet floor pans,suspension kit,radiater power steering lines and lots of chrome etc,is there a manual on what bolts have to be removed,some of it looks pretty intimidating like steering column and wiring.thanks for any help my email is ernest3203@wmconnect.com
http://www.corvette-restoration.com/..._Checklist.pdf
I also just inspected the car and looked for items that were attached to the frame and body. It really isn't all that hard. The hardest part is all of the rusty hardware, especially on the front and rear bumpers. Make sure you tag all electrical connections and take lost of pictures.
01-18-2014, 01:59 PM
#18
Racer
Thread Starter
Member Since: Sep 2002
Location: Englewood CO
Posts: 293
Likes: 0
Received 0 Likes
on
0 Posts
Things are going pretty slowly now. I managed to strip all of the components off of the frame. Next thing is to borrow a welder and fix the rust damage from the rear most body mount on the driver side. Once that is complete I will take the frame to get sand blasted. I was going to do the blasting myself but figured for something like the frame it will be a lot easier to have a professional do it. I think it will also work out cheaper since I probably won't be able to recycle as much of the blasting media as I would like. I will still blast the smaller items that need it as I move forward in the restoration.
I also have all of the paint I need to for the chassis when I get it back from the blaster. I decided to go with POR-15. From what I have read it seems to be very good as long as you prep it properly. I also am using Eastwoods internal frame paint on the inside.

I also have all of the paint I need to for the chassis when I get it back from the blaster. I decided to go with POR-15. From what I have read it seems to be very good as long as you prep it properly. I also am using Eastwoods internal frame paint on the inside.
01-18-2014, 02:02 PM
#19
Racer
Thread Starter
Member Since: Sep 2002
Location: Englewood CO
Posts: 293
Likes: 0
Received 0 Likes
on
0 Posts
Oh yes! I have a ton of pictures. I took pictures of every inch of the frame before I tore it down. I also bagged and labeled all hardware that I removed from the frame. Any electrical connection I took apart I would label both ends and take pictures. With larger items that I could not fit in bags I taped a label to it and secured its respective bolts. I am also trying to leave larger components together until I can get to them so I don't forget how to put them back together.