
Why are there so many shims under my valve springs?
 12-14-2013, 06:57 PM
#1
Drifting

Thread Starter


I put my new cam in last night and went to change out the springs today. After the 6th spring, I realized there were shims in the spring pockets.....so after going back and removing the last 6 springs, I started to wonder.....WHY are there so many shims here? Every valve spring had .095 of shim under it. Now Im really worried about my new cam working properly. I went back and looked at the build sheet I received with the car and all it says is 'CS175R camshaft and lifter kit' and 'Liberty Valve springs, 1.550 with dampner'. I know the heads also had new valve guide installed at that time also.
Should I consider the shims part of the last cam setup and now worry about them? When I ordered my new Hyd Roller cam set from Chris Straub, he told me no to worry about shims. These small details are killing me.
Should I consider the shims part of the last cam setup and now worry about them? When I ordered my new Hyd Roller cam set from Chris Straub, he told me no to worry about shims. These small details are killing me.


 :yes nod:
 12-14-2013, 07:42 PM
#3
Drifting
Thread Starter
 But Ill play the emoticon game too....
12-14-2013, 07:51 PM
But Ill play the emoticon game too....
12-14-2013, 07:51 PM
#4
Le Mans Master


I recall the shop that rebuilt my heads and installed valvetrain pieces (springs, keepers, locks, seals, etc.) shimmed my springs. Perhaps they found that the new springs and my stock valves were not a perfect match given the cylinder heads (ie. could they have been 'loose' when seated?).
My guess is that when you combine the heads, valves and springs, the springs were not properly seated and shims were necessary to establish correct spring seating.
My guess is that when you combine the heads, valves and springs, the springs were not properly seated and shims were necessary to establish correct spring seating.
Last edited by TedH; 12-14-2013 at 07:53 PM.
12-14-2013, 08:02 PM
#5
Drifting
http://www.lunatipower.com/Tech/Valv...pringTech.aspx
I think it is to achieve the proper installed height. The way I understand it, each time you do a valve job you are allowing that valve to sit deeper which will change the spring height. The shims can be used to correct this.
I hope this helps.
I think it is to achieve the proper installed height. The way I understand it, each time you do a valve job you are allowing that valve to sit deeper which will change the spring height. The shims can be used to correct this.
I hope this helps.
12-14-2013, 08:05 PM
#6

Scott,
The shims are there to obtain a certain installed valve spring height. If you need 150 pounds when the valves are closed, the springs need to be compressed a certain amount to get the 150 pound seat pressure. The spring rate and the height of the spring when installed with the shims should result in the 150# (or whatever the recommended seat pressure is). If the installed height is 1.900", then if you measured from the top of the installed shims to underside of the spring retainer where the spring top rides, you would get 1.900". Ideally, you should have an installed height figure for the new cam, a valve micrometer and various shims.
You must have given Chris some info that resulted in him saying to just swap the springs without messing with the shims.

Last edited by Super6; 12-14-2013 at 08:09 PM. Reason: Added photo.
12-14-2013, 08:10 PM
#7
Le Mans Master
http://www.lunatipower.com/Tech/Valv...pringTech.aspx
I think it is to achieve the proper installed height. The way I understand it, each time you do a valve job you are allowing that valve to sit deeper which will change the spring height. The shims can be used to correct this.
I hope this helps.
I think it is to achieve the proper installed height. The way I understand it, each time you do a valve job you are allowing that valve to sit deeper which will change the spring height. The shims can be used to correct this.
I hope this helps.
12-14-2013, 08:24 PM
#8
You can only talk about installed height in reference to a specific set of springs and the open and closed spring pressures required by a specific cam. An installed height of X might be great on one cam and spring combo, but it might not work for another set.
12-14-2013, 08:43 PM
#9
Drifting
Thread Starter
12-14-2013, 10:09 PM
#10
Team Owner

I can't believe that chris would say something that dumb.
You go to the spring or cam card and it lists just what Super6 said. Like last night I was doing my clients 427 BBC 135# closed at an installed height of 1.900 inches. A flat rate shop would probably check one intake and one exhaust and then shim away on the other seven cylinders.
Because these are old iron heads I have no idea if all spring were milled to the same depth or if all the valve seats were ground to the same depth.
It was a good thing because they had variations of up to .009 I used anywhere from .075 to .084 worth of shims. If I was stupid and ran no shims I might have had less than 100 pounds closed seat and the same loss of pounds at max lift
Last edited by gkull; 12-15-2013 at 04:51 PM.
12-15-2013, 12:22 AM
#11
Race Director

Member Since: Apr 2007
Location: South Western Ontario
Posts: 11,061
Received 845 Likes
on
721 Posts

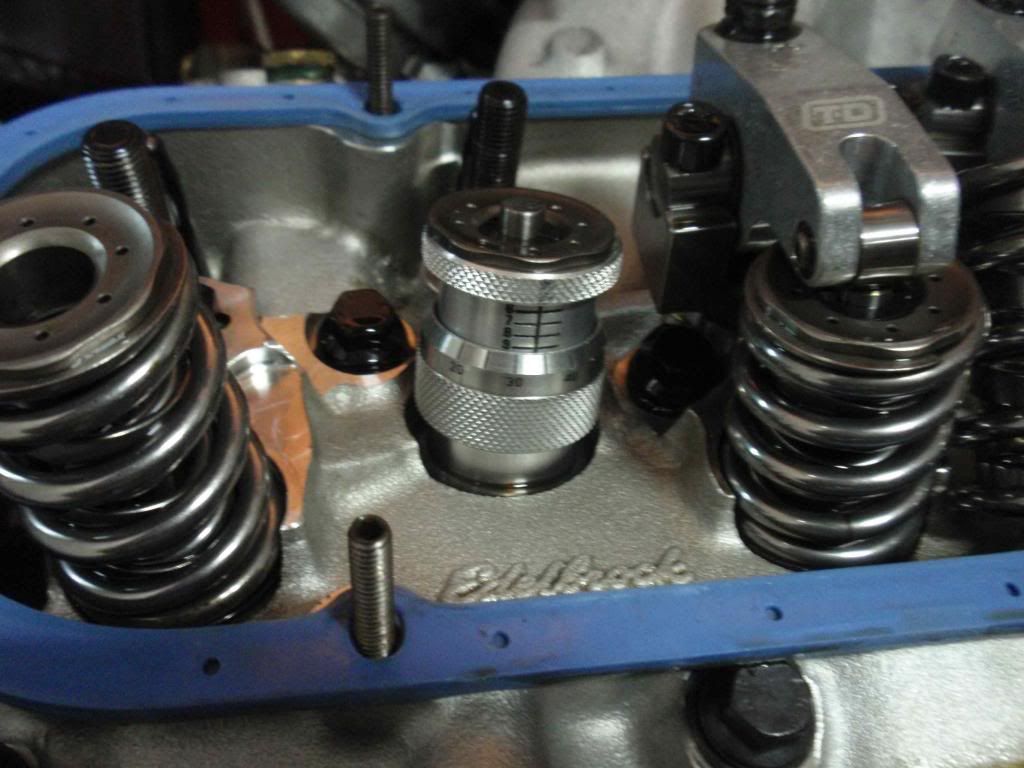
It would be a very bad idea to install the springs without using one of those handy "toys" that Super6 shows in his picture. Lots of bad things could happen to your engine by using the wrong installed spring height.
Lots of people do swap springs without measuring but they're basically keeping the shims as is and hoping the old spring height was correct as well as hoping the new spring uses the same installed height as the old spring. That's a lot of "hope" to gamble on.
Lots of people do swap springs without measuring but they're basically keeping the shims as is and hoping the old spring height was correct as well as hoping the new spring uses the same installed height as the old spring. That's a lot of "hope" to gamble on.
12-15-2013, 01:02 AM
#12
Team Owner
The only way you could say to just keep all the shims if you knew that the previous spring was set to the same installed height. But it doesn't sound like Scottd measured them ahead of time.
12-15-2013, 11:42 AM
#13
Drifting
Thread Starter
gkull, Im pretty sure my comment is not 'about the most stupid head statement you've ever heard'. Despite your positive reinforcement, Im going to press ahead with this thread. Some of us don't benefit from building engines daily. This is a learning experience for me. Now, if you'd like to be productive, help me thru the process. The way I understand it is I need to know my installed height (my cam card only says '1.54 OD single w damper 130# @ 1.9' I ASSUME 1.9 is the installed height?). Using a valve micrometer, I measure the height of the valve stem. Anything over 1.9 will require a shim? What kind of tolerance are we talking here?
The reason I took the old shims out was because the new springs are significantly longer than the old springs. There was .090 of shim under the old springs, and the new springs appear at least that much longer.
The reason I took the old shims out was because the new springs are significantly longer than the old springs. There was .090 of shim under the old springs, and the new springs appear at least that much longer.
Last edited by Scottd; 12-15-2013 at 11:51 AM.
12-15-2013, 04:50 PM
#14
Team Owner
Scott, I was referring to Chris somebody who knows better saying something like that.
Do you have the micrometer tool shown in Fred's picture? If not there is another way just using the rod end of a digital caliper.
Okay your cam card said 130# at 1.900 inches. I'm just going to ask this to be sure. Are your spring part numbers the same part number on your cam card? The reason I ask is the cam card printout is the recommended spring and you might have some substitution spring set or retainer set which could alter correct setup.
Are your heads on the motor? If they are do you have a spark plug hole air hose adapter?
Anyway look at the below picture and you can see the micrometer tool is set to something like 1.935 inches from the top of his shims to the bottom of the retainer held on the top of the valve stem with the keepers. If super6 was trying 1.900 he would have to add a .035 shim and recheck to verify.
12-15-2013, 09:35 PM
#15
Drifting
Thread Starter
gkull, thanks for the clarification. At first I was like 'man, what a dick'.....but seriously, Chris told me not to worry about it. My guess is that Chris has used this combo before and knows it works, but I know my heads have at least had a valve job so I really need to measure them.
PLEASE tell me the digital caliper method!!! The only thing thats holding me back right now is that I dont own a valve micrometer, and I dont want to spend 50 bucks for a one time use tool. After reading what everyone here has said, Ive got to at least measure it.
As for my springs, the only part number I can find are on the invoice, 'STR 1236 I' which I assume to be a Straub stock number.
The heads are still on the car, Im using an air hose. Its a labor intensive, monotonous project. I think Im going to put an add out to buy or rent someones micrometer as I really want to get this job going.
12-16-2013, 12:22 AM
#16
Team Owner
PLEASE tell me the digital caliper method!!! The only thing thats holding me back right now is that I dont own a valve micrometer, and I dont want to spend 50 bucks for a one time use tool. After reading what everyone here has said, Ive got to at least measure it.
As for my springs, the only part number I can find are on the invoice, 'STR 1236 I' which I assume to be a Straub stock number.
The heads are still on the car, Im using an air hose. Its a labor intensive, monotonous project. I think Im going to put an add out to buy or rent someones micrometer as I really want to get this job going.
Before we get too far. When you hook up an air plug to a cylinder even regulated down to say 60 psi. It can cause the motor to rotate. If you have a manual tranny put the tranny in gear. If you have an auto put a breaker bar on the damper crank snout bolt to wedge against the frame for each cylinder near when it is near TDC. You don't have to be exact. You just don't want the piston down so far that a valve could drop down in the cylinder. Another savior is to install the new valve guide seals. It keeps the valve from easily dropping while you are messing with the springs.
Okay open up the digital caliper to just over 2.00 inches. Then most all retainers never cover the whole spring. Put the caliper rod down in the spring pocket flush against the spring. then you push the caliper handle body down to touch the exposed spring edge. (not on the retainer)
So you said it had .095 stack of shims? with no shims your caliper might read lets say 1.950 inches. So you would remove the spring and install a shim combination equal to .050 inches and reassemble and remeasure.
You can buy all kind of shim thicknesses. But on a non race motor you don't have to be super **** about being perfect, but since springs lose tension within a few thousand miles. it is better to error up to .005 tighter.
Just take your time and do it nice

Last edited by gkull; 12-16-2013 at 10:31 AM.
12-16-2013, 12:24 AM
#17
Team Owner
Oh, I bought this tool and it saves so much time doing springs.
http://www.summitracing.com/parts/mor-62370/overview/
http://www.summitracing.com/parts/mor-62370/overview/
12-16-2013, 01:55 PM
#18
Drifting
Thread Starter
Okay, first you always zero the digital caliper closed tight. Just install a spring with retainers and keepers with no shims. You can use a small magnetic tipped tool to pluck them out.
Before we get too far. When you hook up an air plug to a cylinder even regulated down to say 60 psi. It can cause the motor to rotate. If you have a manual tranny put the tranny in gear. If you have an auto put a breaker bar on the damper crank snout bolt to wedge against the frame for each cylinder near when it is near TDC. You don't have to be exact. You just don't want the piston down so far that a valve could drop down in the cylinder. Another savior is to install the new valve guide seals. It keeps the valve from easily dropping while you are messing with the springs.
Okay open up the digital caliper to just over 2.00 inches. Then most all retainers never cover the whole spring. Put the caliper rod down in the spring pocket flush against the spring. then you push the caliper handle body down to touch the exposed spring edge. (not on the retainer)
So you said it had .095 stack of shims? with no shims your caliper might read lets say 1.950 inches. So you would remove the spring and install a shim combination equal to .050 inches and reassemble and remeasure.
You can buy all kind of shim thicknesses. But on a non race motor you don't have to be super **** about being perfect, but since springs lose tension within a few thousand miles. it is better to error up to .005 tighter.
Just take your time and do it nice
12-16-2013, 02:26 PM
#19
Team Owner
You see on Super6's picture how the retainers don't cover the top of the spring 100% You could use a tiny flat blade screw driver placed in the crack between the retainer bottom and top of the spring. You are measuring the distance from the bottom of the spring pocket to the installed height of the spring.
I don't know how to explain it any better and I don't have a camera at work
12-16-2013, 03:12 PM
#20
Melting Slicks


I put my new cam in last night and went to change out the springs today. After the 6th spring, I realized there were shims in the spring pockets.....so after going back and removing the last 6 springs, I started to wonder.....WHY are there so many shims here? Every valve spring had .095 of shim under it. Now Im really worried about my new cam working properly. I went back and looked at the build sheet I received with the car and all it says is 'CS175R camshaft and lifter kit' and 'Liberty Valve springs, 1.550 with dampner'. I know the heads also had new valve guide installed at that time also.
Should I consider the shims part of the last cam setup and now worry about them? When I ordered my new Hyd Roller cam set from Chris Straub, he told me no to worry about shims. These small details are killing me.
Should I consider the shims part of the last cam setup and now worry about them? When I ordered my new Hyd Roller cam set from Chris Straub, he told me no to worry about shims. These small details are killing me.
In a normal installation, when you know how many shims to use to get the required pressure, you can then find out if you have coil bind at the spring installed height with the shims, valve spring locators, valve spring retainers and locks in place.
Remember there are a lot of different style retainers and valve locks, as well as different height valves that need accomodation.
(my bad if this has already been said, but I was too lazy to read all the threads)