
Dash harness routing at steering column
 12-22-2013, 09:43 AM
#1


I am trying to install my steering column and found the dash harness main bundle of wires is blocking the column from sitting up flush with the bracket under the dash. Prior to this, I had the dash completely apart to redo dash pads. Needless to say, everything is really tight fitting in the dash and the factory did not leave much slack on some of the wiring leads for things like tach and speedo lights. To make maters worse, my car has AC so everything is 'jammed' in there. Not remembering exactly how this main harness was routed before, I took my best guess based on where I thought it should go, plus some factory bends set into the main wiring bundle. (Note I tried to use the AIM as a guide but there was not enough slack in wiring leads to be able to do it that way). I ended up routing the main bundle up over the top of the column. The switch (that the ignition controls) on the column is right where the main bundle is crossing over the top of it, so the column doesn't want to push up high enough. Has anyone run into this before or have advice as to how to run this dash harness?
Also, I need one of the aluminum spacers that gets epoxied to the side 'wings' on the column where it bolts up under the dash. Anyone know where to find one of these? thanks, Steve
Steve
Also, I need one of the aluminum spacers that gets epoxied to the side 'wings' on the column where it bolts up under the dash. Anyone know where to find one of these? thanks, Steve
Steve
 12-22-2013, 09:57 AM
#2
Le Mans Master


Member Since: Jul 2006
Location: charlotte north carolina
Posts: 8,117
Likes: 0
Received 100 Likes
on
92 Posts

i remember a post stating that the routing of the harness around the column was changed in 70. pm your e mail and i'll send you pics of my 70 as i disassembled it.
12-22-2013, 10:10 AM
#3
Melting Slicks

You need to install ALL the A/C duct work with the exception for the piece that runs from the center distribution to the drivers vent ball.
The large harness bundle going to the column ignition switch and turn signal connector starts at the top above and between the speedo/tach. From there it should fall down and go just to the right of the central column brace. This allows the column to bolt into the column brace. The harness will lie just in front of the drivers A/C vent duct source and you should from there be able to connect the harness to the column from the right/pass side of the column.
And...if you have a convertible you need to install the braces before installing the dash pads and harness.
12-22-2013, 10:23 AM
#4
You need to install ALL the A/C duct work with the exception for the piece that runs from the center distribution to the drivers vent ball.
The large harness bundle going to the column ignition switch and turn signal connector starts at the top above and between the speedo/tach. From there it should fall down and go just to the right of the central column brace. This allows the column to bolt into the column brace. The harness will lie just in front of the drivers A/C vent duct source and you should from there be able to connect the harness to the column from the right/pass side of the column.
And...if you have a convertible you need to install the braces before installing the dash pads and harness.
The large harness bundle going to the column ignition switch and turn signal connector starts at the top above and between the speedo/tach. From there it should fall down and go just to the right of the central column brace. This allows the column to bolt into the column brace. The harness will lie just in front of the drivers A/C vent duct source and you should from there be able to connect the harness to the column from the right/pass side of the column.
And...if you have a convertible you need to install the braces before installing the dash pads and harness.
12-22-2013, 10:56 AM
#5
Melting Slicks
Thanks. Are you saying I should have installed this ac ductwork before routing the wiring? (The large center plenum in front of the heater distribution box is the one that is 'tight'.) Not sure what you mean about the harness bundle going above and between the speedo / tach? Does it run above the entire assembly? If so, my wires are not long enough to do this. Steve
Harness - to be clear that we're talking about the same thing: The drivers side dash pad harness starts just above the fuse block, runs up toward the headlight switch, crosses over both the speedo & tach, then runs back down the right side of the pad into the center console where it supplies the center gauge cluster.
Now, right in the center of the speedo & tach there should be the column harness which falls down between the speedo & tach running to the right of the column bracket which the column bolts to. There's just enough room between the bracket and the A/C supply duct for the harness to run around the column bracket and back to the rear top of the column to connect to the ignition & turn signal connectors.
12-22-2013, 09:13 PM
#6
Thanks for the replies. I am going to take the drivers lower dash pad off and start again. I'll run the ac ductwork (less the short run to the drivers outlet), then try to run the harness up high over top of both the tach and speedo. When the large wiring bundle does pass over top of the column, is supposed to be in front of (interior side) or behind (engine side) of the sheetmetal covered switch on the column? Any other advice before I restart this project is appreciated.
Steve
Steve
12-22-2013, 09:38 PM
#7
PS - my car is a coupe. After thinking about this some more, I remember I already did try running the harness above the tach and speedo. There was no way all the gray leads for tach lights would reach down to plug into the back of the tach housing if I had the main harness up high. I believe I was ok on the speedo side, but not the tach. Has anyone else with a '70 run into this before? Steve
12-22-2013, 11:37 PM
#9
Nam Labrat


Member Since: Sep 2013
Location: New Orleans Loo-z-anna
Posts: 33,881
Received 4,153 Likes
on
2,726 Posts
I forgot to take pics of my dash harness before I pulled it out to replace some fried wires.
I had the same problem with bulb wires being "too short"....
I ended up removing some of the harness wrapping which gave me a few extra inches of gauge wiring---
just enough to reconnect everything without bulb connectors popping out while trying to situate the harness in the correct spot so the gauge panel would fit like it originally did.
It takes time to get the dash harness just right again.
12-23-2013, 08:41 AM
#10
Le Mans Master


Member Since: Jul 2000
Location: Saginaw Michigan
Posts: 6,001
Likes: 0
Received 98 Likes
on
81 Posts

BTW, those aluminum breakaway capsules were used on millions of GM steering columns in the 70s thru the 80s. They allowed the steering column to release from the vertical mounting bolts that held the column up into the dash structure. So a salvage yard with any number of old GM cars and trucks should be able to supply a replacement capsule.
Column mounting bolts passed through the capsules and held the column securely up into the dash structure. Those capsules were held in place on the steering column mounting bracket by injected plastic. In a severe frontal collision, the plastic would shear and the entire steering column and capsule bracket would slide out from the capsules and release the steering column from the dash mounting.
There may have been a few of them with angled slots (angled with respect to the capsule mounting surfaces). Your Corvette capsules had slots that were exactly parallel to the mounting surfaces. That would be the type that you want.
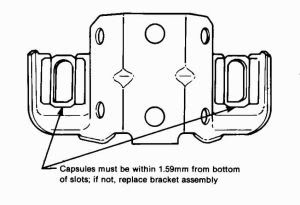
This picture doesn't show the side view necessary to see the angle of the mounting slots to the mounting surfaces.
Also, I would think that a small amount of epoxy glue could hold the replacement capsule to the column bracket (rather than injected plastic.)
Jim
Last edited by Jim Shea; 12-23-2013 at 08:47 AM.
12-23-2013, 09:21 AM
#11
Nam Labrat
Member Since: Sep 2013
Location: New Orleans Loo-z-anna
Posts: 33,881
Received 4,153 Likes
on
2,726 Posts
Ahhhh-ha......so that's why someone put large flat-washers on my mounting bolts----the capsules have been lost!
Thanks for the pic/info.....rookies need pics!
(your post/diagram is going to my modern-technology-wireless-printer right now.....lest I forget by Thursday/Merry Christmas!)
Thanks for the pic/info.....rookies need pics!
(your post/diagram is going to my modern-technology-wireless-printer right now.....lest I forget by Thursday/Merry Christmas!)
Last edited by doorgunner; 12-23-2013 at 09:24 AM.
12-23-2013, 03:27 PM
#12
Thanks Jim, I'll look around for those capsules. If anyone has or knows where to find them (all junk salvage yards around me only have cars from 2000's...), let me know.
Thanks for sending that link Fred. My conclusion from reading that thread, looking at the bends in my wires and my factory hooks in the 'low 4 o'clock and 8 o'clock positions', and from looking at pictures from another member's wiring harness: the AIM is not correct for '70. I am thinking that for '70 the bundle ran low along the tach and speedo and had a jog upwards in between the two to clear the column. I'm going to mess around with this wiring awhile longer (if and when it heats up here in the northeast). If I can't get them to route cleanly, I'll revert to method doorgunner used - I'll remove the factory black tape to hopefully allow more slack in the wires and try to run them like the AIM. Thoughts and ideas are welcome. Steve
Thanks for sending that link Fred. My conclusion from reading that thread, looking at the bends in my wires and my factory hooks in the 'low 4 o'clock and 8 o'clock positions', and from looking at pictures from another member's wiring harness: the AIM is not correct for '70. I am thinking that for '70 the bundle ran low along the tach and speedo and had a jog upwards in between the two to clear the column. I'm going to mess around with this wiring awhile longer (if and when it heats up here in the northeast). If I can't get them to route cleanly, I'll revert to method doorgunner used - I'll remove the factory black tape to hopefully allow more slack in the wires and try to run them like the AIM. Thoughts and ideas are welcome. Steve
12-23-2013, 03:44 PM
#13
Team Owner

Member Since: Sep 2006
Location: Westminster Maryland
Posts: 30,173
Likes: 0
Received 2,878 Likes
on
2,515 Posts
Hi Steve,
You might still be able to tell how the harness was routed by observing the harness clips mounted on the back of the tach and speedometer (if they haven't been moved).
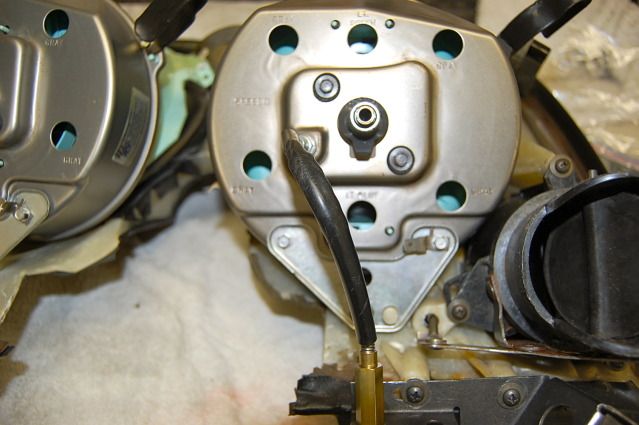
Here's a couple pictures from my 71, showing the clip locations, and note the fact that the harness passes over the column.
Perhaps they'll help you figure out what you have.
Good Luck!
Merry Christmas!
Regards,
Alan
Note the 2 large clips at the very top of the picture:
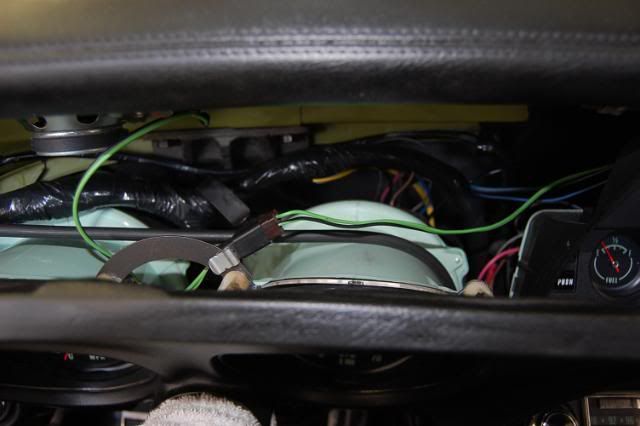
Note clip, harness passing above tach and speedo, and one leg of harness going down between tach and speedo:
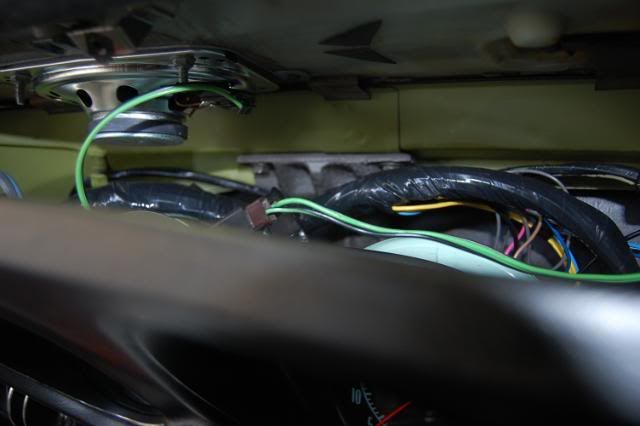
Harness headed down to center gauge bezel and heater/a/c controls:
You might still be able to tell how the harness was routed by observing the harness clips mounted on the back of the tach and speedometer (if they haven't been moved).
Here's a couple pictures from my 71, showing the clip locations, and note the fact that the harness passes over the column.
Perhaps they'll help you figure out what you have.
Good Luck!
Merry Christmas!
Regards,
Alan
Note the 2 large clips at the very top of the picture:

Note clip, harness passing above tach and speedo, and one leg of harness going down between tach and speedo:

Harness headed down to center gauge bezel and heater/a/c controls:

Last edited by Alan 71; 12-23-2013 at 03:46 PM.
12-24-2013, 04:52 PM
#14
Hi Alan. I hope things are going well with you. Thanks - those pictures are great. My large clips were mounted low and on backsides of tach and speedo on the ends of triangular braces where the tach and speedo grounds mount. I may try moving them to where yours is as thats more in line with what the AIM shows. It looks to me like your tach clip bends forward toward the front of car, and the speedo turns back towards interior side. And the wire bundle looks to also run from the interior side near the light switch, then towards the front of the car as it passes over top of the tach. Is that correct?
You too - have a Merry Christmas! Steve
You too - have a Merry Christmas! Steve