When you click on links to various merchants on this site and make a purchase, this can result in this site earning a commission. Affiliate programs and affiliations include, but are not limited to, the eBay Partner Network.
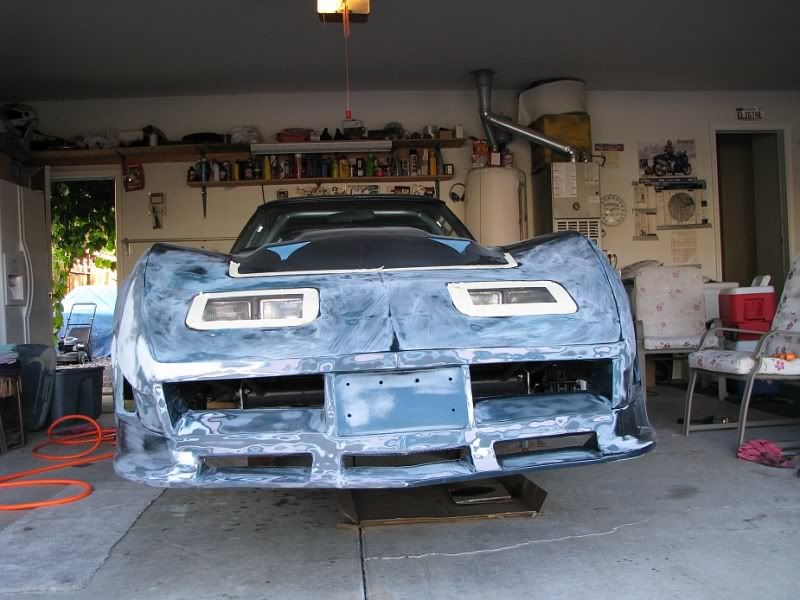
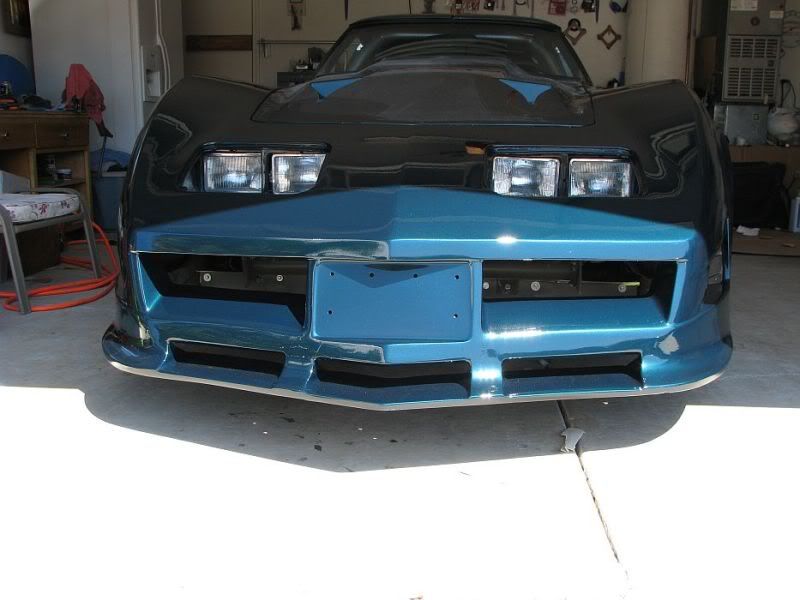
Years ago I put my front end on a weight diet and made the mistake of installing Ecklers Square head light kit. It made it possible to get rid of who knows how many pounds maybe even more than a 100 pounds off the front end that was out in front of the tires. All the metal vacuum tube, bumper, and head light opening stuff.
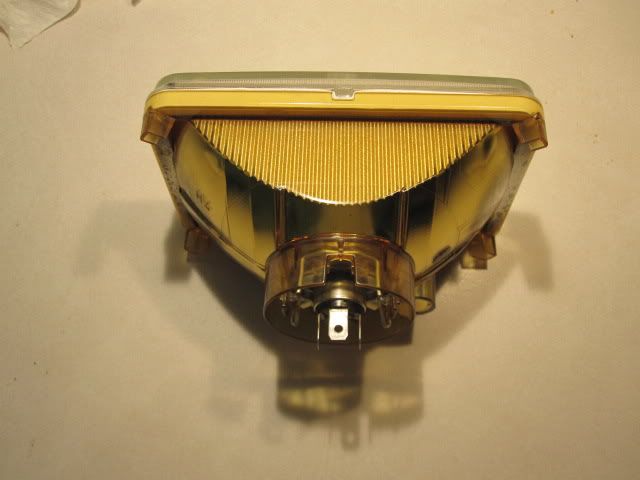
The problem is driving at night. The poorly designed ecklers boxes the square bulbs in and maybe cuts my lights output by some high %. I need to see while driving at night.
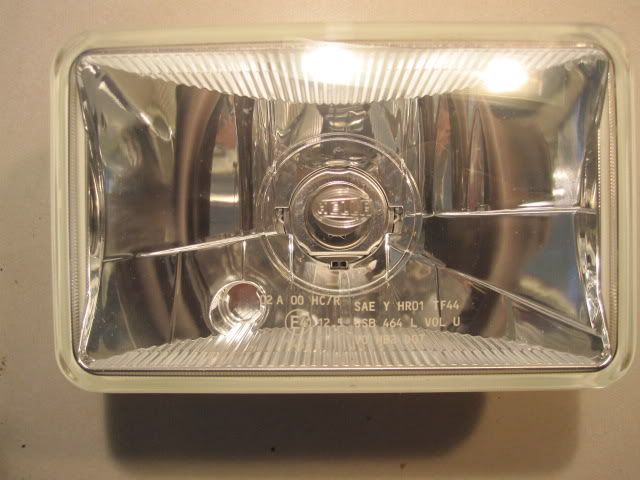
I have sylvainia halogen. I could not figure out the lumens. But would something like this work? Or even brighter because I do have a 100 amp alternator.
Don't you just love aftermarket parts that are supposed to make our C3's better?
The weight part was great! But a friend had bought these and did not install them. I was going to buy the rounded with the bubble lens covers like on the 24 hour of Le' Mans vettes.
I smashed up the passenger side front out road racing and repaired it all at home
Considering where you live, had you considered simply adding a set of HID Fog lights? There are a wide variety of sizes and shapes out there ansd the cost isn't really that high. Here's just one set for under a hundred. http://www.ebay.com/itm/04-05-Acura-...tVp-S8&vxp=mtr
The fabrication work you did in the nose of the car looks terrific.
Don't you just love aftermarket parts that are supposed to make our C3's better?
do you only run stock parts...like bias tires? but to answer your question, I love some aftermarket stuff and some of it I hate...I always liked the recessed headlights....been hunting the 68-72 set for a while now.
Back to the topic at hand, the quad rectangle lamps can shine as well as the round stock lamps However,
I have seen too many quad conversions get trashed because the installer didnt know to rewire the lamps to light correctly...
( thanks ecklers )
If you did do that then sure wiring the lamps with relays and better bulbs will also help light things up...
Upgrade your wires w/ relays and heavier gauge as Shark Racer said.
Get rid of the sealed beams- get some that have a replaceable bulb. You can then run some 80/100w H4 bulbs and 100w H1 bulbs for highs.
AND when the LED technology gets better- you can upgrade to LED replaceable bulbs.
The problem is how they are boxed in and impend the light out to sides. I think the best idea is to mount bright driving lights down lower with the correct right aim
George - did you already do relay conversions for your headlamp wiring? Putting some nice heavy gauge wire will help light output a lot.
I need to get over to see you two some day. This motor I have in is just fun with the 5 speed and 3.55 rear. It makes the first four better than my 4.11 even though I still have the 11 pound fly wheel
do you only run stock parts...like bias tires? but to answer your question, I love some aftermarket stuff and some of it I hate...I always liked the recessed headlights....been hunting the 68-72 set for a while now.
Back to the topic at hand, the quad rectangle lamps can shine as well as the round stock lamps However,
I have seen too many quad conversions get trashed because the installer didnt know to rewire the lamps to light correctly...
( thanks ecklers )
If you did do that then sure wiring the lamps with relays and better bulbs will also help light things up...
Bats.....I have a set of the recessed lights. I bought them off E-Bay because the seller said they would fit a 76. They do not. I'm not sure how the contours are on your car but if they might fit I could send them to you. PM if interested
Bats.....I have a set of the recessed lights. I bought them off E-Bay because the seller said they would fit a 76. They do not. I'm not sure how the contours are on your car but if they might fit I could send them to you. PM if interested
I was just on eckelrs site and the kit I saw was 75-82. That's the only one that came up for my 77, but I assume their is a ??-74 kit and maybe that is the one you have.
I need to get over to see you two some day. This motor I have in is just fun with the 5 speed and 3.55 rear. It makes the first four better than my 4.11 even though I still have the 11 pound fly wheel
Name the day and the kind of beer you'd like. Let's do it.
I also did that change , saved a lot of weight BUT I modified it .
I also do not use the glass lense cover
First what I did was pace the head light buckets ABOVE the oem mounting pads and made z brackets for that front area , the rear still use the OEM holes but drilled slightly off set.
I then used 2 sided automotive tape and installed the buckets flush to the fiberglass nose and bolted them down. This prevents a lense from reflecting light and deletes the UGLY trim ring and makes the install smooth and OEM appearing
To fix brightness increase gauge of wires and get power direct off alt instead of through harness.
I was just on eckelrs site and the kit I saw was 75-82. That's the only one that came up for my 77, but I assume their is a ??-74 kit and maybe that is the one you have.
originally ecklers sold 3 different c3 part numbers 320 was 68-73 520 was 73-74 then 620 was 75-81,
Now I believe it's just two part numbers...the early and late have a different whooptie at the front inner edges....they do not exchange easy.
I want the old early kit just because I dig old school....
Thanks to all for this thread and it's interesting info.
I bought a set of these Ecklers lights long ago for my 71 and they are still in a box. I have recently come back to the project so the car is not yet finished.
It looks to me that the factory opening is just too small for your setup.
To bad you just came back from the paint booth, because I think you should enlarge the factory opening by about 3/4 inch on each side and then fix the headlight trim insert to match.
It's alot of work, but in the end you should get good night illumination.
If the old stock sealed beams and boarder line factory wiring doesn't get the light out as you desire There are plenty of modern lamps/bulbs options that will fit in the old ecklers recessed buckets and flood things with light...no need to make a mountain out of a ant hill....
Same thing happened to me. I called Eckler's and they emailed me the instructions that originally came with the kit. The last step is to swap the location of the wires around.
If the old stock sealed beams and boarder line factory wiring doesn't get the light out as you desire There are plenty of modern lamps/bulbs options that will fit in the old ecklers recessed buckets and flood things with light...no need to make a mountain out of a ant hill....
I have good 12 gauge wiring and the brightest sylvainia halogen square lamps. The box impedes all light dispersion off to the sides.
I didn't change the hole size because if I ever wanted to reinstall my pop ups with an electric motor
I've decided to install two driving lights down lower

 11-24-2015, 05:21 PM