
2780#, and a couple more mods planned.
 07-26-2016, 09:05 PM
#1
Tech Contributor
Thread Starter
Member Since: Jun 2004
Location: I tend to be leery of any guy who doesn't own a chainsaw or a handgun.
Posts: 18,354
Received 768 Likes
on
550 Posts

Finally got around to getting the car weighed. I usually weigh it at the track (Heartland Park Topeka), but they've been having financial problems the past couple years and there hasn't been any track days there for a while. So, I dropped by a truck stop today near the interstate and paid my ten dollars to satisfy my curiosity. The weight is with 1/8 tank of fuel, and full factory interior (but lighter '79 seats). Track day weight is a bit heavier (about 40#), as I run with about five gallons of fuel in the car each session, and an undercar bellypan to reduce drag and lift a touch. For autocross I run without the bellypan, and generally remove the T-tops and rear window, so the car is about 30# lighter for that.
I got two more projects planned to pull some more weight out. I'm pulling off the '82 batwing (attached to my stock iron differential), and going to replace it with a C4 batwing. There's about a 7# difference between these two batwings, and I'll also be able to get rid of the spring mount adapter I welded up to be able to use the Z51 C4 spring on a C3 batwing.
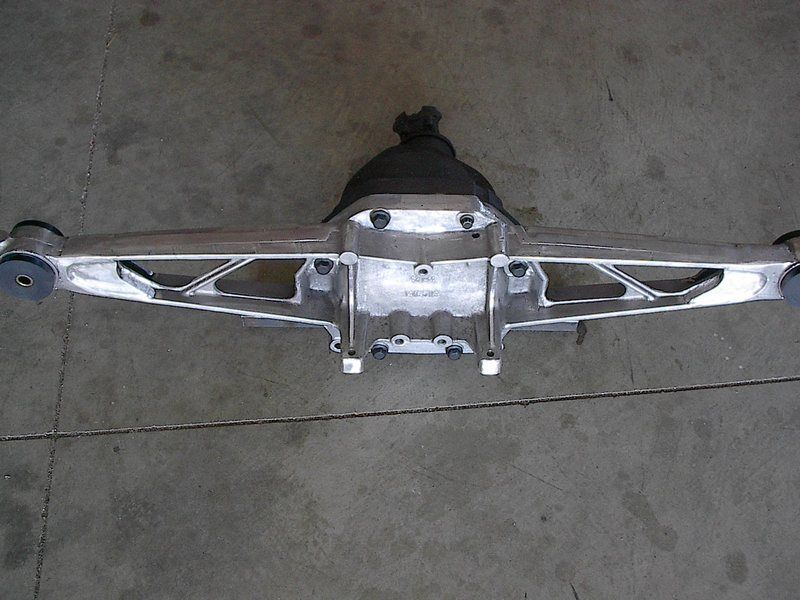
The other item is an aluminum front suspension crossmember (ala C5). I'm hoping for a 5-10# reduction with that piece. The current crossmember is removable (I fab'd it up to put a '96 C4 front suspension on the car years ago), so I'm just planning on making a jig to capture the frame mounts and LCA points off the current piece, and then just finish welding up the new crossmember in that jig.
I got two more projects planned to pull some more weight out. I'm pulling off the '82 batwing (attached to my stock iron differential), and going to replace it with a C4 batwing. There's about a 7# difference between these two batwings, and I'll also be able to get rid of the spring mount adapter I welded up to be able to use the Z51 C4 spring on a C3 batwing.
The other item is an aluminum front suspension crossmember (ala C5). I'm hoping for a 5-10# reduction with that piece. The current crossmember is removable (I fab'd it up to put a '96 C4 front suspension on the car years ago), so I'm just planning on making a jig to capture the frame mounts and LCA points off the current piece, and then just finish welding up the new crossmember in that jig.
 07-27-2016, 01:55 AM
#2
Team Owner


Very lite...... our local Reno-Fernley road racing track also closed. Local division road racing does all there events at Thunder Hill California which is beautiful, but 180 miles away for the San Fransisco SCCA and other groups events.
I was really looking forward to burning up my last sets of slicks just to get rid of the space they were taking up.
Could you post some pics of your front suspension?
I was really looking forward to burning up my last sets of slicks just to get rid of the space they were taking up.
Could you post some pics of your front suspension?

The following users liked this post:
69427 (08-10-2016)
07-27-2016, 08:12 AM
#4

Got a list of the major weight saving mods you did?
Also Heartland Park is (was) a great facility! I used to do track days on my motorcycle there before they closed. I saw that they reopened again this year so I'll try to get down there this fall.
Also Heartland Park is (was) a great facility! I used to do track days on my motorcycle there before they closed. I saw that they reopened again this year so I'll try to get down there this fall.
07-27-2016, 09:42 PM
#5
Tech Contributor
Thread Starter
Member Since: Jun 2004
Location: I tend to be leery of any guy who doesn't own a chainsaw or a handgun.
Posts: 18,354
Received 768 Likes
on
550 Posts
Very lite...... our local Reno-Fernley road racing track also closed. Local division road racing does all there events at Thunder Hill California which is beautiful, but 180 miles away for the San Fransisco SCCA and other groups events.
I was really looking forward to burning up my last sets of slicks just to get rid of the space they were taking up.
Could you post some pics of your front suspension?
I was really looking forward to burning up my last sets of slicks just to get rid of the space they were taking up.
Could you post some pics of your front suspension?
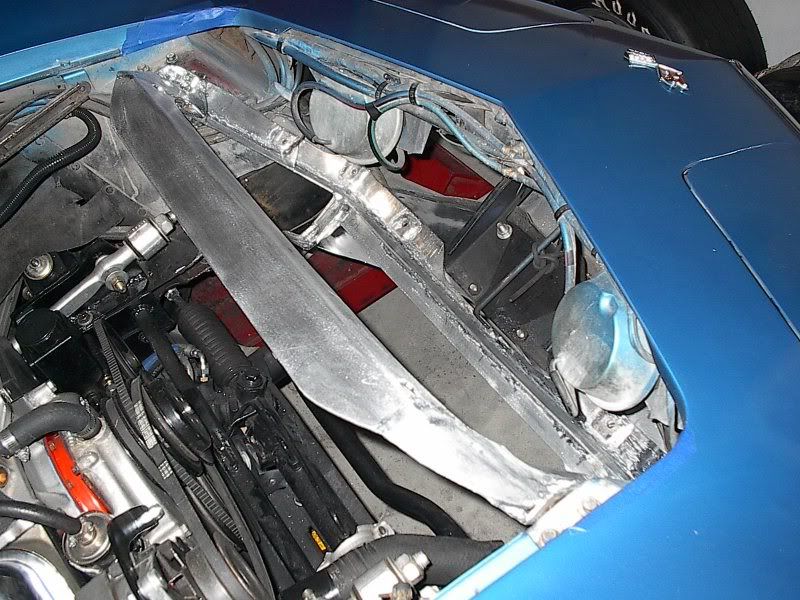
Here's an old picture taken while I was still modifying the (spare) frame and one while I was swapping out the frames. The original frame and suspension is now sitting in a corner of the garage.

 07-28-2016, 09:38 PM
#6
Tech Contributor
Thread Starter
Member Since: Jun 2004
Location: I tend to be leery of any guy who doesn't own a chainsaw or a handgun.
Posts: 18,354
Received 768 Likes
on
550 Posts
 ) so I'll just make a short list for now.
Aluminum:
C4 suspension
Wheels -32
Wilwood calipers -32#
Engine
Radiator -12#
Radiator support & Xmember -9#
Hood hinges
P/S bracket
Transmission crossmember -10#
Shifter bracket -2#
Exhaust system back half -12#
Differential pinion bracket
C3 Differential cover/batwing -15#
Halfshafts
Lighter parts:
Grand Am p/s pump -6#
Denso alternator -4#
C4 brake booster -4#
C5 master cylinder -7#
C4 PMGR starter -9#
Wilwood rotors -8#
L88 flywheel/clutch -20#
tubular shifter linkage
'79 Corvette seats -22#
Lawn tractor battery -15#
Composite rear spring -32#
Last edited by 69427; 07-28-2016 at 10:00 PM. Reason: To reduce chance of additional web connection issues
08-01-2016, 08:46 PM
#7
Tech Contributor
Thread Starter
Member Since: Jun 2004
Location: I tend to be leery of any guy who doesn't own a chainsaw or a handgun.
Posts: 18,354
Received 768 Likes
on
550 Posts
Doing some test fits with the C4 batwing on one of my spare C3 differentials. The batwing arms are narrowed 3" total to fit the narrowed C4 suspension (stock C3 trackwidth). I welded up the cover holes and redrilled it for the C3 cover pattern. I also had to weld/drill/tap a place for the lube plug in the cover, slightly above the spring center. The C4 cover modification nets out a 5# weight reduction (on top of the 15# weight reduction when installing a C3 batwing).
The test fit went well. I welded in some temporary pieces to form a jig to retain the differential in the correct spatial position. I now need to finish cutting and grinding off the old batwing frame mounts so I can weld in the new mounts. (For the NCRS crowd, this is an old spare frame under the car. The original frame is sitting unmolested in the corner of the barn.)

With the C4 cover in place, I should be able to pull an additional 5-6 pounds off the car (for a total of 10 or 11 pounds net reduction) as I no longer need to use the steel adapter brackets I welded up years ago to make the C4 spring and toe rods fit the C3 batwing.


The following users liked this post:
69427 (08-10-2016)
11-07-2016, 09:14 PM
#9
Tech Contributor
Thread Starter
Member Since: Jun 2004
Location: I tend to be leery of any guy who doesn't own a chainsaw or a handgun.
Posts: 18,354
Received 768 Likes
on
550 Posts
A couple guys asked for a bit more detail on some of the weight reduction items, so I'm digging up a few pictures when I can.
A while back I swapped out the original master cylinder and brake booster for a C5 m/c and a C4 booster (I like using GM parts when I can). A couple benefits: The m/c is 6-7# lighter, and the C4 booster ('84) is about 4# lighter, for a good 10# off the left side of the car. The other benefit is that I can pull the booster off in about seven minutes if I need to replace it. I don't take a lot of pictures, so all I've got here is a picture during assembly, before adding the booster adapter top cover and cleaning up my mess:

My first TIG project years ago was a radiator support replacement. I think it was about 5# lighter than the stock piece. Here's during a trial fit before finishing and grinding/sanding/painting black. (Also, at the LF of the engine is an '89 Grand Am p/s pump and aluminum bracket. Six pounds lighter than the stock setup.)
And painted.
The medium gloss black paint works well. Haven't had a single person notice that it's not the factory piece.
A while back I swapped out the original master cylinder and brake booster for a C5 m/c and a C4 booster (I like using GM parts when I can). A couple benefits: The m/c is 6-7# lighter, and the C4 booster ('84) is about 4# lighter, for a good 10# off the left side of the car. The other benefit is that I can pull the booster off in about seven minutes if I need to replace it. I don't take a lot of pictures, so all I've got here is a picture during assembly, before adding the booster adapter top cover and cleaning up my mess:
My first TIG project years ago was a radiator support replacement. I think it was about 5# lighter than the stock piece. Here's during a trial fit before finishing and grinding/sanding/painting black. (Also, at the LF of the engine is an '89 Grand Am p/s pump and aluminum bracket. Six pounds lighter than the stock setup.)

And painted.

The medium gloss black paint works well. Haven't had a single person notice that it's not the factory piece.
Last edited by 69427; 07-26-2017 at 08:50 PM.
11-07-2016, 09:26 PM
#10
Tech Contributor
Thread Starter
Member Since: Jun 2004
Location: I tend to be leery of any guy who doesn't own a chainsaw or a handgun.
Posts: 18,354
Received 768 Likes
on
550 Posts
It's getting tougher to find the big reductions, so occasionally I spend a few free moments working on the small stuff. I replaced the hood hinges with aluminum duplicates, 3.2 ounces each versus 9.2 ounces. Less than a pound total, but it's up front and up high so it's worth it to me. Photo before sanding and painting black:

Mid way through building the pinion bracket. About 3/4 of a pound reduction, and a fun way to use my new-at-the-time spool gun.

Mid way through building the pinion bracket. About 3/4 of a pound reduction, and a fun way to use my new-at-the-time spool gun.
Last edited by 69427; 07-26-2017 at 08:57 PM.
11-07-2016, 09:39 PM
#11
Tech Contributor
Thread Starter
Member Since: Jun 2004
Location: I tend to be leery of any guy who doesn't own a chainsaw or a handgun.
Posts: 18,354
Received 768 Likes
on
550 Posts
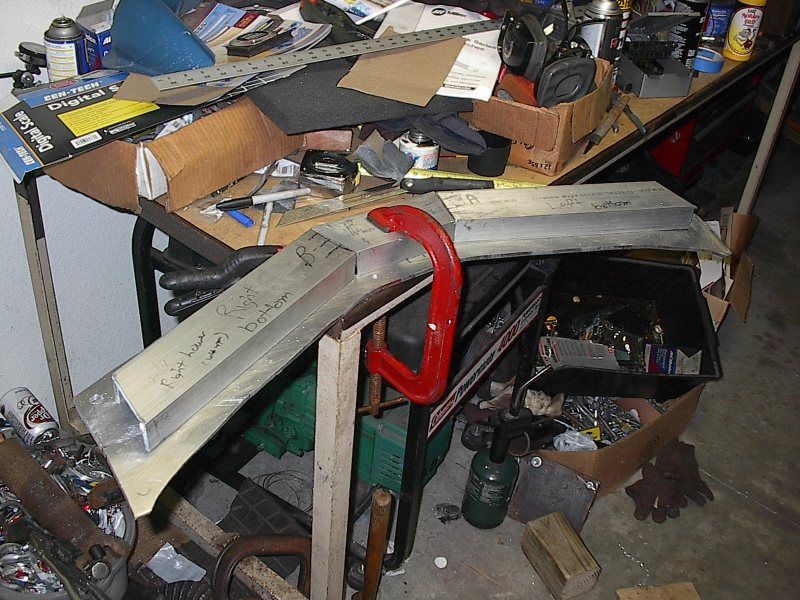
This may have been my first aluminum project a hundred years ago. I made this replacement radiator lower crossmember. I followed the general shape of the stock piece, and then painted it medium black afterward. About 4-5 pounds lighter (up front!). Very early in the process (Pardon the mess. That part of the garage doesn't get much TLC):
 11-07-2016, 09:46 PM
#12
Tech Contributor
Thread Starter
Member Since: Jun 2004
Location: I tend to be leery of any guy who doesn't own a chainsaw or a handgun.
Posts: 18,354
Received 768 Likes
on
550 Posts
I hate to use non-GM parts, but I couldn't find any GM alternators lighter than the stock 37Amp unit that was stock in my car. I found this Denso 42Amp unit at a junkyard for five bucks, and replaced the stock alternator that I had previously moved to the right side of the car to try to more even-out the side to side weight. Four pounds less up front and up high.

Last edited by 69427; 07-26-2017 at 09:04 PM.
11-07-2016, 09:57 PM
#13
Tech Contributor
Thread Starter
Member Since: Jun 2004
Location: I tend to be leery of any guy who doesn't own a chainsaw or a handgun.
Posts: 18,354
Received 768 Likes
on
550 Posts
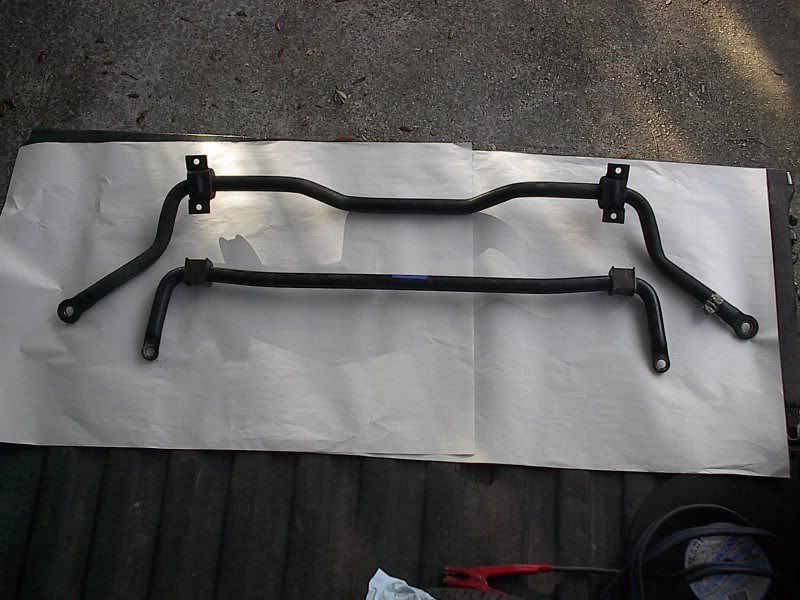
Ran a 1 1/8" front bar for a lot of years, but was always less than happy about the weight of those things, particularly because the weight is ahead of the front axle line. Looked around the junkyards until I found a replacement bar that might work. It was a 1 3/16" OD bar off a 93 Firebird. The spacing between the frame mounts was pretty close, but the arm length was too long. I cut the arms shorter and welded some ends that would fit my heim joint links. Works great on the car, and 4# off the front end.


 11-09-2016, 10:51 PM
#17
Tech Contributor
Thread Starter
Member Since: Jun 2004
Location: I tend to be leery of any guy who doesn't own a chainsaw or a handgun.
Posts: 18,354
Received 768 Likes
on
550 Posts
Edit: The damn thing is finally working today.
Edit again: Using Tinypic:
Here's a picture of an old junk C3 booster and the '84 booster. (A couple years ago I bought a C6 booster to try out, but it was only a couple ounces lighter, and not worth all the headache to install.)

The '84 booster is shorter, so that gave room to make an aluminum adapter to connect the two stud '84 booster to the firewall which is setup for the C3 four stud booster. The brake pedal rod was longer on the '84 booster (and it had a different attachment rod end), so I cut the extra length off and threaded it to take a clevis for ease of attachment to the brake pedal arm. The (unfinished in this picture) adapter shows the two holes that the booster bolts to, and the plate hanging in space inside the adapter was welded to the opposite side, making a rectangular box of the appropriate depth. This plate has the four holes in it to bolt to the firewall.

The assembly order goes as such: The adapter bolts to the firewall (pretty simple and quick), then the booster bolts to the adapter, and then the C5 m/c bolts up to the booster. The pilot hole in the booster is an eighth of an inch bigger in diameter than the C5 m/c rear section, so I made a 1/16" thick aluminum sleeve/ring that installs in the booster pilot hole, and then the m/c slides in securely. Oh, I also had to slightly tweak/elongate the attachment holes in the m/c. For the life of me I don't understand why Chevrolet didn't commonize the pilot hole size and the bolt hole spacings over the years. It sure seems like a good backup plan in case there are supplier issues, and the booster or m/c from other model years could be quickly qualified for production use.
In the event of any future booster problems, I can replace the booster in about ten minutes (two nuts at the m/c, two nuts at the back of the booster, and the cotter key removal at the clevis pin). The hardest part of the deal is just removing/replacing the clevis pin at the pedal arm.
I've got a nice firm brake pedal with this setup. The booster assist level is sufficient, and there's ten less pounds up high and off the left side of the car. So far a win, win, win.
Last edited by 69427; 07-26-2017 at 09:12 PM. Reason: Added content.
The following users liked this post:
mmcfearin (11-21-2016)
11-10-2016, 08:35 PM
#18
Tech Contributor
Thread Starter
Member Since: Jun 2004
Location: I tend to be leery of any guy who doesn't own a chainsaw or a handgun.
Posts: 18,354
Received 768 Likes
on
550 Posts
Don't have any pictures, but that shouldn't be necessary anyway. I was able to pull some decent weight out with four items. These were:
DeWitts aluminum radiator. This piece was 12-13# lighter than the stock brass radiator. The radiator cools so well that if I had a bit more loose cash sitting around I'd order a smaller version just to reduce the amount of water weight up front.
Later C3 steering column support. Mine had the damn heavy cast iron piece that was about 12-13#. The later stamped steel pieces are about 6-8# lighter.
Later C3 seats. I traded away some unneeded C3 suspension parts for a pair of '79 seats. They're about 25# per pair lighter than the stock '69 seats, and have a bit more side support in them. Nice for track days.
Lightweight battery. Over the years I just kept buying smaller and lighter batteries for the car. One day while trying to figure out the next item to pull out weight I wondered if the battery in my garden tractor would start the Corvette. A big block is a lot of mass to turn over, but I do have a C4 PMGR starter (-9#) on it, which should require less amperage draw, so what the heck. For amusement I disconnected the car battery and hooked some jumper cables to the tractor battery, and hot damn, it cranked right over! The tractor battery is 300CCA, 375CA, 16#, and $29.95 at the local Farm & Fleet store! This was 14# lighter than the battery I was using. I pulled the old battery out and made some hold-down clamps for the new battery, but I put this smaller battery in the passenger side compartment to get more weight off the left side. I ran the negative cable out the bottom of the compartment and attached it to the frame, pretty much a mirror image of the original negative battery cable. For the positive lead I routed a small cable (about 18-24" long IIRC) out of the left compartment, under the center compartment, and into the righthand compartment, fastening it to the original positive battery cable. No drilling or cutting of the bodywork to connect all this. So far this battery has been in the car for four years. Once it gets weak I'll throw it into the tractor and buy another thirty dollar battery for the car.
The following users liked this post:
C3 Stroker (11-10-2016)
11-10-2016, 09:49 PM
#19
Race Director


Thanks much for the write-up.
When I did the manual conversion on my 78, I put a booster in that was firm but very reactive once you got into the pedal a bit. After that, I switched to a Cardone reman which felt like my OE booster - sloppy(lots of takeup/"trigger creep") but predictable, and it brakes well. Just a weird feeling getting into it after a while.
Sounds like something I should consider...
11-13-2016, 08:11 PM
#20
Safety Car


Member Since: May 2004
Location: los altos hills california
Posts: 3,609
Received 1,126 Likes
on
730 Posts
A lot of stuff on our cars is just point-to-point on/off. I don't know what our harnesses weigh and am not inclined to find out. But looking at your skill set, seems to me you've got the right background to dig into it a little.
You did ask!