When you click on links to various merchants on this site and make a purchase, this can result in this site earning a commission. Affiliate programs and affiliations include, but are not limited to, the eBay Partner Network.
My winter project has been upgrading my 78 4spd to a 78 5spd. I took advantage of Silver Sports Black Friday sale and pulled the trigger. Been working in an unseated garage for the last few weeks, breaking the big swap I to small, easily achievable steps. Just stabbed in the transmission this afternoon on my second attempt, and thought it a good idea to document what I learned for anyone that may do this in the future.
I am keeping the fixed crossmember, primarily because I cannot weld. The swap would be lots easier without it there, so if you have the abilities, save yourself the trouble. Most of these tips won't be of benefit if you can drop the crossmember.
The Muncie came out easy. Got to fight the rear pinion driveshaft bolts for a few days but they eventually spun out. Once that was done, piece of cake. I pulled the exhaust as far back as I could to have as much room as possible to do the swap.
First tip - unbolt the starter cable that runs through the trans tunnel. I did not do this before getting the trans in place and found I could not tilt the unit enough to sneak the bellhousing by the input shaft. Moving the cable out of the way gave just enough space to squeak by. 10mm ratcheting wrench made it easy.
Second, I made the modified clutch alignment tool per the instructions. After having some interference on my first attempt and seeing the space available inside the bellhousing, I bought another alignment tool and used it as is. There is some slop that you can correct with a full size tool to get the clutch disk properly set in place.
Third, I bought a flywheel spanner for my second attempt after fiddling with the crank bolt on the front of the engine to turn it over. That was a mess! The spanner made it so much easier. $25 well spent on Amazon
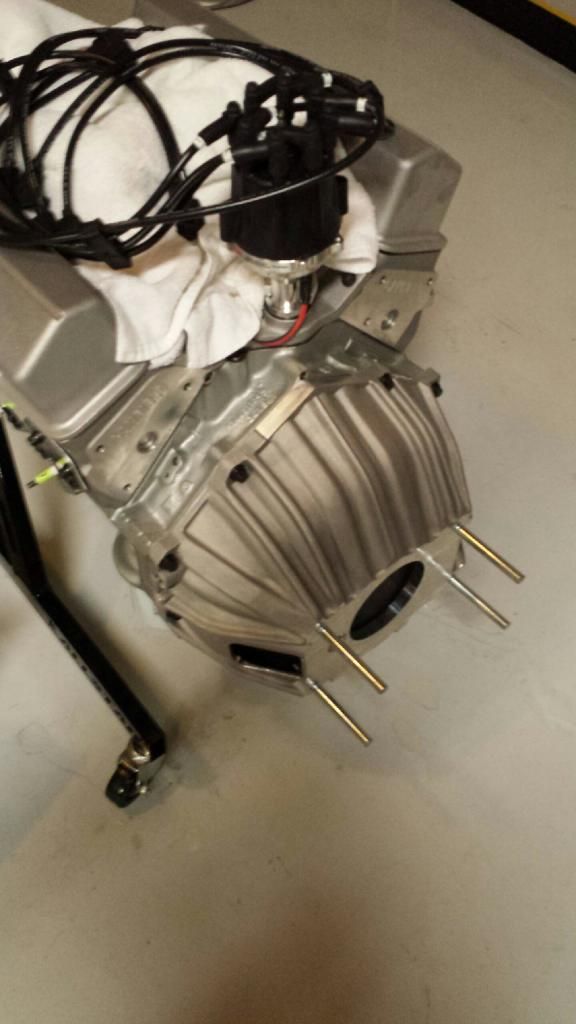
Fourth tip that simplified my second attempt was that I fabbed up some guide bolts. Started with 1/2" bolts that were 8" long. Cut them down to 4.5" and notched the top to allow a screwdriver to back them in or out. I made four, one for each bellhousing hole, but found out the top two bolts were interfering with the transmission. Backed the trans out far enough to remove the upper guide bolts, then slid the trans home so smoothly that I banged my thumb between the trans and crossmember. Minor injury that was a small price to pay to have that part of the job done!
I am doing this swap by myself, with the car on a kwiklift. A transmission jack is vital. Because the kwiklift raises the car up higher than standard jack stands, I built a platform to get enough travel for the jack.
The flywheel spanner I purchased is a Lisle 23800. Worth it's weight in gold.
I'll add more as I go thru the reassembly process, but enjoying a cold one now for all the efforts!
Good idea on the guide bolts. I don't understand the modified clutch alinement tool. I've always been able to use the tool sent with the new clutch and pp
I'm a firm believer in SFI flywheel and blow proof bell housings
I had a heck of time getting the clutch to line up correctly with the transmission shaft when I did my rebuild in 2014 on the 78...finally read on a suburu site that once you get the tranny close to the bell housing, I hooked up the clutch linkage, had an assistant step on the clutch in the car and bamoo everything slide right on...simple and really much easier than fighting the two...
The saving grace of the tko is that it is 26 spline just a small amount of rotation and it fits right through the clutch If you dialed in the bell housing to under .002 it's not a problem
The saving grace of the tko is that it is 26 spline just a small amount of rotation and it fits right through the clutch If you dialed in the bell housing to under .002 it's not a problem
George raises a good point that is worth repeating. You need to be sure that you have dialed in your bell housing to specifications. People have posted issues with their TKO trannies eating bearings early due to misalignment. The TKO seems to be sensitive to this issue.
It's a big investment, be sure to get it right.
You are going to LOVE it by the way, that 5th gear makes it a completely different car.
Looking forward to getting it on the road! Have a clutch issue that may involve pulling trans to replace clutch fork - hope not as everything is all buttoned up for now.
Tips from reassembly (these are more like clarifications on the SST instructions):
1) The green tube of lubricant is for the speedometer cable. Pull it out through the. End that connects to the speedometer and lube it up.
2) To assemble the speedometer driven gear, the o-ring sets on top of the cable, then the plastic driven gear slides over the end and is clamped into place. I wiped a bit of ATF on the gear before inserting it into the trans.
3) If you are using an undercar exhaust, bend the outer flanges of the support bracket that is sandwiched between the trans and the isolator bracket. I didn't do that and got to really work the exhaust clamps into position. I was able to do some bending with some channel locks, but it would have been easier without the exhaust sitting right there.
If you are converting from an original 4-speed to a TKO, or even just changing the clutch, I ended up replacing both my clutch fork and my pivot ball. I think a fair guess that both were original with 118k miles on them. After initially installing trans and buttoning everything back up, my clutch worked like this:
I had a new flywheel, clutch, throw out bearing, pilot bearing, transmission and driveshaft, so aside from the bellhousing, only other parts original to the car were the fork and pivot ball.
I ordered the Lakewood 15501 adjustable pivot ball and the Chevy performance clutch fork from Summit. Unbolted everything and when the parts showed up, put it all back together.
The main culprit to my clutch issues was probably the pivot ball. Here is a pic comparing the original to the new:
Original on left, Lakewood 15501 on right.
Clutch fork springs were also bent at a 90 degree versus more of an angle on the new piece.
New fork on left
These changes bright my clutch back to normal operation. I initially set the pivot ball height to 1.550" and liked it, but backed it down to 1.495 because I was worried about potential binding. I used the clutch rod align,net procedure to get the feel where I wanted, will mess with it a bit to get it dialed in later.
I was able to test drive the car today! All went well, except some interference between the driveshaft and the tunnel, shortly after my test run started.
Herein lies the only thing I would complain about, or change in the SST Kit. The washers to install the transmission mount to the mounting bracket are too small. I noticed this during the installation and thought "that's something I'll need to get to later." With the enlarged slots in the bracket, the flat washer couldn't cover the area and tightly mount the trans. I had torqued it down in initial install but the trans was able to shift under load.
A quick run to the local Fastenal got some new lock washers and flat washers. I'd recommend picking those up first thing. The bolt is 10mm, so a specialty hardware store may be the best bet.
Here's a pic that shows the trans mount shifted over to the passenger side, leading to a bit of interference under load. Shifting it back should give enough clearance.
Trans mount and bad washers
Other than the above, I thought the SST Kit was very well laid out. I'm looking forward to getting it out on the road and cruising with the higher gear.
Very nice write up Matt and cudos for pictures as well.
Upon reading your post regarding the flat washers, I got to checking our inventory as each mount bracket is supposed to have (2) 3/8" flat washers zip tied to the mount for that very reason. Thank you for bringing this to our attention as it looks like we had a few brackets make it out of here without the flat washers. Our apologies.
As for the left to right offset, are you taking into account the "natural" offset from the factory? It may not have been as noticeable with the 4-speed transmission as it was shorter than the TKO.
Thank you Matt, for the pictures and documentation of your installation. We really appreciate it when our customers help us improve our products. We encourage every SST customer to send us emails or call us and share their experiences. As Richard mentioned, we have already adjusted our kit to cover your suggestions. As a small token of our appreciation, Richard is going to send you an SST hat.
Thanks again,
Jack
Originally Posted by Matt81
I was able to test drive the car today! All went well, except some interference between the driveshaft and the tunnel, shortly after my test run started.
Herein lies the only thing I would complain about, or change in the SST Kit. The washers to install the transmission mount to the mounting bracket are too small. I noticed this during the installation and thought "that's something I'll need to get to later." With the enlarged slots in the bracket, the flat washer couldn't cover the area and tightly mount the trans. I had torqued it down in initial install but the trans was able to shift under load.
A quick run to the local Fastenal got some new lock washers and flat washers. I'd recommend picking those up first thing. The bolt is 10mm, so a specialty hardware store may be the best bet.
Here's a pic that shows the trans mount shifted over to the passenger side, leading to a bit of interference under load. Shifting it back should give enough clearance.
Trans mount and bad washers
Other than the above, I thought the SST Kit was very well laid out. I'm looking forward to getting it out on the road and cruising with the higher gear.
I'll have to check the kit I just got. I saw the bag of bolts just have not opened them up yet.
I think it is hardware pack B. If the flat washers are just a little bit bigger than the head of the bolt, I'd recommend picking up larger ones. A 3/8" (can't remember close size in standard, but one is really close) might be close enough for the flat washer if you have those in a bin box. I smashed up the lock washers and they wouldn't fit over the bolt, so I needed to make a hardware store run anyway.
I think it is hardware pack B. If the flat washers are just a little bit bigger than the head of the bolt, I'd recommend picking up larger ones. A 3/8" (can't remember close size in standard, but one is really close) might be close enough for the flat washer if you have those in a bin box. I smashed up the lock washers and they wouldn't fit over the bolt, so I needed to make a hardware store run anyway.
Checked the bag last night and I have the small washers also. I have so much hardware at my house I'm sure I will be able to locate the proper size washers here. Not a big deal but you definitely should install the larger washers.
Checked the bag last night and I have the small washers also. I have so much hardware at my house I'm sure I will be able to locate the proper size washers here. Not a big deal but you definitely should install the larger washers.
The 3/8 washers should be on the cross member bracket itself, not in one of the hardware packs. We use a plastic zip tie to hold the washers to the bracket so it doesn't confuse anyone as to where they go. If this kit was also one that made it out without the washers, our apologies. We have since checked and corrected the ones on the shelf that were missed.
I was able to test drive the car today! All went well, except some interference between the driveshaft and the tunnel, shortly after my test run started.
Herein lies the only thing I would complain about, or change in the SST Kit. The washers to install the transmission mount to the mounting bracket are too small. I noticed this during the installation and thought "that's something I'll need to get to later." With the enlarged slots in the bracket, the flat washer couldn't cover the area and tightly mount the trans. I had torqued it down in initial install but the trans was able to shift under load.
A quick run to the local Fastenal got some new lock washers and flat washers. I'd recommend picking those up first thing. The bolt is 10mm, so a specialty hardware store may be the best bet.
Here's a pic that shows the trans mount shifted over to the passenger side, leading to a bit of interference under load. Shifting it back should give enough clearance.
Trans mount and bad washers
Other than the above, I thought the SST Kit was very well laid out. I'm looking forward to getting it out on the road and cruising with the higher gear.
Hi Matt, great write-up here, thank you. I'm considering swapping out my 2004-R with a TKO600, and was curious what you think of it after having a summer to run your's through the gears. I've read a bunch here on the forum, some positive and some not so positive. The negative being difficult and somewhat 'slow' 2/3 shifts.... Any issues with that or anything else now that you've had some wheel time with it??
Hi Matt, great write-up here, thank you. I'm considering swapping out my 2004-R with a TKO600, and was curious what you think of it after having a summer to run your's through the gears. I've read a bunch here on the forum, some positive and some not so positive. The negative being difficult and somewhat 'slow' 2/3 shifts.... Any issues with that or anything else now that you've had some wheel time with it??
The 2/3 upshift is a hot topic regarding the TKO and we made a video to explain what causes it. It really just boils down to technique.

 02-13-2017, 07:58 PM


 Guide bolts for the win!