When you click on links to various merchants on this site and make a purchase, this can result in this site earning a commission. Affiliate programs and affiliations include, but are not limited to, the eBay Partner Network.
1968 Four-Season Troubleshooting - Controls Have No Effect
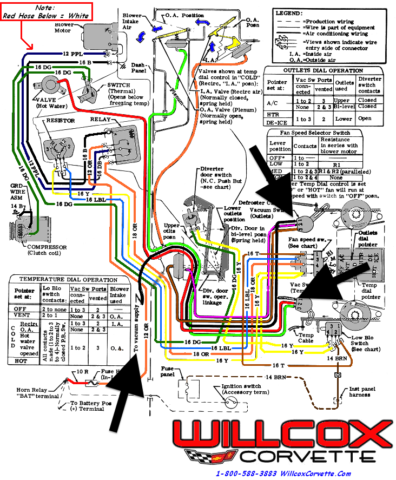
With my wipers now working, thanks to Rescue Rogers et al, it's on to the climate control system. My car is a roadster with air conditioning. I think everything is still 'there' and connected. The exception is the air conditioning which is not charged. The fan flows at all speeds and will shut off. My problem is the other controls. I cannot get the system to open an outside air vent. Nor can I get the temperature control to reduce the heat level. Nor can I direct the blowing air anywhere; it literally seems to be blowing internally and not directing anywhere. I have page 1A-27 from the Chevrolet Chassis Service Manual that shows the Vacuum System Component Function and page 1A-64 that shows the wiring and vacuum hose diagram. I also have an AIM where someone in another thread indicated there was a troubleshooting guide (that I cannot locate). Where do I go from here?
If I were you I'd check the vacuum select switches to see if they are moving vacuum to the appropriate ports as shown in the diagram below. That's where I'd start and then I'd start checking the vacuum pods if the switch checks out okay.
Last edited by Willcox Corvette; 02-19-2017 at 07:09 PM.
I would check and see if you have vacuum going to the 2 plenum actuators behind the dash. Then check and see if those actuators hold vacuum when applied to them. I'm adding factory air to my roadster, and those two actuators control all that stuff (assuming the compressor is operating and providing refrigerated air thru the evaporator core).
What are the "Vacuum Select Switches"? I don't see them in the Willcox illustration. Are they listed by another name? Can you describe the process I should follow to check them?
Similarly, as to the two plenum actuators. I presume I need to pull the hose where it goes into the plenum and attach it to a vacuum gauge. What would trigger the creation of vacuum? As to whether the actuator will hold vacuum, do I need to buy a pump to do that or can I simulate that some other way?
Yes, a vacuum gauge will tell you if there is vacuum from the 3 port vacuum switch attached to the right side temperature wheel on the control panel. you'll need to check both the brown and pink striped vacuum hoses to make sure sufficient vacuum is being sent to both sides of that actuator.
I used a vacuum brake bleeder to test the 2 actuators on my '73 ducting. the later models have a 9 port vacuum switch to control the actuators.
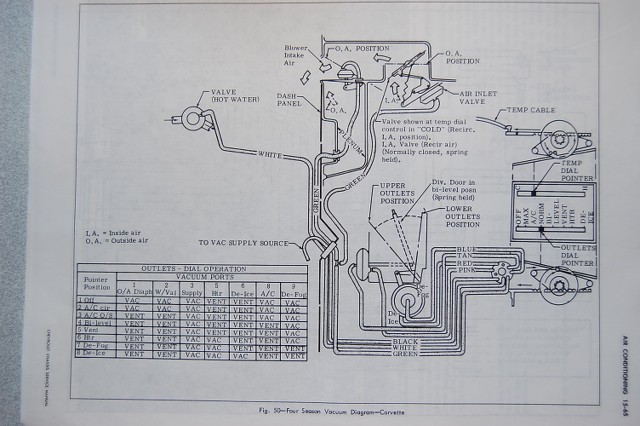
Okay, I have a vacuum gauge and will buy a vacuum pump. Can you tell me how to read this chart?
For example, when it is supposed to be recirculating inside air (i.e., I.A.), what does the "Lo Blo Switch" wording mean ("All contacts made (1 to 2 to 3 to 4) - Normally closed P.B. Sw.)? And under Vac Sw Ports (i.e., Vacuum Switch Ports), what does "1 to 3" and "2" mean under "Connected" and "Vented"
Hi N,
Very basic question�
Do you know if you have vacuum getting to the controller?
The vacuum source/connection is in the engine compartment.
That's needed to operate the functions of the controller (other than the blower switch).
???
Regards,
Alan
Hello, Alan. 'Good to hear from you. Thanks for your help. I have not yet pulled the console to be certain, but I believe I have vacuum at the controller. If I rotate one of the wheels (I think it is the left one - the temperature control), at one position I can hear what sounds like an air 'leak'. I'm trying to get my ducks in a row before I pull the console as that will take the car out of service for a bit. The weather has been amazingly warm in St. Louis this February so I've taken the car out a couple times.
After opening it up I found a bunch of disconnected vacuum hoses. Duh! No wonder.
I hooked them up and got some results but not a roaring success. The outside air / inside air controls seem to work.
The "Outlet Dial" (the one on the passenger side) has three hoses; two of them control both sides of the 'blend door' diverter (moving air between the dash and the floor - with 'no vacuum' being a blend of the two). Are these hoses differentiable at the switch end? In other words, where they connect into the dial? If not, any ideas on figuring out which is which - - - short of hooking them up to see what happens?
The fan motor makes a lot of noise without moving a lot of air. I believe my '69 Camaro (albeit this was in 1974) had a LOT more power, but can't remember. Do these things get weak before they give up the ghost? Even if I had the 'blend door' hoses backwards, the fan would have just pushed in the wrong direction. Wide open, regardless of settings, the air movement is very low. Ideas? (Sorry, I've never seen this thing actually work so I don't know what to expect.) Could the entire thing be dislodged or disconnected somehow?
My vacuum pump comes tomorrow. Then I'll see if these actuators can hold a vacuum. Anybody know how that works on the blend door? It has a connection on either side. How does THAT work.
The "Outlet Dial" (the one on the passenger side) has three hoses; two of them control both sides of the 'blend door' diverter (moving air between the dash and the floor - with 'no vacuum' being a blend of the two). Are these hoses differentiable at the switch end? In other words, where they connect into the dial? If not, any ideas on figuring out which is which - - - short of hooking them up to see what happens?
Yes, the hoses will have stripes on them to differentiate which one is which hose.
The fan motor makes a lot of noise without moving a lot of air. I believe my '69 Camaro (albeit this was in 1974) had a LOT more power, but can't remember. Do these things get weak before they give up the ghost? Even if I had the 'blend door' hoses backwards, the fan would have just pushed in the wrong direction. Wide open, regardless of settings, the air movement is very low. Ideas? (Sorry, I've never seen this thing actually work so I don't know what to expect.) Could the entire thing be dislodged or disconnected somehow?
Run 12 volts to the blower motor and you'll emulate the high blow setting, see what you get as far as output that way. The cars are not known for a ton of air velocity too, but if you power it up with 12 volts you'll see the final output.
My vacuum pump comes tomorrow. Then I'll see if these actuators can hold a vacuum. Anybody know how that works on the blend door? It has a connection on either side. How does THAT work.
One side sucks it open and holds it.. the other sucks it shut and holds it. Test both sides.
Thanks, Willcox. I think the hoses must have been replaced. They have no coloring and their ridges seem quite similar. If I'm looking for a ridge difference, would it be obvious?
As to powering up the motor, I'm wondering how hard it is to pull it off to see how much air it moves. If the motor drives harder when direct connected, would that point to a potentially failing fan speed switch? I don't see where else it might lose power.
Thanks, Alan. I have not seen this. I will look in the AIM and the Service Manual again for my '68. I see that the hoses are marked with colors in this illustration. Mine are all black with apparently identical banding/ridges.
Today I bought some more hose and tees. I think I'll put the vacuum gauge 'in line' with the hose I'm trying to identify. I'll then turn to that switch setting and see where the air flows. After I'm done with this I'm writing a trouble-shooting guide for goofballs like me that come AFTER me.
Hi N,
The fact that your hoses are unmarked is why I thought the chart might help�. it seems to list the hoses by their position at the controller.
Perhaps your 68 AIM has something similar back in the a/c option section.
Regards,
Alan
Ah hah! Now I get it, Alan. I'm sorry for being so dense. Actually the positions on the controllers are numbered just like the drawing. 1,2,3 and 3,2,1 on the controller itself (I thought THAT was a little tricky putting the supply pipe at #1 on the bottom of one and the top of the other - - why would an engineer DO that?). My problem is I have two hoses that go to opposite sides of the blend door actuator (an actuator that I cannot 'see'), so I don't know which is which, hence my idea to connect one of them and see if I get it right. A 50/50 chance.
I was just chatting with a friend who suggested the blower motor might be struggling with 50 year old grease in its bearings. That is an interesting idea. . . .
The Mighty Vac came today and the tests are IN. The Temp Switch (left) held up reasonably well. I pumped #2 up to 15; it took 60 seconds for it to drop to 12. Similarly #3 took 60 seconds to fall from 15 to 13. This seems reasonably strong to me. What should I expect?
The "Outlets" hoses (toward passenger side) did not fare so well. I'm not sure which of these is which so I labelled one of them "A". "A" Fell from 20 to 5 in 30 seconds. I believe this one is the side that drives the air to floor (I will find out tomorrow for sure when I start the car). With "B" I could never achieve a vacuum. From these results I think I need to repair the diverter door actuator (the 'blender' door as some call it. From the research I've done it sounds like this is a royal pain. Since the AC isn't working anyway I think I'll leave it for a bit. You agree with my diagnosis? Any tips for getting to that actuator easily?

 02-19-2017, 06:39 PM